一.开发流程
1.明确需求
我第一个项目是关于个人日志,类似微信朋友圈的功能。网站如下:
https://www.lingshijietao.xyz
需求如下:
(1).发布文章
文章内容包括标题、两张图片(小于10M)、文章内容、作者、时间、点赞数、留言数目、留言。
(2).管理修改发布后的文章
管理文章,指的是管理自己发布过的文章。可以实现两个功能——修改和删除文章。修改的时候,如果是重新选择图片,会不之前的图片进行删除,减少服务器空间的压力。除此之外,可以修改标题,文章内容,最后修改的时间,有系统自动生成,无需手动输入。
删除文章的时候,会把对于数据库记录和对于的图片进行删除
(3).评论文章
评论把评论和查看评论结合在一个模态框内,如果只是查看评论内容,无需登录账号,但留言的时候,要登录自己的账号,没有账号可以注册。
(4).点赞、收藏文章
点赞、收藏都需要登录账号,收藏登录账号很容易理解,因为,同一篇文章,不同的用户可能进行不同的操作,我们需要对每一个账号对操作进行记录,在后面需要重新浏览自己之前收藏过得文章的时候,在数据库查找的时候,需要根据用户ID进行查找,符合自己ID的文章才被显示到页面中,别人收藏的文章,不会显示到自己的收藏中。至于点赞功能为何要实现先登录账号呢?考虑到一台设备,可以由多个账号登录,因为我想实现,点赞之后,按钮颜色会发生改变,所以,不同的用户登录同一台设备的时候,如果没有用户ID作为标识,仅仅靠文字的ID来记录按钮的颜色,自己明明没有点赞,却发现按钮颜色变化了,这是因为在你登录之前,别人在这台设备对这篇文章进行点赞功能,因为cookie的存在一台设备,所以,你的按钮也会发生变化,为了解决这个问题,需要点赞前,登录账号,用自己ID来判断文章时候已经点赞,然后才对DOM进行渲染。
(5).个人账户登录
这个需求主要是用户账号登录和切换
2.数据库设计
 上面的图是该网站设计的实体和对应的属性。这个是第一次的草稿图,存在许多的不足。比如,用户这个实体,在数据库设计的时候,在用户表user的时候,主键是UserID,是唯一的,一个用户可以发布多篇文章,所以,TextId不应该在是用户属性,应该是在发布文章的时候,文章这个实体,userID作为文章的外键。我们可以就可以更具文章的userID找出自己的文章
优化后的关系
user表(存放用户基本信息)


 text表(存放所有用户发布过的文章)

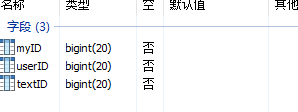
message表(用户存放不同用户对不同文章的留言)

mylike表(用户存放不同用户,对不同文章的收藏数据)

用户表的记录属于一对一的,用户名和ID是唯一,不可重复。text表userID与textID是一对多的关系,同一个userID可以有多个textID。留言表和收藏表也是一对多的关系,所以,要另外建表。
数据库设计最好是一步到位,否则,后期更改涉及到mybatis的接口更改和sql语句的更改,还有java调用方法时候,也需要更改,工作量比较大。说到mybatis的sql语句,涉及到输入参数,和结果输出参数的设计。我在mybatis开发总结的博文有提到。
3.后台程序编写
封装获取sqlsession的类
package com.mialab.mybatis_first_demo.sqlSession;
import java.io.IOException;
import java.io.InputStream;
import java.io.Reader;
import org.apache.ibatis.io.Resources;
import org.apache.ibatis.session.SqlSession;
import org.apache.ibatis.session.SqlSessionFactory;
import org.apache.ibatis.session.SqlSessionFactoryBuilder;
import com.mialab.mybatis_first_demo.mapper.StudentMapper;
import com.mialab.mybatis_first_demo.mapper.TextMapper;
public class DataConnection {
	private  static SqlSessionFactory sqlSessionFactory;
	public  SqlSession getSession() throws IOException {
		InputStream in=Resources.getResourceAsStream("mybatis-config.xml");
		//通过读取mybatis-config.xml配置文件,加载数据库连接池,mapper接口的实例化
		sqlSessionFactory =new SqlSessionFactoryBuilder().build(in);
		SqlSession sqlSession=sqlSessionFactory.openSession();
		return sqlSession;
	}

	public TextMapper getMapper(SqlSession sqlSession)throws IOException{
		TextMapper mapper =sqlSession.getMapper(TextMapper.class);
		return mapper;

	}

	public StudentMapper getStudentMapper(SqlSession sqlSession)throws IOException{
		StudentMapper mapper =sqlSession.getMapper(StudentMapper.class);
		return mapper;

	}

}
xml文件
<?xml version="1.0" encoding="UTF-8"?>
<!DOCTYPE configuration PUBLIC "-//mybatis.org//DTD Config 3.0//EN"

"http://mybatis.org/dtd/mybatis-3-config.dtd">

<configuration>
	<settings>

		<setting name='logImpl' value='LOG4J' />


	</settings>

	<environments default='development'>
		<environment id='development'>
			<transactionManager type='JDBC'></transactionManager>
			<dataSource type="POOLED">
				<property name="driver" value='com.mysql.jdbc.Driver' />
				<property name='url'
					value='jdbc:mysql://127.0.0.1:3306/stu?characterEncoding=utf-8' />
				<property name='username' value='root' />
				<property name="password" value='' />
			</dataSource>
		</environment>

	</environments>

	<mappers>
		<mapper resource="com/mialab/mybatis_first_demo/mapper/StudentMapper.xml" />
		<mapper resource="com/mialab/mybatis_first_demo/mapper/TextMapper.xml" />
		//把mapper接口的路径写到这里,才能加载,将其实例化
	</mappers>

</configuration>
调用一个简单实例(发布文章)
	protected void doPost(HttpServletRequest request, HttpServletResponse response) throws ServletException, IOException {
		// TODO Auto-generated method stub
		//String a=(String)request.getParameter("userID")+(String)request.getParameter("textID");
		int  userID=Integer.parseInt(request.getParameter("userID"));
		BigInteger textID=new BigInteger((String)request.getParameter("textID"));
		String title=request.getParameter("title");
		String rewrite=request.getParameter("rewrite");
		String text=(String)request.getParameter("text");
		String picpath1=request.getParameter("picpath1");
		String picpath2=request.getParameter("picpath2");
		String username=request.getParameter("username");
		SimpleDateFormat sdf2 = new SimpleDateFormat("yyyy年MM月dd日");
		String date=sdf2.format(new Date());
		System.out.println("here 1");
		int num_like=0;
		int num_message=0;
		shareText text2=new shareText(userID, textID, title, text, picpath1, picpath2, username, date, num_like,num_message);
		DataConnection connection=new DataConnection();
		//将封装类实例化,调用写好的get方法,获取session
		SqlSession sqlSession=null;
		if(rewrite==null) {
			System.out.println("here 2");

			try {

				sqlSession=connection.getSession();
				StudentMapper mapper=connection.getStudentMapper(sqlSession);
//				int a=mapper.updateText(title, text, username, date);
//				mapper.addText(userID, textID, title, text, picpath1, picpath2, username, date, num_like, message);
				mapper.addShareText(text2);
				System.out.println("here 3");
				sqlSession.commit();

				System.out.println("here 4");
				Map<String, String> b=new HashMap<String, String>();
				b.put("ok", "ok");
				String jsonString = JSON.toJSONString(b);
				response.setCharacterEncoding("UTF-8");
				response.setContentType("application/json; charset=utf-8");
				PrintWriter writer = response.getWriter();
				System.out.println(jsonString);
				writer.append(jsonString);
				writer.close();

			}catch (Exception e) {
				System.out.println("inserttext has error");
			}

			finally {
				if(sqlSession!=null) {
					sqlSession.close();
				}

			}


		}else if(rewrite.equals("1")){

			try {
			sqlSession=connection.getSession();
			TextMapper mapper=connection.getMapper(sqlSession);
			int a=mapper.reWriteText(text2);
			System.out.println("update");
			sqlSession.commit();
			if(a!=0) {
				Map<String, String> b=new HashMap<String, String>();
				b.put("ok", "ok");
				String jsonString = JSON.toJSONString(b);
				response.setCharacterEncoding("UTF-8");
				response.setContentType("application/json; charset=utf-8");
				PrintWriter writer = response.getWriter();
				System.out.println(jsonString);
				writer.append(jsonString);
				writer.close();
			}else {
				//更新失败
			}
			}catch (Exception e) {
				e.printStackTrace();
			}
			finally {
				if(sqlSession!=null) {
					sqlSession.close();
				}
			}

		}


	}
4.前端程序编写
前端使用jquery,利用ajax一步请求到servlet处理相应的数据库操作,之后servlet把结果以json的形式返回到前端。
function query(begin, num){
	//alert(begin);
	num=$("#num").val();
	//alert(num);
	allNum=num;
	$.ajax({
		  url: "/mybatis_first_demo2/queryAllTextServlet",
	      type: 'POST',
	      data: "begin="+begin+"&num="+num,
	      dataType: 'json',
	      success:function(json){
	      //json的形式进行遍历
	    	console.log(json);
	    		var count=json[0].count
	    		 var picpath1='';
	    		var picpath2='';
	    	//	 $("#shareText").empty();
	    	//如果只有加载更多这个按钮,无需把之前的记录情况,考虑到用户是刷屏浏览查看文章,所以,我们直接在后面加元素即可
	    	  for(var i=1;i<json.length;i++){
	    		 console.log(json);
	    		 picpath1=json[i].picpath1;
	    		 picpath2=json[i].picpath2;
	    	//	  alert(picpath2.length);
	    	if(picpath1.length!=0&&picpath2.length!=0){
	    	//使用append语句,在父节点上根据结果的数目动态调整dom
	    		$("#shareText").append("<div id=textID"+i+" class='col-sm-12 col-md-6 clo-lg-6'><input type=hidden value="+json[i].userID+" />"+"<input type=hidden value="+json[i].textID+" />"+"<div class=thumbnail><div class='box box-element'><img src=./images/"+json[i].username+"/"+picpath1+"	/><img src=./images/"+json[i].username+"/"+picpath2+" /></div>"+"<div class='caption'><h4>"+json[i].title+"</h4><h4>"+json[i].username+"</h4><p>"+json[i].text+"</p><p>"+"<input id=unionID"+i+" type=hidden value="+json[i].userID+json[i].textID+" />"+"<a role=button onclick=isLike("+i+") id=blike"+i+">点赞"+json[i].num_like+"</a><a role=button onclick=addToMine("+i+") id=btome"+i+">收藏</a><a role=button onclick=sendMessage("+i+") data-toggle='modal' data-target='#myModal'>留言"+json[i].num_message+"</a></p></div></div></div>" );
	    		$("#shareText img").css({"width":"48%","float":"left","margin-left":"1%"});

	    		//children("p.1").css({"color":"red","border":"2px solid red"});
	    	}else if(picpath2.length==0){
	    	//	alert(json[i].textID);
	    		$("#shareText").append("<div id=textID"+i+"class='col-sm-12 col-md-6 clo-lg-6'><input type=hidden value="+json[i].userID+" />"+"<input type=hidden value="+json[i].textID+" / >"+"<div class=thumbnail><div class='box box-element'><img src=./images/"+json[i].username+"/"+picpath1+"	/></div>"+"<div class='caption'><h4>"+json[i].title+"</h4><h4>"+json[i].username+"</h4><p>"+json[i].text+"</p><p>"+"<input id=unionID"+i+" type=hidden value="+json[i].userID+json[i].textID+" />"+"<a role=button onclick=isLike("+i+") id=blike"+i+">点赞</a><a role=button onclick=addToMine("+i+") id=btome"+i+">收藏</a><a role=button onclick=sendMessage("+i+") data-toggle='modal' data-target='#myModal'>留言"+json[i].num_message+"</a></p></div></div></div>" );
	    	//	$("#shareText img").css("margin-bottom","5%");
	    		$("img").addClass("img-fluid");
	    	}else{
	    	//	alert("第一种图片为空");
	    		$("#shareText").append("<div id=textID"+i+" class='col-sm-12 col-md-6 clo-lg-6'><input type=hidden value="+json[i].userID+" />"+"<input type=hidden value="+json[i].textID+" />"+"<div class=thumbnail><div class='box box-element'><img src=./images/"+json[i].username+"/"+picpath2+"	/></div>"+"<div class='caption'><h4>"+json[i].title+"</h4><h4>"+json[i].username+"</h4><p>"+json[i].text+"</p><p>"+"<input id=unionID"+i+" type=hidden value="+json[i].userID+json[i].textID+" />"+"<a role=button onclick=isLike("+i+") id=blike"+i+">点赞</a><a role=button onclick=addToMine("+i+") id=btome"+i+">收藏</a><a role=button onclick=sendMessage("+i+") data-toggle='modal' data-target='#myModal'>留言"+json[i].num_message+"</a></p></div></div></div>" );
	    	//	$("#shareText img").css("margin-bottom","5%");

	    	}

			//$("#shareText>div").addClass("col-sm-12 col-md-6 clo-lg-6");
			$("#shareText a").addClass("btn btn-default");
			//是按钮有浮动,消除高度塌陷
			$("#shareText a").css("float","right");
			//$(".caption").addClass("col-sm-12 col-md-12 clo-lg-12'");
			//文章的标题跑到第二章图片的上面,是因为图片的浮动造成的,我们可以消除浮动,可以解决问题
		//	$(".caption").css("overflow","hidden");
		//	$(".caption").css("clear","right");

	    	  }
	    		if(typeof $.cookie('user') == "undefined"){
	    		}else{
	    			var user1=$.cookie('user');
	    			console.log($.cookie('user'));
	    			var user=JSON.parse($.cookie('user'));
	    			$("#myname").text(user.user.username);
	  			$("#myID").val(user.user.userID);

	  			$("#nostate").hide();
	  			$("#hasstate").show();
	  			$("#adduser").hide();
	  			$("#login").hide();


	  		//只有登录的有cookie才遍历likejson
	  			if(typeof $.cookie('likejson') == "undefined"){
	  			//	alert("json清除");


	  				}else{
	  			//根据cookie遍历点赞,渲染dom
	  					var likejson=$.cookie('likejson');
	  					likejson=JSON.parse(likejson);
	  				//	alert(likejson);
	  					for(var i=0;i<likejson.length;i++){
	  						console.log(likejson);
	  					//	var unionID=likejson[i].unionID;
	  						if(user.user.username==likejson[i].username){
	  							console.log(likejson[i].username);
	  							console.log(likejson[i].unionID);
	  							$("input[value="+likejson[i].unionID+"]").next().css("background-color","skyblue");
	  							//alert($("input[value="+likejson[i].unionID+"]").val());
	  						}


	  				}
	  			}

	    		}
	    	$("#count").html(count);

	    	$("#nowpage").html(begin);
	    	//显示当前页数,因为begin默认为一,所以,第一次查询当前页都是一


	    	console.log(

	    	);
	  //设置总页数。当总数除以每页的记录数的时候,如果余数不为零,说明最后一页的记录数的条数是余数,我们要增加一页来放置剩下来的记录
	 //     这种情况包含两种情况,当总记录数小于每页的记录的时候,不能被整除,余数为总记录数。这个时候页数为一页,不能为零
	//  第二张情况是总记录数大于每页记录,但不能被整除,一样需要增加一页
	    	var num2=Number(num);
	    	var count2=Number(count);
	    	Allcount=count2;
	    	var page=0;
	    	if(count2%num2!==0){

	    		page=(count2/num2)+1;
	    		console.log(count2/num2);


	    	}else{
	    		page=count2/num2;

	    	}


	    	//当下一页的按钮隐蔽之后,点击页数的查找记录时候,如果不是小于最后一页,激活按钮
	    	numbegin=Number(begin);
	    	if(numbegin<parseInt(Number(page))){
	    		$("#nextpage").show();
	    	}else{
	    		$("#nextpage").hide();
	    	}


	    	//激活上一页——如果当前页不是第一页,则显示按钮,否则显示按钮
	    	if(numbegin!=1){
	    		$("#prepage").show();
	    	}else{
	    		$("#prepage").hide();
	    	}

	    	console.log(page);

	    	ALLPAGE=page;
	    		$("#page").empty();
	    		//当每一页的记录数目发生变化的时候,我们可以调整页码,在调整之前,要对之前的页数进行清除

	    		//显示当前页数
	    	for(var j=1;j<=page;j++){
	    		$("#page").append("<li><a onclick=topage("+j+")>第"+j+"页</a></li>");
	    	}

	      },
	 error:function(){
	    	  console.log("error");
	    	  alert("我是有底线的啦");
	      }

	})


	};

query('1','10');
5.测试与调优
测试的步骤——
(!)账号登录测试
尝试过密码错误、用户名不存在、注册的时候,用户名重复,均为出错
(2).测试发布文章、收藏、删除、点赞。
第一次测试发布文章的时候,图片无法上传到Tomcat指定路径,后面重新配置tomcat的工作路径解决了。后面的问题总结有介绍。其他的功能均达到预期效果,重传图片的时候,可以把之前的图片删除,删除文章的时候也可以把图片删除。
6.部署与维护
(1)把项目以war包的形式导出——在eclipse中选择export,将项目导出到电脑硬盘上,然后将war包上传到服务器,tomcat的webapp路径下。
(2).重启tomcat服务器——在服务器上重启tomcat服务器,tomcat会自动解压war包,生成可以直接访问的项目
(3)配置tomcat以https访问——
下载证书:
 点击下载,会下载下面的文件,选择tomcat

 其中秘钥就存在keystorePass文件中,然后把
配置路径:C:\Program Files\Apache Software Foundation\Tomcat 8.5_Tomcat8_3\conf
目录下的server.xml修改以下配置,并在conf目录下新建cert文件夹,把server.jks文件拷贝到该目录下。https的默认端口是443,所以,我们在自己云服务器上开启443端口。我们输入域名的时候,https会以443端口访问。
 <Connector port="443" protocol="org.apache.coyote.http11.Http11NioProtocol"
               maxThreads="150" SSLEnabled="true">
        <SSLHostConfig>
		 <Certificate certificateKeystoreFile="cert/server.jks"  //server.jks的路径
		     certificateKeystorePassword="秘钥编码"
                     type="RSA" />
                               </SSLHostConfig>
    </Connector>
配置tomcat默认项目——当我们配置下面的配置的时候,path="" docBase配置好项目的绝对路径的时候,当我们在流浪器输入我们的域名的时候,tomcat直接访问该项目。
<Context docBase="C:\Program Files\Apache Software Foundation\Tomcat 8.5_Tomcat8_3\webapps\mybatis_first_demo2" path="" debug="0" reloadable="true"/>
到这里项目已经部署完毕,可以正常访问啦!修改完配置文件记得重启tomcat服务器哦!
二.开发中遇到的问题与解决方案
开发中遇到的问题
1.图片无法上传到tomcat中指定的目录
 主要是把项目的发布路径更改为tomcat的安装目录即可
2.jquery加载阻塞或无法完成dom的渲染
在对dom进行渲染的时候,写了一个js脚本,发现没有达到预期效果(第一天测试的时候达到预期效果,后面因为新增了许多节点,渲染失效),我以为自己写的脚本有bug,一直改,一直测试,还是一样,后来,我仔细想想,之前好好地,是不是因为自己新增了几个节点,导致渲染失效?
后来我看了一下自己的js脚本,是对dom的背景颜色进行渲染.因为我一开始并没有深入了解html加载的顺序,原来js脚本加载的顺序也是重上面开始加载,如果想要对dom进行加载,其前提条件是,要渲染的dom已经加载完成,而我写的脚本是在dom加载完成之前的。这里多说一点就是,js中首先是对声明的变量和方法进行执行,也就是说,首先把声明做好,之后才执行方法内的代码。
而且我用的是异步请求,所谓的异步请求,就是,请求的代码的执行顺序不影响其他代码的执行,就是在异步请求的同时,会同时加载下面的代码,不需要等待,而一般的代码是,按照顺序加载,如果上一步出错,下面的代码会停止执行。所以,我要确保,异步请求成功后,才对dom进行渲染,后面,我们渲染的代码剪切到success之后,达到预期效果
3.Mysql数据库忘记用户密码
找到mysql的init文件,在mysqld节点下,加入下面的代码,可以跳过用户检验,直接登录数据库
[mysqld]
skip-grant-tables
# bind_address=0.0.0.0
然后打开已管理员的身份运行命令行,输入 mysql --skip-grant-table
接着输入 mysql -u root 回车
select Host , User, Password from mysql.user where User=‘root’ 即可查看密码,如果密码是加密的,可以进行修改,
update user set Password=Password(“新的密码”) where User=“root” ;
最后一定要:flush privileges; 新的密码才能生效,把init文件的skip -grant-table注释掉
这里说明一下,所有的用户信息都存放在user表中,
4.mybatis的resultType
我在mybatis开发总结有涉及到
5..mybatis的多参数输入
6.对数据库进行操作,数据没有更新
sqlSession.commit();
记得要commit哦!
7..联表查询
<select id="queryMyLikeText" parameterType="com.mialab.mybatis_first_demo.domain.User" resultType="com.mialab.mybatis_first_demo.domain.shareText">
		SELECT * FROM mylike right join text on text.userID=mylike.userID and text.textID=mylike.textID where myID=#{userID}
	</select>
这条是右外连接的语句,两张表进行笛卡尔积。显示的内容,每行的记录规定左表记录去和右表记录匹配,有相同字段,且规定的值一样的,如果,右表的记录有,左边没有匹配记录,这条记录的其他字段的值用null填充。这个时候,往往不能完成的预期效果,因为我只想拿到myID特定值有关的记录,所以,在最后需要加上where进行筛选。
这个操作使用右外连接,因为考虑到,如果文章的作者把文章删除了,而其他的用户已经在文章删除之前把文章收藏了。在mylike表中,会有记录,如果使用左外连接的话,text作为右表,但右表没有匹配的记录,会用null值来填充,这样的话,在前端是有一条空记录,影响体验。相反,如果使用右外连接可以解决这个问题,因为where会进行筛选。
但是,需要注意的是,当text的记录很多的时候,使用这种方法,会大大降低性能。
除此之外,我们还可以使用内连接的方法来解决。
SELECT * FROM mylike ,text where text.userID=mylike.userID and text.textID=mylike.textID and myID=#{myID};
8.sql语句优化
<select id="checkLand" parameterType="com.mialab.mybatis_first_demo.domain.User" resultType="com.mialab.mybatis_first_demo.domain.User">

SELECT *  FROM user where username=#{username} and password=#{password} LIMIT 1

	</select>
类似这种查找,我们知道,如果条件符合的话,肯定只有一条记录,为了减少服务器的开支,我们可以在后面加上LIMIT 1 告诉mysql只有一条记录,找到一条之后,无需找找了,就可以减少时延。
9.多端登录
json读取与存储问题
(1).数组形式存储
[{},{},{}]形如以上的形式,都是以数组形式进行储存,我们在遍历的时候只需要写成json[i].属性名,即可得到想要的值
(2).对象形式存储
{} 形如左边的形式,都是以对象的形式储存,我们在使用的时候,需要以对象名.属性值得方式进行读取
var user=JSON.parse($.cookie('user'));
用户名表示为:var username=user.user.username;
第一个是变量user
第二个user是对象名
部署时候遇到的问题
1.乱码问题
(1).post乱码修改
把jsp的编码方式,由iso改为utf-8
<%@ page language="java" contentType="text/html; charset=UTF-8"
    pageEncoding="UTF-8"%>
连接数据库的时候,加入下面的语句
<property name='url' value='jdbc:mysql://127.0.0.1:3306/stu?characterEncoding=utf-8' />
在项目的web.xml中加入过滤器(如果使用Spring框架)
<filter>
	<filter-name>CharacterEncodingFilter</filter-name>
	<filter-class>org.spring.framwork.web.filter.CharacterEndcodingFilter</filter-class>
	<init-param>
	<param-name>encoding</param-name>
	<param-value>utf-8</param-value>
</init-parm>
</filter>
<filter-mapping>
	<filter-name>CharacterEncodingFilter</filter-name>
	<url=patterm>/*</url-patterm>
</filter-mapping>
2.get 请求乱码
在tomcat的配置文件,server.xml修改
<connector URIEncoding="utf-8" connectionTimeOut="2000" />
对各种参数进行重新编码
String username=new String(request.getParameter(“username”).getBytes(“ISO8859-1”),“UTF-8”);
三.项目心得
(1).遇到bug暂时无法解决
(2).开发过程要持续,不能中断
(3).解决一个需求可以试试多种方法
本文完


 7236
7236


 被折叠的 条评论
为什么被折叠?


