


最小化安装CentOs 7 系统及源码安装MySQL5.7
最小化安装CentOS7系统后,由于缺少很多工具,需要手动安装
为了方便后期回忆,现在对安装完系统后的必要安装做个记录
1、更新yum软件仓库
- 新安装的系统yum软件仓库只只有系统本地仓库,需要更新yum源
- 通过wget从阿里云下载yum源,清华源
- 由于最小化安装没有wget,需要手动安装
[root@localhost ~]# wget
-bash: wget: 未找到命令

[root@localhost ~]# yum -y install wget
已加载插件:fastestmirror
Determining fastest mirrors
 * base: mirrors.huaweicloud.com
 * extras: mirrors.huaweicloud.com
 * updates: mirrors.huaweicloud.com
base                                                                                                                                                | 3.6 kB  00:00:00
extras                                                                                                                                              | 2.9 kB  00:00:00
updates                                                                                                                                             | 2.9 kB  00:00:00
(1/4): extras/7/x86_64/primary_db                                                                                                                   | 250 kB  00:00:00
(2/4): base/7/x86_64/group_gz                                                                                                                       | 153 kB  00:00:00
(3/4): updates/7/x86_64/primary_db                                                                                                                  |  17 MB  00:00:03
(4/4): base/7/x86_64/primary_db                                                                                                                     | 6.1 MB  00:01:09
正在解决依赖关系
--> 正在检查事务
---> 软件包 wget.x86_64.0.1.14-18.el7_6.1 将被 安装
--> 解决依赖关系完成

依赖关系解决
-------------------------------------------------------------------------------------------
-------------------------------------------------------------------------------------------
-------------------------------------------------------------------------------------------
-------------------------------------------------------------------------------------------
-------------------------------------------------------------------------------------------
-------------------------------------------------------------------------------------------
-------------------------------------------------------------------------------------------
事务概要
===========================================================================================================================================================================
安装  1 软件包

总下载量:547 k
安装大小:2.0 M
Downloading packages:
警告:/var/cache/yum/x86_64/7/base/packages/wget-1.14-18.el7_6.1.x86_64.rpm: 头V3 RSA/SHA256 Signature, 密钥 ID f4a80eb5: NOKEY
wget-1.14-18.el7_6.1.x86_64.rpm 的公钥尚未安装
wget-1.14-18.el7_6.1.x86_64.rpm                                                                                                                     | 547 kB  00:00:00
从 file:///etc/pki/rpm-gpg/RPM-GPG-KEY-CentOS-7 检索密钥
导入 GPG key 0xF4A80EB5:
 用户ID     : "CentOS-7 Key (CentOS 7 Official Signing Key) <security@centos.org>"
 指纹       : 6341 ab27 53d7 8a78 a7c2 7bb1 24c6 a8a7 f4a8 0eb5
 软件包     : centos-release-7-6.1810.2.el7.centos.x86_64 (@anaconda)
 来自       : /etc/pki/rpm-gpg/RPM-GPG-KEY-CentOS-7
Running transaction check
Running transaction test
Transaction test succeeded
Running transaction
  正在安装    : wget-1.14-18.el7_6.1.x86_64                                                                                                                            1/1
  验证中      : wget-1.14-18.el7_6.1.x86_64                                                                                                                            1/1

已安装:
  wget.x86_64 0:1.14-18.el7_6.1

完毕!
1.1、下载阿里云yum源
- 使用wget下载阿里云yum源
[root@localhost ~]# wget -O /etc/yum.repos.d/CentOS-Base.repo https://mirrors.aliyun.com/repo/Centos-7.repo
--2022-09-16 16:27:23--  https://mirrors.aliyun.com/repo/Centos-7.repo
正在解析主机 mirrors.aliyun.com (mirrors.aliyun.com)... 117.161.36.241, 117.161.36.242, 117.161.36.243, ...
正在连接 mirrors.aliyun.com (mirrors.aliyun.com)|117.161.36.241|:443... 已连接。
已发出 HTTP 请求,正在等待回应... 200 OK
长度:2523 (2.5K) [application/octet-stream]
正在保存至: “/etc/yum.repos.d/CentOS-Base.repo”

100%[=================================================================================================================================>] 2,523       --.-K/s 用时 0.03s

2022-09-16 16:27:23 (87.1 KB/s) - 已保存 “/etc/yum.repos.d/CentOS-Base.repo” [2523/2523])

[root@localhost ~]#
1.2、安装清华源
- 安装清华源
# 进入/etc/yum.repos.d/ 目录
[root@localhost ~]# cd /etc/yum.repos.d/
[root@localhost yum.repos.d]# ls
CentOS-Base.repo  CentOS-CR.repo  CentOS-Debuginfo.repo  CentOS-fasttrack.repo  CentOS-Media.repo  CentOS-Sources.repo  CentOS-Vault.repo
# 备份 CentOS-Base.repo 文件
[root@localhost yum.repos.d]# cp CentOS-Base.repo CentOS-Base.repo.bak
# 查看备份是否成功
[root@localhost yum.repos.d]# ls
CentOS-Base.repo  CentOS-Base.repo.bak  CentOS-CR.repo  CentOS-Debuginfo.repo  CentOS-fasttrack.repo  CentOS-Media.repo  CentOS-Sources.repo  CentOS-Vault.repo
# 修改 CentOS-Base.repo 文件
[root@localhost yum.repos.d]# vi CentOS-Base.repo
- 修改 CentOS-Base.repo 文件
[base]
name=CentOS-$releasever - Base
baseurl=https://mirrors.tuna.tsinghua.edu.cn/centos/$releasever/os/$basearch/
#mirrorlist=http://mirrorlist.centos.org/?release=$releasever&arch=$basearch&repo=os
enabled=1
gpgcheck=1
gpgkey=file:///etc/pki/rpm-gpg/RPM-GPG-KEY-7

#released updates
[updates]
name=CentOS-$releasever - Updates
baseurl=https://mirrors.tuna.tsinghua.edu.cn/centos/$releasever/updates/$basearch/
#mirrorlist=http://mirrorlist.centos.org/?release=$releasever&arch=$basearch&repo=updates
enabled=1
gpgcheck=1
gpgkey=file:///etc/pki/rpm-gpg/RPM-GPG-KEY-7

#additional packages that may be useful
[extras]
name=CentOS-$releasever - Extras
baseurl=https://mirrors.tuna.tsinghua.edu.cn/centos/$releasever/extras/$basearch/
#mirrorlist=http://mirrorlist.centos.org/?release=$releasever&arch=$basearch&repo=extras
enabled=1
gpgcheck=1
gpgkey=file:///etc/pki/rpm-gpg/RPM-GPG-KEY-7

#additional packages that extend functionality of existing packages
[centosplus]
name=CentOS-$releasever - Plus
baseurl=https://mirrors.tuna.tsinghua.edu.cn/centos/$releasever/centosplus/$basearch/
#mirrorlist=http://mirrorlist.centos.org/?release=$releasever&arch=$basearch&repo=centosplus
gpgcheck=1
enabled=0
gpgkey=file:///etc/pki/rpm-gpg/RPM-GPG-KEY-7
1.3、更新yum软件仓库
- 更新yum软件仓库
# 清理yum源
[root@localhost ~]# yum clean all
已加载插件:fastestmirror
正在清理软件源: base extras updates
Cleaning up list of fastest mirrors
[root@localhost ~]#
# 生成新的缓存
[root@localhost ~]#
[root@localhost ~]# yum makecache
已加载插件:fastestmirror
Determining fastest mirrors
 * base: mirrors.aliyun.com
 * extras: mirrors.aliyun.com
 * updates: mirrors.aliyun.com
http://mirrors.aliyuncs.com/centos/7/os/x86_64/repodata/repomd.xml: [Errno 14] curl#7 - "Failed connect to mirrors.aliyuncs.com:80; 拒绝连接"
正在尝试其它镜像。
http://mirrors.cloud.aliyuncs.com/centos/7/os/x86_64/repodata/repomd.xml: [Errno 14] curl#6 - "Could not resolve host: mirrors.cloud.aliyuncs.com; 未知的错误"
正在尝试其它镜像。
base                                                                                                                                                | 3.6 kB  00:00:00
extras                                                                                                                                              | 2.9 kB  00:00:00
updates                                                                                                                                             | 2.9 kB  00:00:00
(1/10): base/7/x86_64/group_gz                                                                                                                      | 153 kB  00:00:02
(2/10): base/7/x86_64/primary_db                                                                                                                    | 6.1 MB  00:01:07
(3/10): extras/7/x86_64/primary_db                                                                                                                  | 250 kB  00:00:03
(4/10): extras/7/x86_64/filelists_db                                                                                                                | 277 kB  00:00:03
(5/10): extras/7/x86_64/other_db                                                                                                                    | 149 kB  00:00:02
(6/10): base/7/x86_64/filelists_db                                                                                                                  | 7.2 MB  00:01:21
(7/10): base/7/x86_64/other_db                                                                                                                      | 2.6 MB  00:00:29
(8/10): updates/7/x86_64/filelists_db                                                                                                               | 9.4 MB  00:01:52
(9/10): updates/7/x86_64/other_db                                                                                                                   | 1.1 MB  00:00:13
(10/10): updates/7/x86_64/primary_db                                                                                                                |  17 MB  00:03:19
元数据缓存已建立
[root@localhost ~]#

# 使用yum update更新yum仓库
[root@localhost ~]# yum update -y

-------------------------------------------------------------
-------------------------------------------------------------
-------------------------------------------------------------
-------------------------------------------------------------
-------------------------------------------------------------
-------------------------------------------------------------

  systemd-sysv.x86_64 0:219-78.el7_9.7                                                  teamd.x86_64 0:1.29-3.el7
  tuned.noarch 0:2.11.0-11.el7_9                                                        tzdata.noarch 0:2022c-1.el7
  util-linux.x86_64 0:2.23.2-65.el7_9.1                                                 vim-minimal.x86_64 2:7.4.629-8.el7_9
  virt-what.x86_64 0:1.18-4.el7_9.1                                                     wpa_supplicant.x86_64 1:2.6-12.el7_9.2
  xfsprogs.x86_64 0:4.5.0-22.el7                                                        xz.x86_64 0:5.2.2-2.el7_9
  xz-libs.x86_64 0:5.2.2-2.el7_9                                                        yum.noarch 0:3.4.3-168.el7.centos
  yum-plugin-fastestmirror.noarch 0:1.1.31-54.el7_8                                     zlib.x86_64 0:1.2.7-20.el7_9

替代:
  iwl7265-firmware.noarch 0:22.0.7.0-69.el7

完毕!
2、安装命令自动补全工具
- 由于最小化安装,Linux系统命令等不能自动补全,很不方便,所以需要手动安装 bash-completion 来实现命令自动补全
- 安装完成后需要 exit 推出当前终端,重新连接才能生效
[root@localhost ~]# yum -y bash-completion
已加载插件:fastestmirror
没有该命令:bash-completion。请使用 /usr/bin/yum --help
[root@localhost ~]# yum -y install bash-completion
[root@localhost ~]# yum -y install bash-completion
已加载插件:fastestmirror
Loading mirror speeds from cached hostfile
 * base: mirrors.aliyun.com
 * extras: mirrors.aliyun.com
 * updates: mirrors.aliyun.com
正在解决依赖关系
--> 正在检查事务
---> 软件包 bash-completion.noarch.1.2.1-8.el7 将被 安装
--> 解决依赖关系完成

依赖关系解决

===========================================================================================================================================================================
 Package                                        架构                                  版本                                       源                                   大小
===========================================================================================================================================================================
正在安装:
 bash-completion                                noarch                                1:2.1-8.el7                                base                                 87 k

事务概要
===========================================================================================================================================================================
安装  1 软件包

总下载量:87 k
安装大小:263 k
Downloading packages:
bash-completion-2.1-8.el7.noarch.rpm                                                                                                                |  87 kB  00:00:00
Running transaction check
Running transaction test
Transaction test succeeded
Running transaction
  正在安装    : 1:bash-completion-2.1-8.el7.noarch                                                                                                                     1/1
  验证中      : 1:bash-completion-2.1-8.el7.noarch                                                                                                                     1/1

已安装:
  bash-completion.noarch 1:2.1-8.el7

完毕!
[root@localhost ~]#
3、安装vim编辑器
[root@localhost ~]# yum -y install vim
已加载插件:fastestmirror
Loading mirror speeds from cached hostfile
 * base: mirrors.aliyun.com
 * extras: mirrors.aliyun.com
 * updates: mirrors.aliyun.com
正在解决依赖关系
--> 正在检查事务
---> 软件包 vim-enhanced.x86_64.2.7.4.629-8.el7_9 将被 安装
--> 正在处理依赖关系 vim-common = 2:7.4.629-8.el7_9,它被软件包 2:vim-enhanced-7.4.629-8.el7_9.x86_64 需要
--> 正在处理依赖关系 perl(:MODULE_COMPAT_5.16.3),它被软件包 2:vim-enhanced-7.4.629-8.el7_9.x86_64 需要
--> 正在处理依赖关系 libperl.so()(64bit),它被软件包 2:vim-enhanced-7.4.629-8.el7_9.x86_64 需要
--> 正在处理依赖关系 libgpm.so.2()(64bit),它被软件包 2:vim-enhanced-7.4.629-8.el7_9.x86_64 需要
--> 正在检查事务
----------------------------------------------------------------
----------------------------------------------------------------
----------------------------------------------------------------
----------------------------------------------------------------
----------------------------------------------------------------
----------------------------------------------------------------
  验证中      : perl-Text-ParseWords-3.29-4.el7.noarch                                                                                                               30/31
  验证中      : 4:perl-libs-5.16.3-299.el7_9.x86_64                                                                                                                  31/31

已安装:
  vim-enhanced.x86_64 2:7.4.629-8.el7_9

作为依赖被安装:
  gpm-libs.x86_64 0:1.20.7-6.el7         perl.x86_64 4:5.16.3-299.el7_9           perl-Carp.noarch 0:1.26-244.el7           perl-Encode.x86_64 0:2.51-7.el7
  perl-Exporter.noarch 0:5.68-3.el7      perl-File-Path.noarch 0:2.09-2.el7       perl-File-Temp.noarch 0:0.23.01-3.el7     perl-Filter.x86_64 0:1.49-3.el7
  perl-Getopt-Long.noarch 0:2.40-3.el7   perl-HTTP-Tiny.noarch 0:0.033-3.el7      perl-PathTools.x86_64 0:3.40-5.el7        perl-Pod-Escapes.noarch 1:1.04-299.el7_9
  perl-Pod-Perldoc.noarch 0:3.20-4.el7   perl-Pod-Simple.noarch 1:3.28-4.el7      perl-Pod-Usage.noarch 0:1.63-3.el7        perl-Scalar-List-Utils.x86_64 0:1.27-248.el7
  perl-Socket.x86_64 0:2.010-5.el7       perl-Storable.x86_64 0:2.45-3.el7        perl-Text-ParseWords.noarch 0:3.29-4.el7  perl-Time-HiRes.x86_64 4:1.9725-3.el7
  perl-Time-Local.noarch 0:1.2300-2.el7  perl-constant.noarch 0:1.27-2.el7        perl-libs.x86_64 4:5.16.3-299.el7_9       perl-macros.x86_64 4:5.16.3-299.el7_9
  perl-parent.noarch 1:0.225-244.el7     perl-podlators.noarch 0:2.5.1-3.el7      perl-threads.x86_64 0:1.87-4.el7          perl-threads-shared.x86_64 0:1.43-6.el7
  vim-common.x86_64 2:7.4.629-8.el7_9    vim-filesystem.x86_64 2:7.4.629-8.el7_9

完毕!
[root@localhost ~]#
4、安装ifconfig
[root@localhost ~]# ifconfig
-bash: ifconfig: 未找到命令

# 在yum仓库中搜索ifconfig
[root@localhost ~]# yum search ifconfig -y
已加载插件:fastestmirror
Loading mirror speeds from cached hostfile
 * base: mirrors.aliyun.com
 * extras: mirrors.aliyun.com
 * updates: mirrors.aliyun.com
====================================================================== 匹配:ifconfig =======================================================================
net-tools.x86_64 : Basic networking tools

# 此处提示需要安装 net-tools.x86_64 : Basic networking tools

[root@localhost ~]# yum -y install net-tools.x86_64
已加载插件:fastestmirror
Loading mirror speeds from cached hostfile
 * base: mirrors.aliyun.com
 * extras: mirrors.aliyun.com
 * updates: mirrors.aliyun.com
正在解决依赖关系
--> 正在检查事务
---> 软件包 net-tools.x86_64.0.2.0-0.25.20131004git.el7 将被 安装
--> 解决依赖关系完成

依赖关系解决

=============================================================================================================================================================
 Package                            架构                            版本                                                 源                             大小
=============================================================================================================================================================
正在安装:
 net-tools                          x86_64                          2.0-0.25.20131004git.el7                             base                          306 k
---------------------------------------------
---------------------------------------------
---------------------------------------------
---------------------------------------------
---------------------------------------------
Running transaction
  正在安装    : net-tools-2.0-0.25.20131004git.el7.x86_64                                                                                                1/1
  验证中      : net-tools-2.0-0.25.20131004git.el7.x86_64                                                                                                1/1

已安装:
  net-tools.x86_64 0:2.0-0.25.20131004git.el7

完毕!
[root@localhost ~]#

# 再次使用ifconfig 显示正常
[root@localhost ~]# ifconfig
ens32: flags=4163<UP,BROADCAST,RUNNING,MULTICAST>  mtu 1500
        inet 192.168.0.20  netmask 255.255.255.0  broadcast 192.168.0.255
        inet6 fe80::9249:da1d:2161:4d9c  prefixlen 64  scopeid 0x20<link>
        ether 00:0c:29:0d:f4:1f  txqueuelen 1000  (Ethernet)
        RX packets 466885  bytes 430458887 (410.5 MiB)
        RX errors 0  dropped 0  overruns 0  frame 0
        TX packets 233076  bytes 16293898 (15.5 MiB)
        TX errors 0  dropped 0 overruns 0  carrier 0  co	llisions 0

lo: flags=73<UP,LOOPBACK,RUNNING>  mtu 65536
        inet 127.0.0.1  netmask 255.0.0.0
        inet6 ::1  prefixlen 128  scopeid 0x10<host>
        loop  txqueuelen 1000  (Local Loopback)
        RX packets 4  bytes 340 (340.0 B)
        RX errors 0  dropped 0  overruns 0  frame 0
        TX packets 4  bytes 340 (340.0 B)
        TX errors 0  dropped 0 overruns 0  carrier 0  collisions 0

[root@localhost ~]#
5、关闭SE LINUX
- 由于SE-LINUX对后续各种操作有限制,需要手动关闭
# 查询SE-LINUX状态
[root@localhost ~]# getenforce
Enforcing
[root@localhost ~]#
# 设置SE-LINUX模式为宽松模式,不然不能关闭
[root@localhost ~]# setenforce 0
[root@localhost ~]# getenforce
Permissive
[root@localhost ~]#
# 通过修改/etc/selinux/config 配置文件,永久关闭SELINUX
# 修改 SELINUX=disabled
[root@localhost ~]#
[root@localhost ~]# vim /etc/selinux/config
  1
  2 # This file controls the state of SELinux on the system.
  3 # SELINUX= can take one of these three values:
  4 #     enforcing - SELinux security policy is enforced.
  5 #     permissive - SELinux prints warnings instead of enforcing.
  6 #     disabled - No SELinux policy is loaded.
  7 SELINUX=disabled
6、关闭防火墙(可选)
- 防火墙有时可能会阻止一些连接,可以选择关闭防火墙,并取消防火墙开机自启
# 查询防火墙运行状态
[root@localhost ~]# systemctl status firewalld.service
● firewalld.service - firewalld - dynamic firewall daemon
   Loaded: loaded (/usr/lib/systemd/system/firewalld.service; enabled; vendor preset: enabled)
   Active: active (running) since 五 2022-09-16 17:05:33 CST; 35min ago
     Docs: man:firewalld(1)
 Main PID: 22739 (firewalld)
   CGroup: /system.slice/firewalld.service
           └─22739 /usr/bin/python2 -Es /usr/sbin/firewalld --nofork --nopid

9月 16 17:05:33 localhost.localdomain systemd[1]: Starting firewalld - dynamic firewall daemon...
9月 16 17:05:33 localhost.localdomain systemd[1]: Started firewalld - dynamic firewall daemon.
9月 16 17:05:33 localhost.localdomain firewalld[22739]: WARNING: AllowZoneDrifting is enabled. This is considered an insecure configuration option. It will be...g it now.
Hint: Some lines were ellipsized, use -l to show in full.
[root@localhost ~]#
# 关闭防火墙
[root@localhost ~]# systemctl stop firewalld.service
[root@localhost ~]# systemctl status firewalld.service
● firewalld.service - firewalld - dynamic firewall daemon
   Loaded: loaded (/usr/lib/systemd/system/firewalld.service; enabled; vendor preset: enabled)
   Active: inactive (dead) since 五 2022-09-16 17:42:12 CST; 1s ago
     Docs: man:firewalld(1)
  Process: 22739 ExecStart=/usr/sbin/firewalld --nofork --nopid $FIREWALLD_ARGS (code=exited, status=0/SUCCESS)
 Main PID: 22739 (code=exited, status=0/SUCCESS)

9月 16 17:05:33 localhost.localdomain systemd[1]: Starting firewalld - dynamic firewall daemon...
9月 16 17:05:33 localhost.localdomain systemd[1]: Started firewalld - dynamic firewall daemon.
9月 16 17:05:33 localhost.localdomain firewalld[22739]: WARNING: AllowZoneDrifting is enabled. This is considered an insecure configuration option. It will be...g it now.
9月 16 17:42:11 localhost.localdomain systemd[1]: Stopping firewalld - dynamic firewall daemon...
9月 16 17:42:12 localhost.localdomain systemd[1]: Stopped firewalld - dynamic firewall daemon.
Hint: Some lines were ellipsized, use -l to show in full.
[root@localhost ~]#
# 关闭防火墙开机自启
[root@localhost ~]# systemctl disable firewalld.service
Removed symlink /etc/systemd/system/multi-user.target.wants/firewalld.service.
Removed symlink /etc/systemd/system/dbus-org.fedoraproject.FirewallD1.service.
# 查询防火墙开机自启状态
[root@localhost ~]# systemctl is-enabled firewalld.service
disabled
[root@localhost ~]#
7、yum安装MySQL
7.1、卸载mariadb
[root@localhost local]# rpm -qa | grep mariadb
mariadb-libs-5.5.68-1.el7.x86_64
[root@localhost local]# yum remove mariadb-libs.x86_64
已加载插件:fastestmirror
Repository base is listed more than once in the configuration
Repository updates is listed more than once in the configuration
Repository extras is listed more than once in the configuration
Repository centosplus is listed more than once in the configuration
正在解决依赖关系
--> 正在检查事务
-----------------------------------------------------------------------
-----------------------------------------------------------------------
-----------------------------------------------------------------------
-----------------------------------------------------------------------
-----------------------------------------------------------------------
-----------------------------------------------------------------------
事务概要
===========================================================================================================================================================================
移除  1 软件包 (+1 依赖软件包)

安装大小:17 M
是否继续?[y/N]:y
Downloading packages:
Running transaction check
Running transaction test
Transaction test succeeded
Running transaction
  正在删除    : 2:postfix-2.10.1-9.el7.x86_64                                                                                                                          1/2
  正在删除    : 1:mariadb-libs-5.5.68-1.el7.x86_64                                                                                                                     2/2
  验证中      : 1:mariadb-libs-5.5.68-1.el7.x86_64                                                                                                                     1/2
  验证中      : 2:postfix-2.10.1-9.el7.x86_64                                                                                                                          2/2

删除:
  mariadb-libs.x86_64 1:5.5.68-1.el7

作为依赖被删除:
  postfix.x86_64 2:2.10.1-9.el7

完毕!
7.2、使用wget下载官网软件包
# 使用wget下载官网yum软件包
[root@localhost local]# wget https://dev.mysql.com/get/mysql80-community-release-el7-7.noarch.rpm
--2022-09-17 09:16:31--  https://dev.mysql.com/get/mysql80-community-release-el7-7.noarch.rpm
正在解析主机 dev.mysql.com (dev.mysql.com)... 104.88.223.138, 2600:140b:2:99d::2e31, 2600:140b:2:99c::2e31
正在连接 dev.mysql.com (dev.mysql.com)|104.88.223.138|:443... 已连接。
已发出 HTTP 请求,正在等待回应... 302 Moved Temporarily
位置:https://repo.mysql.com//mysql80-community-release-el7-7.noarch.rpm [跟随至新的 URL]
--2022-09-17 09:16:31--  https://repo.mysql.com//mysql80-community-release-el7-7.noarch.rpm
正在解析主机 repo.mysql.com (repo.mysql.com)... 23.3.109.33
正在连接 repo.mysql.com (repo.mysql.com)|23.3.109.33|:443... 已连接。
已发出 HTTP 请求,正在等待回应... 200 OK
长度:11196 (11K) [application/x-redhat-package-manager]
正在保存至: “mysql80-community-release-el7-7.noarch.rpm.1”

100%[=================================================================================================================================>] 11,196      --.-K/s 用时 0s

2022-09-17 09:16:32 (107 MB/s) - 已保存 “mysql80-community-release-el7-7.noarch.rpm.1” [11196/11196])
7.3、安装MySQL的yum源
# 安装MySQL的yum源
[root@localhost local]# yum -y install mysql80-community-release-el7-7.noarch.rpm
已加载插件:fastestmirror
Repository base is listed more than once in the configuration
Repository updates is listed more than once in the configuration
Repository extras is listed more than once in the configuration
Repository centosplus is listed more than once in the configuration
正在检查 mysql80-community-release-el7-7.noarch.rpm: mysql80-community-release-el7-7.noarch
mysql80-community-release-el7-7.noarch.rpm 将被安装
正在解决依赖关系
--> 正在检查事务
---> 软件包 mysql80-community-release.noarch.0.el7-7 将被 安装
--> 解决依赖关系完成

依赖关系解决

===========================================================================================================================================================================
 Package                                        架构                        版本                        源                                                            大小
===========================================================================================================================================================================
正在安装:
 mysql80-community-release                      noarch                      el7-7                       /mysql80-community-release-el7-7.noarch                       10 k

事务概要
===========================================================================================================================================================================
安装  1 软件包

总计:10 k
安装大小:10 k
Downloading packages:
Running transaction check
Running transaction test
Transaction test succeeded
Running transaction
  正在安装    : mysql80-community-release-el7-7.noarch                                                                                                                 1/1
  验证中      : mysql80-community-release-el7-7.noarch                                                                                                                 1/1

已安装:
  mysql80-community-release.noarch 0:el7-7

完毕!
7.4、生成yum缓存
[root@localhost local]# yum makecache
已加载插件:fastestmirror
Repository base is listed more than once in the configuration
Repository updates is listed more than once in the configuration
Repository extras is listed more than once in the configuration
Repository centosplus is listed more than once in the configuration
Loading mirror speeds from cached hostfile
 * base: mirrors.aliyun.com
 * extras: mirrors.aliyun.com
 * updates: mirrors.aliyun.com
base                                                                                                                                                | 3.6 kB  00:00:00
extras                                                                                                                                              | 2.9 kB  00:00:00
mysql-connectors-community                                                                                                                          | 2.6 kB  00:00:00
mysql-tools-community                                                                                                                               | 2.6 kB  00:00:00
mysql80-community                                                                                                                                   | 2.6 kB  00:00:00
updates                                                                                                                                             | 2.9 kB  00:00:00
(1/9): mysql-connectors-community/x86_64/filelists_db                                                                                               |  37 kB  00:00:00
(2/9): mysql-connectors-community/x86_64/other_db                                                                                                   |  24 kB  00:00:00
(3/9): mysql-connectors-community/x86_64/primary_db                                                                                                 |  90 kB  00:00:00
(4/9): mysql-tools-community/x86_64/primary_db                                                                                                      |  87 kB  00:00:00
(5/9): mysql-tools-community/x86_64/other_db                                                                                                        |  17 kB  00:00:00
(6/9): mysql-tools-community/x86_64/filelists_db                                                                                                    | 355 kB  00:00:00
(7/9): mysql80-community/x86_64/primary_db                                                                                                          | 211 kB  00:00:00
(8/9): mysql80-community/x86_64/other_db                                                                                                            |  57 kB  00:00:00
(9/9): mysql80-community/x86_64/filelists_db                                                                                                        | 1.9 MB  00:00:01
元数据缓存已建立
[root@localhost local]#
7.5、检查安装的yum源是否存在
- 安装 yum-utils.noarch 工具
- 选择默认安装的版本 默认的是8.0 版本 安装 YUM 管理工具包,此包提供了 yum-config-manager 命令工具
[root@localhost local]# yum -y install yum-utils.noarch
已加载插件:fastestmirror
Repository base is listed more than once in the configuration
Repository updates is listed more than once in the configuration
Repository extras is listed more than once in the configuration
Repository centosplus is listed more than once in the configuration
Loading mirror speeds from cached hostfile
 * base: mirrors.aliyun.com
 * extras: mirrors.aliyun.com
 * updates: mirrors.aliyun.com
正在解决依赖关系
--> 正在检查事务
---> 软件包 yum-utils.noarch.0.1.1.31-54.el7_8 将被 安装
--> 正在处理依赖关系 python-kitchen,它被软件包 yum-utils-1.1.31-54.el7_8.noarch 需要
--> 正在处理依赖关系 libxml2-python,它被软件包 yum-utils-1.1.31-54.el7_8.noarch 需要
--> 正在检查事务
---> 软件包 libxml2-python.x86_64.0.2.9.1-6.el7_9.6 将被 安装
---> 软件包 python-kitchen.noarch.0.1.1.1-5.el7 将被 安装
--> 正在处理依赖关系 python-chardet,它被软件包 python-kitchen-1.1.1-5.el7.noarch 需要
--> 正在检查事务
---> 软件包 python-chardet.noarch.0.2.2.1-3.el7 将被 安装
--> 解决依赖关系完成

依赖关系解决

===========================================================================================================================================================================
 Package                                     架构                                版本                                           源                                    大小
===========================================================================================================================================================================
正在安装:
 yum-utils                                   noarch                              1.1.31-54.el7_8                                base                                 122 k
为依赖而安装:
 libxml2-python                              x86_64                              2.9.1-6.el7_9.6                                updates                              247 k
 python-chardet                              noarch                              2.2.1-3.el7                                    base                                 227 k
 python-kitchen                              noarch                              1.1.1-5.el7                                    base                                 267 k

事务概要
===========================================================================================================================================================================
安装  1 软件包 (+3 依赖软件包)

总下载量:863 k
安装大小:4.3 M
Downloading packages:
(1/4): python-chardet-2.2.1-3.el7.noarch.rpm                                                                                                        | 227 kB  00:00:01
(2/4): python-kitchen-1.1.1-5.el7.noarch.rpm                                                                                                        | 267 kB  00:00:01
(3/4): libxml2-python-2.9.1-6.el7_9.6.x86_64.rpm                                                                                                    | 247 kB  00:00:01
(4/4): yum-utils-1.1.31-54.el7_8.noarch.rpm                                                                                                         | 122 kB  00:00:00
---------------------------------------------------------------------------------------------------------------------------------------------------------------------------
总计                                                                                                                                       368 kB/s | 863 kB  00:00:02
Running transaction check
Running transaction test
Transaction test succeeded
Running transaction
  正在安装    : python-chardet-2.2.1-3.el7.noarch                                                                                                                      1/4
  正在安装    : python-kitchen-1.1.1-5.el7.noarch                                                                                                                      2/4
  正在安装    : libxml2-python-2.9.1-6.el7_9.6.x86_64                                                                                                                  3/4
  正在安装    : yum-utils-1.1.31-54.el7_8.noarch                                                                                                                       4/4
  验证中      : python-kitchen-1.1.1-5.el7.noarch                                                                                                                      1/4
  验证中      : yum-utils-1.1.31-54.el7_8.noarch                                                                                                                       2/4
  验证中      : libxml2-python-2.9.1-6.el7_9.6.x86_64                                                                                                                  3/4
  验证中      : python-chardet-2.2.1-3.el7.noarch                                                                                                                      4/4

已安装:
  yum-utils.noarch 0:1.1.31-54.el7_8

作为依赖被安装:
  libxml2-python.x86_64 0:2.9.1-6.el7_9.6                    python-chardet.noarch 0:2.2.1-3.el7                    python-kitchen.noarch 0:1.1.1-5.el7

完毕!
[root@localhost local]#
- 检查安装的yum源是否存在
- 选择默认安装的版本 默认的是8.0 版本
[root@localhost local]# yum repolist enabled | grep mysql
Repository base is listed more than once in the configuration
Repository updates is listed more than once in the configuration
Repository extras is listed more than once in the configuration
Repository centosplus is listed more than once in the configuration
mysql-connectors-community/x86_64 MySQL Connectors Community                 199
mysql-tools-community/x86_64      MySQL Tools Community                       92
mysql80-community/x86_64          MySQL 8.0 Community Server                 346
[root@localhost local]#
# 禁用MySQL8.0
[root@localhost local]# yum-config-manager --disable mysql80
# 启用MySQL5.7
[root@localhost local]# yum-config-manager --enable mysql57-community
# 查看MySQL5.7的yum源
[root@localhost local]# yum repolist enabled | grep mysql
Repository base is listed more than once in the configuration
Repository updates is listed more than once in the configuration
Repository extras is listed more than once in the configuration
Repository centosplus is listed more than once in the configuration
mysql-connectors-community/x86_64 MySQL Connectors Community                 199
mysql-tools-community/x86_64      MySQL Tools Community                       92
mysql57-community/x86_64          MySQL 5.7 Community Server                 604
[root@localhost local]#
7.6、安装MySQL5.7
[root@localhost local]# yum install -y  mysql-community-server
mysql80-community-release-el7-7.noarch.rpm   mysql-community-libs-compat.x86_64           mysql-connector-python-cext.x86_64
mysql-community-client.i686                  mysql-community-libs.i686                    mysql-connector-python.noarch
mysql-community-client.x86_64                mysql-community-libs.x86_64                  mysql-connector-python.x86_64
mysql-community-common.i686                  mysql-community-release.noarch               mysql-ref-manual-5.5-en-html-chapter.noarch
mysql-community-common.x86_64                mysql-community-server.x86_64                mysql-ref-manual-5.5-en-pdf.noarch
mysql-community-devel.i686                   mysql-community-test.x86_64                  mysql-ref-manual-5.7-en-html-chapter.noarch
mysql-community-devel.x86_64                 mysql-connector-c++-devel.x86_64             mysql-ref-manual-5.7-en-pdf.noarch
mysql-community-embedded-compat.i686         mysql-connector-c++-jdbc.x86_64              mysql-router-community.x86_64
mysql-community-embedded-compat.x86_64       mysql-connector-c++.x86_64                   mysql-router.x86_64
mysql-community-embedded-devel.i686          mysql-connector-java.noarch                  mysql-shell.x86_64
mysql-community-embedded-devel.x86_64        mysql-connector-odbc-setup.x86_64            mysql-utilities-extra.noarch
mysql-community-embedded.i686                mysql-connector-odbc.x86_64                  mysql-utilities.noarch
mysql-community-embedded.x86_64              mysql-connector-python3-cext.x86_64          mysql-workbench-community.x86_64
mysql-community-libs-compat.i686             mysql-connector-python3.x86_64
[root@localhost local]# yum -y install mysql-community-server.x86_64
已加载插件:fastestmirror
Repository base is listed more than once in the configuration
Repository updates is listed more than once in the configuration
Repository extras is listed more than once in the configuration
Repository centosplus is listed more than once in the configuration
Loading mirror speeds from cached hostfile
 * base: mirrors.aliyun.com
 * extras: mirrors.aliyun.com
 * updates: mirrors.aliyun.com
正在解决依赖关系
-----------------------------------------------------------------------------
-----------------------------------------------------------------------------
-----------------------------------------------------------------------------
-----------------------------------------------------------------------------
-----------------------------------------------------------------------------
-----------------------------------------------------------------------------
导入 GPG key 0x5072E1F5:
 用户ID     : "MySQL Release Engineering <mysql-build@oss.oracle.com>"
 指纹       : a4a9 4068 76fc bd3c 4567 70c8 8c71 8d3b 5072 e1f5
 软件包     : mysql80-community-release-el7-7.noarch (@/mysql80-community-release-el7-7.noarch)
 来自       : /etc/pki/rpm-gpg/RPM-GPG-KEY-mysql
Running transaction check
Running transaction test
Transaction test succeeded
Running transaction
  正在安装    : mysql-community-common-5.7.39-1.el7.x86_64                                                                                                             1/5
  正在安装    : mysql-community-libs-5.7.39-1.el7.x86_64                                                                                                               2/5
  正在安装    : mysql-community-client-5.7.39-1.el7.x86_64                                                                                                             3/5
  正在安装    : net-tools-2.0-0.25.20131004git.el7.x86_64                                                                                                              4/5
  正在安装    : mysql-community-server-5.7.39-1.el7.x86_64                                                                                                             5/5
  验证中      : net-tools-2.0-0.25.20131004git.el7.x86_64                                                                                                              1/5
  验证中      : mysql-community-client-5.7.39-1.el7.x86_64                                                                                                             2/5
  验证中      : mysql-community-libs-5.7.39-1.el7.x86_64                                                                                                               3/5
  验证中      : mysql-community-common-5.7.39-1.el7.x86_64                                                                                                             4/5
  验证中      : mysql-community-server-5.7.39-1.el7.x86_64                                                                                                             5/5

已安装:
  mysql-community-server.x86_64 0:5.7.39-1.el7

作为依赖被安装:
  mysql-community-client.x86_64 0:5.7.39-1.el7             mysql-community-common.x86_64 0:5.7.39-1.el7             mysql-community-libs.x86_64 0:5.7.39-1.el7
  net-tools.x86_64 0:2.0-0.25.20131004git.el7

完毕!
[root@localhost local]#
7.7 修改MySQL密码复杂度(生产环境不建议)
- 编辑/etc/my.cnf 配置文件
- 经过测试,修改配置文件需要在首次启动MySQL服务后进行,否则会导致启动服务失败
# 编辑/etc/my.cnf 配置文件
[root@localhost local]# vim /etc/my.cnf

  4 [mysqld]
  5 #


 28 # 修改密码复杂度
 29 validate_password_policy=0
 30 # 修改密码长度
 31 validate_password_length=1
- 启动MySQL服务
# 启动MySQL服务
[root@localhost local]# systemctl start mysqld

# 检查MySQL服务启动状态
[root@localhost local]# systemctl status mysqld.service
● mysqld.service - MySQL Server
   Loaded: loaded (/usr/lib/systemd/system/mysqld.service; enabled; vendor preset: disabled)
   Active: active (running) since 六 2022-09-17 09:38:17 CST; 2min 59s ago
     Docs: man:mysqld(8)
           http://dev.mysql.com/doc/refman/en/using-systemd.html
  Process: 60463 ExecStart=/usr/sbin/mysqld --daemonize --pid-file=/var/run/mysqld/mysqld.pid $MYSQLD_OPTS (code=exited, status=0/SUCCESS)
  Process: 60445 ExecStartPre=/usr/bin/mysqld_pre_systemd (code=exited, status=0/SUCCESS)
 Main PID: 60466 (mysqld)
   CGroup: /system.slice/mysqld.service
           └─60466 /usr/sbin/mysqld --daemonize --pid-file=/var/run/mysqld/mysqld.pid

9月 17 09:38:17 localhost.localdomain systemd[1]: Starting MySQL Server...
9月 17 09:38:17 localhost.localdomain systemd[1]: Started MySQL Server.
[root@localhost local]#

# 设置MySQL服务开机自启
[root@localhost local]# systemctl enable mysqld

# 检查MySQL服务开机自启是否设置成功
[root@localhost local]# systemctl is-enabled mysqld.service
enabled
7.8、登录MySQL并修改初始密码
- MySQL5.7之后会生成初始随机密码,需要在首次登陆后修改密码
# 查看MySQL初始密码
[root@localhost local]# cat /var/log/mysqld.log | grep password
2022-09-17T01:35:22.471521Z 1 [Note] A temporary password is generated for root@localhost: 8&#eL-Rq!r+p
- 使用初始密码登录MySQL,并修改初始密码
# 使用初始密码登录MySQL
[root@localhost local]# mysql -uroot -p
Enter password:
Welcome to the MySQL monitor.  Commands end with ; or \g.
Your MySQL connection id is 2
Server version: 5.7.39

Copyright (c) 2000, 2022, Oracle and/or its affiliates.

Oracle is a registered trademark of Oracle Corporation and/or its
affiliates. Other names may be trademarks of their respective
owners.

Type 'help;' or '\h' for help. Type '\c' to clear the current input statement.

# 修改初始密码
mysql> alter user root@localhost identified by "123456";
Query OK, 0 rows affected (0.00 sec)

mysql>
7.8、设置用户远程登录权限
- 为了方便使用,需要设置远程登录权限
# 进入mysql库
mysql> use mysql;
Reading table information for completion of table and column names
You can turn off this feature to get a quicker startup with -A

Database changed
# 修改root账户远程登录
mysql> update user set host="%" where user="root";
Query OK, 1 row affected (0.00 sec)
Rows matched: 1  Changed: 1  Warnings: 0

# 检查修改是否生效
mysql> select user, host from user;
+---------------+-----------+
| user          | host      |
+---------------+-----------+
| root          | %         |
| mysql.session | localhost |
| mysql.sys     | localhost |
+---------------+-----------+
3 rows in set (0.01 sec)

mysql>
8、源码安装MySQL
8.1、下载源码包
登录MySQL官网下载源码包,也可以使用wget命令直接下载到服务器:MySQL :: Download MySQL Community Server
如果需要下载历史版本,需要点击Archives标签
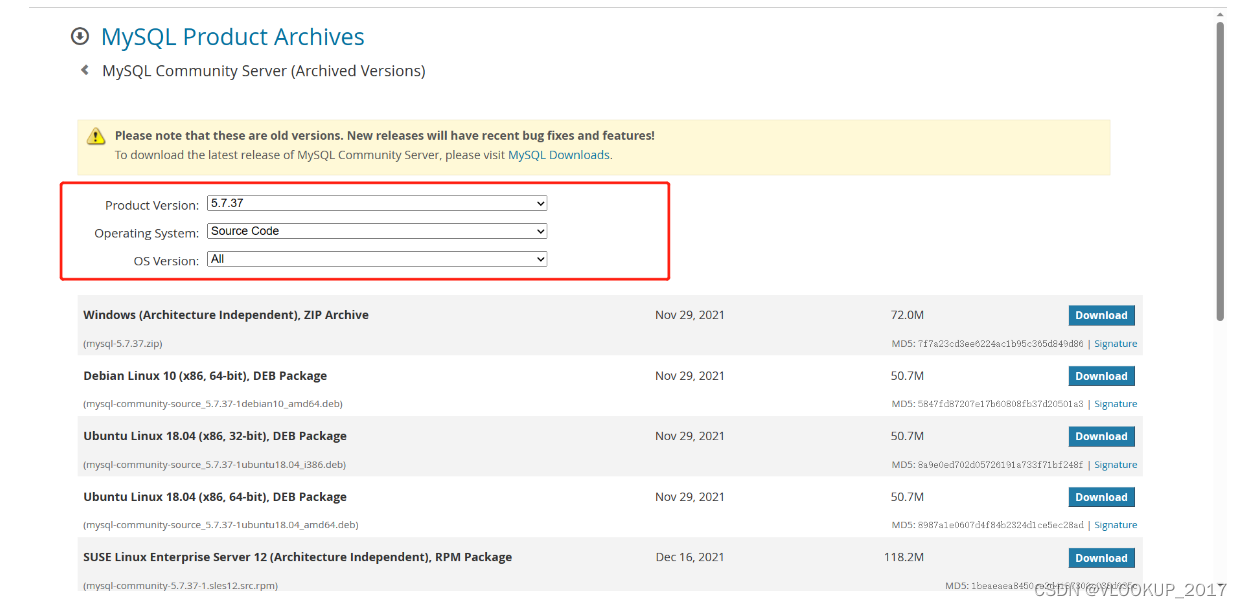
![[外链图片转存失败,源站可能有防盗链机制,建议将图片保存下来直接上传(img-9xOfQ7qD-1682902729148)(C:\Users\Think\AppData\Roaming\Typora\typora-user-images\image-20230423151805153.png)]](https://img-blog.csdnimg.cn/6e7f9c6e6ed84f388e0e897565b7a757.png)
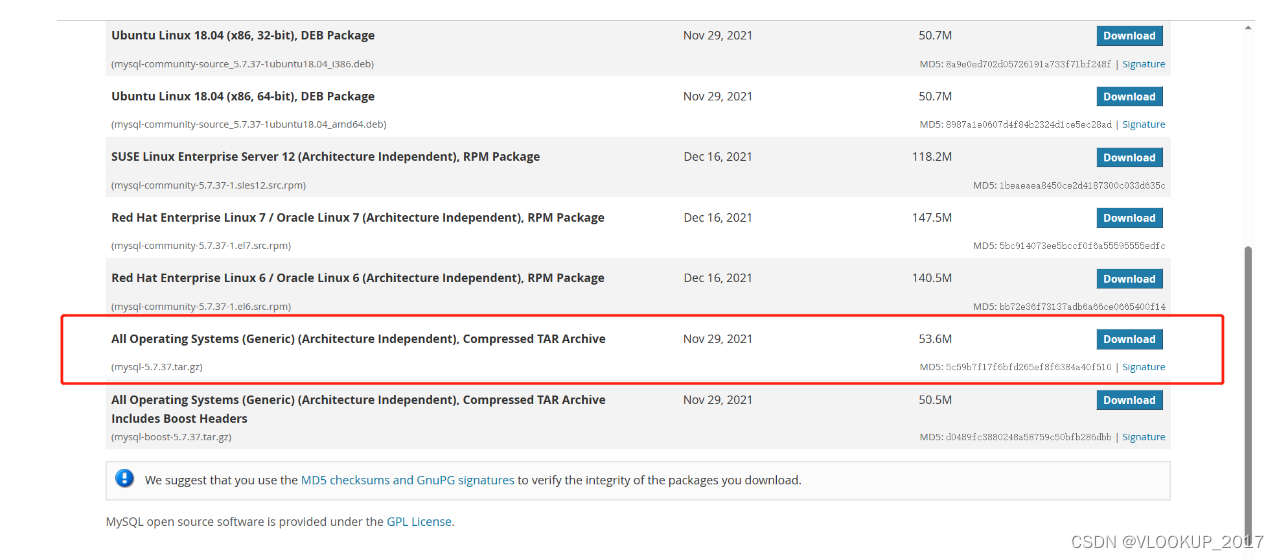
- 如图所示,以下载MySQL5.3.37版本为例,需要下载源码包要在Operating System选择Source Code
- 选择下方的All Operating Systems (Generic) (Architecture Independent), Compressed TAR Archive
- 可以点击下载,或者复制链接后使用wget下载到服务器
- 使用wget下载源码包
# 使用wget将源码包下载到/root 目录下
[root@localhost ~]# wget -o mysql-5.7.37.tar.gz  https://downloads.mysql.com/archives/get/p/23/file/mysql-boost-5.7.37.tar.gz

[root@localhost ~]# ll
总用量 51824
-rw-------. 1 root root     1526 4月  23 12:55 anaconda-ks.cfg
-rw-r--r--. 1 root root    79981 4月  23 15:12 mysql-5.7.37.tar.gz
-rw-r--r--. 1 root root 52978401 11月 30 2021 mysql-boost-5.7.37.tar.gz
8.2、解压缩源码包
- 将下载好的源码包解压缩到/usr/local/src 目录下
- /usr/local:用户级的软件目录,用来存放用户安装编译的软件,用户自己编译安装的软件也默认存放在这里
- /usr/local/src :这个目录是存放用户编译软件所用的源码的
# 将下载好的源码包解压缩到/usr/local/src 目录下
# 解压缩的目录可以随自己喜好,但最好遵循一定的规则
[root@localhost ~]# tar -xzf mysql-boost-5.7.37.tar.gz -C /usr/local/src/
[root@localhost ~]# cd /usr/local/src/
[root@localhost src]# ll
总用量 4
drwxr-xr-x. 35 7161 31415 4096 11月 30 2021 mysql-5.7.37
[root@localhost src]# cd mysql-5.7.37/

[root@localhost mysql-5.7.37]# ll
总用量 508
drwxr-xr-x.  3 7161 31415     26 11月 30 2021 boost
drwxr-xr-x.  2 7161 31415   4096 11月 30 2021 BUILD
drwxr-xr-x.  6 7161 31415   4096 11月 30 2021 client
drwxr-xr-x.  4 7161 31415   4096 11月 30 2021 cmake
-rw-r--r--.  1 7161 31415  28414 11月 30 2021 CMakeLists.txt
-rw-r--r--.  1 7161 31415  14529 11月 30 2021 config.h.cmake
-rw-r--r--.  1 7161 31415  25144 11月 30 2021 configure.cmake
drwxr-xr-x.  2 7161 31415   4096 11月 30 2021 dbug
drwxr-xr-x.  2 7161 31415     80 11月 30 2021 Docs
-rw-r--r--.  1 7161 31415  67369 11月 30 2021 Doxyfile-perfschema
drwxr-xr-x.  7 7161 31415   4096 11月 30 2021 extra
drwxr-xr-x.  5 7161 31415   4096 11月 30 2021 include
-rw-r--r--.  1 7161 31415    333 11月 30 2021 INSTALL
drwxr-xr-x.  5 7161 31415    135 11月 30 2021 libbinlogevents
drwxr-xr-x.  3 7161 31415     39 11月 30 2021 libbinlogstandalone
drwxr-xr-x.  4 7161 31415    275 11月 30 2021 libmysql
drwxr-xr-x.  3 7161 31415    204 11月 30 2021 libmysqld
drwxr-xr-x.  2 7161 31415   4096 11月 30 2021 libservices
-rw-r--r--.  1 7161 31415 259253 11月 30 2021 LICENSE
drwxr-xr-x.  2 7161 31415   4096 11月 30 2021 man
drwxr-xr-x. 10 7161 31415   4096 11月 30 2021 mysql-test
drwxr-xr-x.  2 7161 31415   4096 11月 30 2021 mysys
drwxr-xr-x.  2 7161 31415    280 11月 30 2021 mysys_ssl
drwxr-xr-x. 10 7161 31415    131 11月 30 2021 packaging
drwxr-xr-x. 18 7161 31415   4096 11月 30 2021 plugin
drwxr-xr-x.  4 7161 31415     36 11月 30 2021 rapid
-rw-r--r--.  1 7161 31415    566 11月 30 2021 README
drwxr-xr-x.  2 7161 31415   4096 11月 30 2021 regex
drwxr-xr-x.  4 7161 31415   4096 11月 30 2021 scripts
drwxr-xr-x.  2 7161 31415      6 11月 30 2021 source_downloads
drwxr-xr-x.  8 7161 31415  20480 11月 30 2021 sql
drwxr-xr-x.  2 7161 31415    198 11月 30 2021 sql-common
drwxr-xr-x. 13 7161 31415    175 11月 30 2021 storage
drwxr-xr-x.  2 7161 31415   4096 11月 30 2021 strings
drwxr-xr-x.  4 7161 31415    241 11月 30 2021 support-files
drwxr-xr-x.  2 7161 31415     98 11月 30 2021 testclients
drwxr-xr-x.  5 7161 31415     70 11月 30 2021 unittest
-rw-r--r--.  1 7161 31415     88 11月 30 2021 VERSION
drwxr-xr-x.  3 7161 31415   4096 11月 30 2021 vio
drwxr-xr-x.  2 7161 31415     32 11月 30 2021 win
drwxr-xr-x. 11 7161 31415   4096 11月 30 2021 zlib
8.3、卸载mariadb
- 由于mariadb与MySQL存在冲突,在安装MySQL之前需要卸载mariadb相关内容
[root@localhost mysql-5.7.37]# rpm -qa | grep mariadb
mariadb-libs-5.5.68-1.el7.x86_64
[root@localhost mysql-5.7.37]#
# 使用 --nodeps 忽略依赖关系卸载  mariadb-libs
[root@localhost ~]# rpm -e --nodeps mariadb-libs


[root@localhost mysql-5.7.37]# yum install -y cmake make gcc gcc-c++ openssl openssl-devel ncurses ncurses-devel bison bison-devel
已加载插件:fastestmirror
Loading mirror speeds from cached hostfile
 * base: mirrors.aliyun.com
 * extras: mirrors.aliyun.com
 * updates: mirrors.aliyun.com
软件包 1:make-3.82-24.el7.x86_64 已安装并且是最新版本
软件包 1:openssl-1.0.2k-26.el7_9.x86_64 已安装并且是最新版本
软件包 ncurses-5.9-14.20130511.el7_4.x86_64 已安装并且是最新版本
正在解决依赖关系
--> 正在检查事务
---> 软件包 bison.x86_64.0.3.0.4-2.el7 将被 安装
--> 正在处理依赖关系 m4 >= 1.4,它被软件包 bison-3.0.4-2.el7.x86_64 需要
--------------------------------------------------
--------------------------------------------------
--------------------------------------------------
--------------------------------------------------
--------------------------------------------------
  验证中      : bison-3.0.4-2.el7.x86_64                                                                                        20/25
  验证中      : libkadm5-1.15.1-55.el7_9.x86_64                                                                                 21/25
  验证中      : mpfr-3.1.1-4.el7.x86_64                                                                                         22/25
  验证中      : glibc-devel-2.17-326.el7_9.x86_64                                                                               23/25
  验证中      : libstdc++-devel-4.8.5-44.el7.x86_64                                                                             24/25
  验证中      : libcom_err-devel-1.42.9-19.el7.x86_64                                                                           25/25

已安装:
  bison.x86_64 0:3.0.4-2.el7                  bison-devel.x86_64 0:3.0.4-2.el7      cmake.x86_64 0:2.8.12.2-2.el7
  gcc.x86_64 0:4.8.5-44.el7                   gcc-c++.x86_64 0:4.8.5-44.el7         ncurses-devel.x86_64 0:5.9-14.20130511.el7_4
  openssl-devel.x86_64 1:1.0.2k-26.el7_9

作为依赖被安装:
  cpp.x86_64 0:4.8.5-44.el7                       glibc-devel.x86_64 0:2.17-326.el7_9         glibc-headers.x86_64 0:2.17-326.el7_9
  kernel-headers.x86_64 0:3.10.0-1160.88.1.el7    keyutils-libs-devel.x86_64 0:1.5.8-3.el7    krb5-devel.x86_64 0:1.15.1-55.el7_9
  libarchive.x86_64 0:3.1.2-14.el7_7              libcom_err-devel.x86_64 0:1.42.9-19.el7     libkadm5.x86_64 0:1.15.1-55.el7_9
  libmpc.x86_64 0:1.0.1-3.el7                     libselinux-devel.x86_64 0:2.5-15.el7        libsepol-devel.x86_64 0:2.5-10.el7
  libstdc++-devel.x86_64 0:4.8.5-44.el7           libverto-devel.x86_64 0:0.2.5-4.el7         m4.x86_64 0:1.4.16-10.el7
  mpfr.x86_64 0:3.1.1-4.el7                       pcre-devel.x86_64 0:8.32-17.el7             zlib-devel.x86_64 0:1.2.7-21.el7_9

完毕!
[root@localhost mysql-5.7.37]#
8.4、编译安装MySQL
- 对加压后的源码进行编译,编译后使用 make && make install 命令进行安装,安装过程较慢,需要耐心等待
- 主要编译选项说明如下:
-DCMAKE_INSTALL_PREFIX=/usr/local/mysql 指定MySQL安装目录
-DMYSQL_DATADIR=/usr/local/mysql/data 指定MySQL数据目录
-DSYSCONFDIR=/usr/local/mysql/etc 指定my.cnf选项文件目录
-DWITH_INNOBASE_STORAGE_ENGINE=ON Innodb引擎
-DWITH_MYISAM_STORAGE_ENGINE=ON MyISAM引擎
-DDEFAULT_CHARSET=utf8 服务器字符集,默认latin1
-DDEFAULT_COLLATION=utf8_general_ci 服务器排序规则,默认latin1_swedish_ci
-DENABLED_LOCAL_INFILE=ON 是否为加载数据启用本地,默认为OFF
-DMYSQL_TCP_PORT=3306 服务器监听端口,默认为3306
-DMYSQL_UNIX_ADDR=/usr/local/mysql/tmp/mysql.sock Unix套接字文件路径,默认/tmp/mysql.sock
-DWITH_INNODB_MEMCACHED=ON 是否生成memcached共享库,默认OFF
-DWITH_BOOST=boost/boost_1_59_0 Boost库源代码的位置,指向下载的源码包里,相对/绝对路径皆可
# 对加压后的源码进行编译
[root@localhost mysql-5.7.37]# cmake -DCMAKE_INSTALL_PREFIX=/usr/local/mysql -DMYSQL_DATADIR=/usr/local/mysql/data -DSYSCONFDIR=/usr/local/mysql/etc -DWITH_INNOBASE_STORAGE_ENGINE=ON -DWITH_MYISAM_STORAGE_ENGINE=ON -DDEFAULT_CHARSET=utf8 -DDEFAULT_COLLATION=utf8_general_ci -DENABLED_LOCAL_INFILE=ON -DMYSQL_TCP_PORT=3306 -DMYSQL_UNIX_ADDR=/usr/local/mysql/tmp/mysql.sock -DWITH_INNODB_MEMCACHED=ON -DWITH_BOOST=boost/boost_1_59_0

-- Running cmake version 2.8.12.2
-- Could NOT find Git (missing:  GIT_EXECUTABLE)
-- Configuring with MAX_INDEXES = 64U
-- The C compiler identification is GNU 4.8.5
-- The CXX compiler identification is GNU 4.8.5
-- Check for working C compiler: /usr/bin/cc
-- Check for working C compiler: /usr/bin/cc -- works
-- Detecting C compiler ABI info
-- Detecting C compiler ABI info - done
-- Check for working CXX compiler: /usr/bin/c++
-- Check for working CXX compiler: /usr/bin/c++ -- works
-- Detecting CXX compiler ABI info
-- Detecting CXX compiler ABI info - done
-- CMAKE_GENERATOR: Unix Makefiles
-- Looking for SHM_HUGETLB
------------------------------------------------------
------------------------------------------------------
------------------------------------------------------
------------------------------------------------------
------------------------------------------------------
------------------------------------------------------
-- library target mysqlserver debug_target /usr/local/src/debug/archive_output_directory/libmysqld.a
-- INSTALL mysqlclient.pc lib/pkgconfig
-- Skipping deb packaging on unsupported platform .
-- CMAKE_BUILD_TYPE: RelWithDebInfo
-- COMPILE_DEFINITIONS: _GNU_SOURCE;_FILE_OFFSET_BITS=64;HAVE_CONFIG_H
-- CMAKE_C_FLAGS: -fPIC -fabi-version=2 -fno-omit-frame-pointer -fno-strict-aliasing  -Wall -Wextra -Wformat-security -Wvla -Wwrite-strings -Wdeclaration-after-statement
-- CMAKE_CXX_FLAGS: -fPIC -fabi-version=2 -fno-omit-frame-pointer -fno-strict-aliasing  -Wall -Wextra -Wformat-security -Wvla -Woverloaded-virtual -Wno-unused-parameter
-- CMAKE_CXX_FLAGS_DEBUG: -DENABLED_DEBUG_SYNC -g
-- CMAKE_CXX_FLAGS_RELWITHDEBINFO: -ffunction-sections -fdata-sections -O3 -g -DNDEBUG
-- CMAKE_CXX_FLAGS_RELEASE: -ffunction-sections -fdata-sections -O3 -DNDEBUG
-- CMAKE_CXX_FLAGS_MINSIZEREL: -ffunction-sections -fdata-sections -Os -DNDEBUG
-- CMAKE_C_LINK_FLAGS:
-- CMAKE_CXX_LINK_FLAGS:
-- CMAKE_EXE_LINKER_FLAGS
-- CMAKE_MODULE_LINKER_FLAGS
-- CMAKE_SHARED_LINKER_FLAGS
-- Configuring done
-- Generating done
-- Build files have been written to: /usr/local/src/mysql-5.7.37
[root@localhost mysql-5.7.37]#

# 编译后使用 make && make install 命令进行安装,安装过程较慢,需要耐心等待
[root@localhost mysql-5.7.37]# make && make install
Scanning dependencies of target INFO_BIN
[  0%] Built target INFO_BIN
Scanning dependencies of target INFO_SRC
[  0%] Built target INFO_SRC
Scanning dependencies of target abi_check
[  0%] Built target abi_check
Scanning dependencies of target lz4_lib
[  0%] Building C object CMakeFiles/lz4_lib.dir/extra/lz4/lz4-1.9.3/lz4.c.o
[  0%] Building C object CMakeFiles/lz4_lib.dir/extr

------------------------------------------------------
------------------------------------------------------
------------------------------------------------------
------------------------------------------------------
------------------------------------------------------
------------------------------------------------------

-- Installing: /usr/local/mysql/mysql-test/./t/xa_gtid.test
-- Installing: /usr/local/mysql/mysql-test/./t/xa_prepared_binlog_off-master.opt
-- Installing: /usr/local/mysql/mysql-test/./t/xa_prepared_binlog_off.test
-- Installing: /usr/local/mysql/mysql-test/./t/xml.test
-- Installing: /usr/local/mysql/mysql-test/./valgrind.supp
-- Installing: /usr/local/mysql/mysql-test/./Makefile
-- Installing: /usr/local/mysql/mysql-test/./cmake_install.cmake
-- Installing: /usr/local/mysql/mysql-test/./CTestTestfile.cmake
-- Installing: /usr/local/mysql/mysql-test/./mtr
-- Installing: /usr/local/mysql/mysql-test/./mysql-test-run
-- Installing: /usr/local/mysql/./README-test
-- Up-to-date: /usr/local/mysql/mysql-test/mtr
-- Up-to-date: /usr/local/mysql/mysql-test/mysql-test-run
-- Installing: /usr/local/mysql/mysql-test/lib/My/SafeProcess/my_safe_process
-- Up-to-date: /usr/local/mysql/mysql-test/lib/My/SafeProcess/my_safe_process
-- Installing: /usr/local/mysql/mysql-test/lib/My/SafeProcess/Base.pm
-- Installing: /usr/local/mysql/support-files/mysqld_multi.server
-- Installing: /usr/local/mysql/support-files/mysql-log-rotate
-- Installing: /usr/local/mysql/support-files/magic
-- Installing: /usr/local/mysql/share/aclocal/mysql.m4
-- Installing: /usr/local/mysql/support-files/mysql.server
[root@localhost mysql-5.7.37]#
8.5、初始化MySQL数据库
8.5.1、配置MySQL的所有者和所有组等初始信息
创建mysql组:groupadd mysql
创建mysql用户:useradd -r -g mysql -s /bin/false mysql
cd /usr/local/mysql
mkdir -p /usr/local/mysql/data
mkdir -p /usr/local/mysql/etc
mkdir -p /usr/local/mysql/tmp
mkdir -p /usr/local/mysql/logs
修改mysql目录的所有者和所有组的权限:chown -R mysql:mysql /usr/local/mysql
配置my.cnf文件:vim /usr/local/mysql/etc/my.cnf
[root@localhost mysql-5.7.37]# groupadd mysql
[root@localhost mysql-5.7.37]# useradd -r -g mysql -s /bin/false mysql
[root@localhost mysql-5.7.37]#
[root@localhost mysql-5.7.37]# mkdir /usr/local/mysql/data
[root@localhost mysql-5.7.37]# mkdir /usr/local/mysql/tmp
[root@localhost mysql-5.7.37]# mkdir /usr/local/mysql/logs
[root@localhost mysql-5.7.37]# mkdir /usr/local/mysql/etc
[root@localhost mysql-5.7.37]#

[root@localhost mysql-5.7.37]# chown -R mysql.mysql /usr/local/mysql

[root@localhost mysql-5.7.37]# ll /usr/local/mysql
总用量 280
drwxr-xr-x.  2 mysql mysql   4096 4月  23 16:46 bin
drwxr-xr-x.  2 mysql mysql      6 4月  23 17:21 data
drwxr-xr-x.  2 mysql mysql     55 4月  23 16:46 docs
drwxr-xr-x.  2 mysql mysql      6 4月  23 17:21 etc
drwxr-xr-x.  3 mysql mysql   4096 4月  23 16:46 include
drwxr-xr-x.  4 mysql mysql    192 4月  23 16:46 lib
-rw-r--r--.  1 mysql mysql 259253 11月 30 2021 LICENSE
drwxr-xr-x.  2 mysql mysql      6 4月  23 17:21 logs
drwxr-xr-x.  4 mysql mysql     30 4月  23 16:46 man
drwxr-xr-x. 10 mysql mysql   4096 4月  23 16:46 mysql-test
-rw-r--r--.  1 mysql mysql    566 11月 30 2021 README
-rw-r--r--.  1 mysql mysql    566 11月 30 2021 README-test
drwxr-xr-x. 28 mysql mysql   4096 4月  23 16:46 share
drwxr-xr-x.  2 mysql mysql     90 4月  23 16:46 support-files
drwxr-xr-x.  2 mysql mysql      6 4月  23 17:21 tmp
[root@localhost mysql-5.7.37]#
8.5.2、配置my.cnf文件
[root@localhost mysql-5.7.37]# vim /usr/local/mysql/etc/my.cnf
[root@localhost mysql-5.7.37]#


[client]                                                #客户端设置
port=3306                                               #服务器监听端口,默认为3306
socket=/usr/local/mysql/tmp/mysql.sock                  #Unix套接字文件路径,默认/tmp/mysql.sock

[mysqld]                                                #服务端设置
## 一般配置选项
port=3306                                               #服务器监听端口,默认为3306
basedir=/usr/local/mysql                                #MySQL安装根目录
datadir=/usr/local/mysql/data                           #MySQL数据文件目录
socket=/usr/local/mysql/tmp/mysql.sock                  #Unix套接字文件路径,默认/tmp/mysql.sock
pid-file=/usr/local/mysql/tmp/mysql.pid                 #服务进程pid文件路径
character_set_server=utf8                               #默认字符集
default_storage_engine=InnoDB                           #默认InnoDB存储引擎
user=mysql

# 为了避免设置简单密码策略导致的服务无法启动,需要设置下面2条参数
plugin-load-add=validate_password.so #插件的加载方法,每次服务器启动时都必须给出该选项;

validate-password=FORCE_PLUS_PERMANENT #validate-password在服务器启动时使用该选项来控制插件的激活。

# 设置简单密码策略
validate_password_length=3   #修改密码策略,修改长度
validate_password_policy=0   #0宽容模式
validate_password_mixed_case_count=0   #混合模式,0关闭大小写
validate_password_number_count=0  #字母
validate_password_special_char_count=0   #特殊符号


## 连接配置选项
max_connections=200                                     #最大并发连接数
table_open_cache=400                                    #表打开缓存大小,默认2000
open_files_limit=1000                                   #打开文件数限制,默认5000
max_connect_errors=200                                  #最大连接失败数,默认100
back_log=100                                            #请求连接队列数
connect_timeout=20                                      #连接超时时间,默认10秒
interactive_timeout=1200                                #交互式超时时间,默认28800秒
wait_timeout=600                                        #非交互超时时间,默认28800秒
net_read_timeout=30                                     #读取超时时间,默认30秒
net_write_timeout=60                                    #写入超时时间,默认60秒
max_allowed_packet=8M                                   #最大传输数据字节,默认4M
thread_cache_size=10                                    #线程缓冲区(池)大小
thread_stack=256K                                       #线程栈大小,32位平台196608、64位平台262144

## 临时内存配置选项
tmpdir=/tmp                                             #临时目录路径
tmp_table_size=64M                                      #临时表大小,默认16M
max_heap_table_size=64M                                 #最大内存表大小,默认16M
sort_buffer_size=1M                                     #排序缓冲区大小,默认256K
join_buffer_size=1M                                     #join缓冲区大小,默认256K

## Innodb配置选项
#innodb_thread_concurrency=0							#InnoDB线程并发数
innodb_io_capacity=200                                  #IO容量,可用于InnoDB后台任务的每秒I/O操作数(IOPS),
innodb_io_capacity_max=400                              #IO最大容量,InnoDB在这种情况下由后台任务执行的最大IOPS数
innodb_lock_wait_timeout=50                             #InnoDB引擎锁等待超时时间,默认50(单位:秒)

innodb_buffer_pool_size=512M							#InnoDB缓冲池大小,默认128M
innodb_buffer_pool_instances=4                          #InnoDB缓冲池划分区域数
innodb_max_dirty_pages_pct=75							#缓冲池最大允许脏页比例,默认为75
innodb_flush_method=O_DIRECT                            #日志刷新方法,默认为fdatasync
innodb_flush_log_at_trx_commit=2                        #事务日志刷新方式,默认为0
transaction_isolation=REPEATABLE-READ                   #事务隔离级别,默认REPEATABLE-READ

innodb_data_home_dir=/usr/local/mysql/data              #表空间文件路径,默认保存在MySQL的datadir中
innodb_data_file_path=ibdata1:128M:autoextend           #表空间文件大小
innodb_file_per_table=ON                                #每表独立表空间

innodb_log_group_home_dir=/usr/local/mysql/data         #redoLog文件目录,默认保存在MySQL的datadir中
innodb_log_files_in_group=2                             #日志组中的日志文件数,默认为2
innodb_log_file_size=128M                               #日志文件大小,默认为48MB
innodb_log_buffer_size=32M                              #日志缓冲区大小,默认为16MB

## MyISAM配置选项
key_buffer_size=32M                                     #索引缓冲区大小,默认8M
read_buffer_size=4M										#顺序读缓区冲大小,默认128K
read_rnd_buffer_size=4M									#随机读缓冲区大小,默认256K
bulk_insert_buffer_size=8M                              #块插入缓冲区大小,默认8M
myisam_sort_buffer_size=8M								#MyISAM排序缓冲大小,默认8M
#myisam_max_sort_file_size=1G                           #MyISAM排序最大临时大小
myisam_repair_threads=1                                 #MyISAM修复线程
skip-external-locking                                   #跳过外部锁定,启用文件锁会影响性能

## 日志配置选项
log_output=FILE                                         #日志输出目标,TABLE(输出到表)、FILE(输出到文件)、NONE(不输出),可选择一个或多个以逗>号分隔
log_error=/usr/local/mysql/logs/error.log               #错误日志存放路径
log_error_verbosity=1                                   #错误日志过滤,允许的值为1(仅错误),2(错误和警告),3(错误、警告和注释),默认值为3。
log_timestamps=SYSTEM                                   #错误日志消息格式,日志中显示时间戳的时区,UTC(默认值)和 SYSTEM(本地系统时区)
general_log=ON                                          #开启查询日志,一般选择不开启,因为查询日志记录很详细,会增大磁盘IO开销,影响性能
general_log_file=/usr/local/mysql/logs/general.log      #通用查询日志存放路径

## 慢查询日志配置选项
slow_query_log=ON                                       #开启慢查询日志
slow_query_log_file=/usr/local/mysql/logs/slowq.log		#慢查询日志存放路径
long_query_time=2                                       #慢查询时间,默认10(单位:秒)
min_examined_row_limit=100                              #最小检查行限制,检索的行数必须达到此值才可被记为慢查询
log_slow_admin_statements=ON                            #记录慢查询管理语句
log_queries_not_using_indexes=ON                        #记录查询未使用索引语句
log_throttle_queries_not_using_indexes=5                #记录未使用索引速率限制,默认为0不限制
log_slow_slave_statements=ON                            #记录从库复制的慢查询,作为从库时生效,从库复制中如果有慢查询也将被记录

## 复制配置选项
server-id=1                                             #MySQL服务唯一标识
log-bin=mysql-bin                                       #开启二进制日志,默认位置是datadir数据目录
log-bin-index=mysql-bin.index                           #binlog索引文件
binlog_format=MIXED                                     #binlog日志格式,分三种:STATEMENT、ROW或MIXED,MySQL 5.7.7之前默认为STATEMENT,之后默认为ROW
binlog_cache_size=1M                                    #binlog缓存大小,默认32KB
max_binlog_cache_size=1G                                #binlog最大缓存大小,推荐最大值为4GB
max_binlog_size=256M                                    #binlog最大文件大小,最小值为4096字节,最大值和默认值为1GB
expire_logs_days=7                                      #binlog过期天数,默认为0不自动删除
log_slave_updates=ON                                    #binlog级联复制
sync_binlog=1                                           #binlog同步频率,0为禁用同步(最佳性能,但可能丢失事务),为1开启同步(影响性能,但最安全不会丢失任何事务),为N操作N次事务后同步1次

relay_log=relay-bin                                     #relaylog文件路径,默认位置是datadir数据目录
relay_log_index=relay-log.index                         #relaylog索引文件
max_relay_log_size=256M                                 #relaylog最大文件大小
relay_log_purge=ON                                      #中继日志自动清除,默认值为1(ON)
relay_log_recovery=ON                                   #中继日志自动恢复

auto_increment_offset=1                                 #自增值偏移量
auto_increment_increment=1                              #自增值自增量
slave_net_timeout=60                                    #从机连接超时时间
replicate-wild-ignore-table=mysql.%                     #复制时忽略的数据库表,告诉从线程不要复制到与给定通配符模式匹配的表
skip-slave-start                                        #跳过Slave启动,Slave复制进程不随MySQL启动而启动

## 其他配置选项
#memlock=ON                                             #开启内存锁,此选项生效需系统支持mlockall()调用,将mysqld进程锁定在内存中,防止遇到操作系统导致mysqld交换到磁盘的问题

[mysqldump]                                             #mysqldump数据库备份工具
quick                                                   #强制mysqldump从服务器查询取得记录直接输出,而不是取得所有记录后将它们缓存到内存中
max_allowed_packet=16M                                  #最大传输数据字节,使用mysqldump工具备份数据库时,某表过大会导致备份失败,需要增大该值(大>于表大小即可)

[myisamchk]                                             #使用myisamchk实用程序可以用来获得有关你的数据库表的统计信息或检查、修复、优化他们
key_buffer_size=32M                                     #索引缓冲区大小
myisam_sort_buffer_size=8M                              #排序缓冲区大小
read_buffer_size=4M                                     #读取缓区冲大小
write_buffer_size=4M                                    #写入缓冲区大小
8.5.3、初始化数据库
[root@localhost ~]# /usr/local/mysql/bin/mysqld --defaults-file=/usr/local/mysql/etc/my.cnf --initialize --user=mysql
8.6、配置环境变量&启动服务
# /etc/profile 在文件末尾加入下面代码
[root@localhost mysql-5.7.37]# vim /etc/profile
--------------------------------------
--------------------------------------
 76
 77 export MYSQL_HOME=/usr/local/mysql
 78 export PATH=$MYSQL_HOME/bin:$PATH


# 使环境变量即时生效
[root@localhost mysql-5.7.37]# source /etc/profile
[root@localhost mysql-5.7.37]#

# 复制配置文件到系统服务配置
[root@localhost mysql-5.7.37]# cp /usr/local/mysql/support-files/mysql.server /etc/init.d/mysqld
[root@localhost mysql-5.7.37]#

# 重新加载系统服务配置
[root@localhost mysql-5.7.37]# systemctl daemon-reload

# 启动MySQL服务
[root@localhost mysql-5.7.37]# systemctl start mysqld
# 查看MySQL服务状态
[root@localhost mysql-5.7.37]# systemctl status mysqld.service
● mysqld.service - LSB: start and stop MySQL
   Loaded: loaded (/etc/rc.d/init.d/mysqld; bad; vendor preset: disabled)
   Active: active (running) since 日 2023-04-23 17:32:34 CST; 9s ago
     Docs: man:systemd-sysv-generator(8)
  Process: 78660 ExecStart=/etc/rc.d/init.d/mysqld start (code=exited, status=0/SUCCESS)
   CGroup: /system.slice/mysqld.service
           ├─78673 /bin/sh /usr/local/mysql/bin/mysqld_safe --datadir=/usr/local/mysql/data --pid-file=/usr/local/mysql/tmp/mysql.p...
           └─79851 /usr/local/mysql/bin/mysqld --basedir=/usr/local/mysql --datadir=/usr/local/mysql/data --plugin-dir=/usr/local/m...

4月 23 17:32:32 localhost.localdomain systemd[1]: Starting LSB: start and stop MySQL...
4月 23 17:32:34 localhost.localdomain mysqld[78660]: Starting MySQL.. SUCCESS!
4月 23 17:32:34 localhost.localdomain systemd[1]: Started LSB: start and stop MySQL.

# 设置MySQL开机自启
[root@localhost mysql-5.7.37]# chkconfig mysqld on

# 查看开机自启是否成功
[root@localhost mysql-5.7.37]# systemctl is-enabled mysqld.service
mysqld.service is not a native service, redirecting to /sbin/chkconfig.
Executing /sbin/chkconfig mysqld --level=5
enabled
[root@localhost mysql-5.7.37]# systemctl status mysqld.service
● mysqld.service - LSB: start and stop MySQL
   Loaded: loaded (/etc/rc.d/init.d/mysqld; bad; vendor preset: disabled)
   Active: active (running) since 日 2023-04-23 17:32:34 CST; 3min 0s ago
     Docs: man:systemd-sysv-generator(8)
   CGroup: /system.slice/mysqld.service
           ├─78673 /bin/sh /usr/local/mysql/bin/mysqld_safe --datadir=/usr/local/mysql/data --pid-file=/usr/local/mysql/tmp/mysql.p...
           └─79851 /usr/local/mysql/bin/mysqld --basedir=/usr/local/mysql --datadir=/usr/local/mysql/data --plugin-dir=/usr/local/m...

4月 23 17:32:32 localhost.localdomain systemd[1]: Starting LSB: start and stop MySQL...
4月 23 17:32:34 localhost.localdomain mysqld[78660]: Starting MySQL.. SUCCESS!
4月 23 17:32:34 localhost.localdomain systemd[1]: Started LSB: start and stop MySQL.
[root@localhost mysql-5.7.37]#
8.7 登录MySQL并修改初始密码
# 查看MySQL初始密码
[root@localhost mysql-5.7.37]# cat /usr/local/mysql/logs/error.log | grep root
2023-04-23T17:23:31.352778+08:00 1 [Note] A temporary password is generated for root@localhost: qQ#QPrij(4!4

# 登录MySQL并修改初始密码
[root@localhost mysql-5.7.37]# mysql -u root -p
Enter password:
Welcome to the MySQL monitor.  Commands end with ; or \g.
Your MySQL connection id is 2
Server version: 5.7.37-log

Copyright (c) 2000, 2022, Oracle and/or its affiliates.

Oracle is a registered trademark of Oracle Corporation and/or its
affiliates. Other names may be trademarks of their respective
owners.

Type 'help;' or '\h' for help. Type '\c' to clear the current input statement.

# 修改密码
mysql> set password = password('123');
Query OK, 0 rows affected, 1 warning (0.00 sec)

mysql> exit;
Bye
[root@localhost mysql-5.7.37]#
9、MySQL常用命令
9.1、LOAD DATA INFILE
- 参考文档:https://blog.csdn.net/longzhoufeng/article/details/112377942
- 官方的说明: https://dev.mysql.com/doc/refman/5.7/en/load-data.html
- 使用csv文档时使用 CSV UTF-8 (逗号分隔) (*.csv) 格式,否则在生成csv文件时会自动使用双引号将字段内容包裹,影响后续操作,需要注意。
- 想要使用LOAD DATA INFILE命令需要确认已经打开source功能
LOAD DATA INFILE '/usr/local/mysql/mysql_data_files/工单查询结果_原始数据.csv' INTO TABLE `工单查询结果_原始数据`
FIELDS TERMINATED BY ','
LINES TERMINATED BY '\n'
IGNORE 1 LINES
(  `工单ID` ,  `创建人` ,  `地市` ,  `厂家` ,  `创建时间` ,  `工单编号` ,  `当前环节` ,  `当前状态` ,  `处理时限` ,  `超时状态` ,  `超时环节` ,  `流程分类` ,  `计费类型` ,  `工单分类` ,
  `网络制式` ,  `工单问题` ,  `ECI` ,  `小区中文名` ,  `工单名称` ,  `操作时间` ,  `主工单编号` ,  `是否追加问题` ,  `派单工作量` ,  `确认工作量` ,  `处理方案分类` ,  `EMOS工单号` ,
  `投诉类型` ,  `投诉系统关联工单号` ,  `派单问题`);


 1080
1080


 被折叠的 条评论
为什么被折叠?
被折叠的 条评论
为什么被折叠?
 到【灌水乐园】发言


