


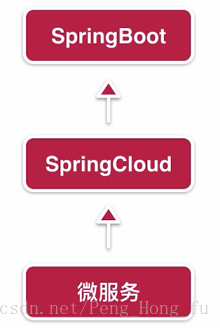
SpringBoot

SpringBoot 是 SpringMVC 的升级版,相对于编码、配置、部署和监控方面,会更加简单
微服务
微服务是一个新兴的软件架构,就是把一个大型的单个应用程序和服务拆分为数十个的支持微服务。一个微服务的策略可以让工作变得更为简便,它可扩展单个组件而不是整个的应用程序堆栈,从而满足服务等级协议。
Spring 为 微服务提供了一整套的组件-SpringClound , SpirngBoot 就是该基础。
第一个SpringBoot程序
这里使用的开发软件是IntelliJ Idea,和Eclipse差不太多,界面更炫酷,功能更强大;Android Studio就是基于IntelliJ 开发的,我之前使用过Android Studio,它俩界面几乎一样。
IntelliJ Idea官网:http://www.jetbrains.com/idea/
配置好 maven, tomcat, jdk 就可以使用了
maven配置的中央仓库阿里云镜像
这个地址下载 jar 包的速度,谁用谁知道!
setting.xml
-
.
-
.
-
<mirrors>
-
<mirror>
-
<id>alimaven
</id>
-
<name>aliyun maven
</name>
-
<url>http://maven.aliyun.com/nexus/content/groups/public/
</url>
-
<mirrorOf>central
</mirrorOf>
-
</mirror>
-
</mirrors>
-
.
-
.
- 1
- 2
- 3
- 4
- 5
- 6
- 7
- 8
- 9
- 10
- 11
- 12
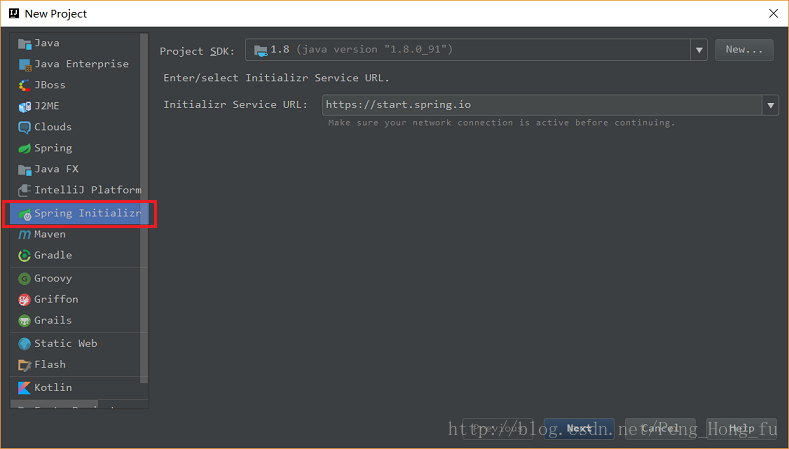
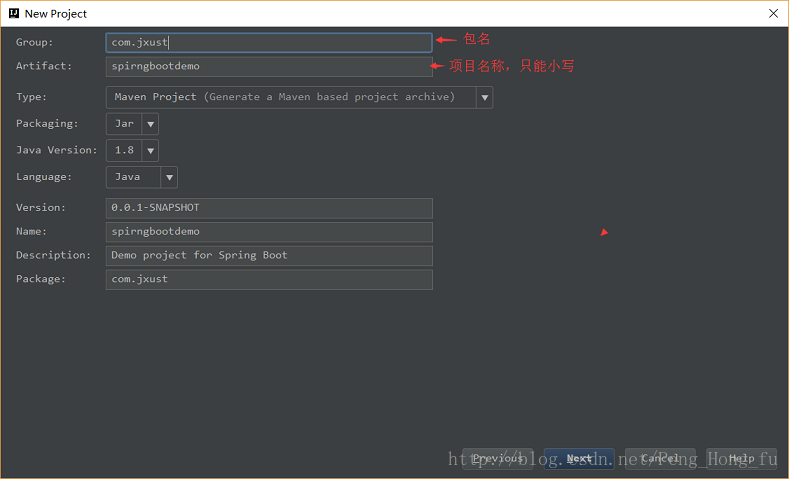
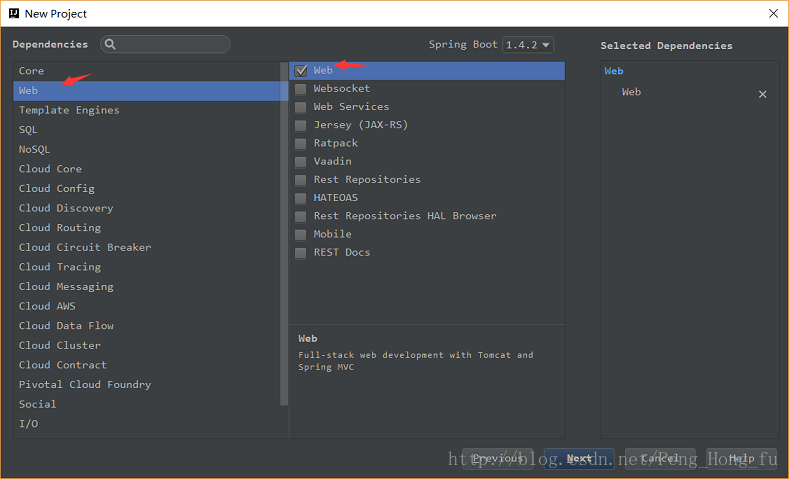
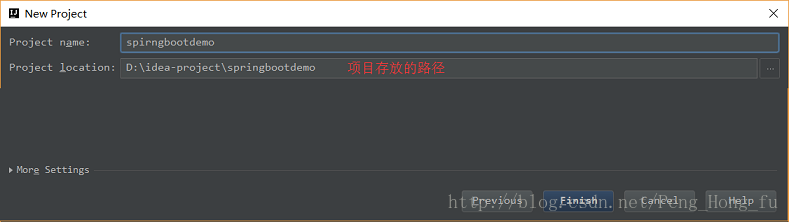
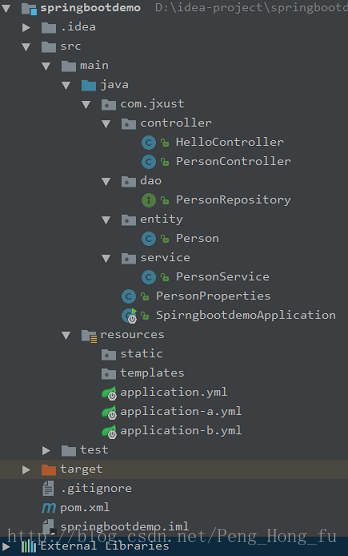
使用IDEA创建SpringBoot项目
我的
IDEA版本:IntelliJ IDEA 2016.3.1
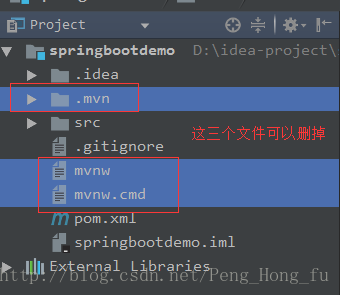
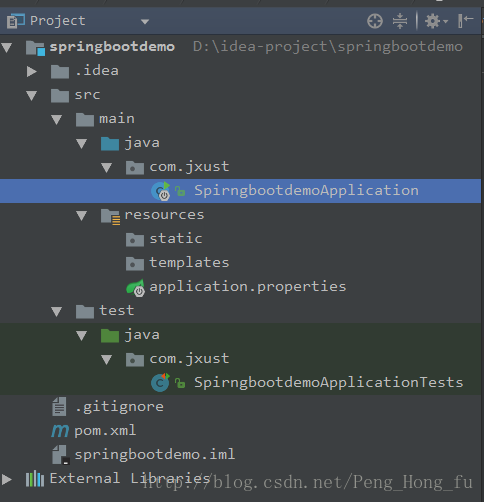
项目结构为:
项目默认的 maven
pom.xml文件
pom.xml
-
<?xml version="1.0" encoding="UTF-8"?>
-
<project xmlns="http://maven.apache.org/POM/4.0.0" xmlns:xsi="http://www.w3.org/2001/XMLSchema-instance"
-
xsi:schemaLocation
=
"http://maven.apache.org/POM/4.0.0 http://maven.apache.org/xsd/maven-4.0.0.xsd"
>
-
<modelVersion>4.0.0
</modelVersion>
-
-
<groupId>com.jxust
</groupId>
-
<artifactId>spirngbootdemo
</artifactId>
-
<version>0.0.1-SNAPSHOT
</version>
-
<packaging>jar
</packaging>
-
-
<name>spirngbootdemo
</name>
-
<description>Demo project for Spring Boot
</description>
-
-
<parent>
-
<groupId>org.springframework.boot
</groupId>
-
<artifactId>spring-boot-starter-parent
</artifactId>
-
<version>1.4.2.RELEASE
</version>
-
<relativePath/>
<!-- lookup parent from repository -->
-
</parent>
-
-
<properties>
-
<project.build.sourceEncoding>UTF-8
</project.build.sourceEncoding>
-
<project.reporting.outputEncoding>UTF-8
</project.reporting.outputEncoding>
-
<java.version>1.8
</java.version>
-
</properties>
-
-
<dependencies>
-
<dependency>
-
<groupId>org.springframework.boot
</groupId>
-
<artifactId>spring-boot-starter-web
</artifactId>
-
</dependency>
-
-
<dependency>
-
<groupId>org.springframework.boot
</groupId>
-
<artifactId>spring-boot-starter-test
</artifactId>
-
<scope>test
</scope>
-
</dependency>
-
</dependencies>
-
-
<build>
-
<plugins>
-
<plugin>
-
<groupId>org.springframework.boot
</groupId>
-
<artifactId>spring-boot-maven-plugin
</artifactId>
-
</plugin>
-
</plugins>
-
</build>
-
</project>
- 1
- 2
- 3
- 4
- 5
- 6
- 7
- 8
- 9
- 10
- 11
- 12
- 13
- 14
- 15
- 16
- 17
- 18
- 19
- 20
- 21
- 22
- 23
- 24
- 25
- 26
- 27
- 28
- 29
- 30
- 31
- 32
- 33
- 34
- 35
- 36
- 37
- 38
- 39
- 40
- 41
- 42
- 43
- 44
- 45
- 46
- 47
- 48
运行SpirngbootdemoApplication的main方法,就能开始运行。
其他启动方式,请看视频教程http://www.imooc.com/learn/767\
控制台输出:
-
"C:
\Program
Files
\Java
\jdk
1.8.0_91
\bin
\java
" ....
-
-
. ___
_
_ _
_
_
_
-
/
\\ / __
_
'_ __ _ _(_)_ __ __ _
\
\
\
\
-
( ( )
\_
__ | '
_
| '_|
| '_
\/
_` |
\
\
\
\
-
\\/ __
_)
| |
_)
| |
| |
| |
| (_|
| ) ) ) )
-
' |___
_
| .__|
_
| |
_
|_|
|_
\_
_, | /
/ / /
-
=========
|_|==============
|___/=/_/_/_/
-
:: Spring Boot :: (v1.4.2.RELEASE)
-
2016-12-16 14:56:52.083 INFO 15872 ---
[
main
]
o.s.j.e.a.AnnotationMBeanExporter : Registering beans for JMX exposure on startup
-
2016-12-16 14:56:52.215 INFO 15872 ---
[
main
]
s.b.c.e.t.TomcatEmbeddedServletContainer : Tomcat started on port(s): 8080 (http)
-
2016-12-16 14:56:52.255 INFO 15872 ---
[
main
]
com.jxust.SpirngbootdemoApplication : Started SpirngbootdemoApplication in 7.795 seconds (JVM running for 9.177)
- 1
- 2
- 3
- 4
- 5
- 6
- 7
- 8
- 9
- 10
- 11
- 12
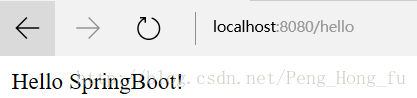
从这里可以看到 Tomcat 的端口号,因为还没有自定义Controller,所以还没有视图,下面来创建一个输出
Hello SpringBoot!的视图。
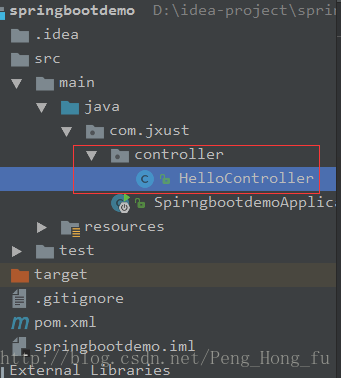
创建一个HelloController,位于controller包下
HelloController.java
-
package com.jxust.controller;
-
-
import org.springframework.web.bind.annotation.GetMapping;
-
import org.springframework.web.bind.annotation.RestController;
-
-
/**
-
* Created by Peng
-
* Time: 2016/12/16 15:45
-
*/
-
@RestController
-
public
class HelloController {
-
-
@RequestMapping(
"/hello")
-
public
String
say
(){
-
return
"Hello SpringBoot!";
-
}
-
}
- 1
- 2
- 3
- 4
- 5
- 6
- 7
- 8
- 9
- 10
- 11
- 12
- 13
- 14
- 15
- 16
- 17
@RestControllerSpring4 之后新加的注解,原来返回json需要@ResponseBody配合@Controller,现在一个顶俩
在浏览器中输入http://localhost:8080/hello就能输出Hello SpringBoot!这句话。
自定义属性配置
用到的是application.properties这个文件
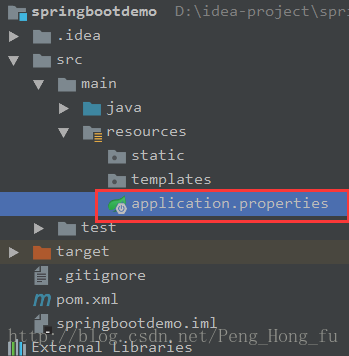
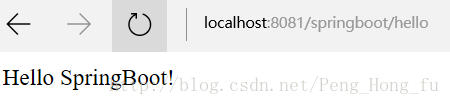
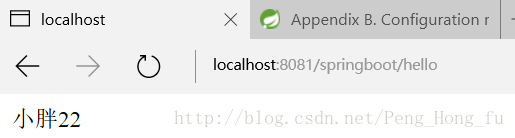
配置端口号和访问前缀
application.properties
-
server.port=
8081
-
server.context-path=/springboot
- 1
- 2
除了使用.properties格式的文件,还可以使用.yml格式的配置文件(推荐),更加简便
application.yml

把原来的
application.properties文件删除
注意格式,空格不能少
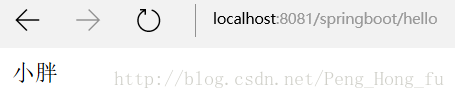
获取配置文件中的属性值
我们也可以在配置文件中,配置数据,在 Controller 中获取,比如:
application.yml
- 1
- 2
- 3
- 4
HelloController 获取配置文件中的值
HelloController.java
-
....
-
@RestController
-
public
class HelloController {
-
-
@Value(
"${name}")
-
private String name;
-
-
@RequestMapping(value =
"/hello",method = RequestMethod.GET)
-
public
String
say
(){
-
return name;
-
}
-
}
- 1
- 2
- 3
- 4
- 5
- 6
- 7
- 8
- 9
- 10
- 11
- 12
返回的为name的值
配置文件中值配置方式的多样化
配置文件的值可以是多个,也可以是组合,如:
application.yml
-
name:
小胖
-
age:
22
- 1
- 2
或者
application.yml
-
name:
小胖
-
age:
22
-
content:
"name: ${name},age: ${age}"
- 1
- 2
- 3
或者
application.yml
-
server:
-
port:
8081
-
context-path: /springboot
-
person:
-
name: 小胖
-
age:
22
- 1
- 2
- 3
- 4
- 5
- 6
前两种配置获取值的方式都是一样的,但是对于这种方式,person 有相应的两个属性,需要这样处理
PersonProperties.java
-
package com.jxust;
-
-
import org.springframework.boot.context.properties.ConfigurationProperties;
-
import org.springframework.stereotype.Component;
-
-
/**
-
* Created by Peng
-
* Time: 2016/12/16 16:34
-
*/
-
@Component
-
@ConfigurationProperties(prefix =
"person")
-
public
class PersonProperties {
-
private String name;
-
private Integer age;
-
-
public
String
getName
() {
-
return name;
-
}
-
-
public
void
setName
(String name) {
-
this.name = name;
-
}
-
-
public
Integer
getAge
() {
-
return age;
-
}
-
-
public
void
setAge
(Integer age) {
-
this.age = age;
-
}
-
}
- 1
- 2
- 3
- 4
- 5
- 6
- 7
- 8
- 9
- 10
- 11
- 12
- 13
- 14
- 15
- 16
- 17
- 18
- 19
- 20
- 21
- 22
- 23
- 24
- 25
- 26
- 27
- 28
- 29
- 30
- 31
Alt+insert快捷键提示生成Getter and Setter
pom.xml需要加入下面的依赖,处理警告
-
<dependency>
-
<groupId>org.springframework.boot
</groupId>
-
<artifactId>spring-boot-configuration-processor
</artifactId>
-
<optional>true
</optional>
-
</dependency>
- 1
- 2
- 3
- 4
- 5
HelloController.java
-
package com.jxust.controller;
-
-
import com.jxust.PersonProperties;
-
import org.springframework.beans.factory.annotation.Autowired;
-
import org.springframework.web.bind.annotation.RequestMapping;
-
import org.springframework.web.bind.annotation.RequestMethod;
-
import org.springframework.web.bind.annotation.RestController;
-
-
/**
-
* Created by Peng
-
* Time: 2016/12/15 20:55
-
*/
-
@RestController
-
public
class HelloController {
-
-
@Autowired
-
private PersonProperties personProperties;
-
-
@RequestMapping(value =
"/hello",method = RequestMethod.GET)
-
public
String
say
(){
-
return personProperties.getName()+personProperties.getAge();
-
}
-
}
- 1
- 2
- 3
- 4
- 5
- 6
- 7
- 8
- 9
- 10
- 11
- 12
- 13
- 14
- 15
- 16
- 17
- 18
- 19
- 20
- 21
- 22
- 23
关于配置文件application.yml的多套配置
类似 il8n 文件国际化的配置方式
i18n_en_US.properties和i18n_zh_CN.properties
这样能解决,需要频繁修改配置的尴尬
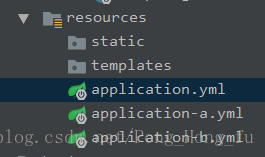
由application.yml配置文件决定使用那套配置文件。
application.yml
-
spring:
-
profiles:
-
active:
a
- 1
- 2
- 3
application-a.yml
-
server:
-
port:
8081
-
context-path: /springboot
-
person:
-
name: 小雷
-
age:
21
- 1
- 2
- 3
- 4
- 5
- 6
- 7
application-b.yml
-
server:
-
port:
8081
-
context-path: /springboot
-
person:
-
name: 小胖
-
age:
22
- 1
- 2
- 3
- 4
- 5
- 6
SpringBoot增删改查实例
完整的项目结构
Controller的使用
-
@Controller chu处理http请求
-
-
@RestController
Spring4 之后新加的注解,原来返回json需要
@ResponseBody配合
@Controller
-
-
@RequestMapping 配置url映射
- 1
- 2
- 3
- 4
- 5
对于 REST 风格的请求

对于 Controller 中的方法上的注解
-
@RequestMapping(value =
"/hello",method = RequestMethod.GET)
-
@RequestMapping(value =
"/hello",method = RequestMethod.POST)
-
@RequestMapping(value =
"/hello",method = RequestMethod.DELETE)
-
@RequestMapping(value =
"/hello",method = RequestMethod.PUT)
- 1
- 2
- 3
- 4
SpringBoot 对上面的注解进行了简化
-
@GetMapping(value =
"/girls")
-
@PostMapping(value =
"/girls")
-
@PutMapping(value =
"/girls/{id}")
-
@DeleteMapping(value =
"/girls/{id}")
- 1
- 2
- 3
- 4
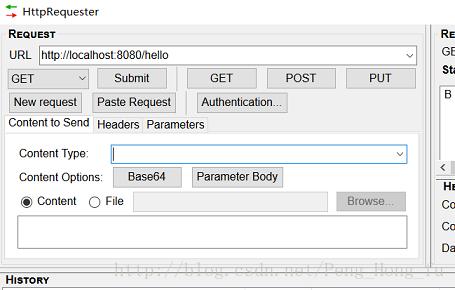
浏览器需要发送不同方式的请求,可以安装HttpRequester插件,火狐浏览器可以直接搜索该组件安装。

spring-data-jpa
JPA全称Java Persistence API.JPA通过JDK 5.0注解或XML描述对象-关系表的映射关系,并将运行期的实体对象持久化到数据库中。
Hibernate3.2+、TopLink 10.1.3以及OpenJPA都提供了JPA的实现。
利用JPA创建MySQL数据库
pom.xml加入JPA和MySQL的依赖
-
<dependency>
-
<groupId>org.springframework.boot
</groupId>
-
<artifactId>spring-boot-starter-data-jpa
</artifactId>
-
</dependency>
-
-
<dependency>
-
<groupId>mysql
</groupId>
-
<artifactId>mysql-connector-java
</artifactId>
-
</dependency>
- 1
- 2
- 3
- 4
- 5
- 6
- 7
- 8
- 9
配置JPA和数据库
application.yml
-
spring:
-
profiles:
-
active: a
-
datasource:
-
driver
-class
-name
: com
.
mysql
.
jdbc
.
Driver
-
url: jdbc:mysql:
//127.0.0.1:3306/db_person
-
username: root
-
password: root
-
-
jpa:
-
hibernate:
-
ddl
-auto: update
-
show
-sql:
true
- 1
- 2
- 3
- 4
- 5
- 6
- 7
- 8
- 9
- 10
- 11
- 12
- 13
格式很重要
需要自己手动去创建 db_person 数据库
创建与数据表对应的实体类Person
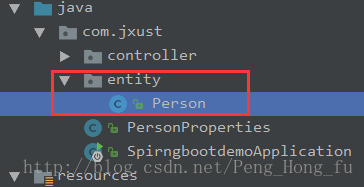
Person.java
-
package com.jxust.entity;
-
-
import javax.persistence.Entity;
-
import javax.persistence.GeneratedValue;
-
import javax.persistence.Id;
-
-
/**
-
* Created by Peng
-
* Time: 2016/12/16 17:56
-
*/
-
@Entity
-
public
class Person {
-
@Id
-
@GeneratedValue
-
private Integer id;
-
private String name;
-
private Integer age;
-
-
//必须要有构造函数
-
public
Person
() {
-
}
-
-
public
Integer
getId
() {
-
return id;
-
}
-
-
public
void
setId
(Integer id) {
-
this.id = id;
-
}
-
-
public
String
getName
() {
-
return name;
-
}
-
-
public
void
setName
(String name) {
-
this.name = name;
-
}
-
-
public
Integer
getAge
() {
-
return age;
-
}
-
-
public
void
setAge
(Integer age) {
-
this.age = age;
-
}
-
}
- 1
- 2
- 3
- 4
- 5
- 6
- 7
- 8
- 9
- 10
- 11
- 12
- 13
- 14
- 15
- 16
- 17
- 18
- 19
- 20
- 21
- 22
- 23
- 24
- 25
- 26
- 27
- 28
- 29
- 30
- 31
- 32
- 33
- 34
- 35
- 36
- 37
- 38
- 39
- 40
- 41
- 42
- 43
- 44
- 45
- 46
- 47
运行项目后,查看数据库,会自动创建表 person
-
mysql>
use db_person;
-
Database changed
-
mysql> desc person;
-
+
-------+--------------+------+-----+---------+----------------+
-
| Field | Type | Null | Key | Default | Extra |
-
+
-------+--------------+------+-----+---------+----------------+
-
| id | int(11) | NO | PRI | NULL | auto_increment |
-
| age | int(11) | YES | | NULL | |
-
| name | varchar(255) | YES | | NULL | |
-
+
-------+--------------+------+-----+---------+----------------+
-
3 rows in
set (0.09 sec)
- 1
- 2
- 3
- 4
- 5
- 6
- 7
- 8
- 9
- 10
- 11
接下来就可以进行person表的增删改查了
创建控制器PersonController.java
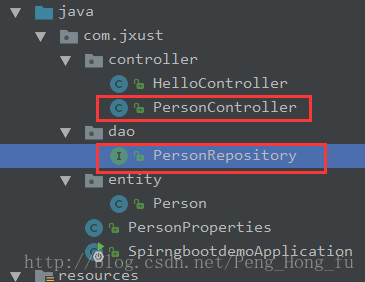
首先创建一个接口PersonRepository,位于dao包下,PersonController调用该接口继承自JpaRepository的方法,来实现和数据库交互
这个
PersonRepository接口的功能,与SSM框架中 dao 层接口功能有异曲同工之妙;在SSM框架中,Service层通过该接口,间接执行Mybatis数据库映射文件(.xml)里的相应sql语句,执行数据库增删改查的操作。(Mapper自动实现DAO接口)
PersonRepository.java
-
package com.jxust.dao;
-
-
import com.jxust.entity.Person;
-
import org.springframework.data.jpa.repository.JpaRepository;
-
-
/**
-
* Created by Peng
-
* Time: 2016/12/16 18:07
-
*/
-
public
interface PersonRepository extends JpaRepository<Person,Integer> {
-
}
- 1
- 2
- 3
- 4
- 5
- 6
- 7
- 8
- 9
- 10
- 11
PersonController.java
-
package
com
.jxust
.controller
;
-
-
import
com
.jxust
.dao
.PersonRepository
;
-
import
com
.jxust
.entity
.Person
;
-
import
org
.springframework
.beans
.factory
.annotation
.Autowired
;
-
import
org
.springframework
.web
.bind
.annotation
.GetMapping
;
-
import
org
.springframework
.web
.bind
.annotation
.RestController
;
-
-
import
java
.util
.List
;
-
-
/**
-
* Created by Peng
-
* Time: 2016/12/16 18:04
-
*/
-
@
RestController
-
public class PersonController {
-
@
Autowired
-
PersonRepository personRepository
;
-
@
GetMapping(
value =
"/person")
-
private List<Person> personList() {
-
return
personRepository
.findAll()
;
-
}
-
}
- 1
- 2
- 3
- 4
- 5
- 6
- 7
- 8
- 9
- 10
- 11
- 12
- 13
- 14
- 15
- 16
- 17
- 18
- 19
- 20
- 21
- 22
- 23
- 24
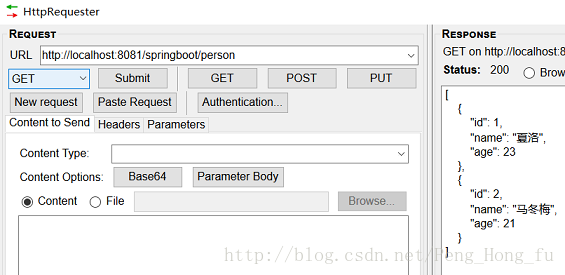
在数据库中添加两条数据
-
mysql> select * from person;
-
+----+------+--------+
-
| id | age | name |
-
+----+------+--------+
-
| 1 |
23
| 夏洛 |
-
| 2 | 21 | 马冬梅 |
-
+----+------+--------+
-
2 rows
in set (
0.
04 sec)
- 1
- 2
- 3
- 4
- 5
- 6
- 7
- 8
启动项目执行请求http://localhost:8081/springboot/person
控制台输出的sql语句:
Hibernate: select person0_.id as id1_0_, person0_.age as age2_0_, person0_.name as name3_0_ from person person0_
- 1
其他增删改查的方法
PersonController.java
-
....
-
/**
-
* 添加一个人员
-
*
-
*
@param
name
-
*
@param
age
-
*
@return
-
*/
-
@PostMapping(value =
"/person")
-
public
Person
personAdd
(@
RequestParam
("name") String name,
-
@
RequestParam
("age") Integer age) {
-
Person person =
new Person();
-
person.setName(name);
-
person.setAge(age);
-
-
return personRepository.save(person);
-
}
-
-
/**
-
* 查询一个人员
-
*
-
*
@param
id
-
*
@return
-
*/
-
@GetMapping(value =
"/person/{id}")
-
public
Person
personFindOne
(@
PathVariable
("id") Integer id) {
-
return personRepository.findOne(id);
-
}
-
-
/**
-
* 删除一个人员
-
*
-
*
@param
id
-
*/
-
@DeleteMapping(value =
"/person/{id}")
-
public
void
personDelete
(@
PathVariable
("id") Integer id) {
-
personRepository.delete(id);
-
}
-
-
/**
-
* 更新一个人员
-
*
-
*
@param
id
-
*
@param
name
-
*
@param
age
-
*
@return
-
*/
-


 295
295


 被折叠的 条评论
为什么被折叠?
被折叠的 条评论
为什么被折叠?
 到【灌水乐园】发言


