


注意:本配置的前提是项目必须是MAVEN项目。
项目开发过程中,如果一个项目经常发布,那么在打包之前会不断的修改配置文件,这无疑是很麻烦的一件事情。今天我介绍下这个问题怎么解决(当然,如果使用的是springboot那么没必要看这篇文章)。
使用maven filter (指定使用配置文件)+ filtering (使用变量${})
目录结构:
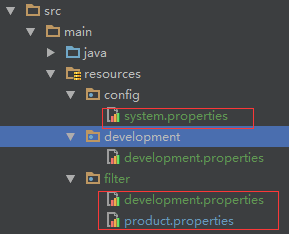
第一步、创建配置文件
在项目的src/main/filter目录下创建 development.properties (开发配置内容) 、 production.properties (正式配置内容) 两个文件。
例如development:
driverClassName=com.mysql.jdbc.Driver
jdbc_url=jdbc\:mysql\://192.168.1.5:3306/testdev?useUnicode\=true&characterEncoding\=utf8
jdbc_username=sun
jdbc_password=123456
#redis.host=127.0.0.1
production如下:
driverClassName=com.mysql.jdbc.Driver
jdbc_url=jdbc\:mysql\://192.168.1.5:3306/testpro?useUnicode\=true&characterEncoding\=utf8
jdbc_username=sx
jdbc_password=124565
#redis.host=127.0.0.1
注意:以上文件中写入中文,会出现乱码,暂时是写入unicode
第二步:配置需要读取的配置文件 system.properties中需要变化的变量使用参数进行配置,如
driverClassName=com.mysql.jdbc.Driver
jdbc_url=${jdbc_url}
jdbc_username=${jdbc_username}
jdbc_password=${jdbc_password}
#redis.host=127.0.0.1
注意:${jdbc.url} 直接对
应上面配置的development.properties或production.properties文件中的名称。
第三步:配合MAVEN 的 pom.xml文件
<!-- maven 的 profile 可以在打包时,指定使用哪组参数 -->
<profiles>
    <profile>
        <id>dev</id>
        <properties>
            <!-- 测试环境 -->
            <!-- properties 属性,按需求命名,如 env、deploy.env 等-->
            <env>development</env>
        </properties>
        <activation>
            <activeByDefault>true</activeByDefault>
        </activation>
    </profile>
    <profile>
        <id>prod</id>
        <properties>
            <!-- 正式环境 -->
            <env>production</env>
        </properties>
    </profile>
</profiles>
<build>
    <finalName>web</finalName>
    <filters>
    	<!--  使用filter指定需要使用的properties配置文件,之后resources目录下的文件要用到的值都会从该properties中引用。
    	如果配置了多个 filter,并且两个 filter 中有相同的 key,则后面的 value 为最终取值 -->
        <filter>src/main/resources/filter/${env}.properties</filter>
    </filters>
    <resources>
        <resource>
            <directory>src/main/resources</directory>
            <excludes>
                <exclude>filter/*.properties</exclude>
            </excludes>
            <filtering>true</filtering>
        </resource>
    </resources>
</build>
profiles说明:
profile可以让我们定义一系列的配置信息,然后指定其激活条件。这样我们就可以定义多个profile,然后每个profile对应不同的激活条件和配置信息,从而达到不同环境使用不同配置信息的效果
<id>dev</id>
<properties>
    <!-- 测试环境 -->
    <env>development</env>
</properties>
properties说明
key-value,可以有多个键值对。
如:env=development
默认启用的是dev环境配置:
<activation>
    <activeByDefault>true</activeByDefault>
</activation>
配置文件路径,此路径可以自定义:
<filter>src/main/resources/filter/${env}.properties</filter>
maven中配置文件目录:
src/main/resources
第四 步:打包
打包方式一、通过 idea 插件直接选择激活 profile文件

打包方式二:参数打包
mvn -P参数名 install
根据 -P 参数决定赋值,参数为 profile 的id
打包方法三:(选择打包方式)
目录结构:
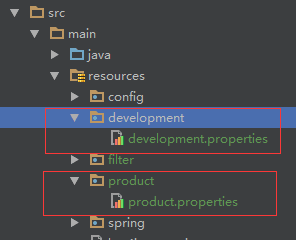
pom.xml内容:
<profiles>
    <profile>
        <id>dev</id>
        <properties>
            <!-- 测试环境 -->
            <env>development</env>
        </properties>
        <activation>
            <activeByDefault>true</activeByDefault>
        </activation>
    </profile>
    <profile>
        <id>prod</id>
        <properties>
            <!-- 正式环境 -->
            <env>production</env>
        </properties>
    </profile>
</profiles>
<build>
    <finalName>web</finalName>
    <resources>
        <resource>
            <directory>src/main/resources</directory>
            <!-- 资源根目录排除各环境的配置,使用单独的资源目录来指定 -->
            <excludes>
                <exclude>development/*</exclude>
                <exclude>production/*</exclude>
            </excludes>
        </resource>
        <resource>
            <directory>src/main/resources/${env}</directory>
        </resource>
    </resources>
</build>
war文件结构:
打本地包 mvn -Pdev install或者mvn install(因为本例activeByDefault配的为true)
打产品包 mvn -Pprod install
注意:打包时请先mvn clean一下,否则可能两类配置文件同时存在引起误解
如果要带上文件夹:
将
<resource>
            <directory>src/main/resources/${env}</directory>
 </resource>
替换为
<resource>
    <directory>src/main/resources</directory>
    <includes>
        <include>${env}/*.properties</include>
 <!--使用<include>${env}</include>则加不进去-->
    </includes>
</resource>
五、查看效果:
系统运行后查看target下对应配置文件内容,可以看到 已经不是 ${url} ,而是 www.baidu.xxx

六、其他目录使用 filtering
前面有讲到,filtering的作用域是maven的配置文件目录 src/main/resources,那如果其他目录也需要使用该功能呐?以下举例 src/main/webapp 目录。
则需要使用到 maven-war-plugin 这个插件
<!-- <build>目录下的 <plugins> 目录下添加以下配置 -->
<plugin>
    <groupId>org.apache.maven.plugins</groupId>
    <artifactId>maven-war-plugin</artifactId>
    <version>2.3</version>
    <configuration>
    <resourceEncoding>GB2312</resourceEncoding>
       <webResources>
           <resource>
              <filtering>true</filtering>
              <directory>src/main/webapp</directory>
              <includes>
                <include>**/*.xml</include>
              </includes>
           </resource>
       </webResources>
    </configuration>
</plugin>


 780
780


 被折叠的 条评论
为什么被折叠?
被折叠的 条评论
为什么被折叠?
 到【灌水乐园】发言


