


前言:由于公司前几天短信接口被一直攻击,并且攻击者不停变换IP,导致阿里云短信平台上的短信被恶意刷取了几千条,然后在Nginx上对短信接口做了一些限制
临时解决方案:
1、查看Nginx日志发现被攻击的IP 和接口
[root@app_lb1 ~]# tail -f /var/log/nginx/access.log
发现攻击者一直在用POST请求 /fhtowers/user/getVerificationCode这个接口

2、用awk和grep脚本过滤nginx日志,提取攻击短信接口的ip(一般这个接口是用来发注册验证码的,一分钟如果大于10次请求的话就不是正常的访问请求了,大家根据自己的实际情况更改脚本)并放到一个txt文件中去,然后重启nginx
[root@app_lb1 ~]# cat denyip.sh
#!/bin/bash
nginx_home=/usr/local/openresty/nginx
log_path=/var/log/nginx/access.log
tail -n5000 $log_path | grep  getVerification | awk '{print $1}' |sort | uniq -c | sort -nr -k1 | head -n 100 |awk '{if($1>10)print ""$2""}' >$nginx_home/denyip/blocksip.txt
/usr/bin/nginx -s reload
3、设置Nginx去读取用脚本过滤出来的blocksip.txt(注意一下,我这里的Nginx是用的openresty,自带识别lua语法的,下面会有讲openresty的用法)
    location =  /fhtowers/user/getVerificationCode {  #短信接口
    access_by_lua '
       local f = io.open("/usr/local/openresty/nginx/denyip/blocksip.txt")   #黑名单列表
       for line in f:lines() do
              if ngx.var.http_x_forwarded_for == line then   #如果ip在黑名单列表里直接返回403
                     ngx.exit(ngx.HTTP_FORBIDDEN)
              end
      end
     ';
     proxy_pass http://appservers;   #不在名单里就转发给后台的tomcat服务器
   }
4、把过滤脚本放进crontab任务里,一分钟执行一次
[root@app_lb1 ~]# crontab -e
*/1 * * * * sh /root/denyip.sh
5、查看一下效果
发现攻击者的请求都被返回403并拒绝了

这个算是个临时方案,不过也给我预警了一下,如果以后还有这种攻击,希望能够提前做好准备
在网上找了找资料,发现用的比较多的是Nginx+Lua脚本+Redis来自动封禁访问频率过高的IP
架构图:比较随意…随便看看吧

实现方法
环境介绍:
Centos 7.5.1804
openresty/1.13.6.1
redis-3.2.5
一、安装使用 OpenResty,这是一个集成了各种 Lua 模块的 Nginx 服务器,是一个以Nginx为核心同时包含很多第三方模块的Web应用服务器,使用Nginx的同时又能使用lua等模块实现复杂的控制
1、安装编译工具、依赖库
[root@test1 ~]# yum -y install readline-devel pcre-devel openssl-devel gcc
2、下载openresty-1.13.6.1.tar.gz 源码包,并解压;下载ngx_cache_purge模块,该模块用于清理nginx缓存;下载nginx_upstream_check_module模块,该模块用于ustream健康检查
[root@test1 ~]# cd /usr/local/
[root@test1 local]# wget https://openresty.org/download/openresty-1.13.6.1.tar.gz
[root@test1 local]# tar -zxvf openresty-1.13.6.1.tar.gz
[root@test1 local]# cd openresty-1.13.6.1/bundle
[root@test1 local]# wget http://labs.frickle.com/files/ngx_cache_purge-2.3.tar.gz
[root@test1 local]# tar -zxvf ngx_cache_purge-2.3.tar.gz
[root@test1 local]# wget https://github.com/yaoweibin/nginx_upstream_check_module/archive/v0.3.0.tar.gz
[root@test1 local]# tar -zxvf v0.3.0.tar.gz
3、配置需安装的模块
# ./configure --help可查询需要安装的模块并编译安装
[root@test1 openresty-1.13.6.1]# ./configure --prefix=/usr/local/openresty --with-luajit --with-http_ssl_module --user=root --group=root --with-http_realip_module --add-module=./bundle/ngx_cache_purge-2.3/ --add-module=./bundle/nginx_upstream_check_module-0.3.0/ --with-http_stub_status_module
[root@test1 openresty-1.13.6.1]# make && make install
4、创建一个软链接方便启动停止
[root@test1 ~]# ln -s /usr/local/openresty/nginx/sbin/nginx /bin/nginx
5、启动nginx
[root@test1 ~]# nginx  #启动
 [root@test1 ~]# nginx  -s reload   #重启
如果启动时候报错找不到PID的话就用以下命令解决(如果没有更改过目录的话,让它去读nginx的配置文件就好了)
[root@test1 ~]# /usr/local/openresty/nginx/sbin/nginx -c /usr/local/openresty/nginx/conf/nginx.conf

OK 去浏览去访问一下这台机器的地址
出现下图的页面就是成功了
6、在Nginx上测试一下能否使用Lua脚本
[root@test1 ~]# vim /usr/local/openresty/nginx/conf/nginx.conf
在server里面加一个
location /lua {
default_type text/plain;
content_by_lua ‘ngx.say(“hello,lua!”)’;
}

加完后重启nginx
[root@test1 ~]# nginx -s reload
在浏览器里输入 ip地址/lua
出现下面的字就表示Nginx能够成功使用lua了
二、安装Redis
1、下载、解压、编译安装
[root@test1 ~]# cd /usr/local/
[root@test1 local]# wget http://download.redis.io/releases/redis-3.2.5.tar.gz
[root@test1 local]# tar -zxvf redis-3.2.5.tar.gz
[root@test1 local]# cd redis-3.2.5
[root@test1 redis-3.2.5]# make
[root@test1 redis-3.2.5]# make install
2、查看是否安装成功
[root@test1 redis-3.2.5]# ls -lh /usr/local/bin/
[root@test1 redis-3.2.5]# redis-server -v
Redis server v=3.2.5 sha=00000000:0 malloc=jemalloc-4.0.3 bits=64 build=dae2abf3793b309d

3、配置redis 创建dump file、进程pid、log目录
[root@test1 redis-3.2.5]# cd /etc/
[root@test1 etc]# mkdir redis
[root@test1 etc]# cd /var/
[root@test1 var]# mkdir redis
[root@test1 var]# cd redis/
[root@test1 redis]# mkdir  data log  run
4、修改配置文件
[root@test1 redis]# cd /usr/local/redis-3.2.5/
[root@test1 redis-3.2.5]# cp redis.conf /etc/redis/6379.conf
[root@test1 redis-3.2.5]# vim /etc/redis/6379.conf
#绑定的主机地址
bind 192.168.1.222
#端口
port 6379
#认证密码(方便测试不设密码,注释掉)
#requirepass
#pid目录
pidfile /var/redis/run/redis_6379.pid
#log存储目录
logfile /var/redis/log/redis.log
#dump目录
dir /var/redis/data
#Redis默认不是以守护进程的方式运行,可以通过该配置项修改,使用yes启用守护进程
daemonize yes
5、设置启动方式
[root@test1 redis-3.2.5]# cd /usr/local/redis-3.2.5/utils/
[root@test1 utils]# cp redis_init_script /etc/init.d/redis
[root@test1 utils]# vim /etc/init.d/redis   #根据自己实际情况修改
#!/bin/sh
#
# Simple Redis init.d script conceived to work on Linux systems
# as it does use of the /proc filesystem.

REDISPORT=6379
EXEC=/usr/local/bin/redis-server
CLIEXEC=/usr/local/bin/redis-cli

PIDFILE=/var/run/redis_${REDISPORT}.pid
CONF="/etc/redis/${REDISPORT}.conf"

case "$1" in
    start)
        if [ -f $PIDFILE ]
        then
                echo "$PIDFILE exists, process is already running or crashed"
        else
                echo "Starting Redis server..."
                $EXEC $CONF
        fi
        ;;
    stop)
        if [ ! -f $PIDFILE ]
        then
                echo "$PIDFILE does not exist, process is not running"
        else
                PID=$(cat $PIDFILE)
                echo "Stopping ..."
                $CLIEXEC -p $REDISPORT shutdown
                while [ -x /proc/${PID} ]
                do
                    echo "Waiting for Redis to shutdown ..."
                    sleep 1
                done
                echo "Redis stopped"
        fi
        ;;
    *)
        echo "Please use start or stop as first argument"
        ;;
esac
[root@test1 utils]# chmod a+x /etc/init.d/redis   #增加执行权限
[root@test1 utils]# service redis start     #启动redis
6、查看redis是否启动
[root@test1 utils]# redis-cli -h 192.168.1.222 -p 6379
192.168.1.222:6379> set hello "hi,redis"
OK
192.168.1.222:6379> KEYS *
1) "hello"
192.168.1.222:6379> get "hello"
"hi,redis"
192.168.1.222:6379>

三、在Nginx中使用Lua脚本访问Redis
1、连接redis,然后添加一些测试参数
[root@test1 utils]# redis-cli -h 192.168.1.222 -p 6379
192.168.1.222:6379> set "123" "456"
OK
2、编写链接Redis的Lua脚本
[root@test1 utils]# vim /usr/local/openresty/nginx/conf/lua/redis.lua
local redis = require "resty.redis"
local conn = redis.new()
conn.connect(conn, '192.168.1.222', '6379')     #根据自己情况写ip和端口号
local res = conn:get("123")
if res==ngx.null then
    ngx.say("redis集群中不存在KEY——'123'")
    return
end
ngx.say(res)
3、在nginx配置文件中添加以下location
[root@test1 utils]# vim /usr/local/openresty/nginx/conf/nginx.conf
location /lua_redis {
        default_type text/plain;
        content_by_lua_file /usr/local/openresty/nginx/conf/lua/redis.lua;
    }

[root@test1 utils]# nginx -s reload #重启一下Nginx
4、验证
在浏览器输入ip/lua_redis
看能不能获取到刚才在redis添加的"123" 这个key 并获取到他的值
如果能看到下图的内容表示可以访问redis

好的,准备工作已经准备好了,现在要来最终的Nginx+Lua+Redis自动封禁并解封IP了
三、Nginx+Lua+Redis
1、添加访问控制的Lua脚本
(此脚本需要改的只有下面的这一句,把redis的ip和端口替换一下即可
ok, err = conn:connect(“192.168.1.222”, 6379)
温馨提示:如果在nginx的上层有用到阿里云的SLB负载均衡的话需要修改一下脚本里的所有…ngx.var.remote_addr
把remote_addr替换成从SLB获取真实IP的字段即可,不然获取到的IP全都是阿里云SLB发过来处理过的IP,全都是一个网段的,根本没有办法起到封禁的效果)
[root@test1 lua]# vim /usr/local/openresty/nginx/conf/lua/access.lua
local ip_block_time=300 --封禁IP时间(秒)
local ip_time_out=30    --指定ip访问频率时间段(秒)
local ip_max_count=20 --指定ip访问频率计数最大值(秒)
local BUSINESS = ngx.var.business --nginx的location中定义的业务标识符,也可以不加,不过加了后方便区分

--连接redis
local redis = require "resty.redis"
local conn = redis:new()
ok, err = conn:connect("192.168.1.222", 6379)
conn:set_timeout(2000) --超时时间2秒

--如果连接失败,跳转到脚本结尾
if not ok then
    goto FLAG
end

--查询ip是否被禁止访问,如果存在则返回403错误代码
is_block, err = conn:get(BUSINESS.."-BLOCK-"..ngx.var.remote_addr)
if is_block == '1' then
    ngx.exit(403)
    goto FLAG
end

--查询redis中保存的ip的计数器
ip_count, err = conn:get(BUSINESS.."-COUNT-"..ngx.var.remote_addr)

if ip_count == ngx.null then --如果不存在,则将该IP存入redis,并将计数器设置为1、该KEY的超时时间为ip_time_out
    res, err = conn:set(BUSINESS.."-COUNT-"..ngx.var.remote_addr, 1)
	res, err = conn:expire(BUSINESS.."-COUNT-"..ngx.var.remote_addr, ip_time_out)
else
    ip_count = ip_count + 1 --存在则将单位时间内的访问次数加1

    if ip_count >= ip_max_count then --如果超过单位时间限制的访问次数,则添加限制访问标识,限制时间为ip_block_time
        res, err = conn:set(BUSINESS.."-BLOCK-"..ngx.var.remote_addr, 1)
        res, err = conn:expire(BUSINESS.."-BLOCK-"..ngx.var.remote_addr, ip_block_time)
	else
        res, err = conn:set(BUSINESS.."-COUNT-"..ngx.var.remote_addr,ip_count)
		res, err = conn:expire(BUSINESS.."-COUNT-"..ngx.var.remote_addr, ip_time_out)
    end
end

-- 结束标记
::FLAG::
local ok, err = conn:close()
2、在需要做访问限制的location里加两段代码即可,这里用刚才的/lua做演示
[root@test1 lua]# vim /usr/local/openresty/nginx/conf/nginx.conf

主要添加
access_by_lua_file /usr/local/openresty/nginx/conf/lua/access.lua;
让没一个请求都去调用这个lua脚本,注意路径和名字不要写错
set $business “lua” 是为了把IP放进redis的时候标明是哪个location的,可以不加
[root@test1 lua]# nginx -s reload #修改完后重启nginx
3、去访问192.168.1.222/lua 并一直按F5刷新

连接redis
[root@test1 ~]# redis-cli -h 192.168.1.222 -p 6379
发现redis已经在统计访问lua这个网页ip的访问次数了

这个key的过期时间是30秒,如果30秒没有重复访问20次这个key就会消失,所以说正常用户一般不会触发这个封禁的脚本

当30秒内访问超过了20次
发现触发脚本了,变成了403

进到redis里发现多了一个lua-block-192.168.1.158
过期时间是300秒,就是说在300秒内这个ip无法继续访问192.168.1.222/lua这个页面了
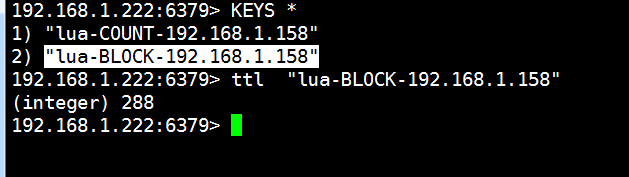
过五分钟后再去访问这个页面,又可以访问了

这个脚本的目的很简单:一个IP如果在30秒内其访问次数达到20次则表明该IP访问频率太快了,因此将该IP封禁5分钟。同时由于计数的KEY在Redis中的超时时间设置成了30秒,所以如果两次访问间隔时间大于30秒将会重新开始计数
后续这个脚本可以继续优化,比如第一次封禁300秒,第二次再进去封3天,再进去永久封禁之类的,不过能力有限,还得继续研究,如果上面写的有什么错误,欢迎各位大神指正


 588
588


 被折叠的 条评论
为什么被折叠?
被折叠的 条评论
为什么被折叠?
 到【灌水乐园】发言


