


这还用了SpringMVC 来实现session和redis的共享,这用到了@Controller
session实现共享的好几种实现方法,这只说一种,就是实现session和redis的共享数据
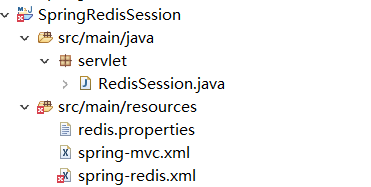
简单的目录结构
红叉不用管,出现Referenced file contains errors (http://www.springframework.org/schema/context/spring-context.xsd). For more information, right click on the message in the Problems View and select “Show Details…” 错误了,改context的版本就行,或者可以直接不管,直接不加版本号
pom.xml
<dependency>
            <groupId>org.springframework.session</groupId>
            <artifactId>spring-session-data-redis</artifactId>
            <version>1.2.1.RELEASE</version>
        </dependency>
        <dependency>
            <groupId>redis.clients</groupId>
            <artifactId>jedis</artifactId>
            <version>2.8.1</version>
        </dependency>
spring-session-data-redis 把spring-data-redis给替换下来了
其他的可以根据SSM来添加配置
web.xml
<?xml version="1.0" encoding="UTF-8"?>
<web-app xmlns:xsi="http://www.w3.org/2001/XMLSchema-instance"
    xmlns="http://java.sun.com/xml/ns/javaee"
    xsi:schemaLocation="http://java.sun.com/xml/ns/javaee http://java.sun.com/xml/ns/javaee/web-app_2_5.xsd"
    version="2.5">
    <display-name></display-name>
    <welcome-file-list>
        <welcome-file>index.jsp</welcome-file>
    </welcome-file-list>
    <!-- 这个很关键,如果不添加这个,那么SpringMVC的核心控制端的contextConfigLocation
    就要去/WEB-INF/下去找applicationContext.xml -->
	<context-param>
	    <param-name>contextConfigLocation</param-name>
	    <param-value>classpath:spring-*.xml</param-value>
  </context-param>


    <!-- Spring监听器 -->
    <listener>
       	 <listener-class>org.springframework.web.context.ContextLoaderListener</listener-class>
    </listener>
    <!-- SpringMVC核心配置 -->
	 <servlet>
		    <servlet-name>springDispatcherServlet</servlet-name>
		    <servlet-class>org.springframework.web.servlet.DispatcherServlet</servlet-class>
    <init-param>
	      <param-name>contextConfigLocation</param-name>
	      <param-value>classpath:spring-mvc.xml</param-value>
    </init-param>
    <load-on-startup>1</load-on-startup>
  </servlet>
  <servlet-mapping>
	    <servlet-name>springDispatcherServlet</servlet-name>
	    <url-pattern>/</url-pattern>
  </servlet-mapping>
	<!-- Springsession拦截器 -->
     <filter>
        <filter-name>springSessionRepositoryFilter</filter-name>
        <filter-class>org.springframework.web.filter.DelegatingFilterProxy</filter-class>
    </filter>
    <filter-mapping>
        <filter-name>springSessionRepositoryFilter</filter-name>
        <url-pattern>/*</url-pattern>
    </filter-mapping>

</web-app>
第一个问题
<context-param>如果不写上会报错误:
Could not open ServletContext resource [/WEB-INF/applicationContext.xml]
解释:
别看你在Spring核心配置的<init-param>里写上了classpath:spring-mvc.xml,但是如果没写<context-param>那么SpringMVC的核心控制端的contextConfigLocation就要去/WEB-INF/下去找applicationContext.xml
spring-mvc.xml(简单实现)
<?xml version="1.0" encoding="UTF-8"?>
<beans xmlns="http://www.springframework.org/schema/beans"
    xmlns:xsi="http://www.w3.org/2001/XMLSchema-instance"
    xmlns:p="http://www.springframework.org/schema/p"
    xmlns:context="http://www.springframework.org/schema/context"
    xmlns:mvc="http://www.springframework.org/schema/mvc"
    xmlns:tx="http://www.springframework.org/schema/tx"
    xsi:schemaLocation="http://www.springframework.org/schema/beans
    					http://www.springframework.org/schema/beans/spring-beans.xsd
    					http://www.springframework.org/schema/context
    					http://www.springframework.org/schema/context/spring-context.xsd
    					http://www.springframework.org/schema/mvc
    					http://www.springframework.org/schema/mvc/spring-mvc.xsd
    					http://www.springframework.org/schema/tx
    					http://www.springframework.org/schema/tx/spring-tx.xsd">

    <!-- 注解的适配器 -->
	<mvc:annotation-driven/>
	 <!--1.扫描controller注解(只是扫描@Controller) 不加service层了-->
	<context:component-scan base-package="servlet"/>

	<!-- 配置一个视图解析器 -->
	<bean class="org.springframework.web.servlet.view.InternalResourceViewResolver">
	<property name="prefix" value="/"></property>
		<property name="suffix" value=".jsp"></property>
	</bean>
</beans>
spring-redis.xml
<?xml version="1.0" encoding="UTF-8"?>
<beans xmlns:xsi="http://www.w3.org/2001/XMLSchema-instance"
    xmlns="http://www.springframework.org/schema/beans"
    xmlns:context="http://www.springframework.org/schema/context"
    xmlns:cache="http://www.springframework.org/schema/cache"
    xmlns:aop="http://www.springframework.org/schema/aop"
    xmlns:tx="http://www.springframework.org/schema/tx"
    xsi:schemaLocation="http://www.springframework.org/schema/beans
    					http://www.springframework.org/schema/beans/spring-beans.xsd
    					http://www.springframework.org/schema/context
    					http://www.springframework.org/schema/context/spring-context.xsd
    					http://www.springframework.org/schema/cache
    					http://www.springframework.org/schema/cache/spring-cache.xsd
    					http://www.springframework.org/schema/aop
    					http://www.springframework.org/schema/aop/spring-aop.xsd
    					http://www.springframework.org/schema/tx
    					http://www.springframework.org/schema/tx/spring-tx.xsd">

    <!-- 连接池基本参数配置,类似数据库连接池 -->
    <context:property-placeholder location="classpath:redis.properties" ignore-unresolvable="true" />
    <!-- 这用不到缓存的注解,就不写上了-->
    <!-- redis连接池 -->
    <bean id="poolConfig" class="redis.clients.jedis.JedisPoolConfig">
        <property name="maxTotal" value="${redis.maxActive}" />
        <property name="maxIdle" value="${redis.maxIdle}" />
        <property name="testOnBorrow" value="${redis.testOnBorrow}" />
    </bean>

    <!-- 连接池配置,类似数据库连接池 -->
    <bean id="jedisConnectionFactory"
        class="org.springframework.data.redis.connection.jedis.JedisConnectionFactory">
        <property name="hostName" value="${redis.host}"></property>
        <property name="port" value="${redis.port}"></property>
        <!-- <property name="password" value="${redis.pass}"></property> -->
        <property name="poolConfig" ref="poolConfig"></property>
    </bean>
	<!-- 因为session和redis共享新添加的下面的-->
	 <bean id="redisHttpSessionConfiguration"
        class="org.springframework.session.data.redis.config.annotation.web.http.RedisHttpSessionConfiguration">
        <property name="maxInactiveIntervalInSeconds" value="600" />
    </bean>

</beans>
redis.properties
redis.host=127.0.0.1
redis.port=6379
redis.pass=
redis.dbIndex=0
redis.expiration=21600
redis.maxIdle=300
redis.maxActive=600
redis.maxWait=1000
redis.testOnBorrow=true
RedisSeesion.java
import org.springframework.stereotype.Controller;
import org.springframework.web.bind.annotation.RequestMapping;


@Controller
public class RedisSession {
	 @RequestMapping(value = "/redisSession")
	 public String redisSession(HttpServletRequest request){
		 System.out.println("===================");
		    return "index";
	  }
}
jsp
 <div>成功</div>
  			<a href="${pageContext.request.contextPath}/redisSession">跳转</a>
   </body>
这我要做检讨,以前喜欢 ./ 来做 ${pageContext.request.contextPath}以后不再用 ./ 了,格式是 /项目名
执行测试
http://localhost:8080/SpringRedisSession/redisSession
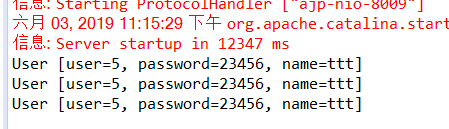
完成,这个共享共享的是sessionID,目前本人还不会把这个redis取出来,这个需要创建对象,session返回的就是个对象,别忘对象实现序列化,上面这存储在redis很繁琐,
讲解请看
https://blog.csdn.net/j3T9Z7H/article/details/80046307
里面从Spring方面讲解,为自己以后自己写redis和session实现共享提供了很好的思路4

session和redis共享后根据自己的特有方式取出来
这涉及到redis序列化器方面,请看这https://blog.csdn.net/weixin_43113679/article/details/90761001
用的redis序列化器是下面的
spring-redis.xml中bean为redisTemplate的里面修改成下面的
<property name="hashKeySerializer">
            <bean class="org.springframework.data.redis.serializer.StringRedisSerializer"/>
 </property>
<property name="hashValueSerializer">
            <bean class="org.springframework.data.redis.serializer.JdkSerializationRedisSerializer"/>
  </property>
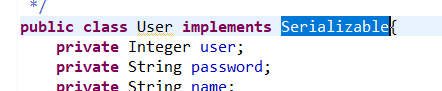
这样session存的对象只需要实现
就可以储存了,不用自己主动去序列化和反序列化
session存储对象,redis取出对象
@Controller
request.getSession().setAttribute("User", user);
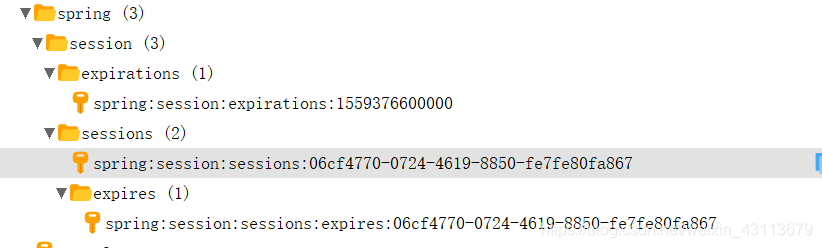
//看到这就明白session对象在redis存储的结构了 spring:session:sessions:"sessonID",item就是sessionAttr:+(session存的时候那个name)
User user2 =(User)redisUtil.hget("spring:session:sessions:"+request.getSession().getId(),"sessionAttr:"+"User");
System.out.println(user2);
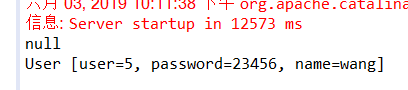
第一个null是第一次 Controller 时 redis还没存进去,所以为null;第二次就没问题了

redis存储对象,session取出对象
		//存进redis,key,item存的结构和上面一样,额外加生命周期
		redisUtil.hset("spring:session:sessions:"+request.getSession().getId(), "sessionAttr:"+"User", user,1800);
		//从session中取
		User user2 =(User) request.getSession().getAttribute("User");
null的原因和上面一样,
集合redis存储和session取出,需要序列化和反序列化(换过来session存的时候就不需要序列化了,让Spring序列化去,redis需要反序列化)
ArrayList<User> list = new ArrayList<User>();
......    //省略添加的对象
//存进redis
		redisUtil.hset("spring:session:sessions:"+request.getSession().getId(), "sessionAttr:"+"userList", SerializeUtil.serialize(list),1800);
		//从session中取
		byte[] bytes = (byte[]) request.getSession().getAttribute("userList");
		//加判断要不如果为空那里面的再执行会报错
		if(bytes != null) {
			ArrayList<User> list2 = (ArrayList<User>) SerializeUtil.unserialize(bytes);
			for(int i = 0; i < list2.size(); i++) {
				System.out.println(list.get(i));
			}
		}
这个方法适用于任何对于不是bean类无法实现Serializable接口的对象用于redis和session共享都是有效的
这样redis和session实现共享完成
自己在这个过程中遇到的问题
除了上面没写<context-param>的问题外,遇到了也是以前遇到的最大的问题
第二个问题
我用的是Eclipse创建Maven一切如常,因为创建的MAVEN是落后版本的(在找一键解决的方法),需要自己去settings去改配置文件,以前不懂org.eclipse.wst.common.component的project-version="1.5.0"不改也能把Project Facets修改过来,这就成了我的梦魇,
在这个全写完后再启动没问题,jsp也能打开,就是url找不到
Console会有警告
No mapping found for HTTP request with URI [/SpringRedisSession/redisSession] in DispatcherServlet with name ‘springDispatcherServlet’,就是找不到,我以为是路径的问题,最后不是
就是因为**project-version=“1.5.0”**应该修改,我改成 1.6.0就没问题了
配置文没问题再考虑是不是xml没加注解,所以找不到指定的url或者web.xml里的问题
第三个问题
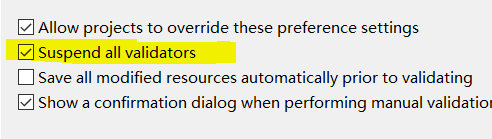
第二个问题解决后,再往下继续调试的时候,不知道又鼓捣哪出问题了,又出现这个问题了,我又回去找,发现不是1.6.0的问题了,最后弄出来,Project–>clean,清理一下错误的项目,也是清理以前错的缓存,清理后发现还是这样,发现Eclipse的Progress里的spring-mvc.xml一直Validating,哦,原来在验证所以一直没有清理完,所以我就让它跳过验证了,一会就clean一个项目
步骤: Preferences–>Validation
黄色的那一行打勾,退出重新启动就可以了,
项目里有更改的代码(除了jsp里的),就先Project–>clean再重新提交给Tomcat,运行,


 2152
2152


 被折叠的 条评论
为什么被折叠?
被折叠的 条评论
为什么被折叠?
 到【灌水乐园】发言


