


NIO基础
non-blicking io 非阻塞IO
1.三大组件
1.1 Channel & Buffer
Channel类似于stream ,读写数据的双向通道,Buffer为暂存的缓冲区。
常见的Channel有
- FileChannel
- DatagramChannel
- SocketChannel
- ServerSocketChannel
常见buffer - ByteBuffer(最常用)
- MappedByteBuffer
- DirectByteBuffer
- HeapByteBuffer
- ShortBuffer
- IntBuffer
- LongBuffer
- FloatBuffer
- DoubleBuffer
- CharBuffer
1.2 Selector
/多线程版缺点: - 内存占用高
- 线程上下文切换成本高
- 只适合连接数少的场景
/线程池版缺点 - 阻塞模式下,线程仅能处理一个socket连接
- 仅适合短连接场景
/selector版设计
selector的作用就是配合一个线程来管理多个channel,获取这些channel上发生的事件 这些channel工作在非阻塞模式下,不会让线程吊死在一个channel上。适合连接数特别多,但流量低的场景(low traffic)
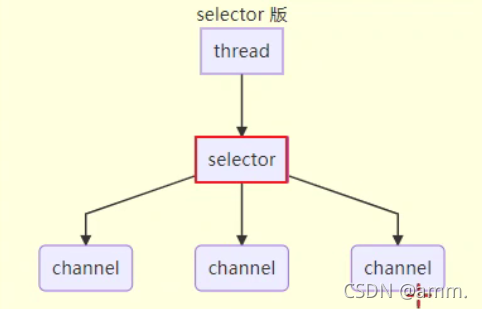
调用selector的select()会阻塞直到channel发生了读写就绪事件,这些事件发生,select方法就会返回这些事件交给thread来处理。
有四种类型事件:
accept - 会在有连接请求时触发
connect - 是客户端,连接建立后触发
read - 可读事件
write - 可写事件
@Slf4j
public class Server{
	public static void main(String args)throws IOException{
		//1.创建选择器 selector(是个集合存储key),管理多个 channel
		Selector selector = Selector.open();

		ByteBuffer buffer = ByteBuffer.allocate(16);
		ServerSocketChannel ssc = ServerSocketChannel.open();
		ssc.configureBlocking(false);

		//2.建立selector 和 channel 的联系(注册)
		//SelectionKey 就是将来事件发生后,通过它可以知道事件和哪个channel的时间
		Selection sscKey = ssc.register(selector,0,null);
		//key 只关注 accept 事件
		sscKey.interstOps(SelectionKey.OP_ACCEPT);

		ssc.bind(new InetSocketAddress(8080));
		while(true){
			//3.select 方法,没有事件发生,线程阻塞,有事件,线程才会恢复运行
			selector.select();
			//4.处理事件 selectedKeys 内部包含了所有发生的事件
			Iterator<SelectionKey> iter = selector.selectedKeys().iterator();
			while(iter.hasNext()){
				SelectionKey key = iter.next();
				//处理key时,要从selectedKeys 集合中删除,
				//否则下次处理相同key,key上又没有事件就会报错
				iter.remove();
				log.debug("key:{}",key);
				//5.区分事件类型
				if(key.isAcceptable()){//如果是accept 肯定是ServerSocketChannel 触发的
					ServerSocketChannel channel = (ServerSocketChannel) key.channel();
					SocketChannel sc = channel.accept();//建立连接
					sc.configureBlocking(false);
					SelectionKey scKey = sc.register(selector,0,null);
					log.debug("{}",sc);
				}else if(key.isReadable()){//如果是read 肯定是客户端发了新的数据,肯定是SocketChannel 做数据的读取
					SocketChannel channel = (SocketChannel )key.channel();//拿到触发事件的channel
					ByteBuffer buffer = ByteBuffer.allocate(16);//设置缓冲区大小
					channel.read(buffer);//如果是正常断开,read 的方法的返回值是-1
					if(read == -1){
						key.cancel();
					}else{
						buffer.flip();
						System.out.println(Chartset.defaultCharset().decode(buffer));
					}catch(IOException e){
						e.printStackTrace();
						key,cancel();//因为客户端断开了,因此需要将key 取消,(从selector 的keys 集合中真正删除 key)
					}
				}

//				key.cancel();
			}
		}
	}
}
- 客户端
public class Client{
	public static void main(String[] args) throws IOException{
		SocketChannel sc = SocketChannel.open();
		sc.connect(new InetSocketAdress("localhost",8080));
		SocjetAddress address = sc.getLocalAddress();
		sc.write(Charset.defaultCharset().encode("hello\nworld\n"));
		System.in.read();
	}
}
对上面代码解读:

如何正确处理消息边界(read事件,预先创建的ByteBuffer会不符合,会产生黏包或半包)
2.ByteBuffer
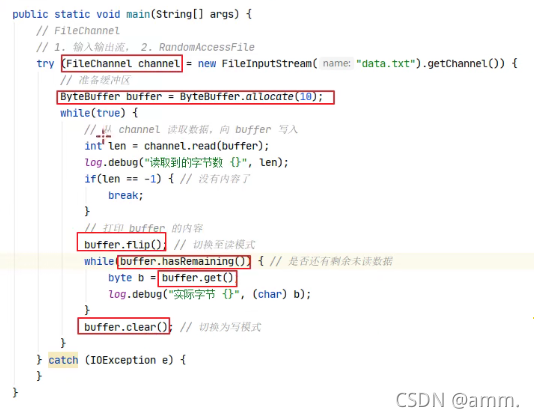
2.1 ByteBuffer正确使用姿势
1.向buffer写入数据,例如调用channel.read(buffer);
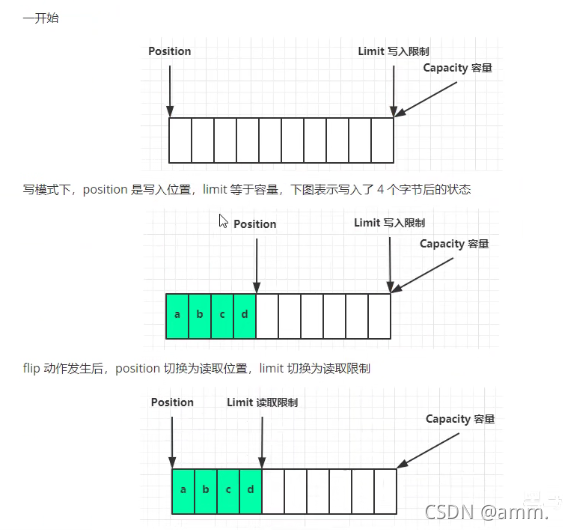
2.调用filp()切换至读模式
3.从buffer读取数据,例如调用buffer.get()
4.调用clear()或compact()切换至写模式
5.重复1~4步骤
2.2 ByteBuffer结构
重要属性:
Capacity:容量
Position:读写指针
limit:读写限制
- 分配容量:
-class java.nio.HeapByteBuffer -java堆内存,读写效率较低,受到GC的影响。
ByteBuffer.allocate(10);
-class java.nio.DirectByteBuffer -直接内存,读写效率高(少一次拷贝),不会受到GC影响,分配效率低,必须释放。
ByteBuffer.allocateDirect(12);

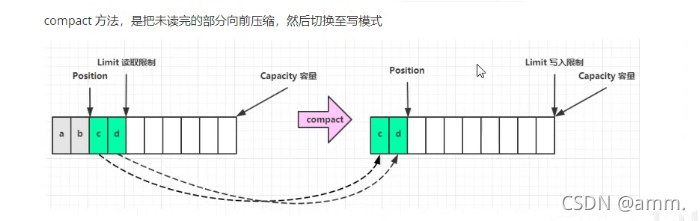
compact(压缩)方法。是把未读完的部分向前压缩,然后切换至写模式。
2.3ByteBuffer 常见方法
分配空间
Bytebuffer buf = ByteBuffer.allocate(16);
向buffer写入数据
-
调用channel的read方法 int readBytes = channel.read(buf);
-
调用buffer自己的get方法 buf.put((byte)127);
从buffer读取数据 -
调用channel的write方法 int writeBytes = channel.write(buf);
-
调用buffer自己的put方法 buf.get();
get方法会让position读指针向后走,如果想重复读取数据 -
可以调用rewind方法将position重新置为0
-
或者调用get(int i)方法获取索引 i 的内容,它不会移动读指针(不会改变读索引的位置)
mark和reset
mark是在读取时做一个标记,
reset是重置到mark的位置。
字符串与ByteBuffer之间的互相转换
1.把字符串转为ByteBuffer
ByteBuffer buffer1 = ByteBuffer.allocate(16);
buffer.put("hello".getBytes());
2.charset
ByteBuffer buffer2 = StandardCharsets.UTF_8.encode("hello");
3.wrap
ByteBuffer buffer3 = ByteBuffer.wrap("hello".getBytes());

4.切换为读模式的ByteBuffer转换成字符串(2.3)
String str1 = StanfardCharsets.UTF_8.decode(buffer2).toString();
2.4 Scattering Reads
分散读取:
分散读– 创建多个ByteBuffer,channel.read(new ByteBuffer[]{b1,b2,b3…});
集中写–把多个ByteBuffer组合到一个整体写入,channel.write(new ByteBuffer[]{b1,b2,b3…});
黏包:一次性发送多条给服务器
半包:服务器缓冲区大小限制
处理黏包半包:
private static void split(ByteBuffer source){
	source.flip();
	for(int i=0; i<source.limit(); i++){
		//找到一条完整消息
		if(source.get(i) == '\n'){
			int length = i + 1 - source.postion();
			//吧这条完整消息存入新的 ByteBuffer
			ByteBuffer target = ByteBuffer.allocate(length);
			//从source 读,向 target 写
			for(int j = 0; j < length; j++){
				target.put(source.get());
			}

		}
	}
	source.compact();
}
- 如何正确处理消息边界(read事件,预先创建的ByteBuffer会不符合,会产生黏包或半包)

解释上述解决方法:
1.客户端和服务器端 约定一个固定长度,一个最大容量(会造成空间浪费,会影响网络带宽)
2.客户端发消息时分割消息,服务器端解析根据分隔符出现位置创建新的ByteBuffer,再用这个ByteBuffer创建新的ByteBuffer(还要考虑扩容问题,一个一个查效率低)
3.LTV格式:将消息分成两部分,一部分固定大小的存储内容长度,第二部分也是固定长度,先发送长度给服务器,服务器先接收第一部分再接收第二部分。(比较常用,http协议就是这么做的)
- 服务端
@Slf4j
public class Server{
	public static void main(String args)throws IOException{
		//1.创建选择器 selector(是个集合存储key),管理多个 channel
		Selector selector = Selector.open();

		ByteBuffer buffer = ByteBuffer.allocate(16);
		ServerSocketChannel ssc = ServerSocketChannel.open();
		ssc.configureBlocking(false);

		//2.建立selector 和 channel 的联系(注册)
		//SelectionKey 就是将来事件发生后,通过它可以知道事件和哪个channel的时间
		Selection sscKey = ssc.register(selector,0,null);
		//key 只关注 accept 事件
		sscKey.interstOps(SelectionKey.OP_ACCEPT);

		ssc.bind(new InetSocketAddress(8080));
		while(true){
			//3.select 方法,没有事件发生,线程阻塞,有事件,线程才会恢复运行
			selector.select();
			//4.处理事件 selectedKeys 内部包含了所有发生的事件
			Iterator<SelectionKey> iter = selector.selectedKeys().iterator();
			while(iter.hasNext()){
				SelectionKey key = iter.next();
				//处理key时,要从selectedKeys 集合中删除,
				//否则下次处理相同key,key上又没有事件就会报错
				iter.remove();
				log.debug("key:{}",key);
				//5.区分事件类型
				if(key.isAcceptable()){//如果是accept 肯定是ServerSocketChannel 触发的
					ServerSocketChannel channel = (ServerSocketChannel) key.channel();
					SocketChannel sc = channel.accept();//建立连接
					sc.configureBlocking(false);
					SelectionKey scKey = sc.register(selector,0,null);
					log.debug("{}",sc);
				}else if(key.isReadable()){//如果是read 肯定是客户端发了新的数据,肯定是SocketChannel 做数据的读取
					SocketChannel channel = (SocketChannel )key.channel();//拿到触发事件的channel
					ByteBuffer buffer = ByteBuffer.allocate(16);//设置缓冲区大小
					channel.read(buffer);//如果是正常断开,read 的方法的返回值是-1
					if(read == -1){
						key.cancel();
					}else{
						split(buffer);//调用上面的方法;
					}catch(IOException e){
						e.printStackTrace();
						key,cancel();//因为客户端断开了,因此需要将key 取消,(从selector 的keys 集合中真正删除 key)
					}
				}

//				key.cancel();
			}
		}
	}
}
- 客户端
public class Client{
	public static void main(String[] args) throws IOException{
		SocketChannel sc = SocketChannel.open();
		sc.connect(new InetSocketAdress("localhost",8080));
		SocjetAddress address = sc.getLocalAddress();
		sc.write(Charset.defaultCharset().encode("hello\nworld\n"));
		System.in.read();
	}
}
3.文件编程
3.1 FileChannel
注意:FileChannel只能工作在阻塞模式下
读取:会从channel读取数据填充ByteBuffer,返回值表示读到多少字节,-1表示到达了文件的末尾
int readBytes = channel.read(buffer);
写入:写入的正确姿势如下
ByteBuffer buffer = ...;
buffer.put(...);//存入数据
buffer.flip();//切换读模式
while(buffer.hasRemaining()){//检查有没有剩余数据
	channel.write(buffer);
}
在while中调用channel.write是因为write方法不能保证一次将buffer中的内容全部写入channel。
关闭
channel 必须关闭。
位置
获取当前位置:
long pos = channel.position();
设置当前位置:
long newPos = …;
channel.position(newPos);
设置当前位置时,如果设置为文件的末尾
- 这时读取会返回-1
- 这时写入,会追加内容,但要注意如果position超过了文件末尾,再写入事在新内容和原末尾之间会有空洞(00)
大小使用size方法获取文件的大小
强制写入操作系统处于性能考虑会将数据缓存,不是立刻写入磁盘。可以调用force(true)方法将文件内容和元数据(文件的权限等信息)立刻写入磁盘
3.2 两个Channel 传输数据
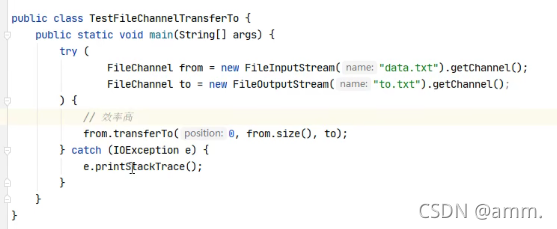
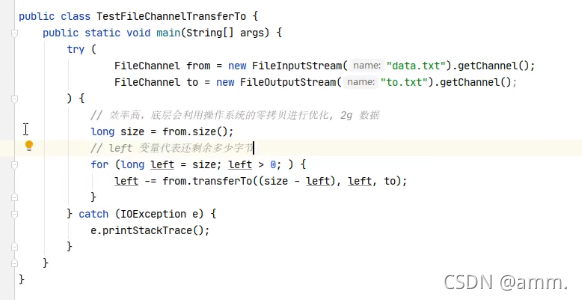
transferTo():最大传输2G数据
效率高:底层会利用操作系统的零拷贝进行优化
–对最大传输的优化(分多次传输)
3.3 Path
jdk7引入了Path和Paths类 - Path用来表示文件路径
- Paths是工具类,用来获取Path实例对象
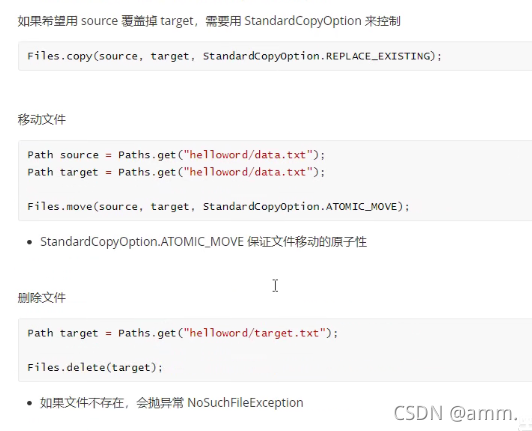
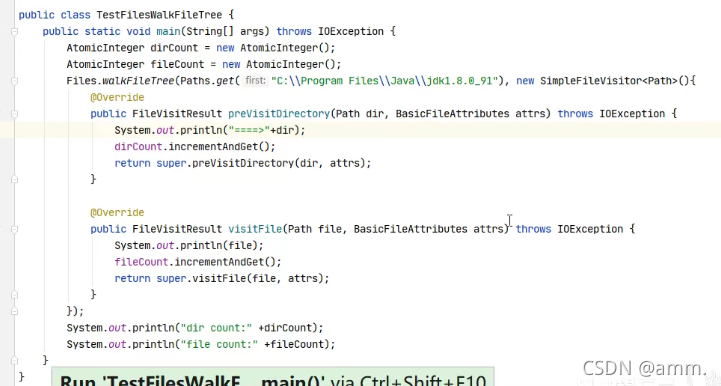
3.4 Files
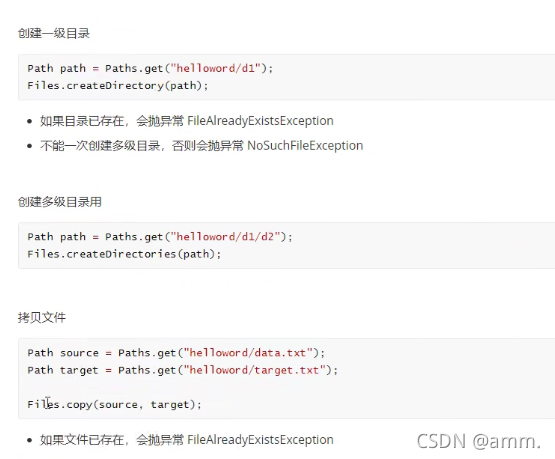
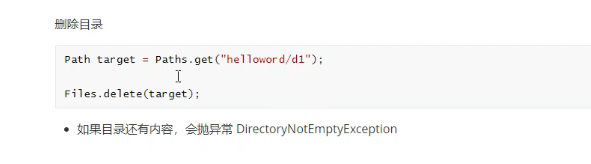
访问者模式遍历文件夹和文件目录:
多级目录拷贝: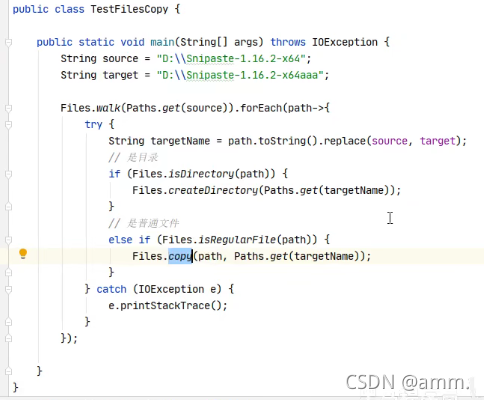
ctrl+Alt+T


 被折叠的 条评论
为什么被折叠?
被折叠的 条评论
为什么被折叠?
 到【灌水乐园】发言


