


在一个网页中,html负责页面布局和内容,css负责组件具体样式,JS则与后台进行交互。
在设计网页前先介绍DIV,简单来说就是一个在网页上分割区域的方块。在DIV里面可以添加组件,包括另外的DIV。
制作登录界面。登录界面一般有两个文本框,分别用来获取用户的用户名和密码。我们也考虑用户忘记密码和未进行注册的情况,故也要加上这两个功能区域。
首先我们为登录界面设置一个标题:
<title>Welcome!Please write your individual information.</title> 然后在body内设计我们想要用户看见的内容:
<body>
<div id ="login">
<form name="login",method="post",action="*">
<div id = "loginDiv">
<p style="left:10px">
Welcome to login!</p>
<div id="user">
<input type="text" placeholder="手机号\邮箱\昵称" style="height: 30px;"/>
</div>
<div id="password">
<input type="password" placeholder="请输入密码" style="height: 30px;"/>
</div>
<div id="check">
<input type="checkbox" /><span style="font-size: x-small;">请勿在公用电脑上勾选此选项 <a href="#">忘记密码?</a></span>
</div>
<input type="submit" id="loginbutton" value="登录" />
<p id="reg" style="font-size: x-small;left: 70px;">
<a href="http://127.0.0.1:8020/Tb/js/register.html">注册</a>
</p>
</div>
</form>
</div>
</body>我们首先建立了一个div里面又建立了一个表单(用户填入的信息一定是全在表单里的,然后由表单发送给后台控制器,故下面的文本框等全部是在表单中)。我们依次建立两个div分别用来装用户名和密码文本框。为什么要把它们用div装起来呢?是为了方便在CSS中对它们的位置,长宽,样式等进行设计。然后就是登录按钮,登录按扭有很多种设立方式,此处给的是具有跳转表单指定地址的提交按钮。
最后两个功能:注册和忘记密码我们用超链接将他们表现出来,用户可以点击文字跳转到指点页面,进行对应操作。超链接一般格式如下:
<a href="http://127.0.0.1:8020/Tb/js/register.html">这里写你想放入的字符,前面的地址即是跳转地址。</a>具体的div大小 、样式等由CSS决定。我们设置一个,里面为div、表单、按钮和字体等设置样式:
<style type="text/css">
        #login{

        }
        #loginDiv{
            border: 1px solid #646464;
            background-color:   #E8E8E8;
            margin-top: 300px;
            margin-left: 900px;
            width: 360px;
            height: 500px;
        }

        #user{
            width: 270px;
            height: 34px;
            margin-top: 120px;
            margin-left: auto;
        }
        #password{
            width: 270px;
            height: 34px;
            margin-top: 40px;
            margin-left: auto;
        }
        #check{
            margin-top: 70px;
            margin-left: 60px;
        }
        #loginbutton{
            margin-left: 57px;
            width: 270px;
            height: 34px;
            margin-top: 1;
            background-color: aliceblue;
            color: burlywood;
            border:0px solid;
            border-radius:6px;
            font: normal 20px/44px "Microsoft Yahei";
        }
        #reg{
            margin-left: 300px;
            width: 100px;
        }
    </style>
再就是文首提到的JS,,制作简单表单并未与其它表单或者底层数据进行交互,因此暂时并未用到,以后涉及到后会展示出来。
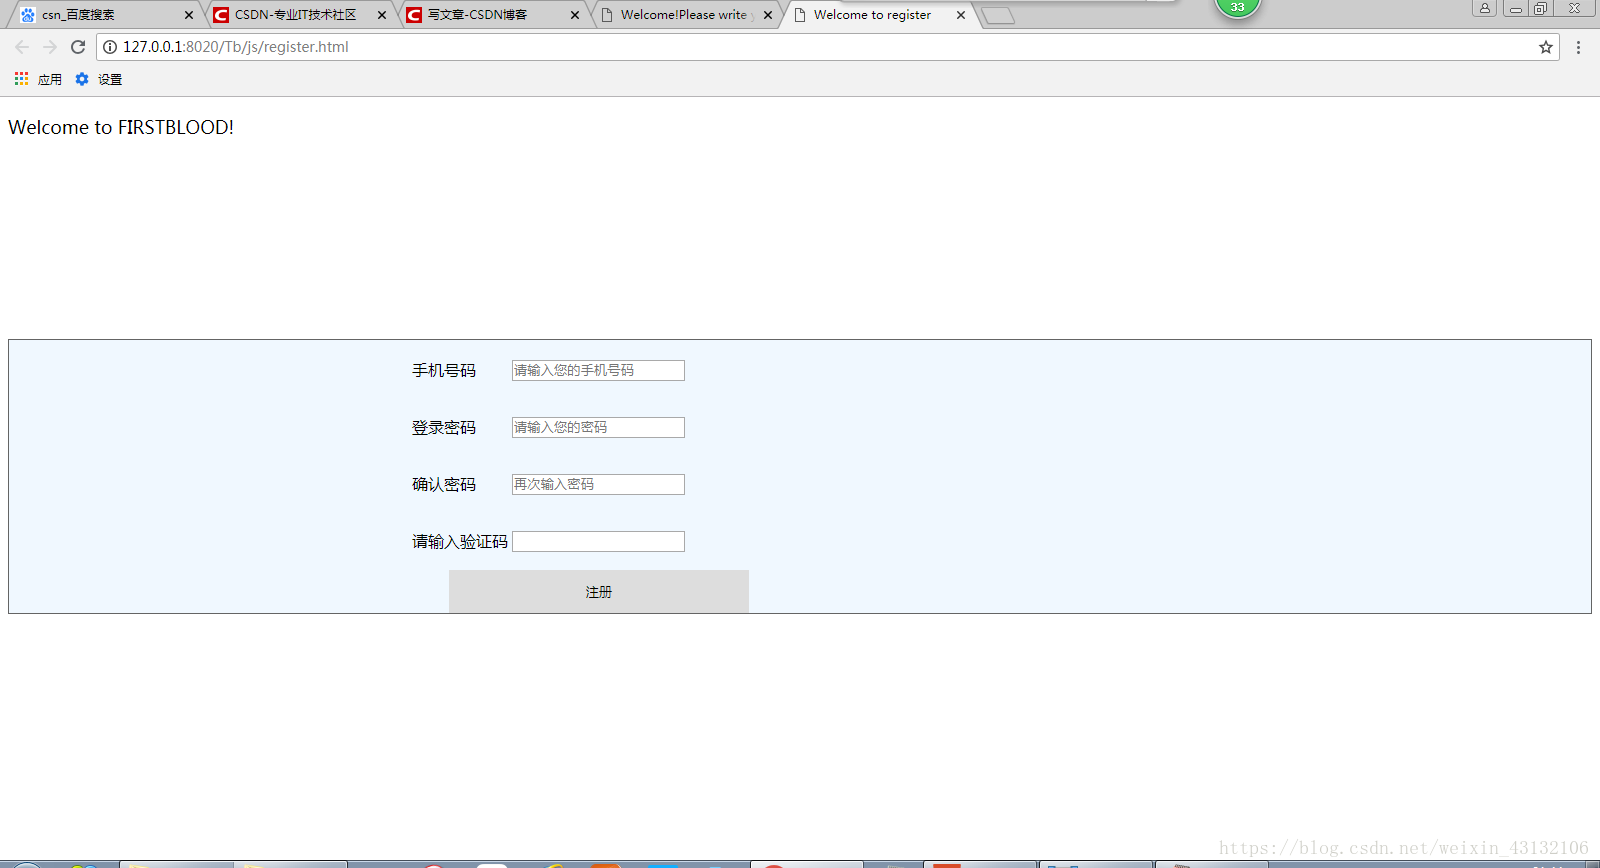
接下来就是注册页,注册与登录页类似也是以几个文本框为主体。代码见下:
<!DOCTYPE html>
<html>
    <head>
        <meta charset="UTF-8">
        <title>Welcome to register</title>
    </head>
    <style type="text/css">

        #house{
            background-color:#F0F8FF;
            margin-top: 200px;
            border:1px solid #646464;;
        }
        #register{
            width: 400px;
            margin-left: 400px;

        }
        #ge{
            margin-left: 40px;
            width: 300px;
            height: 43px;
            border: coral;
        }

    </style>
    <body>
        <p style="font: '微软雅黑';font-size: large;"> Welcome to FIRSTBLOOD!</p>
        <div id="house">
            <form action="*" method="post" id="register">
                <table>
                    <tr>
                        <td><p>手机号码</p></td>
                        <td><input placeholder="请输入您的手机号码"> </td>
                    </tr>
                    <tr>
                        <td><p>登录密码</p></td>
                        <td><input type="password" placeholder="请输入您的密码"></td>
                    </tr>
                    <tr>
                        <td><p>确认密码</p></td>
                        <td><input type="password" placeholder="再次输入密码"></td>
                    </tr>
                    <tr>
                        <td><p>请输入验证码</p></td>
                        <td><input  ></td>
                    </tr>

                </table>
                <input type="submit" id="ge" value="注册"/>
            </form>
        </div>
    </body>
</html>
在注册页面中我们以表格为骨架把内容整齐划分。
以上便是简单制作登录和注册页面。笔者也是初学者有很多也不太明白,在此讲的比较简陋,见谅。
下附页面截图(登录):

(注册)


 被折叠的 条评论
为什么被折叠?
被折叠的 条评论
为什么被折叠?
 到【灌水乐园】发言


