


前言
直接将数据写在代码里面,不是一种合理的做法。如果数据经常改,就要经常翻开对应的代码进行修改,造成代码扩展性低。因此,可以考虑将经常变的数据放在文件中进行存储,程序启动后从文件中读取最新的数据。如果要变动数据,直接修改数据文件即可,不用修改代码。一般可以使用属性列表文件存储 NSArray 或者 NSDictionary 之类的数据,这种 “属性列表文件” 的扩展名是 plist,因此也称为 “plist 文件”。 plist 是以 xml 文件形式存储的。
如果对象是 NSString、NSArray、NSDictionary、NSData 和 NSNumber 类型,可以用这些类中实现的 writeToFile: atomically: 方法将数据写到文件中。
当根据字典创建属性列表时,字典中的键必须都是 NSString 对象。数组中的元素或字典中的值可以是 NSString、NSArray、NSDictionary、NSData、NSDate 和 NSNumber 对象。
iOS 实现的序列化方式的两种:NSKeyedArchiver,NSPropertyListSerialization。在这两种序列化方式中,NSData 都是序列化的目标。两种方式的不同点在于 NSPropertyListSerialization 是针对数组和字典类型的,而 NSKeyedArchiver 是针对对象的。
1、Write 写入方式
永久保存在磁盘中。具体方法为:
第一步:获得文件即将保存的路径:
使用 C 函数 NSSearchPathForDirectoriesInDomains 来获得沙盒中目录的全路径。该函数有三个参数,目录类型、domain mask、布尔值。其中布尔值表示是否需要通过 ~ 扩展路径。而且第一个参数是不变的,即为 NSSearchPathDirectory 。在 iOS 中后两个参数也是不变的,即为:NSUserDomainMask 和 YES。
NSString *documentPath = NSSearchPathForDirectoriesInDomains(NSDocumentDirectory, NSUserDomainMask, YES)[0];还有一种方法是使用 NSHomeDirectory 函数获得 sandbox 的路径,但是不能在 sandbox 的本文件层上写文件也不能创建目录,而应该是此基础上创建一个新的可写的目录,例如 Documents, Library 或者 temp 。具体的用法为:
    // 将 Documents 添加到 sandbox 路径上
    NSString *documentPath = [NSHomeDirectory() stringByAppendingPathComponent:@"Documents"];
这两者的区别就是:使用 NSSearchPathForDirectoriesInDomains 比在 NSHomeDirectory 后面添加 Documents 更加安全。因为该文件目录可能在未来发送的系统上发生改变。
第二步:生成在该路径下的文件:
    // fileName 就是保存文件的文件名
    NSString *FileName = [documentPath stringByAppendingPathComponent:@"fileName"];
第三步:往文件中写入数据:
    // 将 NSData 类型对象 data 写入文件,文件名为 FileName
    [data writeToFile:FileName atomically:YES];
第四步:从文件中读出数据:
    // 从 FileName 中读取出数据
    NSData *data = [NSData dataWithContentsOfFile:FileName options:0 error:NULL];
2、Plist 文件的读写
    NSString *arrayPath = [NSHomeDirectory() stringByAppendingString:@"/Desktop/arrayToPList.plist"];
    NSString *dictionaryPath = [NSHomeDirectory() stringByAppendingString:@"/Desktop/dictionaryToPList.plist"];

    // 待写入数据
    NSArray *array = @[@"bei", @"jing", @"huan", @"ying", @"nin"];

    // 待写入数据
    NSDictionary *dictionary = @{@"name":@"chen chao", @"age":@"18", @"info":@"Good Teacher"};

    // 写 Plist 文件

        // 数组写入 plist 文件
        BOOL bl1 = [array writeToFile:arrayPath atomically:YES];

        // 字典写入 plist 文件
        BOOL bl2 = [dictionary writeToFile:dictionaryPath atomically:YES];

    // 读 Plist 文件

        NSArray *arrayFromPlist = [NSArray arrayWithContentsOfFile:arrayPath];
        NSDictionary *dicFromPList = [NSDictionary dictionaryWithContentsOfFile:dictionaryPath];
3、Plist 序列化
    NSString *arrayPath = [NSHomeDirectory() stringByAppendingString:@"/Desktop/arrayPropertyList.plist"];
    NSString *dictionaryPath = [NSHomeDirectory() stringByAppendingString:@"/Desktop/dictionaryPropertyList.plist"];

    // 待写入数据
    NSArray *array = @[@"bei", @"jing", @"huan", @"ying", @"nin"];

    // 待写入数据
    NSDictionary *dictionary = @{@"name":@"chen chao", @"age":@"18", @"info":@"Good Teacher"};

    // 序列化,将数据转换成 XML 格式的文件

        NSData *arrayData = [NSPropertyListSerialization dataWithPropertyList:array
                                                                       format:NSPropertyListXMLFormat_v1_0
                                                                      options:1
                                                                        error:nil];

        NSData *dictionaryData = [NSPropertyListSerialization dataWithPropertyList:dictionary
                                                                            format:NSPropertyListXMLFormat_v1_0
                                                                           options:1
                                                                             error:nil];

        // 输出到 .txt 格式文件中
        BOOL bl1 = [arrayData writeToFile:arrayPath atomically:YES];
        BOOL bl2 = [dictionaryData writeToFile:dictionaryPath atomically:YES];

    // 反序列化

        NSArray *arrayFromeFile = [NSArray arrayWithContentsOfFile:arrayPath];
        NSDictionary *dicitionaryFromeFile = [NSDictionary dictionaryWithContentsOfFile:dictionaryPath];
4、Plist 文件的使用
4.1 Plist 文件的创建
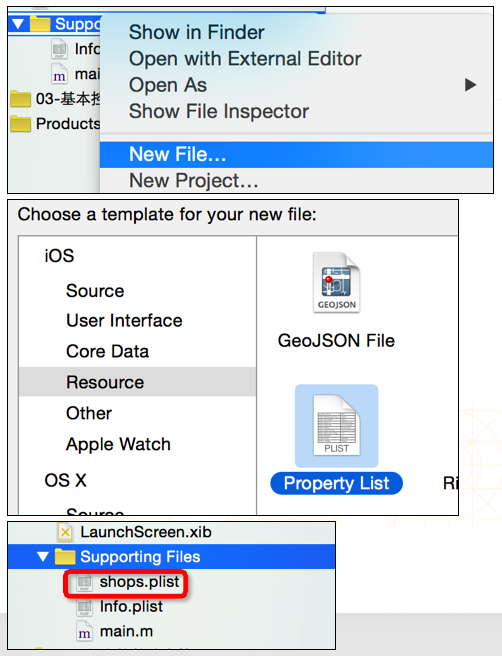
4.2 Plist 文件的解析
// 获得 Plist 文件的全路径
NSString *path = [[NSBundle mainBundle] pathForResource:@"shops" ofType:@"plist"];
// 加载 plist 文件
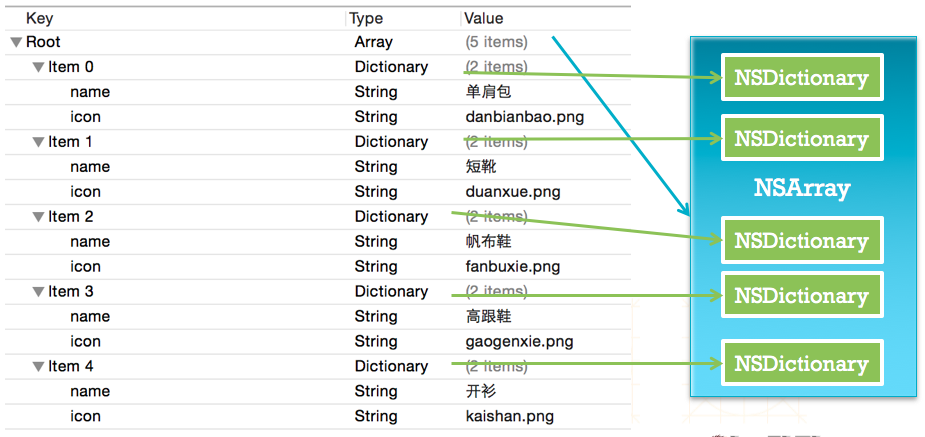
NSArray *shops = [NSArray arrayWithContentsOfFile:path];4.3 Plist 文件的解析过程
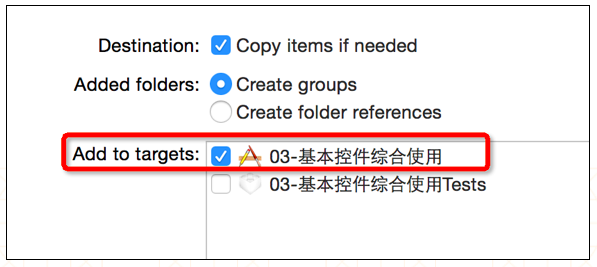
4.4 Plist 的使用注意
plist 的文件名不能叫做 “info”、“Info” 之类的。
添加 plist 等文件资源的时候,一定要勾选下面的选项。


 217
217


 被折叠的 条评论
为什么被折叠?
被折叠的 条评论
为什么被折叠?
 到【灌水乐园】发言


