LaTeX笔记
LaTeX简述
LaTeX是一种基于ΤΕΧ的排版系统,由美国计算机学家莱斯利·兰伯特(Leslie Lamport)在20世纪80年代初期开发,利用这种格式,即使使用者没有排版和程序设计的知识也可以充分发挥由TeX所提供的强大功能,短时间内生成很多具有书籍质量的印刷品。对于生成复杂表格和数学公式,这一点表现得尤为突出。因此它非常适用于生成高印刷质量的科技和数学类文档。这个系统同样适用于生成从简单的信件到完整书籍的所有其他种类的文档。——摘自百度百科
LaTeX中文模板学习
对于国赛的论文我分为了文章布局、标题、摘要、关键字、正文、参考文献、以及附录里的代码这几个模块写.
本文的编程工具为TexStudio,Compiler默认为XeLaTeX
整体的模板简化版
\documentclass[UTF8]{ctexart}
	%插入\usepackge{}
	\begin{document}
	\begin{abstract} %摘要
	\textbf{关键字}   %摘要
	\end{abstract}
	\newpage

	\section*{title}    %段落
	\subsection*{title}
	\subsubsection*{title}

	\bibliographystyle{style} %参考文献导入
	\bibliography{bib file}

	\begin{lstlisting}  %代码部分
						%需要引入\usepackage{lstlisting}
	\end{lstlisting}

	\end{document}
1.文章布局
对于一篇中文的论文,我们设置为A4纸的格式,以及字体为宋体{\song},大小为小四号{\xiaosihao},以及把页脚设置居中 ,具体参考phoenixtree7的博客
\usepackage[a4paper]{geometry}
	\usepackage{amsmath,amssymb}% AMSLaTeX宏包 用来排出更加漂亮的公式
	\usepackage{cases}
	\usepackage{graphicx}
	\usepackage{fancyhdr}
	\pagestyle{fancy}
	\fancyhead{}
	\title{\textbf{基于······的研究}}
	\date{}
	\author{}
	\cfoot{\thepage}%页脚中间
	\renewcommand{\headrulewidth}{0pt}
	\renewcommand{\footrulewidth}{0pt}
	\newcommand{\xiaosihao}{\fontsize{12pt}{\baselineskip}\selectfont}
	\newcommand{\song}{\CJKfamily{song}}
2.标题
在\begin{document}后面加上\maketitle
在\begin{document}前面写标题内容\title{}
\title{}
\begin{document}
\maketitle
3.摘要、关键字
\begin{abstract}
%另起一段是要多打一个空格
%\textit{} 斜体
\noindent %表示不缩进
\textbf{关键字}~~关键字~~关键字 %~~表示空两格
 		                       %\textbf{} 表示加粗
\end{abstract}
\newpage %新起一页写正文
4.正文
4.1数学公式
4.1.1数学公式的插入
\section*{}  %标题   \ 有*号不会自己排序,但是适合中文排版\
\subsection*{} %第一标题
\subsubsection*{}  %第二标题

%插入公式
\begin{equation}
\left\{
\begin{array}{lcl}
.....    ,&   \\
.....    ,&
\end{array}
\right.
\end{equation}
%(18)

\begin{equation}   %会自动排序

\end{equation}
%(19)

\begin{equation}
\left\{
\begin{array}{lcl}
.....    \\

\end{array}
\right.
\end{equation}
%(20)

4.1.2 常用的数学公式
使用公式和特殊符号前应该加上
$.....$
\int_{}{}       %积分		\sum_{}{}       %求和
\sqrt{}     	%求根		\frac{}{}    	%分式
^{}				%上角标	      _{}			%下角标
\sim       		%波浪线  ~  	\vert   		%绝对值  |
\cdot        	%点乘	·	\cdots     		% ······
\times      	%乘号	*
\hat{}
\in    			%属于		\ang{}   		%角度
特殊符号
\alpha \beta \gamma
\theta \delta \sigma
\epsilon \phi \mu
α β γ θ δ σ ϵ ϕ μ \ \qquad \alpha \qquad \beta \qquad \gamma \qquad \theta \qquad \delta \qquad \sigma \qquad \epsilon \qquad\phi \qquad \mu αβγθδσϵϕμ
4.2插入图片
图片的文件可以保存为.jpg格式,而且要和.tex文件放在同个文件夹
插入一个图片
\begin{figure}[ht]
\centering
\includegraphics[width=..cm,height=..cm]{file}
\caption{}
\end{figure}
插入两个并排图片
在\begin{document}前面加入一段
\usepackage{subfigure}
begin{figure}[ht]
	\begin{minipage}[t]{0.45\linewidth}
	\centering
	\includegraphics[width=..cm,height=..cm]{file}
	\caption{}
	\end{minipage}

	\begin{minipage}[t]{0.45\linewidth}
	\hspace{2mm}
	\includegraphics[width=..cm,height=..cm]{file}
	\caption{}
	\end{minipage}
\end{figure}
参考天义AI的博客
4.3插入表格
4.3.1 一般的表格类型
\begin{table}[ht]
\centering
\begin{tabular}{|c|c|c|c|}    \hline   %|表示竖线 \hline 表示横线
    1 &  2 &  3 &  4    \\  \hline
    5 &  6 &  7 &  8    \\  \hline
    9 &  10&  11&  12   \\  \hline
\end{tabular}
\caption{} %表格名称
\end{table}
4.3.2 表格网格线的加粗
应在\begin{document}前加上,以下代码,用来定义\whline
\usepackage{array}
\newcolumntype{I}{!{\vrule width 3pt}}
\newlength\savedwidth
\newcommand\whline{\noalign{\global\savedwidth\arrayrulewidth
		\global\arrayrulewidth 3pt}%
	\hline
	\noalign{\global\arrayrulewidth\savedwidth}}
\newlength\savewidth
\newcommand\shline{\noalign{\global\savewidth\arrayrulewidth
		\global\arrayrulewidth 1.5pt}%
	\hline
	\noalign{\global\arrayrulewidth\savewidth}}
加粗后记得I与|不能混淆,以及\whline 的位置
\begin{table}[ht]
\centering
\begin{tabular}{|c|cIc|c|}  \whline
   1 &  2 &  3 &  4   \\  \whline
   5 &  6 &  7 &  8   \\  \hline
   9 &  10&  11 &  12 \\  \whline
\end{tabular}
\caption{} %表格名称
\end{table}
效果图

参考 yhl_leo的博客
5. 参考文献
5.1 生成.bib文件
1.参考文献首先前往Google学术查找论文
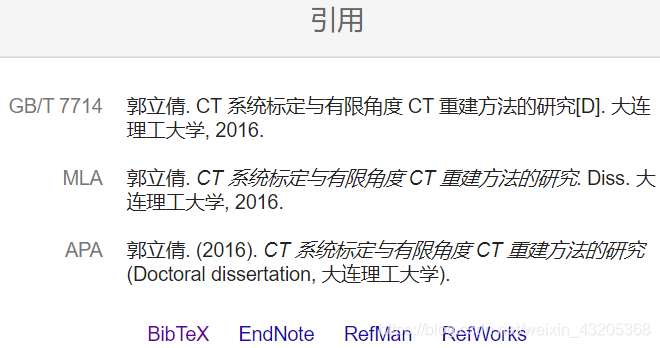
2.比如查询 [1]郭立倩,CT系统标定与有限角度CT重建方法的研究[D],大连理工大学,2016

3.点击下面一栏的引用,点击BibTex,会弹出右边的这些信息


4.在texstudio 中建立一个文件,保存形式为.bib文件,将上面的信息复制过去
注意将.bib文件放在与.tex位置相同的文件夹
5.2 插入到.tex文件
1.在引用到的地方插入\cite{},括号内容为.bib文件中括号里的第一行
比如:\cite{郭立倩2016ct}
2.在end{document}前插入代码
\bibliographystyle{style} %style 默认为plain
\bibliography{bib file}   %.bib文件名
3.点击菜单栏上的options -> Configure Texstudio -> Build -> Default Complier
将pdfLaTex 修改为XeLaTex
4.点击Compiler -> Bibiography -> Compiler ->Compiler
参考Xeon-Shao的博客
6.代码部分
首先引入宏包,使得代码更加简洁易懂。
\usepackage{listings}
\usepackage{xcolor}
\lstset{
	columns=fixed,
	numbers=left,                                        % 在左侧显示行号
	frame=none,                                          % 不显示背景边框
	backgroundcolor=\color[RGB]{245,245,244},            % 设定背景颜色
	keywordstyle=\color[RGB]{40,40,255},                 % 设定关键字颜色
	numberstyle=\footnotesize\color{darkgray},           % 设定行号格式
	commentstyle=\it\color[RGB]{0,96,96},                % 设置代码注释的格式
	stringstyle=\rmfamily\slshape\color[RGB]{128,0,0},   % 设置字符串格式
	showstringspaces=false,                              % 不显示字符串中的空格
	language=c++,                                        % 设置语言
}
再将所需要的代码写到
\begin{lstlisting}
\end{lstlisting}
之间运行就可以了


 2万+
2万+

 被折叠的 条评论
为什么被折叠?


