


Flume简介及常用操作
一,Flume简介
Flume是一个分布式,可扩展,可靠,高可用的海量日志有效聚合及移动的框架。它通常用于log数据的收集,支持在系统中定制各类数据发送方,用于收集数据。它具有可靠性和容错可调机制和许多故障转移和恢复机制。

二,Flume组织架构
2.1 0.9x组织架构 Flume OG

在0.9x架构中,组成部分有: agent collector master(通过zookeeper实现高可用)
2.2 1.0x Flume NG
flume 1.0x 版本中flume只有 agent,agent由三个部分组成

Agent:
由 Source Channel Sink 三大组件
Source:
从Client收集数据,传递给Channel。可以接受外部源发送过来的数据,不同的Source可以接受不同格式的数据。
比如有目录池(spooling directoy)数据源,可以监控指定文件夹中的新文件变化,如果有文件产生,就立刻读取其内容。
Channel:
是一个存储池,接收Source的输出,直到有Sink消费掉channel中的数据或者channel中的数据到下一个channel中或者进入终端才会被删除,当sink写入失败后,可以自动重启,不会造成数据丢失,因此很可靠。
Sink:
Sink是用来输出的
组合方式也有很多种,具体组合看具体业务场景


三,Flume的特性
3.1 数据可靠性(内部实现)
当节点出现故障时,日志能够被传送到其它节点上而不会丢失。
Flume提供了三种级别的可靠性保障,从强到弱依次分别为:
1.end-to-end : 收到数据agent首先将event写到磁盘上,当数据传送成功后,再删除,如果数据发送失败,可以重新发送。
2.Store on faliure : 当数据发送方crash时(确认传输但未成功完成的时候)
3.Best effort : 数据发送到接收方后,不会进行确认。(udp)
一般使用end-to-end级别,保障数据的安全性,如果数据不是很重要(允许少量丢失),可以考虑其他两种级别。
3.2 自身可扩展性
Flume采用了三层架构,分别为agent,collector和storage,每一层均可以水平扩展。所有agent和 collector由master统一管理,使得系统容易监控和维护。master允许有多个(使用ZooKeeper进行管理和负载均衡),避免单点故障问题。【1.0自身agent实现扩展】
3.3 功能可扩展性
用户可以根据需要添加自己的agent,Flume自带了很多组件,包括各种agent(file , syslog, HDFS等)。
四,Flume的安装
1.将下载的flume包,解压到你要安装的目录(自行去官网查找与自己环境匹配的压缩包)
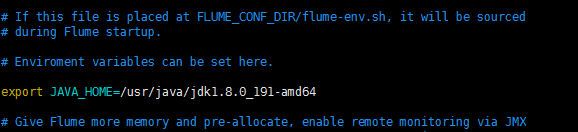
2.conf目录下,修改flume-env-template 重命名为 flume-env.sh 并配置其中的 JAVA_HOME
3.配置环境变量(不配置也可以,必须得在bin下操作)
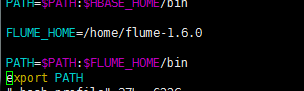
source ~/.bash_profile
##使配置的环境变量生效 我这里配置的是局部环境变量  也可以在 /etc/profile中配置全局环境变量
4.验证是否安装成功
[root@node03 ~]# flume-ng version
Flume 1.6.0
Source code repository: https://git-wip-us.apache.org/repos/asf/flume.git
Revision: 2561a23240a71ba20bf288c7c2cda88f443c2080
Compiled by hshreedharan on Mon May 11 11:15:44 PDT 2015
From source with checksum b29e416802ce9ece3269d34233baf43f
搞定!!!
五,常用操作
具体的操作细节(一些配置的参数,详细的解释)可以去官网查看:http://flume.apache.org/releases/content/1.9.0/FlumeUserGuide.html
这里我作几个简单的例子来操作下Flume
exec Unix 等操作系统执行命令行: tail | cat
netcat 监听一个指定端口,并将接收到的数据的每一行转换为一个event事件
avro 是序列化的一种,实现了RPC(远程过程调用协议)。监听avro端口来接收来自外部Avro客户端的事件流
Flume关于 Event
在Flume中使用Event对象来作为传递数据的格式。
Sources端在flume-ng-core子项目中的org.apache.flume.serialization包下,有一个名为LineDeserializer的类,这个类负责把数据按行来读取,每一行封装成一个Event(实现方式:按字节读取,当遇到"\n"时封装成Event返回,下一次获取Event时继续获取下一字节并判断)。然后按用户设置的批量传输的值来封装List
5.1 netcat --> logger
source数据格式为 netcat ,传输到 channel,然后Sink获取打印在控制台
在/root/flume/目录下新建 netcat_logger文件,内容如下
# example.conf: A single-node Flume configuration

# Name the components on this agent
<!-- 指定agent的 source -->
a1.sources = r1
<!-- 指定agent的 sink-->
a1.sinks = k1
<!-- 指定agent的 channel-->
a1.channels = c1

# Describe/configure the source
<!-- 指定source 数据格式-->
a1.sources.r1.type = netcat
<!-- 指定source 监听ip和端口-->
a1.sources.r1.bind = localhost
a1.sources.r1.port = 44444

# Describe the sink
<!-- 指定sink 输出到哪里 logger表示服务器节点命令行-->
a1.sinks.k1.type = logger

# Use a channel which buffers events in memory
<!-- 指定channel 类型 存储在内存中-->
a1.channels.c1.type = memory
<!-- 指定channel中 存储event 最多的个数-->
a1.channels.c1.capacity = 1000
<!-- 指定channel中 source每次放入的event数量 和 sink拉取的event数量-->
a1.channels.c1.transactionCapacity = 100

# Bind the source and sink to the channel
<!-- 指定source对应的 channel -->
a1.sources.r1.channels = c1
<!-- 指定sink对应的 channel -->
a1.sinks.k1.channel = c1
在安装 Flume的节点上,敲以下命令
[root@node03 flume]# flume-ng agent --conf ./ --conf-file netcat_logger --name a1
复制ssh渠道,开启另一个命令行页面,输入下面命令
[root@node03 ~]# telnet localhost 44444
没有安装telnet服务,yum一键安装命令
yum -y install telnet telnet-server telnet-client

在telnet命令行页面敲入内容,在另一个开启的页面能看到输出打印.


5.2 exec --> logger
在/root/flume/目录下新建 exec_logger文件,内容如下
a1.sources = r1
a1.channels = c1
a1.sinks = k1

<!-- 指定source 数据格式为 exec -->
a1.sources.r1.type = exec
<!-- 指定数据来源 监听flume.log的变化 -->
a1.sources.r1.command = tail -f /root/flume.log

a1.skins.k1.type = logger

a1.channels.c1.type = memory
a1.channels.c1.capacity = 1000
a1.channels.c1.transactionCapacity=100

a1.sources.channels = c1
a1.sinks.channel = c1
重复的配置不再解释
启动命令:
[root@node03 flume]# flume-ng agent --conf ./ --conf-file exec_logger --name a1
给flume.log文件中追加内容命令
echo  xixi  >>  flume.log
echo  heihei  >>  flume.log
echo  123  >>  flume.log
查看启动flume服务端命令行

5.3 avro_logger
在/root/flume/目录下新建 avro_logger文件,内容如下
##使用avro方式在某节点上将文件发送到本服务器上且通过logger方式显示
##当前flume节点执行:
#flume-ng agent --conf ./ --conf-file avro_loggers --name a1
##其他flume节点执行:flume-ng avro-client --conf ./ -H node03 -p 55555 -F ./logs


a1.sources=r1
a1.channels=c1
a1.sinks=k1

<!-- 指定source 数据格式为 avro 并配置监听ip和端口 -->
a1.sources.r1.type = avro
a1.sources.r1.bind=node03
a1.sources.r1.port=55555

a1.sinks.k1.type=logger

a1.channels.c1.type = memory
a1.channels.c1.capacity=1000
a1.channels.c1.transactionCapacity = 100

a1.sources.r1.channels=c1
a1.sinks.k1.channel=c1
启动命令:
[root@node03 flume]# flume-ng agent --conf ./ --conf-file avro_logger --name a1
测试命令:
flume-ng avro-client --conf ./ -H node03 -p 55555 -F /文件路径
5.4 netcat–>hdfs
在/root/flume/目录下新建 netcat_hdfs文件,内容如下
# a1 which ones we want to activate.
a1.channels = c1
a1.sources = r1
a1.sinks = k1

a1.sources.r1.type = netcat
a1.sources.r1.bind = node03
a1.sources.r1.port = 41414

<!-- 指定sink 输出到hdfs 并指定了存储目录 %y表示用当前年月日做文件夹,必须跟着下面配置的useLocalTimeStamp=true -->
a1.sinks.k1.type = hdfs
a1.sinks.k1.hdfs.path = hdfs://wcb/myflume/%y-%m-%d
a1.sinks.k1.hdfs.useLocalTimeStamp=true

# Define a memory channel called c1 on a1
a1.channels.c1.type = memory

# Define an Avro source called r1 on a1 and tell it
a1.sources.r1.channels = c1
a1.sinks.k1.channel = c1
启动命令;
flume]# flume-ng agent --conf ./ --conf-file netcat_hdfs --name a1
测试:
telnet node03 41414
输入内容后,去查看Hdfs上对应目录中的内容,可以看到先有.tmp(临时文件)文件再形成文件
5.5 exec–>hdfs
在/root/flume/目录下新建 exec_hdfs文件,内容如下
# a1 which ones we want to activate.
a1.channels = c1
a1.sources = r1
a1.sinks = k1

a1.sources.r1.type = exec
a1.sources.r1.command = tail -F /root/flume.log

a1.sinks.k1.type = hdfs
a1.sinks.k1.hdfs.path = hdfs://wcb/myflume/%y-%m-%d
a1.sinks.k1.hdfs.useLocalTimeStamp=true

# Define a memory channel called c1 on a1
a1.channels.c1.type = memory

# Define an Avro source called r1 on a1 and tell it
a1.sources.r1.channels = c1
a1.sinks.k1.channel = c1
启动测试命令同 5.2
5.6 avro–> hdfs
# a1 which ones we want to activate.
a1.channels = c1
a1.sources = r1
a1.sinks = k1

a1.sources.r1.type = avro
a1.sources.r1.bind=node03
a1.sources.r1.port=55555

a1.sinks.k1.type = hdfs
a1.sinks.k1.hdfs.path = hdfs://wcb/myflume/%y-%m-%d
a1.sinks.k1.hdfs.useLocalTimeStamp=true

# Define a memory channel called c1 on a1
a1.channels.c1.type = memory

# Define an Avro source called r1 on a1 and tell it
a1.sources.r1.channels = c1
a1.sinks.k1.channel = c1

====================
执行命令:flume-ng avro-client --conf ./ -H node03 -p 55555 -F ./logs

运行命令 :  flume-ng agent --conf ./ --conf-file exec_hdfs  --name a1
执行测试命令同 5.3
5.7 多个Agent

一个agent的输出是另一个agent的输入源
node01节点/root/flume下新建 netcat02_send文件,内容如下
# Name the components on this agent
 a1.sources = r1
 a1.sinks = k1
 a1.channels = c1

 # Describe/configure the source
 a1.sources.r1.type = netcat
 a1.sources.r1.bind = node01
 a1.sources.r1.port = 44444

 # Describe the sink
 <!-- 指定sink 输出到其他节点的哪个端口 -->
 a1.sinks.k1.type = avro
 a1.sinks.k1.hostname = node02
 a1.sinks.k1.port = 60000


 # Use a channel which buffers events in memory
 a1.channels.c1.type = memory
 a1.channels.c1.capacity = 1000
 a1.channels.c1.transactionCapacity = 100

 # Bind the source and sink to the channel
 a1.sources.r1.channels = c1
 a1.sinks.k1.channel = c1
node02节点 /root/flume/ 下新建 avro2文件 内容如下
a1.sources = r1
a1.sinks = k1
a1.channels = c1
<!-- 指定source 监听的ip和端口-->
a1.sources.r1.type = avro
a1.sources.r1.bind = node02
a1.sources.r1.port = 60000

a1.sinks.k1.type = logger

# Use a channel which buffers events in memory
a1.channels.c1.type = memory
a1.channels.c1.capacity = 1000
a1.channels.c1.transactionCapacity = 100

# Bind the source and sink to the channel
a1.sources.r1.channels = c1
a1.sinks.k1.channel = c1
先启动 Node02上的agent
flume-ng agent --conf ./ --conf-file avro02 -n a1
再启动node01上的agent
flume-ng agent --conf ./ --conf-file netcat02_send --name a1
启动telnet测试
telnet node01 44444
输入测试内容,在node02节点查看命令行输入结果


 3947
3947


 被折叠的 条评论
为什么被折叠?
被折叠的 条评论
为什么被折叠?
 到【灌水乐园】发言


