


在学习了vue的相关知识后,便做了一个名为“疫情动态实时播报”的小案例
下面是最后做完之后的一些主要的界面:
头部,

简介,

内容,


现在让我们从0开始正式进入项目吧!!!
0.涉及知识点:
- vue基础知识
- vue-router
- axios
- vant
- Echarts
0.前期准备:
a.创建项目
首先,在命令行工具中进入到你要创建项目的位置,通过 vue create xxx 创建vue项目
然后,选择最后一项:vue-covid19

其次,回车后选择:

其次,回车, 选择 n,也就是mode为hash

其次,回车,选择默认再回车即可

最后,选择 n,不保存,即可

等待项目创建,出现如下则项目创建完成

b.整理修改项目
项目创建完成后,删除一些不用的东西,例如HelloWorld.vue以及About.vue并删除与之相关的配置,最后项目结构物大致如下:

在assets文件夹下新建css文件夹,用来存放初始化的css文件,并在main.js文件里引入css的初始化文件
import "./assets/css/common.css"由于本项目的所有数据都是来源于网络请求,因此需要通过 npm install axios --save 命令安装 axios
c.运行项目
通过 npm run serve 在集成终端中运行该项目(VSCode)
![]()

d.素材准备
将头部导航需要用到的图片复制到assets目录下
e.项目分模块
在本项目中采用的组件化思想,例如头部导航、疫情数据、疫情地图...都是一个模块,因此我们将每个模块都做成一个独立的组件
对于该项目来说不是特别大,因此在这里我们将独立的组件都放在components里
例如,在components新建一个头部组件 Header.vue,并在 Home.vue 里引入:
注:本项目中用到的接口都是一些开源接口,可到 聚合数据 和 天行数据 获取
下面正式开始项目!!!
1.头部导航实现
a.在 src/components目录下新建 Header.vue 文件并进行相关设置:
Header.vue
<template>
  <div class="header">
      <h3>头部</h3>
  </div>
</template>

<style scoped>
     .header{
        width: 100%;
        height: 0;
        position: relative;
        padding-top: 33.5%;
        color: #fff;
        font-size: 0.28rem;
        text-align: center;
        background: url("../assets/1.jpg") no-repeat;
        background-size: cover;
    }
</style>
然后在 src/views/Home.vue 里引入
src/views/Home.vue
<template>
  <div>
    <Header />
  </div>
</template>

<script>
import Header from "../components/Header.vue"

export default {
  name: 'Home',
  components: {
    Header
  }
}
</script>
最后,效果如下:

到这里,头部导航就算是实现了
2.病毒信息渲染模块的实现
a.在 src 目录下新建一个名为 utils 的文件夹,用来存放网络请求所需的文件,并在该文件夹里新建一个名为 requst.js 的文件,进行如下配置:
request.js
import axios from "axios"
import qs from "querystring"

//处理错误信息的方法
const errorHandle = (status, info) => {
    switch (status) {
        case 400:
            console.log("语义有误");
            break;
        case 401:
            console.log("服务器认证失败");
            break;
        case 403:
            console.log("服务器拒绝访问");
            break;
        case 404:
            console.log("地址错误");
            break;
        case 500:
            console.log("服务器遇到意外");
            break;
        case 502:
            console.log("服务器无响应");
            break;
        default:
            console.log(info);
            break;
    }
}

//创建实例
const instance = axios.create({
    timeout: 5000,
    //baseURL: "http://iwenwiki.com"
});


/**
 * 拦截器
 */
//1.请求拦截
instance.interceptors.request.use(
    config => {
        //判断请求方式
        if (config.method === "post") {
            //数据转换
            config.data = qs.stringify(config.data);
        }
        return config;
    },
    //请求失败
    error => Promise.reject(error)
)

//2.响应拦截
instance.interceptors.response.use(
    response => response.status === 200 ? Promise.resolve(response) : Promise.reject(response),
    error => {
        const { response } = error;
        errorHandle(response.status, response.info);
    }
)


//导出
export default instance;
b.在 src 目录下新建一个名为 api 的文件夹,用来存放所有网络请求所需的函数文件;并在该文件夹下分别新建名为base.js和index.js的文件
base.js--存放接口,
const base = {
    baseUrl: "http://iwenwiki.com",
    ncov: "/wapicovid19/ncov.php"
};

export default base;
index.js--存放接口请求方法,
c.在src/component目录下新建名为 Covid19Info.vue 的文件,并在src/views/Home.vue文件里引入和注入
src/views/Home.vue,
<template>
  <div>
    <Header />
    <Covid19Info />
  </div>
</template>

<script>
import Header from "../components/Header.vue"
import Covid19Info from "../components/Covid19Info.vue"

export default {
  name: 'Home',
  components: {
    Header,
    Covid19Info
  }
}
</script>
src/component/Covid19Info.vue
<template>
  <div class="info">
      <p class="title">
          <i></i>
          病毒信息
      </p>
      <div class="content">
          <p>{{ covid19Info.note1 }}</p>
          <p>{{ covid19Info.note2 }}</p>
          <p>{{ covid19Info.note3 }}</p>
          <p>{{ covid19Info.remark1 }}</p>
          <p>{{ covid19Info.remark2 }}</p>
          <p>{{ covid19Info.remark3 }}</p>
      </div>
  </div>
</template>

<script>
import api from "../api"

export default {
    data () {
        return {
            covid19Info:{}
        }
    },
    mounted () {
        api.getNcov({
            key:"62e34ad34025d5d5127135efa58d4ca8"
        }).then(res=>{
            // console.log(res.data);
            if(res.status === 200){
                this.covid19Info = {
                    note1:res.data.newslist[0].desc.note1,
                    note2:res.data.newslist[0].desc.note2,
                    note3:res.data.newslist[0].desc.note3,
                    remark1:res.data.newslist[0].desc.remark1,
                    remark2:res.data.newslist[0].desc.remark2,
                    remark3:res.data.newslist[0].desc.remark3
                }
            }return;
        }).catch(error=>{
            console.log(error);
        })
    }
}
</script>

<style scoped>
.info{
    padding: 0.16rem;
    background: #fff;
    border-bottom: 1px solid #f1f1f1;
}

.title{
    font-size: 0.17rem;
}

.title i{
    display: inline-block;
    width: 0.04rem;
    height: 0.16rem;
    margin-right: 0.03rem;
    vertical-align: middle;
    background: #4169e2;
}

.content{
    padding: 0.06rem 0.16rem;
}

.content p{
    font-size: 13px;
    margin: 5px 0;
}

</style>
最后效果如下:

3.疫情病例详情模块实现
i.该模块用到的接口还是病毒信息渲染模块的接口,在获取接口的时候没必要再重复一次:
- 因此我们需要将 Covid19Info.vue 文件里面的 网络请求api的引用以及 data(){} 和 mounted () {} 全部剪切放到父级(Home.vue)里
- 在子组件 Covid19Info.vue 文件里利用 props 进行处理接收父类传递过来的数据:
 props: {
      covid19Info:{
      typeof:Object,
      default:()=>{
          return {}
        }
     }
  }
ii.在src/components下新建CaseNum.vue视图结构,并完成相应的配置:

src/components/CaseNum.vue,
<template>
  <div class="case-num">
      <div class="container">
          <div class="title">
              <span>截止 {{}} 全国数据统计</span>
          </div>
      </div>
      <div class="num">
          <ul class="count">
              <li class="create-item">
                  <div class="create-count">
                      <b>较昨日 <em style="color:rgb(247,76,49)"></em>{{}}</b>
                  </div>
                  <strong style="color:rgb(247,76,49)">{{}}</strong>
                  <span>现存确诊</span>
              </li>
              <li class="create-item">
                  <div class="create-count">
                      <b>较昨日 <em style="color:rgb(247, 130, 7)">+{{}}</em> </b>
                  </div>
                  <strong style="color:rgb(247, 130, 7)">{{}}</strong>
                  <span>累计确诊</span>
              </li>
              <li class="create-item">
                  <div class="create-count">
                      <b>较昨日 <em style="color:rgb(162, 90, 78)">+{{}}</em> </b>
                  </div>
                  <strong style="color:rgb(162, 90, 78)">{{}}</strong>
                  <span>累计境外输入</span>
              </li>
              <li class="create-item">
                  <div class="create-count">
                      <b>较昨日 <em style="color:rgb(174, 33, 44)">+{{}}</em> </b>
                  </div>
                  <strong style="color:rgb(174, 33, 44)">{{}}</strong>
                  <span>累计治愈</span>
              </li>
              <li class="create-item">
                  <div class="create-count">
                      <b>较昨日 <em style="color:rgb(93, 112, 146)">+{{}}</em> </b>
                  </div>
                  <strong style="color:rgb(93, 112, 146)">{{}}</strong>
                  <span>累计死亡</span>
              </li>
              <li class="create-item">
                  <div class="create-count">
                      <b>较昨日 <em style="color:rgb(40, 183, 163)">{{}}</em> </b>
                  </div>
                  <strong style="color:rgb(40, 183, 163)">{{}}</strong>
                  <span>现存无症状</span>
              </li>
          </ul>
      </div>
  </div>
</template>

<script>
export default {

}
</script>

<style scoped>

.case-num {
    padding: 0.16rem;
    background: #fff;
}
.container {
    margin: -0.16rem 0 0;
    font-size: 0.12rem;
}
.title {
    display: flex;
    align-items: center;
    justify-content: space-between;
    padding: 0.08rem 0 0.07rem;
    line-height: 0.24rem;
}
.title span {
    color: #666;
}
.title em {
    display: flex;
    align-items: center;
    justify-content: space-between;
    height: 0.24rem;
    margin-right: -0.16rem;
    padding: 0 0.08rem;
    color: #666;
    font-style: normal;
    background-color: #f7f7f7;
    border-radius: 0.12rem 0 0 0.12rem;
}
.title em img {
    width: 0.123rem;
    height: 0.123rem;
    margin-right: 0.037rem;
}
.num {
    position: relative;
    text-align: center;
    background: #fff;
}
.num::after {
    position: absolute;
    top: -0.01rem;
    left: -0.01rem;
    display: block;
    width: 200%;
    height: 200%;
    border: 0.01rem solid #ebebeb;
    border-radius: 0.08rem;
    box-shadow: 0 0.04rem 0.12rem 0 rgba(0, 0, 0, 0.05);
    transform: scale(0.5);
    transform-origin: 0 0;
    content: "";
}
.num ul {
    flex-flow: wrap;
    position: relative;
    display: flex;
    margin: 0;
    padding: 0.08rem 0 0.12rem;
}
.num ul li {
    position: relative;
    z-index: 1;
    display: flex;
    flex-direction: column;
    align-items: center;
    justify-content: center;
    box-sizing: border-box;
    width: 33.3333333%;
    margin: 10px 0;
}
.num ul li .create-item {
    position: relative;
    text-align: center;
}
.num ul li .create-item .create-count {
    display: flex;
    align-items: center;
    height: 0.12rem;
    margin-bottom: 0.02rem;
    color: #666;
    font-weight: 400;
    font-size: 0.09rem;
}
.num ul li .create-item .create-count em {
    font-weight: 400;
    font-style: normal;
}
.num ul li strong {
    margin-bottom: 0.01rem;
    font-weight: 700;
    font-size: 0.2rem;
    line-height: 0.25rem;
}
.num ul li span {
    display: block;
    color: #333;
    font-weight: 700;
    font-size: 0.11rem;
    line-height: 0.15rem;
}

</style>
iii.在src/views/Home.vue中引入和注入并且将数据传递给子类:
src/views/Home.vue,
<template>
  <div>
    <Header />
    <Covid19Info :covid19Info="covid19Info" />
    <CaseNum :caseNum="caseNum" />
  </div>
</template>

<script>
import api from "../api"
import Header from "../components/Header.vue"
import Covid19Info from "../components/Covid19Info.vue"
import CaseNum from "../components/CaseNum.vue"


export default {
  name: 'Home',
    data () {
        return {
            covid19Info:{},
            caseNum:{}
        }
    },
   mounted () {
        api.getNcov({
            key:"62e34ad34025d5d5127135efa58d4ca8"
        }).then(res=>{
            // console.log(res.data);
            if(res.status === 200){
                this.covid19Info = {
                    note1:res.data.newslist[0].desc.note1,
                    note2:res.data.newslist[0].desc.note2,
                    note3:res.data.newslist[0].desc.note3,
                    remark1:res.data.newslist[0].desc.remark1,
                    remark2:res.data.newslist[0].desc.remark2,
                    remark3:res.data.newslist[0].desc.remark3
                };
                this.caseNum = {
                   // 更新时间戳
                  modifyTime:res.data.newslist[0].desc.modifyTime,
                  // 现存确诊人数
                  currentConfirmedCount:res.data.newslist[0].desc.currentConfirmedCount,
                  // 累计确诊人数
                  confirmedCount:res.data.newslist[0].desc.confirmedCount,
                  // 累计境外输入人数
                  suspectedCount:res.data.newslist[0].desc.suspectedCount,
                  // 累计治愈人数
                  curedCount:res.data.newslist[0].desc.curedCount,
                  // 累计死亡人数
                  deadCount:res.data.newslist[0].desc.deadCount,
                  // 现存无症状人数
                  seriousCount:res.data.newslist[0].desc.seriousCount,
                  // 新增境外输入人数
                  suspectedIncr:res.data.newslist[0].desc.suspectedIncr,
                  // 相比昨天现存确诊人数
                  currentConfirmedIncr:res.data.newslist[0].desc.currentConfirmedIncr,
                  // 相比昨天累计确诊人数
                  confirmedIncr:res.data.newslist[0].desc.confirmedIncr,
                  // 相比昨天新增治愈人数
                  curedIncr:res.data.newslist[0].desc.curedIncr,
                  // 相比昨天新增死亡人数
                  deadIncr:res.data.newslist[0].desc.deadIncr,
                  // 相比昨天现存无症状人数
                  seriousIncr:res.data.newslist[0].desc.seriousIncr
                };
            }
        }).catch(error=>{
            console.log(error);
        })
    },
    components: {
    Header,
    Covid19Info,
    CaseNum
  },
}
</script>
iv.在src/components/CaseNum.vue里通过props获取父类传递过来的数据,并完成相应的逻辑部分的书写:
注意:
对于“累计确诊”、“累计境外输入”、“累计治愈”、“累计死亡”这些只能是正的,也就是只能增加,因此需要在前面加一个“+”号即可
对于“现存确诊”、“现存无症状”这两个有增有减,因此需要特殊处理
<template>
  <div class="case-num">
      <div class="container">
          <div class="title">
              <span>截止 {{ formatDate(caseNum.modifyTime) }} 全国数据统计</span>
          </div>
      </div>
      <div class="num">
          <ul class="count">
             <li class="create-item">
                  <div class="create-count">
                      <b>较昨日 <em style="color:rgb(247,76,49)">{{numZore(caseNum.currentConfirmedIncr)}}</em> </b>
                  </div>
                  <strong style="color:rgb(247,76,49)">{{ caseNum.currentConfirmedCount }}</strong>
                  <span>现存确诊</span>
              </li>
              <li class="create-item">
                  <div class="create-count">
                      <b>较昨日 <em style="color:rgb(247, 130, 7)">+{{caseNum.confirmedIncr }}</em> </b>
                  </div>
                  <strong style="color:rgb(247, 130, 7)">{{ caseNum.confirmedCount }}</strong>
                  <span>累计确诊</span>
              </li>
              <li class="create-item">
                  <div class="create-count">
                      <b>较昨日 <em style="color:rgb(162, 90, 78)">+{{ caseNum.suspectedIncr }}</em> </b>
                  </div>
                  <strong style="color:rgb(162, 90, 78)">{{  caseNum.suspectedCount }}</strong>
                  <span>累计境外输入</span>
              </li>
              <li class="create-item">
                  <div class="create-count">
                      <b>较昨日 <em style="color:rgb(174, 33, 44)">+{{ caseNum.curedIncr }}</em> </b>
                  </div>
                  <strong style="color:rgb(174, 33, 44)">{{ caseNum.curedCount }}</strong>
                  <span>累计治愈</span>
              </li>
              <li class="create-item">
                  <div class="create-count">
                      <b>较昨日 <em style="color:rgb(93, 112, 146)">+{{ caseNum.deadIncr }}</em> </b>
                  </div>
                  <strong style="color:rgb(93, 112, 146)">{{ caseNum.deadCount }}</strong>
                  <span>累计死亡</span>
              </li>
              <li class="create-item">
                  <div class="create-count">
                      <b>较昨日 <em style="color:rgb(40, 183, 163)">{{ numZore(caseNum.seriousIncr) }}</em> </b>
                  </div>
                  <strong style="color:rgb(40, 183, 163)">{{ caseNum.seriousCount }}</strong>
                  <span>现存无症状</span>
              </li>
          </ul>
      </div>
  </div>
</template>

<script>
export default {
    props: {
        caseNum:{
            type:Object,
            default:()=>{
                return {};
            }
        }
    },
    methods: {
        //处理正负问题
        numZore(num){
            return num >= 0 ? "+" + num : num;
        },

        // 格式化日期和时间
        formatDate(date){
            var date = new Date();
            var YY = date.getFullYear()+"-";
            var MM = (date.getMonth() + 1) < 10 ? "0" + (date.getMonth() + 1) + "-" : date.getMonth() + "-";
            var DD = date.getDate() < 10 ? "0" + date.getDate() + "  " : date.getDate() + "  ";
            var hh = date.getHours() < 10 ? "0" + date.getHours() + ":" : date.getHours() + ":";
            var mm = date.getMinutes() <  10 ? "0" + date.getMinutes() : date.getMinutes();
            return YY +  MM + DD + hh + mm;
        }
    }
}
</script>
最后,效果如下,

3.地图模块实现
在实现这个模块之前我们需要先了解什么是 Echarts 以及 vant 的简单使用
a.Echarts
i.关于安装Echarts的方案:
1. 手动引入Echarts,自己封装使用(本项目使用的方法)
地址:Apache ECharts![]() https://echarts.apache.org/zh/index.html
https://echarts.apache.org/zh/index.html
- npm install echarts@4.x --save
2. 引入第三方封装好的Echarts
- https://github.com/ecomfe/vue-echarts
注意事项:
4.x:我们当前选择的版本(当前选择)
5.x:引入地图比较麻烦,我们需要单独找到地图的json资源
ii.流程:
1.在src下新建一个名为 plugins 的文件夹,在该文件夹里面新建一个名为 echarts.js的文件,并在src/main.js里引入:
main.js
import Echarts from "./plugins/echarts"

Vue.use(Echarts)
2.在 src/components 目录下新建一个名为 Map.vue 的文件,并在 src/views/Home.vue 里引入和注入:
<template>
  <div class="home">
      <Map />
  </div>
</template>

<script>
import Map from "../components/Map.vue"
export default {
    name:"Home",
    components: {
        Map
    }
}
</script>
3.完成 echarts.js 里的中国地图的相关配置 :
import echarts from "echarts"

const install = function(Vue) {
    //将其挂载到原型属性上
    Object.defineProperties(Vue.prototype, {
        $charts: {
            get() {
                return {
                    //方法,提供外部访问
                    chinaMap: function(id, data) {
                        //定义容器接收并初始化
                        var chartDom = document.getElementById(id);
                        var myChart = echarts.init(chartDom);
                        var option = {
                            //鼠标移动上去提示框
                            tooltip: {
                                triggerOn: "click", // 事件类型
                                enterable: true, // 鼠标是否允许滑入悬浮框中
                                //对数据进行格式化操作
                                formatter(data) {
                                    return data.name + '<br>' + data.value;
                                    // return `<a href='/#/city/${ data.name }' style='color:#fff'>省:${data.name}<br/>病例:${ data.value }个</a>`;
                                }
                            },
                            //将数值的大小映射到明暗度
                            visualMap: [{
                                //如何放置 visualMap 组件,水平('horizontal')或者竖直('vertical')
                                orient: "vertical",
                                type: "piecewise", //分段型
                                pieces: [ // 匹配数据
                                    { min: 0, max: 0, color: "#fff" },
                                    { min: 1, max: 10, color: "#fdfdcf" },
                                    { min: 10, max: 100, color: "#fe9e83" },
                                    { min: 100, max: 1000, color: "#e55a4e" },
                                    { min: 1000, max: 10000, color: "#4f070d" },
                                ]
                            }],
                            //呈现出来的样式的系列(柱状图、饼图...)
                            series: [{
                                name: "中国地图",
                                type: "map", // 选择类型为地图
                                map: "china", // 中国地图
                                roam: false, // 是否允许缩放
                                zoom: 1.2, // 放大比例
                                label: { // 配置文本
                                    normal: {
                                        show: true, // 是否允许地图显示文字
                                        textStyle: { // 配置字体样式
                                            fontSize: 8
                                        }
                                    }
                                },
                                //地图区域多边形图形样式(包含字体颜色、阴影等)
                                itemStyle: {
                                    // 地图的区域颜色,线和区块的颜色
                                    normal: {
                                        areaColor: "rgba(0,255,236,0)",
                                        borderColor: "rgba(0,0,0,0.2)"
                                    },
                                    // 区域颜色与阴影
                                    emphasis: {
                                        areaColor: "rgba(255,180,0,0.8)",
                                        shadowOffsetX: 0,
                                        shadowOffsetY: 0,
                                        shadowBlur: 20,
                                        borderWidth: 0
                                    }
                                },
                                // data: [
                                //         { name: "内蒙古", value: 130 },
                                //         { name: "新疆", value: 12 },
                                //         { name: "西藏", value: 8 },
                                //         { name: "青海", value: 0 },
                                //     ]
                                data
                            }]
                        };
                        myChart.setOption(option);
                    }
                }
            }
        }
    })
};

//导出
export default install
4..在main.js里引入中国地图的js文件
import "../node_modules/echarts/map/js/china"5.在 src/api/base.js 中base = {}字段中引入接口(provinceNcov: "/wapicovid19/all.php");并在 src/api/index.js 文件里 const api = {} 字段里添加存放该接口请求的方法:
base.js
const base = {
    baseUrl: "http://iwenwiki.com",
    ncov: "/wapicovid19/ncov.php",
    provinceNcov: "/wapicovid19/all.php", // 全国各个省市疫情数据
};

export default base;
index.js
import axios from '../utils/request'
import base from './base'

const api = {
    getNcov(params) {
        // console.log(base.baseUrl + base.ncov); //http://iwenwiki.com/wapicovid19/ncov.php
        // console.log(params); //{key: '62e34ad34025d5d5127135efa58d4ca8'}
        return axios.get(base.baseUrl + base.ncov, {
            params
        });
    },
    /**
     * 各个省市疫情数据
     */
    getProvinceNcov() {
        return axios.get(base.baseUrl + base.provinceNcov);
    },
};

export default api;
6.在 src/components 里的Map.vue里引入 api以及进行相应的渲染和配置:
<template>
  <div>
      <p class="title"><i></i>疫情地图</p>
      <div id="map" class="map"></div>
  </div>
</template>

<script>
import api from "../api"
export default {
    mounted () {
        //各省市地图
        api.getProvinceNcov()
        .then(res=>{
            //data:[{name:"",valuue:""}]
            console.log(res);
            //过滤数据
            // this.$charts.chinaMap("map");
            let allCitys = [];//定义一个容器去接收所有数据
            //遍历循环
            for(let i = 0; i < res.data.retdata.length; i++){
                // 获取数据里的name和vale字段
                let temp = {
                    name: res.data.retdata[i].xArea,
                    value: res.data.retdata[i].curConfirm
                };// 将数据里的name和vale字段放入容器里
                allCitys.push(temp);
            }
            //渲染数据
            this.$charts.chinaMap("map",allCitys);
        }).catch(error=>{
            console.log(error);
        })
    }
}
</script>

<style scoped>
.map{
    width: 375px;
    height: 400px;
}
.title {
    border-top: 0.005rem solid #ebebeb;
    border-bottom: 0;
    display: -webkit-box;
    display: -ms-flexbox;
    display: flex;
    -webkit-box-align: center;
    -ms-flex-align: center;
    align-items: center;
    -webkit-box-pack: start;
    -ms-flex-pack: start;
    justify-content: flex-start;
    height: 0.44rem;
    padding: 0 0.16rem;
    font-weight: 500;
    font-size: 0.17rem;
    line-height: 0.44rem;
    background: #fff;
}
.title::before {
    content: "";
    width: 5px;
    height: 20px;
    background: #4169e2;
    margin-right: 10px;
}
</style>
效果如下:

b.封装Tab组件
接下来将要做的就是利用vant封装一个Tab组件,以此来进行切换:

1.首先,在 src/components下新建tabs文件夹,并在该文件夹里分别新建 index.js(主入口文件)、tabs.vue、tab.vue、content.vue,这里关于tab的分析流程如下:
这是我们需要使用的结构大致如下:
<tabs :currentIndex="index" @onIndex="changeHandle">

    <tab index="1" label="导航一">内容1</tab>

    <tab index="2" label="导航二">内容2</tab>

    <tab index="3" label="导航三">内容3</tab>

</tabs>
这是浏览器渲染后的结构:
<div>
    <div>---tabs
        <ul>
            <li>导航1</li>--tab
            <li>导航2</li>
            <li>导航3</li>
        </ul>
    </div>
    <div>--content
        <div>内容1</div>
        <div>内容2</div>
        <div>内容3</div>
    </div>
</div>
组件之间的关系:
- tabs -> tab:在我们封装组件中,他俩之间是通过slots进行处理的
- tabs -> content:引用关系
- tab -> content:在我们封装组件中,他俩之间是通过slots进行处理的
组件之间的关系说明:
- 1. $slots:插槽
- 2. $parent:边界管理-> 儿子通过$parent读取父级的属性和方法
- 3. props
- 4. 自定义事件:$emit
2.其次,在main.js里引入并完成tabs/index.js中主入口文件的配置:
import Tabs from "./components/tabs"

Vue.use(Tabs)
src/components/tabs/index.js
import Tabs from "./tabs.vue"
import Tab from "./tab.vue"


export default (Vue) =>{
    Vue.component(Tabs.name,Tabs)
    Vue.component(Tab.name,Tab)
}
3.完成tabs/tabs.vue、tabs/tab.vue、tabs/content.vue的书写
tabs.vue
<script>
import Content from "./content.vue";

export default {
    name:"Tabs",
    data () {
        return {
             // 所有内容部分的容器
            pans: [],
        }
    },
    props:{
        currentIndex:{
            type:[String,Number],
            default:1
        }
    },
    components: {
        Content,
    },
    methods: {
        getIndex(index) {
            //子传父,获取子类的数据
        this.$emit("onIndex", index);
        },
    },
    render(){
        return(
            <div>
                <ul class="tabs-header">{ this.$slots.default }</ul>
                <Content pans={ this.pans } />
            </div>
        );
    }
}
</script>

<style scoped>
.tabs-header {
  display: flex;
  list-style: none;
  margin: 0;
  padding: 0;
  border-bottom: 2px solid #ededed;
}
</style>
tab.vue
<script>
export default {
     name:"Tab",
     props:{
         label:{
             type:String,
             default:"tab"
         },
         /*
         高亮制作:判断 currentIndex 是否等于 index
         1.在tab.vue里面读取到index的值
         2.在tabs.vue里读取currentIndex的值
         3.判断 currentIndex 是否等于 index
            3.1获取父级里的currentIndex属性
            3.2作对比
            3.3高亮显示
         4.实现点击谁谁就高亮显示
            4.1给li添加点击事件
            4.2传值
            4.3
          */
         index:{
             type:[String,Number],
             default:1
         }
     },
     computed:{
        isActive(){
            // 3.2作对比
            return this.$parent.currentIndex == this.index
        }
    },
     mounted(){
        //  3.1读取父级里面的currentIndex属性
        // console.log(this.$parent.currentIndex);
        //读取到自己里面的内容并扔给pans
        // this.$parent.pans.push(this.$slots.default)
        //读取自己本身
        this.$parent.pans.push(this);
     },
     methods:{
         clickItemHandle(){
            //  4.2
            //  console.log(666);
            // 改变currentIndex的值,就可以改变高亮
            // console.log(this.index);
            // 利用事件回调将当前的index值传递给父级
            this.$parent.getIndex(this.index)
         }
     },
     render() {
        //  3.3高亮显示
        //  console.log(this.isActive);//调用
        let classNames = {
            tab:true,
            active:this.isActive
        }
         return(
             <li onClick={ this.clickItemHandle } class={classNames}>{ this.label }</li>
         );
     }
}
</script>

<style scoped>

.tab {
    flex: 1;
    list-style: none;
    line-height: 40px;
    margin-right: 30px;
    position: relative;
    text-align: center;
}

.tab.active {
    border-bottom: 2px solid blue;
}

</style>
content.vue
<script>
export default {
  name:"Content",
  props:{
    pans:{
      type:Array,
      default:() =>{
        return []
      }
    }
  },
  render(){
    return(
      <div>
        {
          this.pans.map((ele,index) =>{
            //   相当于移除和加载
            // return  ele.isActive ? ele.$slots.default : ""

            //相当于显示和隐藏
            return <div style={{ display:ele.isActive ? 'block' : 'none' }}>{ ele.$slots.default }</div>
          })
        }
      </div>
    )
  }
}
</script>

<style>

</style>
4.在Map.vue里引入封装好的组件
<template>
<div>
<p class="title"><i></i>疫情地图</p>
<!-- 第一步 -->
<tabs :currentIndex="currentIndex" @onIndex="getIndexHandle">
<tab index="chinaMap" label="中国地图">
<div class="map" id="map"></div>
</tab>
<tab index="worldMap" label="世界地图">
<!-- <div class="map" id="worldMap"></div> -->
测试
</tab>
</tabs>
</div>
</template>
<script>
import api from "../api"
export default {
data(){
return{
// 第二步
currentIndex:"chinaMap"
}
},
methods:{
// 第三步
getIndexHandle(index){
this.currentIndex = index
}
},
mounted () {
//各省市地图
api.getProvinceNcov()
.then(res=>{
//data:[{name:"",valuue:""}]
console.log(res);
//过滤数据
// this.$charts.chinaMap("map");
let allCitys = [];//定义一个容器去接收所有数据
//遍历循环
for(let i = 0; i < res.data.retdata.length; i++){
// 获取数据里的name和vale字段
let temp = {
name: res.data.retdata[i].xArea,
value: res.data.retdata[i].curConfirm
};// 将数据里的name和vale字段放入容器里
allCitys.push(temp);
}
//渲染数据
this.$charts.chinaMap("map",allCitys);
}).catch(error=>{
console.log(error);
})
}
}
</script>
<style scoped>
.map{
width: 375px;
height: 400px;
}
.title {
border-top: 0.005rem solid #ebebeb;
border-bottom: 0;
display: -webkit-box;
display: -ms-flexbox;
display: flex;
-webkit-box-align: center;
-ms-flex-align: center;
align-items: center;
-webkit-box-pack: start;
-ms-flex-pack: start;
justify-content: flex-start;
height: 0.44rem;
padding: 0 0.16rem;
font-weight: 500;
font-size: 0.17rem;
line-height: 0.44rem;
background: #fff;
}
.title::before {
content: "";
width: 5px;
height: 20px;
background: #4169e2;
margin-right: 10px;
}
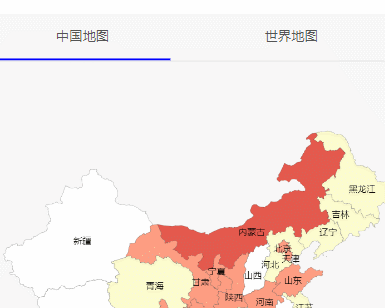
</style>最后就是渲染世界地图、各省市地图,这些都与上面的加载中国地图、渲染中国地图一样,因此关于这一部分这里就不去叙述了。我们就直接看成品:
四、疫情曲线图
这一部分的实现主要是用swiper,然后就是用了几张图片来替代
安装swiper:cnpm install swiper vue-awesome-swiper --save
1.在components目录下新建MySwiper.vue文件:
在Home.vue里引入
2.在api/base.js和api/index.js里进行引入相关接口与函数编写:
const base = {
    swiperImg:"/wapicovid19/ncovimg.php", // 曲线图
}

export default base;
import axios from "../utils/request"
import base from "./base"
const api = {
getSwiperImg(){
return axios.get(base.baseUrl + base.swiperImg)
},
}
export default api;3.在components/MySwiper.vue里面引入
<template>
  <div class="chart">
    <h3 class="title">全国</h3>
    <swiper ref="mySwiper" :options="swiperOptions">
      <swiper-slide v-for="(item, index) in swiperData" :key="index">
        <img :src="item.image" alt="" />
      </swiper-slide>
    </swiper>
    <ul class="navigator">
      <li
        :class="{ active: index === currentIndex }"
        v-for="(item, index) in swiperData"
        :key="index"
        class="navigatorItem"
        @click="clickItemHandle(index)"
      >
        {{ item.title }}
      </li>
    </ul>
  </div>
</template>

<script>
import { Swiper, SwiperSlide, directive } from "vue-awesome-swiper";
import "swiper/swiper-bundle.css";
import api from "../api";

export default {
  data() {
    let _this = this;
    return {
      swiperData: [],
      currentIndex: 0,
      swiperOptions: {
        on: {
          slideChangeTransitionEnd: function () {
            _this.currentIndex = this.activeIndex;
          },
        },
      },
    };
  },
  components: {
    Swiper,
    SwiperSlide,
  },
  mounted() {
    api
      .getSwiperImg()
      .then((res) => {
        if (res.status === 200) {
          this.swiperData = res.data.result;
        }
      })
      .catch((error) => {
        console.log(error);
      });
  },
  computed: {
    swiper() {
      return this.$refs.mySwiper.$swiper;
    },
  },
  methods: {
    clickItemHandle(index) {
      this.currentIndex = index;
      this.swiper.slideTo(index, 1000, false);
    },
  },
};
</script>

<style scoped>
.line {
  padding: 0 10px;
  width: 100%;
  height: 300px;
}
.chart {
  position: relative;
  background: #fff;
  padding: 0.16rem 0;
}
.chart .title {
  font-size: 0.16rem;
  margin: 0 0 0.08rem 0.16rem;
}
.chart .swiper-pagination {
  position: absolute;
  text-align: center;
  -webkit-transition: 300ms opacity;
  -o-transition: 300ms opacity;
  transition: 300ms opacity;
  -webkit-transform: translate3d(0, 0, 0);
  transform: translate3d(0, 0, 0);
  z-index: 10;
}
.chart .swiper-pagination-bullet {
  width: calc(20% - 0.02rem);
  text-align: center;
  background: #f7f7f7;
  padding: 0.045rem;
  box-sizing: border-box;
  color: #666;
  display: flex;
  align-items: center;
  justify-content: center;
  border-radius: 0.02rem;
}
.navigator {
  font-size: 0.12rem;
  list-style: none;
  display: flex;
  padding: 0 0.16rem;
  justify-content: center;
  margin: 0.06rem 0 0;
}
.navigatorItem {
  color: #4169e2;
  background: #f1f5ff;
  position: relative;
  width: calc(20% - 0.02rem);
  text-align: center;
  background: #f7f7f7;
  padding: 0.045rem;
  box-sizing: border-box;
  color: #666;
  display: flex;
  align-items: center;
  justify-content: center;
  border-radius: 0.02rem;
  margin-left: 0.025rem;
}
.active {
  color: #4169e2;
  background: #f1f5ff;
  position: relative;
}
</style>
五、疫情出行UI布局的实现
对于这一部分的实现我们依旧采用组件化的思想,利用vant来实现,通过
npm i vant -Snpm i babel-plugin-import -D命令来进行安装,具体可参考:vanthttps://vant-contrib.gitee.io/vant/#/zh-CN/quickstart![]() https://vant-contrib.gitee.io/vant/#/zh-CN/quickstart
https://vant-contrib.gitee.io/vant/#/zh-CN/quickstart
1.在components文件夹里新建一个Trip.vue并在Home.vue里注册引入
<template>
  <div class="home">
      <Trip />
  </div>
</template>

<script>
import Trip from "../components/Trip.vue"

export default {
    name:"Home",

    components: {
        Trip
    }
}
</script>
2.在安装好vant后,在babel.config.js里进行如下配置
module.exports = {
    presets: [
        '@vue/cli-plugin-babel/preset'
    ],
    "plugins": [
        ["import", {
            "libraryName": "vant",
            "libraryDirectory": "es",
            "style": true
        }]
    ]
}
3.在plugins文件夹里新建vant.js,并进行配置,将需要用到的引入
import Vue from 'vue';
import { Cascader } from 'vant';
import { Field } from 'vant';
import { Button } from 'vant';
import { Popup } from 'vant';

Vue.use(Popup);
Vue.use(Button);
Vue.use(Field);
Vue.use(Cascader);
4.在main.js里引入vant
import "./plugins/vant"5.在components目录下新建Cascader.vue文件,用来封装组件以达到复用的效果
<template>
  <div>
    <van-field
        v-model="city"
        is-link
        readonly
        :label="label"
        placeholder="请选择所在地区"
        @click="show = true"
        />
    <van-popup v-model="show" round position="bottom">
    <van-cascader
            v-model="cascaderValue"
            title="请选择所在地区"
            :options="options"
            @close="show = false"
            @finish="onFinish"
        />
    </van-popup>
    </div>
</template>

<script>
export default {
    data () {
        return {
            city:"",
            show:false,
            cascaderValue:""
        }
    },
    props:{
        options:{
            type:Array,
            default:()=>{
                return []
            }
        },
        label:{
            type:String,
            default:""
        }
    },
    methods: {
        // 全部选项选择完毕后,会触发 finish 事件
        onFinish({ selectedOptions }) {
        this.show = false;
        this.city = selectedOptions.map((option) => option.text).join('/');
        this.$emit("onValue",selectedOptions[1]);//子传父
        },
    }
}
</script>
6.进行数据适配,在api/base.js和api/index.js里分别写入接口和接口函数
base.js,
const base = {
    baseUrl: "http://iwenwiki.com",
    citys: "/wapicovid19/citys.php", // 获取所有城市
};

export default base;
index.js,
import axios from '../utils/request'
import base from './base'

const api = {
    getNcov(params) {
        // console.log(base.baseUrl + base.ncov); //http://iwenwiki.com/wapicovid19/ncov.php
        // console.log(params); //{key: '62e34ad34025d5d5127135efa58d4ca8'}
        return axios.get(base.baseUrl + base.ncov, {
            params
        });
    },
    /** 防疫政策数据*/
    getCitys(params) {
        return axios.get(base.baseUrl + base.citys, {
            params
        })
    }
};

export default api;
7.在Trip.vue里进行配置
<template>
<div class="spring">
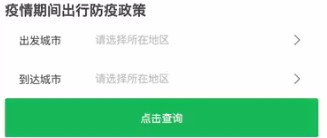
<h3 class="title">疫情期间出行防疫政策</h3>
<Cascader label="出发城市" :options="options" @onValue="getFromCity" />
<Cascader label="到达城市" :options="options" @onValue="getToCity" />
<van-button type="primary" block>查看政策</van-button>
</div>
</template>
<script>
import Cascader from "./Cascader.vue"
import api from "../api"
export default {
data () {
return {
options:[]
}
},
components:{
Cascader
},
mounted () {
api.getCitys({
key:"171e165a7d991c5f6ecd5194c54778ef",
}).then(res=>{
//获取相对应的数据
// console.log(res.data);
var currentAll = [];
for(var i=0;i<res.data.result.length;i++){
var arr = [];
for(var j=0;j<res.data.result[i].citys.length;j++){
var temp2= {
text:res.data.result[i].citys[j].city,
value:res.data.result[i].citys[j].city_id
};
arr.push(temp2);
}
var temp1= {
text:res.data.result[i].province,
value:res.data.result[i].province_id,
children:arr
};
currentAll.push(temp1);
}
// console.log(currentAll);
this.options = currentAll;
}).catch(error=>{
console.log(error);
})
},
methods: {
getFromCity(fromCity){
console.log(fromCity);
},
getToCity(toCity){
console.log(toCity);
}
}
}
</script>
<style scoped>
.spring {
width: 100%;
background: #fff;
padding: 10px;
box-sizing: border-box;
}
.spring .title {
font-size: 0.16rem;
margin: 0 0 0.08rem 0.16rem;
}
</style>


 172
172


 被折叠的 条评论
为什么被折叠?
被折叠的 条评论
为什么被折叠?
 到【灌水乐园】发言


