


一、插件的基本使用
1.1 初识插件
Vue.use()做了什么事情?
Vue.use的作用是注册一个Vue插件(注册组件), Vue.use必须在new Vue之前使用
什么时候需要定义插件?
当某一个组件或者功能经常需要被使用到时, 我们就可以将这个组件或者功能定义成一个插件
例如: 网络加载指示器
如何自定义一个插件?
自定义插件![]() https://cn.vuejs.org/v2/guide/plugins.html#%E5%BC%80%E5%8F%91%E6%8F%92%E4%BB%B6
https://cn.vuejs.org/v2/guide/plugins.html#%E5%BC%80%E5%8F%91%E6%8F%92%E4%BB%B6
4.插件通常用来为 Vue 添加全局功能
插件的功能范围没有严格的限制——一般有下面几种:
-
添加全局方法或者 property。如:vue-custom-element
-
添加全局资源:指令/过滤器/过渡等。如 vue-touch
-
通过全局混入来添加一些组件选项。如 vue-router
-
添加 Vue 实例方法,通过把它们添加到
Vue.prototype上实现。 -
一个库,提供自己的 API,同时提供上面提到的一个或多个功能。如 vue-router
1.2 插件开发流程
通过 vue create name 创建好vue项目后
在src目录下新建一个名为plugins的文件夹并在该文件夹里面新建一个loading的目录,在loading目录下新建一个名为loading.vue和index.js的文件
plugins/loading/loading.vue
<template>
    <div class="container">
        <div class="loading"></div>
        <p class="title">正在加载...</p>
    </div>
</template>

<script>
    export default {
        name: "Loading"
    }
</script>

<style scoped>
    .container{
        width: 200px;
        height: 200px;
        border-radius: 20px;
        background: rgba(0,0,0,.5);
        position: absolute;
        left: 50%;
        top: 50%;
        transform: translate(-50%,-50%);
    }

    .container .loading{
        width: 100px;
        height: 100px;
        border-radius: 50%;
        border: 5px solid #fff;
        margin: 20px auto;
        border-right-color: #4fc08d;
        animation: loading  2s linear infinite;
    }

    .container .title  {
        text-align: center;
        color: #fff;
    }

    @keyframes loading {
        from{
            transform: rotate(0deg);
        }
        to{
            transform: rotate(360deg);
        }
    }
</style>
plugins/loading/index.js
import Vue from "vue"
import Loading from "./loading"

export default {
     /*
    * 如果要将一个组件封装成一个插件,那么必须提供一个install方法,必须在install方法中注册当前的这个组件
    */
    install() {
        Vue.component(Loading.name,Loading);
    }
}
main.js
import Vue from 'vue'
import App from './App.vue'
import './registerServiceWorker'
// import Loading from "./components/Loading";
import Loading from "./plugins/loading/index";
// 注册为全局组件
// import Loading from "./components/Loading";
// Vue.component(Loading.name,Loading)
//或通过use的方式,但是先要将组件先封装成一个插件后才能
Vue.use(Loading)

Vue.config.productionTip = false

new Vue({
  render: h => h(App),
}).$mount('#app')
App.vue
<template>
  <div id="app">
    <Loading></Loading>
  </div>
</template>

<script>
    // import Loading from "./components/Loading";

export default {
  name: 'App',
  components: {
    // Loading
  },
  data:function(){
     return{

     }
  },
   methods:{

   }
}
</script>

<style scoped>
</style>
将以上代码进行优化改造:
plugins/loading/loading.vue
<template>
    <div class="container" v-show="isShow">
        <div class="loading"></div>
        <p class="title">{{title}}</p>
    </div>
</template>

<script>
    export default {
        name: "Loading",
        data(){
            return {
                title: '正在加载...',
                isShow: false
            }
        },
    }
</script>

<style scoped>
    .container{
        width: 200px;
        height: 200px;
        border-radius: 20px;
        background: rgba(0,0,0,.5);
        position: absolute;
        left: 50%;
        top: 50%;
        transform: translate(-50%,-50%);
    }

    .container .loading{
        width: 100px;
        height: 100px;
        border-radius: 50%;
        border: 5px solid #fff;
        margin: 20px auto;
        border-right-color: #4fc08d;
        animation: loading  2s linear infinite;
    }

    .container .title  {
        text-align: center;
        color: #fff;
    }

    @keyframes loading {
        from{
            transform: rotate(0deg);
        }
        to{
            transform: rotate(360deg);
        }
    }
</style>
plugins/loading/index.js
import Loading from "./loading"

export default {
    /*
    * 如果要将一个组件封装成一个插件,那么必须提供一个install方法,必须在install方法中注册当前的这个组件
    */
    install(Vue,Options) {
        //1.根据组件生成构造函数
        let LoadingConstructor = Vue.extend(Loading)

        //2.根据构造函数创建实例对象
        let LoadingInstance = new LoadingConstructor();

        //3.随便创建一个标签(元素)
        let oDiv= document.createElement('div');

        //4.将创建好的标签添加到页面上
        document.body.appendChild(oDiv);

        //5.将创建好的实例对象挂载到创建好的元素上
        LoadingInstance.$mount(oDiv);

        // console.log(Options);
        // console.log(LoadingInstance.title);
        //添加初始化值
        setTimeout(function () {
            if(Options&&Options.title!==null&&Options.title!==undefined){
                LoadingInstance.title=Options.title;
            }
        },2000);

        //添加全局方法
        Vue.showLoading=function () {
            LoadingInstance.isShow = true;
        };

        Vue.hiddenLoading=function () {
            LoadingInstance.isShow = false;
        }

        //添加实例方法(局部)
        Vue.prototype.$showLoading=function () {
            LoadingInstance.isShow = true;
        };
        Vue.prototype.$hiddenLoading=function () {
            LoadingInstance.isShow = false;
        };
    }
}
main.js
import Vue from 'vue'
import App from './App.vue'
import './registerServiceWorker'
import Loading from "./plugins/loading/index";
//或通过use的方式,但是先要将组件先封装成一个插件后才能
//只要调用use方法,就会去调用其对应的install方法
Vue.use(Loading,{
  title: '加载完成'
})

Vue.config.productionTip = false

new Vue({
  render: h => h(App),
}).$mount('#app')
App.vue
<template>
  <div id="app">
      <button @click="myFn1">显示</button>
      <button @click="myFn2">隐藏</button>
  </div>
</template>

<script>
// import Vue from 'vue'

export default {
  name: 'App',
  components: {
  },
  data:function(){
     return{
     }
  },
   methods:{
       myFn1(){
           // Vue.showLoading();//全局方法
           this.$showLoading();
       },
       myFn2(){
           // Vue.hiddenLoading();//全局方法
           this.$hiddenLoading();
       }
   }
}
</script>

<style scoped>
</style>
二、插件示例
2.1 自定义 Toast 提示框
App.vue
<template>
  <div id="app">
    <button @click="toastHandle">提示框</button>
  </div>
</template>

<script>
export default {
  name: 'App',
  components: {

  },
  methods: {
    toastHandle() {
      this.$toast("toast提示框",{
        duration:10000,
        defaultType:"warning"
      });
    },
  }
}
</script>

<style>
#app {
  font-family: Avenir, Helvetica, Arial, sans-serif;
  -webkit-font-smoothing: antialiased;
  -moz-osx-font-smoothing: grayscale;
  text-align: center;
  color: #2c3e50;
  margin-top: 60px;
}
</style>
main.js
import Vue from 'vue'
import App from './App.vue'
import './registerServiceWorker'
import Toast from "./plugins/toast"
import "./plugins/toast/toast.css"

Vue.use(Toast);
Vue.config.productionTip = false

new Vue({
    render: h => h(App),
}).$mount('#app')
plugins/toast/toast.css
.vue-toast{
    position: fixed;
    color: #fff;
    width: 50%;
    height: 150px;
    display: flex;
    justify-content: center;
    align-items: center;
    font-size: 20px;
    background:rgba(0, 0, 0, 0.6);
    border-radius: 10px;
    top: 50%;
    left: 50%;
    margin-left: -25%;
    margin-top: -25%;
    z-index:999;
}

.toast-success{
    color: #fff;
}

.toast-danger{
    color: #ff0000;
}

.toast-warning{
    color: #ff0;
}
plugins/toast/index.js
var Toast = {}
Toast.install = function(Vue) {

    let opt = {
        duration: 3000,
        defaultType: "success"
    }

    Vue.prototype.$toast = (tips, type) => {
        if (type.duration) {
            opt.duration = type.duration
        }
        if (type.defaultType) {
            opt.defaultType = type.defaultType
        }
        let toastTpl = new Vue({
            render() {
                return (
                    <div class = {
                        ['vue-toast', 'toast-' + opt.defaultType] } > { tips } </div>
                )
            }
        })

        let tpl = toastTpl.$mount().$el; // 创建实例,挂载到文档中
        document.body.appendChild(tpl);
        setTimeout(function() {
            document.body.removeChild(tpl)
        }, opt.duration)
    }

    ["success", "danger", "warning"].forEach(type => {
        Vue.prototype.$toast[type] = (tips) => {
            return Vue.prototype.$toast(tips, type)
        }
    })

}

export default Toast
点击“提示框”按钮后

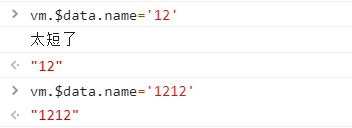
2.2 自定义数据校验插件
<div id="root"></div><script src="https://unpkg.com/vue@next"></script><script>
//对数据做校验的插件
const app = Vue.createApp({
data() {
return {
name: 'dell',
age: 21
}
},
rules: {
age: {
validate: (age) => age > 25,
message: '太年轻了'
},
name: {
validate: (name) => name.length >= 4,
message: '太短了'
}
},
template: `
<div>name:{{name}},age:{{age}}</div>
`
});
//用法二:plugin用法
// const validatorPlugin = {
// install(app, options) {}
// }
//或
const validatorPlugin = (app, options) => {
app.mixin({
created() {
for (let key in this.$options.rules) {
const item = this.$options.rules[key];
this.$watch(key, (value) => {
// console.log(key + 'changed');
const result = item.validate(value);
if (!result) {
console.log(item.message);
}
});
}
}
})
}
app.use(validatorPlugin);
//用法一:mixin用法
// app.mixin({
// created() {
// for (let key in this.$options.rules) {
// const item = this.$options.rules[key];
// this.$watch(key, (value) => {
// // console.log(key + 'changed');
// const result = item.validate(value);
// if (!result) {
// console.log(item.message);
// }
// });
// }
// }
// })
const vm = app.mount('#root');
</script>![]()


 2188
2188


 被折叠的 条评论
为什么被折叠?
被折叠的 条评论
为什么被折叠?
 到【灌水乐园】发言


