


本文旨在阐明,在ASP .Net MVC项目中,如何通过Web表单控件管理报表。
所以,我们需要创建一个Web应用程序,它将允许:
1)上传Web报表;
2)以三种格式之一导出报表;
3)显示/隐藏报表的Web工具栏;
4)自定义工具栏上按钮的样式;
5)在Online Designer上运行报表。
我们开工。首先,我们将做一些准备工作,在MVC应用程序中启动一个Web报表。添加对以下库的引用:FastReport和FastReport.Web。
现在你需要编辑文件夹“Views-> Shared”中的_Layout.cshtml文件。为header添加脚本和样式:
@WebReportGlobals.Scripts
@WebReportGlobals.Styles
在视图文件夹中有一个Web.config文件,给它添加命名空间:
在项目的根目录,还有另一个Web.config。在其中我们添加一个处理句柄,紧随modules部分之后:
在HomeController中,我们添加报表的工作逻辑。
在Index方法中,我们将加载报表并将其发送到视图。
public ActionResult Index
{
SetReport;
webReport.Width=Unit.Percentage(100);
webReport.Height=Unit.Percentage(100);
ViewBag.WebReport=webReport;
return View;
}
我把报表上传到一个单独的方法,我们将在下面讨论。将web报表的宽度和高度设置为100%。使用ViewBag,我们将报表传递给视图。并返回索引视图。
为了在不同的方法中使用报表对象,我创建了一个全局变量,一个WebReport对象的实例。
public WebReport webReport=new WebReport;
1)现在考虑下载报表:
private void SetReport
{
string report_path=GetReportPath;
System.Data.DataSet dataSet=new System.Data.DataSet;
dataSet.ReadXml(report_path + "nwind.xml");
webReport.Report.RegisterData(dataSet, "NorthWind");
webReport.Report.Load(report_path + "Master-Detail.frx");
}
指定包含报表的文件夹的路径。为了方便起见,我创建了一个将路径变量分配给报表的单独方法。接下来,创建一个“DataSet”的实例并加载XML数据库。然后,我们在报表对象中注册数据源。最后,将报表模板加载到WebReport对象中。
指定包含报表的文件夹路径的方法:
private string GetReportPath
{
return this.Server.MapPath("~/App_Data/");
}
2)在进入“视图”之前,再添加一个选择报表导出的方法:
public void ReportExport(string type)
{
SetReport;
switch (type)
{
case "pdf":
webReport.ExportPdf;
break;
case "csv":
webReport.ExportCsv;
break;
default:
webReport.ExportWord2007;
break;
}
这里我们加载一个报表。根据类型参数的值,我们执行三种类型的导出之一。
现在打开“索引”视图。将包含三个导出选项的下拉列表添加到表单中:
@using (Html.BeginForm("ReportExport", "Home"))
{
@Html.DropDownList("Type", new List
这里我们使用了一个html助手来创建一个表单,它指向控制器“Home”和action(method)“ReportExport”。请记住,我们已经在控制器中创建了这个方法。在表单内部,我们创建一个DropDownList控件,并为其填充值。当然,你可以创建一个数据模型。但是,鉴于列表只有三个元素,所以我直接在视图中填充了它。下拉列表打开后,会出现一个提交类型的按钮,它会在网页上刷新。
就像你记得的那样,ReportExport方法需要一个类型参数 - 一个来自下拉列表的值。根据所选值,报表将被导出为适当的格式。
3)现在实现报表工具栏的隐藏。视图代码如下所示::
@using (Html.BeginForm("Index", "Home"))
{
@Html.CheckBox("Toolbar", true, new { @οnchange="this.form.submit" }) Toolbar
}
和前面的例子一样,我们创建一个表单。但是,这一次我们指定了"Index"指令 - 我们在那里显示报表。在表单中,我们创建了一个CheckBox元素。它的值将被传递给Index方法。这一次,我决定不添加另一个按钮来更新页面,我使用了"onchange"事件,它具有发送表单“this.form.submit ”的功能。现在,如果你更改复选框的值,页面将被刷新。
类似于导出报表,我们需要传递一个参数给方法。在这种情况下,要传递的是“工具栏”。布尔函数的字符串将被传输。我们继续:
public ActionResult Index(string toolbar)
{
SetReport;
webReport.Width=Unit.Percentage(100);
webReport.Height=Unit.Percentage(100);
if (toolbar=="true")
webReport.ShowToolbar=true;
else
webReport.ShowToolbar=false;
ViewBag.WebReport=webReport;
return View;
}
在该方法中,添加了一个参数和条件。根据工具栏参数的值,我们可以决定启用或禁用它。
4)现在让我们转到控件的创建,借助它我们可以选择图标样式。我们将添加四个更多的RadioButton元素到前面的例子中:
@using (Html.BeginForm("Index", "Home"))
{
@Html.CheckBox("Toolbar", true, new { @οnchange="this.form.submit" }) Toolbar Black Buttons: @Html.RadioButton("Radio", "Black Buttons", true, new { style="width: 13px;", @οnchange="this.form.submit" }) Green Buttons: @Html.RadioButton("Radio", "Green Buttons", false, new { style="width: 13px;", @οnchange="this.form.submit" }) Blue Buttons:@Html.RadioButton("Radio", "Blue Buttons", false, new { style="width: 13px;", @οnchange="this.form.submit" }) Red Buttons:@Html.RadioButton("Radio", "Red Buttons", false, new { style="width: 13px;", @οnchange="this.form.submit" })
@ViewBag.WebReport.GetHtml
为了改善外观,我把项目放到表单里。。让我们考虑一下RadioButton组件:
Html.RadioButton("Radio", "Black Buttons", true, new { style="width: 13px;", @οnchange="this.form.submit" })
这是控件的名称 - “Radio”。这是Index操作中另一个参数的名称。下一个参数 - “Black Buttons”。也就是说,工具栏将显示黑色按钮。下一个值表示选定的单选按钮是否被默认标记。最后一个参数是HtmlAttributes对象。在这里,你可以为标签指定任何可用的属性。我利用这一点,指定控件的宽度和“onchange”事件,类似于前面消费社区的复选框元素。
所以,只有四个单选按钮 - 工具栏中的四种风格的图标。让我们回到Index指令:
public ActionResult Index(string toolbar, string radio)
{
SetReport;
webReport.Width=Unit.Percentage(100);
webReport.Height=Unit.Percentage(100);
if (toolbar=="true")
webReport.ShowToolbar=true;
else
webReport.ShowToolbar=false;
switch (radio)
{
case "Red Buttons":
webReport.ToolbarIconsStyle=ToolbarIconsStyle.Red;
break;
case "Green Buttons":
webReport.ToolbarIconsStyle=ToolbarIconsStyle.Green;
break;
case "Blue Buttons":
webReport.ToolbarIconsStyle=ToolbarIconsStyle.Blue;
break;
default:
webReport.ToolbarIconsStyle=ToolbarIconsStyle.Black;
break;
}
ViewBag.WebReport=webReport;
return View;
}
现在再添加一个参数 - "radio"。在交换机设计中,我根据radio的值指定了所需的风格。我们将参数“radio”和“toolbar”的处理分配到不同的方法中。
public void ShowToolbar(string toolbar)
{
if (toolbar=="true")
webReport.ShowToolbar=true;
else
webReport.ShowToolbar=false;
}
public void ToolbarStyle(string radio)
{
switch (radio)
{
case "Red Buttons":
webReport.ToolbarIconsStyle=ToolbarIconsStyle.Red;
break;
case "Green Buttons":
webReport.ToolbarIconsStyle=ToolbarIconsStyle.Green;
break;
case "Blue Buttons":
webReport.ToolbarIconsStyle=ToolbarIconsStyle.Blue;
break;
default:
webReport.ToolbarIconsStyle=ToolbarIconsStyle.Black;
break;
}
}
"Index"也发生了变化:
public ActionResult Index(string toolbar, string radio)
{
SetReport;
webReport.Width=Unit.Percentage(100);
webReport.Height=Unit.Percentage(100);
ShowToolbar(toolbar);
ToolbarStyle(radio);
ViewBag.WebReport=webReport;
return View;
}
5)继续实施最后一个设想的功能 -在Online Designer中运行报表。值得一提的是,为了显示它,需要从官网下载“OnlineDesigner”程序集并将其包含在项目中。只需解压并将整个WebReportDesigner文件夹添加到项目的根目录即可。
将按钮和隐藏的字段添加到前面例子里的表单中:
表单将通过点击按钮提交。请注意,属性值是通过“ViewBag”定义的。我们传递来自控件的按钮值。稍后,你会明白我为什么这样做。“oncklick”事件被分配给按钮。现在我给它的元素赋值“Hidden(隐藏)”。请注意,由于ViewBag,我得到了web报表属性的值。因此,如果页面显示报表设计器,隐藏字段的值将是“true”,否则为“false”。
对于隐藏字段,设置 id="hid"属性。多亏了标识符,我们在表单上找到了所需的元素。现在所有的视图代码如下所示:
@{
ViewBag.Title="Home Page";
}
@using (Html.BeginForm("ReportExport", "Home"))
{
@Html.DropDownList("Type", new List
@using (Html.BeginForm("Index", "Home"))
{
@Html.CheckBox("Toolbar", true, new { @οnchange="this.form.submit" }) Toolbar
Black Buttons: @Html.RadioButton("Radio", "Black Buttons", true, new { style="width: 13px;", @οnchange="this.form.submit" })
Green Buttons: @Html.RadioButton("Radio", "Green Buttons", false, new { style="width: 13px;", @οnchange="this.form.submit" })
Blue Buttons:@Html.RadioButton("Radio", "Blue Buttons", false, new { style="width: 13px;", @οnchange="this.form.submit" })
Red Buttons:@Html.RadioButton("Radio", "Red Buttons", false, new { style="width: 13px;", @οnchange="this.form.submit" })
}
@ViewBag.WebReport.GetHtml
我们来看看控制器。
public ActionResult Index(string toolbar, string radio, string dsg)
{
SetReport;
webReport.Width=Unit.Percentage(100);
webReport.Height=Unit.Percentage(100);
ShowToolbar(toolbar);
ToolbarStyle(radio);
ViewBag.Result=ShowDesigner(dsg);
ViewBag.WebReport=webReport;
return View;
}
public string ShowDesigner(string dsg)
{
if (dsg=="False")
{
webReport.DesignReport=true;
return "Show Report";
}
else if (dsg=="True")
{
webReport.DesignReport=false;
return "Show Designer";
}
return "Show Designer";
}
如你所见,另外一个参数被添加到了Index方法中。它的名称对应于视图中隐藏元素的名称。还添加了一行:“ViewBag.Result=ShowDesigner (dsg);”。
其中,我将按钮的名称传递给视图。一个新的方法“ShowDesigner”,用来启用或禁用报表设计器并返回按钮的名称。
运行应用程序:
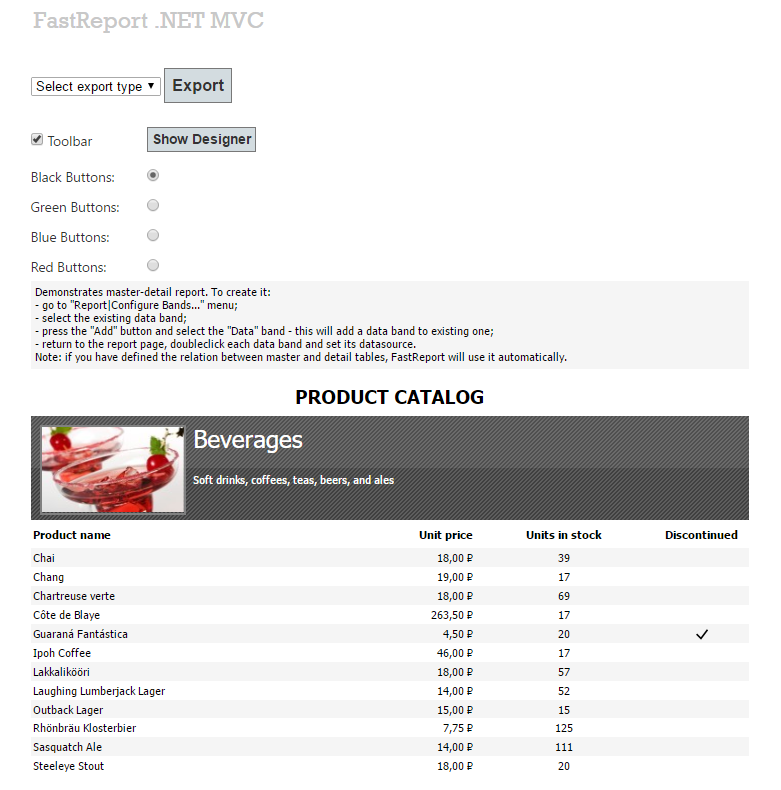
这是一个包含三种导出类型的下拉列表:
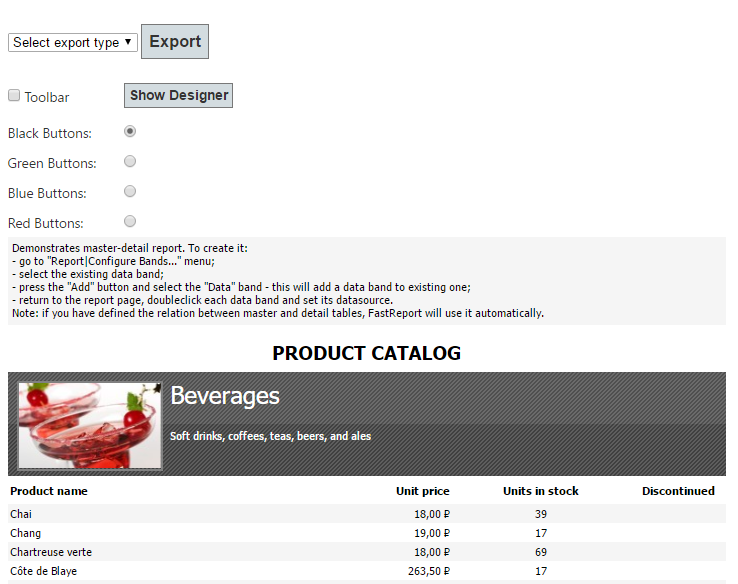
让我们禁用工具栏:
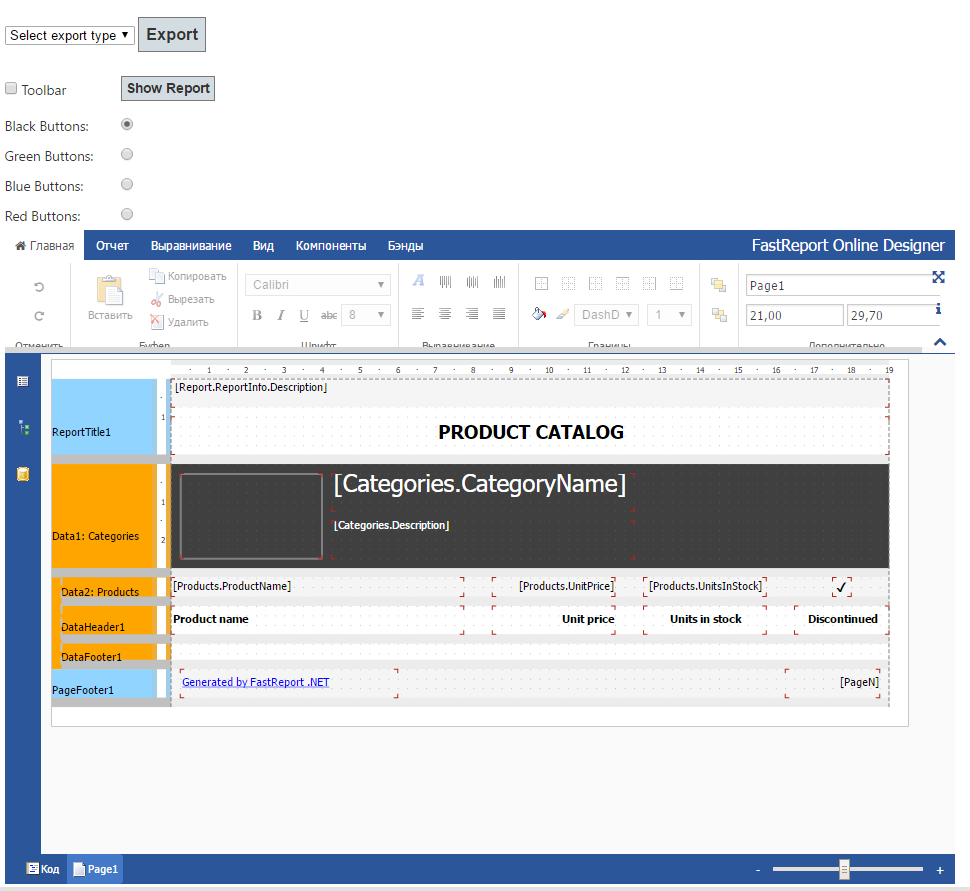
现在我们启用在线报表设计器:
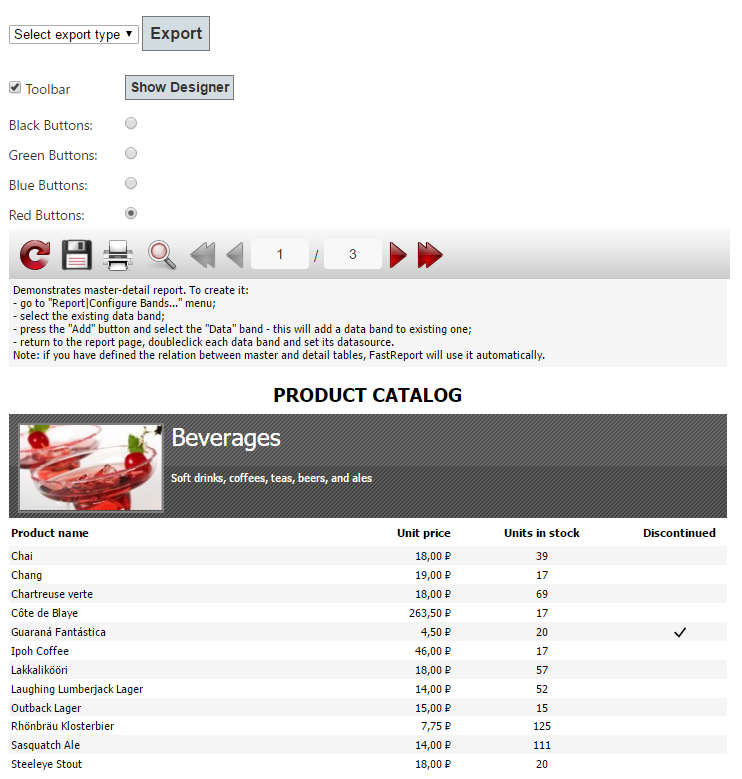
显示报表并打开工具栏。让我们为工具栏上的按钮选择一些样式:
就这样,我们已经创建了外部控件,通过它我们可以管理ASP .Net MVC应用程序中的WebReport对象的属性。


 1558
1558


 被折叠的 条评论
为什么被折叠?
被折叠的 条评论
为什么被折叠?
 到【灌水乐园】发言


