


目录
2.2.1、createCoroutineUnintercepted方法
本文的介绍内容如下:1、协程和线程的区别;2、协程是如何执行的;3、协程是如何挂起的;4、协程挂起后是如何恢复的。
协程可以看作是一个通过“状态机”执行的代码块,还是在线程上执行,并没有新的机器指令的支持。
一、协程的使用
下面给出一个简介的demo。在挂起函数test1中,先挂起30ms,然后执行挂起函数test2。
class TestSuspend {
    private val TAG = "TestSuspend"
    suspend fun test1(): Int {
        delay(30)
        Log.i(TAG, "test1")
        test2()
        return 1
    }

    suspend fun test2() {
        Log.i(TAG, "test2")
    }

    @OptIn(DelicateCoroutinesApi::class)
    fun startTest() {
        GlobalScope.launch {
            test1()
            test2()
        }
    }
}
二、协程的执行原理
2.1、挂起函数的反编译代码及执行分析
以挂起函数test1为例,为了更好的分析协程是如何执行的,需要查看上述demo的反编译代码,如下:
public final class TestSuspend {
   @NotNull
   private final String TAG = "TestSuspend";
   public static final int $stable;

   // 如果是第二次以后的执行,传入的参数就是内部创建的那个协程对象$continuation
   @Nullable
   public final Object test1(@NotNull Continuation $completion) {
      Continuation $continuation;
      label27: {
         if ($completion instanceof <undefinedtype>) {
            $continuation = (<undefinedtype>)$completion;
            if (($continuation.label & Integer.MIN_VALUE) != 0) {
               $continuation.label -= Integer.MIN_VALUE;
               break label27;
            }
         }

         // 注1:创建一个协程对象,此协程对象的作用是在存储当前协程的状态及返回
         $continuation = new ContinuationImpl($completion) {
            Object L$0;
            // $FF: synthetic field
            Object result;
            int label;

            // 注3 调用协程的resume方法去恢复协程执行时,会调用到这里
            @Nullable
            public final Object invokeSuspend(@NotNull Object $result) {
               this.result = $result;
               this.label |= Integer.MIN_VALUE;
               return TestSuspend.this.test1((Continuation)this);
            }
         };
      }

      Object $result = $continuation.result;
      // var4是协程挂起状态常量
      Object var4 = IntrinsicsKt.getCOROUTINE_SUSPENDED();
      // 通过switch的方式,实现状态机
      switch ($continuation.label) {
         case 0:
            ResultKt.throwOnFailure($result);
            $continuation.L$0 = this;
            $continuation.label = 1;
            // 注2:delay方法会返回一个协程挂起状态常量,与var4相同。这时直接返回的方式,挂起当前协程
            if (DelayKt.delay(30L, $continuation) == var4) {
               return var4;
            }
            break;
         case 1:
            this = (TestSuspend)$continuation.L$0;
            ResultKt.throwOnFailure($result);
            break;
         case 2:
            ResultKt.throwOnFailure($result);
            return Boxing.boxInt(1);
         default:
            throw new IllegalStateException("call to 'resume' before 'invoke' with coroutine");
      }

      Log.i(this.TAG, "test1");
      $continuation.L$0 = null;
      $continuation.label = 2;
      // 执行挂起函数test2,因为test2的返回值是Unit.INSTANCE,所以会返回1,当前协程就执行结束了
      if (this.test2($continuation) == var4) {
         return var4;
      } else {
         return Boxing.boxInt(1);
      }
   }

   @Nullable
   public final Object test2(@NotNull Continuation $completion) {
      Log.i(this.TAG, "test2");
      return Unit.INSTANCE;
   }

    public final void startTest() {
      // 在default线程执行
      BuildersKt.launch$default((CoroutineScope)GlobalScope.INSTANCE, (CoroutineContext)null, (CoroutineStart)null, new Function2((Continuation)null) {
         int label;

         public final Object invokeSuspend(Object $result) {
            Object var2 = IntrinsicsKt.getCOROUTINE_SUSPENDED();
            switch (this.label) {
               case 0:
                  ResultKt.throwOnFailure($result);
                  TestSuspend var10000 = TestSuspend.this;
                  Continuation var10001 = (Continuation)this;
                  this.label = 1;
                  // 调用test1方法,因为test1内部会调用delay,所以这里第一次调用时会挂起
                  if (var10000.test1(var10001) == var2) {
                     return var2;
                  }
                  break;
               case 1:
                  ResultKt.throwOnFailure($result);
                  break;
               case 2:
                  ResultKt.throwOnFailure($result);
                  return Unit.INSTANCE;
               default:
                  throw new IllegalStateException("call to 'resume' before 'invoke' with coroutine");
            }

            TestSuspend var3 = TestSuspend.this;
            Continuation var4 = (Continuation)this;
            this.label = 2;
            if (var3.test2(var4) == var2) {
               return var2;
            } else {
               return Unit.INSTANCE;
            }
         }

         public final Continuation create(Object value, Continuation $completion) {
            return (Continuation)(new <anonymous constructor>($completion));
         }

         // 调用invokeSuspend开始执行协程
         public final Object invoke(CoroutineScope p1, Continuation p2) {
            return ((<undefinedtype>)this.create(p1, p2)).invokeSuspend(Unit.INSTANCE);
         }

         // $FF: synthetic method
         // $FF: bridge method
         public Object invoke(Object p1, Object p2) {
            return this.invoke((CoroutineScope)p1, (Continuation)p2);
         }
      }, 3, (Object)null);
   }
}
kotlin中协程的执行方式与状态机相同,在如果发生了挂起,就更新、记录内部的状态(代码中的label)。然后挂起协程,等待下一次的执行恢复回调。当再次执行时,根据内部状态,跳转到对应的逻辑处执行,直至协程执行结束。
根据上面的字节码,可以看出:
首先,挂起函数test1会在内部创建一个协程对象(注1),这个协程对象会保存协程的状态(即label)、下次恢复执行协程时需要的参数(此demo中未给出)、当前协程自身(即L$0)。
然后,协程基于switch实现状态机,作为协程实现挂起和恢复的基础。在注2处,test1方法调用了另一个挂起函数delay,此函数会返回一个COROUTINE_SUSPENDED对象,告诉当前协程需要挂起,当前方法就会通过return方式,实现协程挂起等待。在delay结束后,会调用协程的resume方法,继而调用到invokeSuspend方法,在此方法中重新调用test1方法去继续执行协程。delay函数的实现方式与线程有关,针对主线程,通过postDelay的方式实现,在延迟结束后,回去执行协程的resume方法。针对非主线程,会通过pack方式实现,调用此方法当线程阻塞一段时间。
最后,在延迟结束后,会调用协程的resume方法,恢复协程的执行。在之前调用delay时,将状态label改成了1,这时会直接跳转到label=1的地方进行执行。因为label=1的地方没有挂起函数,会继续往下执行,调用挂起函数test2,因为test2方法没有返回COROUTINE_SUSPENDED,所以返回test1方法的返回值,执行结束。
以上介绍了挂起函数test1的执行流程和协程挂起的实现方式----通过return实现挂起。下面分析test1是如何被调用。
2.2、协程执行流程分析
在demo中,通过GlobalScope.launch方式启动了一个协程,在协程内部执行了挂起函数test1和test2。此launch方法实现如下:
public fun CoroutineScope.launch(
    context: CoroutineContext = EmptyCoroutineContext,
    start: CoroutineStart = CoroutineStart.DEFAULT,
    block: suspend CoroutineScope.() -> Unit
): Job {
    val newContext = newCoroutineContext(context)
    val coroutine = if (start.isLazy)
        LazyStandaloneCoroutine(newContext, block) else
        StandaloneCoroutine(newContext, active = true)
    coroutine.start(start, coroutine, block)
    return coroutine
}
可以看到此方法首先会调用newCoroutineContext方法创建一个协程上下文,如下:
public actual fun CoroutineScope.newCoroutineContext(context: CoroutineContext): CoroutineContext {
    val combined = foldCopies(coroutineContext, context, true)
    val debug = if (DEBUG) combined + CoroutineId(COROUTINE_ID.incrementAndGet()) else combined
    return if (combined !== Dispatchers.Default && combined[ContinuationInterceptor] == null)
        debug + Dispatchers.Default else debug
}
在此方法中会将Dispatchers.Default添加到上下文中,即协程会执行在默认分发器Default上。
然后,会创建一个StandaloneCoroutine对象,调用此对象的start方法启动协程,并将我们自定义的挂起函数作为block参数传入,此方法如下:
public fun <R> start(start: CoroutineStart, receiver: R, block: suspend R.() -> T)
{
    start(block, receiver, this)
}

public enum class CoroutineStart {
    DEFAULT,
    LAZY,
    ATOMIC,
    UNDISPATCHED;
    public operator fun <R, T> invoke(block: suspend R.() -> T, receiver: R, completion: Continuation<T>): Unit =
        when (this) {
            // 注4
            DEFAULT -> block.startCoroutineCancellable(receiver, completion)
            ATOMIC -> block.startCoroutine(receiver, completion)
            UNDISPATCHED -> block.startCoroutineUndispatched(receiver, completion)
            LAZY -> Unit // will start lazily
        }
}
start方法会去调用CoroutineStart的invoke方法,因为传入的DEFAULT类型的CoroutineStart,所以会调用到注4处,如下:
internal fun <R, T> (suspend (R) -> T).startCoroutineCancellable(
    receiver: R, completion: Continuation<T>,
) = runSafely(completion) {
    createCoroutineUnintercepted(receiver, completion).intercepted().resumeCancellableWith(Result.success(Unit))
}
此方法首先,会调用createCoroutineUnintercepted方法创建一个协程对象,此协程对象内部会调用我们自定义的挂起函数。然后,通过intercepted方法对创建的协程对象进行包装,以控制协程对象的执行;最后,调用resumeCancellableWith方法将协程抛到分发器(dispatcher)中去执行。
接下来,依次对上面3个步骤进行分析:
2.2.1、createCoroutineUnintercepted方法
public actual fun <R, T> (suspend R.() -> T).createCoroutineUnintercepted(
    receiver: R,
    completion: Continuation<T>
): Continuation<Unit> {
    val probeCompletion = probeCoroutineCreated(completion)
    return if (this is BaseContinuationImpl)
        create(receiver, probeCompletion)
    else {
        createCoroutineFromSuspendFunction(probeCompletion) {
            (this as Function2<R, Continuation<T>, Any?>).invoke(receiver, it)
        }
    }
}
通过查看反编译代码,发现我们传入的是Function2类型的对象,所以会执行else中的代码,如下:
private inline fun <T> createCoroutineFromSuspendFunction(
    completion: Continuation<T>,
    crossinline block: (Continuation<T>) -> Any?
): Continuation<Unit> {
    val context = completion.context
    // label == 0 when coroutine is not started yet (initially) or label == 1 when it was
    return if (context === EmptyCoroutineContext)
        object : RestrictedContinuationImpl(completion as Continuation<Any?>) {
            ......
        }
    else
        object : ContinuationImpl(completion as Continuation<Any?>, context) {
            private var label = 0

            override fun invokeSuspend(result: Result<Any?>): Any? =
                when (label) {
                    0 -> {
                        label = 1
                        result.getOrThrow() // Rethrow exception if trying to start with exception (will be caught by BaseContinuationImpl.resumeWith
                        // block是我们自定义的挂起函数
                        block(this) // run the block, may return or suspend
                    }
                    1 -> {
                        label = 2
                        result.getOrThrow() // this is the result if the block had suspended
                    }
                    // 上面将label设置为1,此处直接抛Error。表示此协程只能在此执行一次;多次执行此处会报错
                    else -> error("This coroutine had already completed")
                }
        }
}
此方法最后会创建一个匿名ContinuationImpl对象,将我们传入的自定义挂起函数封装到一个协程对象中。
2.2.2、intercepted方法
public actual fun <T> Continuation<T>.intercepted(): Continuation<T> =
    (this as? ContinuationImpl)?.intercepted() ?: this

internal abstract class ContinuationImpl(
    completion: Continuation<Any?>?,
    private val _context: CoroutineContext?
) : BaseContinuationImpl(completion) {

    // 注5
    public fun intercepted(): Continuation<Any?> =
        intercepted
            ?: (context[ContinuationInterceptor]?.interceptContinuation(this) ?: this)
                .also { intercepted = it }

}

public abstract class CoroutineDispatcher :
    AbstractCoroutineContextElement(ContinuationInterceptor), ContinuationInterceptor {
    // 返回一个包裹原协程的协程对象,用于拦截原协程的resume调用
    public final override fun <T> interceptContinuation(continuation: Continuation<T>): Continuation<T> =
        DispatchedContinuation(this, continuation)

}
此方法会查找协程的上下文context,从中读取实现了ContinuationInterceptor接口的对象。从上面看到,CoroutineDispatcher实现了ContinuationInterceptor接口,所以注5处返回的是抽象类CoroutineDispatcher的一个子类对象,而这子类对象就是协程中的分发器Dispatcher。比较常见的分发器对应的类如下表格:
| 协程中的分发器 | 对应类(CoroutineDispatcher的子类) |
| Dispatchers.Default | DefaultScheduler |
| Dispatchers.Main | MainCoroutineDispatcher |
| Dispatchers.IO | DefaultIoScheduler |
在注5处得到CoroutineDispatcher对象后,会调用interceptContinuation方法创建一个DispatchedContinuation对象,此对象会在协程resume之前,把协程分发到对应的Dispatcher中去恢复执行。具体实现方式在下一小节介绍。
2.2.3、resumeCancellableWith方法
internal class DispatchedContinuation<in T>(
    @JvmField internal val dispatcher: CoroutineDispatcher,
    @JvmField val continuation: Continuation<T>
) : DispatchedTask<T>(MODE_UNINITIALIZED), CoroutineStackFrame, Continuation<T> by continuation {

    override fun resumeWith(result: Result<T>) {
        val state = result.toState()
        if (dispatcher.safeIsDispatchNeeded(context)) {
            _state = state
            resumeMode = MODE_ATOMIC
            dispatcher.safeDispatch(context, this)
        } else {
            executeUnconfined(state, MODE_ATOMIC) {
                withCoroutineContext(context, countOrElement) {
                    continuation.resumeWith(result)
                }
            }
        }
    }

    // We inline it to save an entry on the stack in cases where it shows (unconfined dispatcher)
    // It is used only in Continuation<T>.resumeCancellableWith
    @Suppress("NOTHING_TO_INLINE")
    internal inline fun resumeCancellableWith(result: Result<T>) {
        val state = result.toState()
        // 先检查是否可以在dispatcher上执行当前协程。
        if (dispatcher.safeIsDispatchNeeded(context)) {
            _state = state
            resumeMode = MODE_CANCELLABLE
            1)、检查通过,放到dispatcher执行
            dispatcher.safeDispatch(context, this)
        } else {
            2)、检查不通过,直接在当前线程执行
            executeUnconfined(state, MODE_CANCELLABLE) {
                if (!resumeCancelled(state)) {
                    resumeUndispatchedWith(result)
                }
            }
        }
    }

}
在协程执行前,会调用safeIsDispatchNeeded方法,检查协程是否可以在dispatcher上执行。此方法默认值会true,所以一般情况会分发到dispatcher上执行。dispatcher的类型是CoroutineDispatcher,来源于context[ContinuationInterceptor],大多数情况下,是Dispatchers.Default、Dispatchers.Main、Dispatchers.IO这3个对象中的一个。
在调用dispatcher的safeDispatch方法时,它的第二个参数是一个Runnable对象(亦是当前对象this),表示安排这个Runnable对象在分发器上执行。这个Runnable接口是由父类DispatchedTask实现的,如下:
internal abstract class DispatchedTask<in T> internal constructor(
    @JvmField var resumeMode: Int
) : SchedulerTask() {
    // 在分发器上执行此run方法
    final override fun run() {
        assert { resumeMode != MODE_UNINITIALIZED } // should have been set before dispatching
        try {
            val delegate = delegate as DispatchedContinuation<T>
            // 获取当前的协程对象
            val continuation = delegate.continuation
            withContinuationContext(continuation, delegate.countOrElement) {
                val context = continuation.context
                val state = takeState() // NOTE: Must take state in any case, even if cancelled
                val exception = getExceptionalResult(state)
                /*
                 * Check whether continuation was originally resumed with an exception.
                 * If so, it dominates cancellation, otherwise the original exception
                 * will be silently lost.
                 */
                val job = if (exception == null && resumeMode.isCancellableMode) context[Job] else null
                if (job != null && !job.isActive) {
                    val cause = job.getCancellationException()
                    cancelCompletedResult(state, cause)
                    // 恢复协程执行
                    continuation.resumeWithStackTrace(cause)
                } else {
                    // 让挂起过的协程,恢复执行
                    if (exception != null) {
                        continuation.resumeWithException(exception)
                    } else {
                        continuation.resume(getSuccessfulResult(state))
                    }
                }
            }
        } catch (e: DispatchException) {
            handleCoroutineException(delegate.context, e.cause)
        } catch (e: Throwable) {
            handleFatalException(e)
        }
    }
}
综合上面代码可以看出,在调用safeDispatch方法之后,会把协程安排到对应的分发器上恢复执行,即执行一个含有协程对象的Runnable对象,然后在执行Runnable对象时,调用协程对象的resumeWithException方法,此方法最终会调用invokeSuspend方法,而是invokeSuspend方法是在编译时生成的(见注3处),其内部会调用我们自定义的挂起函数。ps: 在2.2.1节中也有一个invokeSuspend方法,但是这个invokeSuspend方法只会在协程启动时执行,而非协程resume恢复时执行,且在协程整个生命周期只会执行1次,多了就会报错。从resumeWithException方法调用invokeSuspend方法的具体流程如下:
public inline fun <T> Continuation<T>.resume(value: T): Unit =
    resumeWith(Result.success(value))

public inline fun <T> Continuation<T>.resumeWithException(exception: Throwable): Unit =
    resumeWith(Result.failure(exception))


internal abstract class BaseContinuationImpl(
    // completion是外层的协程对象,见2.1节反编译代码,
    // 在startTest方法调用test1方法时,会给test1传入一个外部协程对象。
    public val completion: Continuation<Any?>?
) : Continuation<Any?>, CoroutineStackFrame, Serializable {

    public final override fun resumeWith(result: Result<Any?>) {
        // This loop unrolls recursion in current.resumeWith(param) to make saner and shorter stack traces on resume
        var current = this
        var param = result
        // 从内层到外层遍历协程,然后resume协程
        while (true) {

            probeCoroutineResumed(current)
            // 在便利协程对象,通过with函数,来更新协程对象,
            // 从而可以调用外层协程对象的invokeSuspend
            with(current) {
                val completion = completion!! // fail fast when trying to resume continuation without completion
                val outcome: Result<Any?> =
                    try {
                        // invokeSuspend的实现详见 注3 ,其内部会调用我们自定义的挂起方法
                        val outcome = invokeSuspend(param)
                        // 如果遇到挂起函数,则return 挂起
                        if (outcome === COROUTINE_SUSPENDED) return
                        Result.success(outcome)
                    } catch (exception: Throwable) {
                        Result.failure(exception)
                    }
                releaseIntercepted() // this state machine instance is terminating
                // 检查是否还有外层协程,如果有,则重置current和param,继续恢复外层协程
                if (completion is BaseContinuationImpl) {
                    // unrolling recursion via loop
                    current = completion
                    param = outcome
                } else {
                    // top-level completion reached -- invoke and return
                    completion.resumeWith(outcome)
                    return
                }
            }
        }
    }

    // 1)、编译时实现,如 注3;
    // 2)、协程首次启动时实现(不会在resume时执行,只在首次启动执行)如 2.2.1
    protected abstract fun invokeSuspend(result: Result<Any?>): Any?
}
上面给出了协程在resume时会执行的操作。首先、发生挂起协程会执行resume方法,在此方法内部调用invokeSuspend方法,继续执行之前的协程逻辑。然后、在执行完内部协程逻辑后(假设不再发生挂起),会获取外层的协程,继续去执行外层协程的逻辑,直到全部协程执行结束,或有协程再次发生挂起。
从以上可以看出:
1)、针对“挂起”操作,当存在挂起函数嵌套调用时(相当于有多个协程体互相嵌套),内部的挂起函数发生挂起后,外部的挂起函数也会暂停执行。因为当内部的挂起函数挂起后,即返回“挂起标识常量”后,此常量会被一层一层的传递到最外层挂起函数,每一层挂起函数检测到此常量后,都会return,终止当前的执行。
2)、针对“恢复”操作,当挂起函数被恢复时,会从内到外依次遍历外层的协程体对象(每一个协程体对象代表一个外层嵌套的挂起函数),然后调用协程体对象的invokeSuspend方法,以继续执行外层挂起函数。
2.3、Dispatcher----分发器的实现
在前面几节,介绍了协程如何挂起和协程的恢复操作。这个恢复操作是在一个Runnable对象(即DispatchedTask)中去发起的。那么,接下来将介绍,这个Runnable对象是如何被调用的。Kotlin的分发器虽然分为Default、Main、IO,但可以依据他们执行所在的线程分成2类:主线程(Main)、子线程(Default、Main)。
2.3.1、Main 分发器的实现
在kotlin中,Main分发器的定义如下:
public actual object Dispatchers {
    public actual val Main: MainCoroutineDispatcher get() = MainDispatcherLoader.dispatcher
}

internal object MainDispatcherLoader {
    private val FAST_SERVICE_LOADER_ENABLED = systemProp(FAST_SERVICE_LOADER_PROPERTY_NAME, true)

    @JvmField
    val dispatcher: MainCoroutineDispatcher = loadMainDispatcher()

    private fun loadMainDispatcher(): MainCoroutineDispatcher {
        return try {
            // FAST_SERVICE_LOADER_ENABLED的定义在上面,默认值是true
            val factories = if (FAST_SERVICE_LOADER_ENABLED) {
                // 返回AndroidDispatcherFactory
                FastServiceLoader.loadMainDispatcherFactory()
            } else {
                // We are explicitly using the
                // `ServiceLoader.load(MyClass::class.java, MyClass::class.java.classLoader).iterator()`
                // form of the ServiceLoader call to enable R8 optimization when compiled on Android.
                ServiceLoader.load(
                        MainDispatcherFactory::class.java,
                        MainDispatcherFactory::class.java.classLoader
                ).iterator().asSequence().toList()
            }
            @Suppress("ConstantConditionIf")
            factories.maxByOrNull { it.loadPriority }?.tryCreateDispatcher(factories)
                ?: createMissingDispatcher()
        } catch (e: Throwable) {
            // Service loader can throw an exception as well
            createMissingDispatcher(e)
        }
    }
}
从上面代码可以看出,Main分发器的类型是MainCoroutineDispatcher,是由FastServiceLoader.loadMainDispatcherFactory()方法,返回的AndroidDispatcherFactory对象,通过调用tryCreateDispatcher方法创建。具体代码如下:
public fun MainDispatcherFactory.tryCreateDispatcher(factories: List<MainDispatcherFactory>): MainCoroutineDispatcher =
    try {
        createDispatcher(factories)
    } catch (cause: Throwable) {
        createMissingDispatcher(cause, hintOnError())
    }


internal class AndroidDispatcherFactory : MainDispatcherFactory {

    override fun createDispatcher(allFactories: List<MainDispatcherFactory>): MainCoroutineDispatcher {
        // 创建Main Dispatcher,并把主线程的Looper作为参数传入。
        val mainLooper = Looper.getMainLooper() ?: throw IllegalStateException("The main looper is not available")
        return HandlerContext(mainLooper.asHandler(async = true))
    }

    override fun hintOnError(): String = "For tests Dispatchers.setMain from kotlinx-coroutines-test module can be used"

    override val loadPriority: Int
        get() = Int.MAX_VALUE / 2
}
从上面代码看出,最终Main分发器的实现类是HandlerContext,其代码如下:
internal class HandlerContext private constructor(
    private val handler: Handler,
    private val name: String?,
    private val invokeImmediately: Boolean
) : HandlerDispatcher(), Delay {
    constructor(
        handler: Handler,
        name: String? = null
    ) : this(handler, name, false)

    override fun isDispatchNeeded(context: CoroutineContext): Boolean {
        return !invokeImmediately || Looper.myLooper() != handler.looper
    }

    override fun dispatch(context: CoroutineContext, block: Runnable) {
        // 执行DispatchedTask
        if (!handler.post(block)) {
            cancelOnRejection(context, block)
        }
    }
}
在上面的dispatch方法,会把DispatchedTask抛到handler中去执行,而这个handler又是在主线程执行的,基于此Main分发器就实现了把协程体抛到主线程执行。
2.3.2、Default、IO分发器的实现
Default和IO分发器都是在子线程执行的,且IO分发器也是基于Default分发器下的类实现的,只是参数不同,所以在此只分析Default的分发器的实现。
在kotlin中,Default分发器的定义如下:
public actual object Dispatchers {
    @JvmStatic
    public actual val Default: CoroutineDispatcher = DefaultScheduler
}

internal object DefaultScheduler : SchedulerCoroutineDispatcher(
    CORE_POOL_SIZE, MAX_POOL_SIZE,
    IDLE_WORKER_KEEP_ALIVE_NS, DEFAULT_SCHEDULER_NAME
) {

    ......

    override fun toString(): String = "Dispatchers.Default"
}


internal open class SchedulerCoroutineDispatcher(
    private val corePoolSize: Int = CORE_POOL_SIZE,
    private val maxPoolSize: Int = MAX_POOL_SIZE,
    private val idleWorkerKeepAliveNs: Long = IDLE_WORKER_KEEP_ALIVE_NS,
    private val schedulerName: String = "CoroutineScheduler",
) : ExecutorCoroutineDispatcher() {
    private var coroutineScheduler = createScheduler()

    private fun createScheduler() =
        CoroutineScheduler(corePoolSize, maxPoolSize, idleWorkerKeepAliveNs, schedulerName)

    override fun dispatch(context: CoroutineContext, block: Runnable): Unit = coroutineScheduler.dispatch(block)
}
从上面的代码可知,Default分发器最终会由SchedulerCoroutineDispatcher对象来实现,其内部会创建一个CoroutineScheduler对象,用于执行Runnable对象,通过调用dispatch方法去实现,其代码如下:
fun dispatch(block: Runnable, taskContext: TaskContext = NonBlockingContext, fair: Boolean = false) {
        trackTask()
        // 将Runnable对象封装成一个task(TaskImpl类型)
        val task = createTask(block, taskContext)
        // 因为构造task的taskContext是NonBlockingContext,所以这里是false
        val isBlockingTask = task.isBlocking
        // Invariant: we increment counter **before** publishing the task
        // so executing thread can safely decrement the number of blocking tasks
        val stateSnapshot = if (isBlockingTask) incrementBlockingTasks() else 0
        // try to submit the task to the local queue and act depending on the result
        // 获取一个当前正在执行的worker,这个worker继承了Thread,是一个正在执行的线程
        val currentWorker = currentWorker()
        // 把Runnable对象添加到worker的待执行队列中。
        // 若未添加成功,会把task原封返回
        val notAdded = currentWorker.submitToLocalQueue(task, fair)
        if (notAdded != null) {
            // 注6 把task添加到一个全局待执行队列
            if (!addToGlobalQueue(notAdded)) {
                // Global queue is closed in the last step of close/shutdown -- no more tasks should be accepted
                throw RejectedExecutionException("$schedulerName was terminated")
            }
        }
        // Checking 'task' instead of 'notAdded' is completely okay
        if (isBlockingTask) {
            // Use state snapshot to better estimate the number of running threads
            signalBlockingWork(stateSnapshot)
        } else {
            // 执行了 注6 处的代码才会到这里
            // (若没有则先创建)启动一个Worker去拉取全局待执行队列中的task 去执行
            signalCpuWork()
        }
    }
dispatch方法执行Runnable的流程为:
首先,将Runnable封装成一个Task对象,给这个Runnable对象扩展一些执行的参数,要不要阻塞之类的。
然后,尝试获取一个Worker,Woker继承了Thread,并在内部维护了一个task队列。会在内部启动一个循环去读取task队列,并执行task(即Runnable)。当所有task都执行完毕时,会阻塞自己(通过LockSupport.parkNanos方法)或直接结束自己。当有task添加进来时,会通过LockSupport.unpark方法,唤醒一个正在阻塞的Worker。Worker的代码如下:
internal inner class Worker private constructor() : Thread() {
    val localQueue: WorkQueue = WorkQueue()

    override fun run() = runWorker()

    private fun runWorker() {
            var rescanned = false
            while (!isTerminated && state != WorkerState.TERMINATED) {
                // 从本地队列(localQueue)或全局队列中读取一个task
                val task = findTask(mayHaveLocalTasks)
                // Task found. Execute and repeat
                if (task != null) {
                    rescanned = false
                    minDelayUntilStealableTaskNs = 0L
                    // 执行此task后,继续读取执行下个task
                    executeTask(task)
                    continue
                } else {
                    mayHaveLocalTasks = false
                }
                ......
                // 没有可用task了,阻塞当前worker,即阻塞当前线程
                tryPark()
            }
            tryReleaseCpu(WorkerState.TERMINATED)
        }
}
最后,如果找不到正在执行的Worker,则先会调用addToGlobalQueue方法,将task添加到全局队列中。然后,调用signalCpuWork方法尝试唤醒一个worker或创建一个worker(如果当前一个worker都没有)。代码如下
// 添加task到全局队列中
private fun addToGlobalQueue(task: Task): Boolean {
        return if (task.isBlocking) {
            globalBlockingQueue.addLast(task)
        } else {
            globalCpuQueue.addLast(task)
        }
    }

fun signalCpuWork() {
        // 先尝试唤醒一个阻塞的Worker(通过LockSupport.unpark方法)
        if (tryUnpark()) return
        // 如果没有worker可用,则创建一个新的worker
        if (tryCreateWorker()) return
        tryUnpark()
    }

// 创建并启动一个Worker
private fun createNewWorker(): Int {
        val worker: Worker
        return synchronized(workers) {
            // Make sure we're not trying to resurrect terminated scheduler
            if (isTerminated) return -1
            val state = controlState.value
            val created = createdWorkers(state)
            val blocking = blockingTasks(state)
            val cpuWorkers = (created - blocking).coerceAtLeast(0)
            // Double check for overprovision
            if (cpuWorkers >= corePoolSize) return 0
            if (created >= maxPoolSize) return 0
            // start & register new worker, commit index only after successful creation
            val newIndex = createdWorkers + 1
            require(newIndex > 0 && workers[newIndex] == null)

            worker = Worker(newIndex)
            workers.setSynchronized(newIndex, worker)
            require(newIndex == incrementCreatedWorkers())
            cpuWorkers + 1
        }.also { worker.start() } // 启动Worker
    }
综上所述,Default分发器首先,会将Runnable对象封装成task,并添加到task队列中。然后启动Thread去循环读取task队列中的task,并执行。
三、Delay挂起函数的实现
之前部分分析了1)、协程如何挂起----通过返回挂起标识常量,return方法执行;2)协程恢复的流程----从内层协程到外层协程依次恢复执行;3)、协程是如何执行的----实现了Runnable接口,放到Thread中去执行。但是还缺少一点,那就是从协程挂起如何转为协程恢复执行,即在何时、如何resume协程。下面将对Delay方法进行分析来查看协程是如何恢复的。
因为协程可以在不同的分发器上执行(既可在主线程执行,也可以在子线程执行),所以delay方法的实现也与线程有关。
3.1、Delay函数的定义
在kotlin中,delay函数定义如下:
public interface Delay {

    ......
    public fun scheduleResumeAfterDelay(timeMillis: Long, continuation: CancellableContinuation<Unit>)

    public fun invokeOnTimeout(timeMillis: Long, block: Runnable, context: CoroutineContext): DisposableHandle =
        DefaultDelay.invokeOnTimeout(timeMillis, block, context)
}

public suspend fun delay(timeMillis: Long) {
    if (timeMillis <= 0) return // don't delay
    return suspendCancellableCoroutine sc@ { cont: CancellableContinuation<Unit> ->
        // if timeMillis == Long.MAX_VALUE then just wait forever like awaitCancellation, don't schedule.
        if (timeMillis < Long.MAX_VALUE) {
            // 注7 先获取协程上下文中的delay对象,然后调用delay对象的scheduleResumeAfterDelay方法
            cont.context.delay.scheduleResumeAfterDelay(timeMillis, cont)
        }
    }
}
3.2、主线程的Delay函数实现
在主线程,Delay函数的实现简单明了,如下所示:
internal class HandlerContext private constructor(
    private val handler: Handler,
    private val name: String?,
    private val invokeImmediately: Boolean
) : HandlerDispatcher(), Delay {

        override fun scheduleResumeAfterDelay(timeMillis: Long, continuation: CancellableContinuation<Unit>) {
        // 生成一个Runnable对象,调用协程的resume方法,恢复协程
        val block = Runnable {
            with(continuation) { resumeUndispatched(Unit) }
        }
        // 将上述Runnable对象延迟执行,实现delay的效果
        if (handler.postDelayed(block, timeMillis.coerceAtMost(MAX_DELAY))) {
            continuation.invokeOnCancellation { handler.removeCallbacks(block) }
        } else {
            cancelOnRejection(continuation.context, block)
        }
    }

    override fun invokeOnTimeout(timeMillis: Long, block: Runnable, context: CoroutineContext): DisposableHandle {
        if (handler.postDelayed(block, timeMillis.coerceAtMost(MAX_DELAY))) {
            return DisposableHandle { handler.removeCallbacks(block) }
        }
        cancelOnRejection(context, block)
        return NonDisposableHandle
    }
}
可以看到,在主线程中,HandlerContext不仅作为Main分发器使用,还实现了Delay接口。所以在注7处返回的就是HandlerContext对象。在调用delay方法,直接往主线程抛一个恢复协程执行的Runnable对象,并让它延迟执行。
3.3、子线程的Delay函数实现
以Default分发器为例,因为DefaultScheduler并没有实现delay接口,所以在Default分发器中使用delay方法时,在注7处返回的Delay对象为DefaultExecutor,如下所示:
internal val CoroutineContext.delay: Delay get() = get(ContinuationInterceptor) as? Delay ?: DefaultDelay

internal actual val DefaultDelay: Delay = initializeDefaultDelay()

private val defaultMainDelayOptIn = systemProp("kotlinx.coroutines.main.delay", false)
private fun initializeDefaultDelay(): Delay {
    // 默认值为false,返回DefaultExecutor
    // Opt-out flag
    if (!defaultMainDelayOptIn) return DefaultExecutor
    val main = Dispatchers.Main
    /*
     * When we already are working with UI and Main threads, it makes
     * no sense to create a separate thread with timer that cannot be controller
     * by the UI runtime.
     */
    return if (main.isMissing() || main !is Delay) DefaultExecutor else main
}
在Default分发器中,会使用DefaultExecutor作为Delay接口的实现类,其代码如下:
internal actual object DefaultExecutor : EventLoopImplBase(), Runnable {
    private var _thread: Thread? = null

    // 创建一个新的Thread对象,以执行run方法,因为run方法中有循环,可能会发生阻塞
    override val thread: Thread
        get() = _thread ?: createThreadSync()

    private val _delayed = atomic<DelayedTaskQueue?>(null)

   override fun scheduleResumeAfterDelay(timeMillis: Long, continuation: CancellableContinuation<Unit>) {
        val timeNanos = delayToNanos(timeMillis)
        if (timeNanos < MAX_DELAY_NS) {
            val now = nanoTime()
            // 封装成DelayedResumeTask对象,
            // 此task对象有协程需要恢复执行的时间,即now + timeNanos
            DelayedResumeTask(now + timeNanos, continuation).also { task ->
                // 把task添加到_delayed队列中
                schedule(now, task)
                continuation.disposeOnCancellation(task)
            }
        }
    }

    override fun run() {
        ThreadLocalEventLoop.setEventLoop(this)
        registerTimeLoopThread()
        try {
            var shutdownNanos = Long.MAX_VALUE
            if (!notifyStartup()) return
            while (true) {
                Thread.interrupted() // just reset interruption flag
                // 读取下个task,检查此task需要何时执行,如需立刻执行则执行并返回0
                // 如不需立刻执行,则会返回下个task的执行时间点与现在时刻的差值parkNanos,
                // 并在之后让线程阻塞parkNanos时长。
                var parkNanos = processNextEvent()
                if (parkNanos == Long.MAX_VALUE) {
                    // nothing to do, initialize shutdown timeout
                    val now = nanoTime()
                    if (shutdownNanos == Long.MAX_VALUE) shutdownNanos = now + KEEP_ALIVE_NANOS
                    val tillShutdown = shutdownNanos - now
                    if (tillShutdown <= 0) return // shut thread down
                    parkNanos = parkNanos.coerceAtMost(tillShutdown)
                } else
                    shutdownNanos = Long.MAX_VALUE
                if (parkNanos > 0) {
                    // check if shutdown was requested and bail out in this case
                    if (isShutdownRequested) return
                    // 当前没有task需要立刻执行,需要让当前线程阻塞parkNanos时长
                    parkNanos(this, parkNanos)
                }
            }
        } finally {
            _thread = null // this thread is dead
            acknowledgeShutdownIfNeeded()
            unregisterTimeLoopThread()
            // recheck if queues are empty after _thread reference was set to null (!!!)
            if (!isEmpty) thread // recreate thread if it is needed
        }
    }

    override fun processNextEvent(): Long {
        // unconfined events take priority
        if (processUnconfinedEvent()) return 0
        // queue all delayed tasks that are due to be executed
        enqueueDelayedTasks()
        // then process one event from queue
        // 读取一个需要立刻执行的task
        val task = dequeue()
        if (task != null) {
            // 执行此task
            platformAutoreleasePool { task.run() }
            return 0
        }
        return nextTime
    }

    private fun createThreadSync(): Thread {
        return _thread ?: Thread(this, THREAD_NAME).apply {
            _thread = this
            contextClassLoader = this@DefaultExecutor.javaClass.classLoader
            isDaemon = true
            start()
        }
    }
}
上面代码表明,在Default分发器(子线程)执行delay操作,会先把恢复协程操作封装一个task;然后,把这个task加入到task队列中;接着,在一个新的线程中重复读取task队列,若task的时间点到了,则立刻执行,即立刻调用协程的resume方法。若task的时间点未到,则计算这个时间点与现在的时长,当线程阻塞这个时长,然后在去重复检查task。
四、总结
1)、协程的挂起是通过return 挂起函数执行实现;2)、在协程恢复时,会从内层协程到外层协程依次恢复执行。3)、协程代码依旧是执行在线程上;4)、delay挂起函数在恢复协程时,是把协程resume操作封装到了Runnable对象,然后延迟执行此Runnable对象实现的。
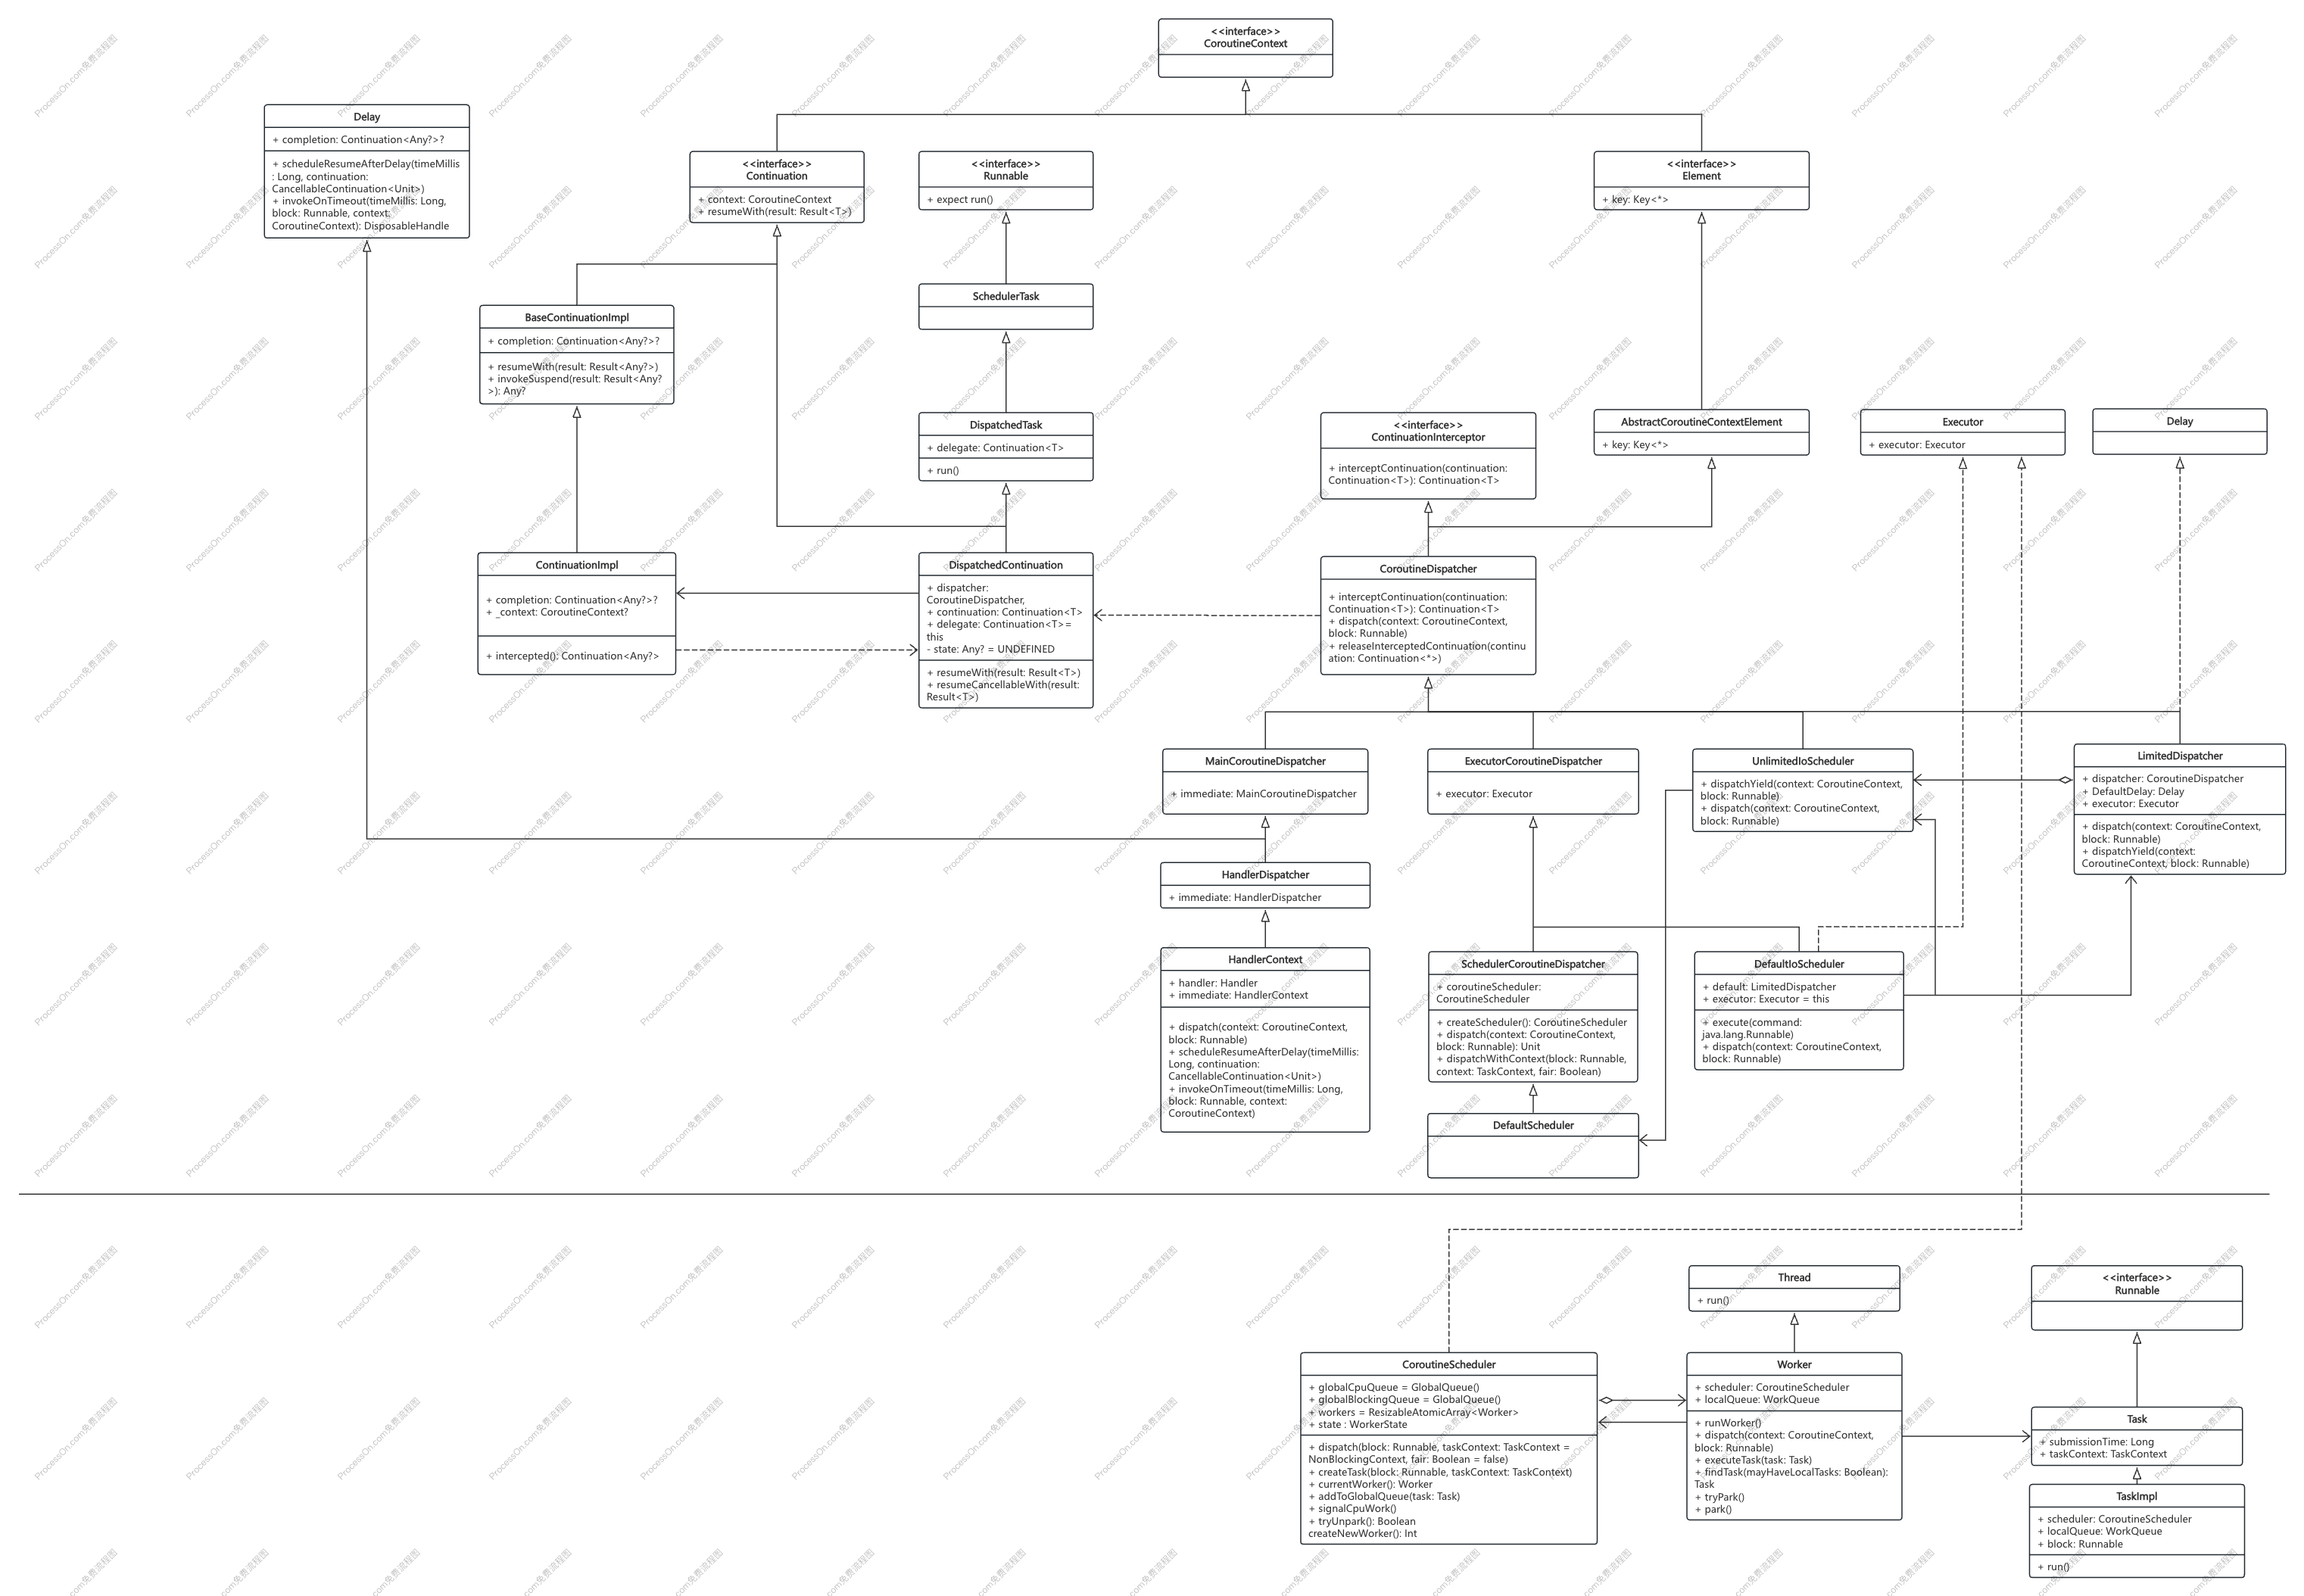
协程UML图
参考
1、协程源码github: https://github.com/Kotlin/kotlinx.coroutines.git
2、kotlin源码 github: GitHub - JetBrains/kotlin: The Kotlin Programming Language.
3、delay方法解析:Kotlin delay方法解析_kotlin none of the following candidates is applica-CSDN博客


 被折叠的 条评论
为什么被折叠?
被折叠的 条评论
为什么被折叠?
 到【灌水乐园】发言


