


前后端分离实现省市三级联动:
实现最基本的省市三级联动
开发软件:
- 后台开发:Idea;
- 后台测试:Postman;
- 前端开发:VScod;
后台开发:
1、创建SpringBoot项目:
使用Idead点击file,选择New Project,选择Spring InitInitializr,自行配置项目的基础配置;
2、在pom.xml文件中导入依赖:
<dependencies>
        <dependency>
            <groupId>org.springframework.boot</groupId>
            <artifactId>spring-boot-starter-data-jdbc</artifactId>
        </dependency>
        <dependency>
            <groupId>org.springframework.boot</groupId>
            <artifactId>spring-boot-starter-data-jpa</artifactId>
        </dependency>
        <dependency>
            <groupId>org.springframework.boot</groupId>
            <artifactId>spring-boot-starter-web</artifactId>
        </dependency>

        <dependency>
            <groupId>mysql</groupId>
            <artifactId>mysql-connector-java</artifactId>
            <scope>runtime</scope>
        </dependency>
        <dependency>
            <groupId>org.springframework.boot</groupId>
            <artifactId>spring-boot-starter-test</artifactId>
            <scope>test</scope>
            <exclusions>
                <exclusion>
                    <groupId>org.junit.vintage</groupId>
                    <artifactId>junit-vintage-engine</artifactId>
                </exclusion>
            </exclusions>
        </dependency>
        <!--添加servlet依赖模块 -->
        <dependency>
            <groupId>javax.servlet</groupId>
            <artifactId>javax.servlet-api</artifactId>
            <scope>provided</scope>
        </dependency>
        <!-- 添加jstl标签库依赖模块 -->
        <dependency>
            <groupId>javax.servlet</groupId>
            <artifactId>jstl</artifactId>
        </dependency>
        <!--添加tomcat依赖模块-->
        <dependency>
            <groupId>org.springframework.boot</groupId>
            <artifactId>spring-boot-starter-tomcat</artifactId>
            <scope>provided</scope>
        </dependency>
        <dependency>
            <groupId>org.projectlombok</groupId>
            <artifactId>lombok</artifactId>
            <version>1.16.2</version>
        </dependency>
        <!-- 用于 JSON API 文档的生成-->
        <dependency>
            <groupId>io.springfox</groupId>
            <artifactId>springfox-swagger2</artifactId>
            <version>2.9.2</version>
        </dependency>

        <!--用于文档界面展示-->
        <dependency>
            <groupId>io.springfox</groupId>
            <artifactId>springfox-swagger-ui</artifactId>
            <version>2.9.2</version>
        </dependency>
    </dependencies>
3、在resource文件夹下编写application.yml配置文件:
server:
  port: 8181   #服务器启动端口号
spring:
  application:
    name:address-service
  devtools:
    restart:
      enabled: true
  datasource:   #连接池
    url: jdbc:mysql://127.0.0.1:3306/vue?useUnicode=true&serverTimezone=UTC&characterEncoding=utf-8
    username: root
    password: root
    driver-class-name: com.mysql.jdbc.Driver
  jpa:
    hibernate:
      ddl-auto: update
      show-sql: true
  mvc:
    date-format: yyyy-MM-dd
  main:
    allow-bean-definition-overriding: true
4、创建dao,service,web,entity,config等基础包并启动项目:
这里启动是为了保证项目初始环境没有任何问题,如对自己的项目有充分信心可跳过启动项目,至此构建项目完成
5、编写实体类:
import lombok.Data;

import javax.persistence.*;

@Data
@Entity
@Table(name = "t_address_city")
public class City {
    @Id
    @GeneratedValue(strategy = GenerationType.IDENTITY)
    @Column(name = "id")
    private Integer id;

    @Column(name="code")
    private String code;

    @Column(name = "name")
    private String  name;

    @Column(name = "provincecode")
    private String provinceCode;
}
import lombok.Data;

import javax.persistence.*;
import java.util.ArrayList;
import java.util.List;

@Data
@Entity
@Table(name = "t_address_province")
public class Province {
    @Id
    @GeneratedValue(strategy = GenerationType.IDENTITY)
    @Column(name = "id")
    private Integer id;

    @Column(name="code")
    private String code;

    @Column(name = "name")
    private String name;
}
import lombok.Data;

import javax.persistence.*;

@Data
@Entity
@Table(name = "t_address_town")
public class Town {
    @Id
    @GeneratedValue(strategy = GenerationType.IDENTITY)
    @Column(name = "id")
    private int id;

    @Column(name = "code")
    private String code;

    @Column(name = "name")
    private String name;

    @Column(name = "citycode")
    private String cityCode;
}
注:实体类中使用的@Data来自lombok插件,使用该注解后,可省略代码中的get/set方法,@Table声明该实体类与数据库中表名为@Table注解后name相对应。
如何安装lombok及lombok的使用
6、编写dao:
在这里使用了jpa,对于简单的CRUD语句及其方法会由实现jpa的ORM框架进行编写,我们对其直接进行调用即可:
什么是JpaRepository及其使用
import org.springframework.data.jpa.repository.JpaRepository;

public interface ProvinceDao extends JpaRepository<Province,Integer> {
}
7、编写service及其实现(可省略service接口编写):
import org.springframework.beans.factory.annotation.Autowired;
import org.springframework.stereotype.Service;
import org.springframework.transaction.annotation.Transactional;

import java.util.List;

@Service
@Transactional
public class ProvinceService {
    @Autowired
    private ProvinceDao provinceDao;

    public List<Province> findAll(){
        return provinceDao.findAll();
    }
}
8、编写Controller:
import org.springframework.beans.factory.annotation.Autowired;
import org.springframework.web.bind.annotation.GetMapping;
import org.springframework.web.bind.annotation.RequestParam;
import org.springframework.web.bind.annotation.RestController;

import java.util.List;

@RestController
public class Controller {
    @Autowired
    private ProvinceService provinceService;

    @Autowired
    private CityService cityService;

    @Autowired
    private TownService townService;

    @GetMapping("/findprovince")
    public List<Province> findProvince(){
        return provinceService.findAll();
    }

    @GetMapping("/findcity")
    public List<City> findCity(@RequestParam("provinceCode") String provinceCode){
        System.out.println(provinceCode);
        return cityService.findAll(provinceCode);
    }

    @GetMapping("/findtown")
    public List<Town> findAll(@RequestParam("cityCode") String cityCode){
        return townService.findAll(cityCode);
    }
}
9、跨域实现:
由于该项目是前后端分离,不可避免的会产生跨域问题,下面是对跨域问题的解决
在config包下创建该配置文件,文件名可自行更改:
import org.springframework.context.annotation.Bean;
import org.springframework.context.annotation.Configuration;
import org.springframework.web.cors.CorsConfiguration;
import org.springframework.web.cors.UrlBasedCorsConfigurationSource;
import org.springframework.web.filter.CorsFilter;

@Configuration
public class CorsConfig {
    // 初始化 CorsConfiguration 对象并设置允许的域名、请求头部信息和请求方式
    private CorsConfiguration buildConfig() {
        CorsConfiguration corsConfiguration = new CorsConfiguration();
        corsConfiguration.addAllowedOrigin("*"); // 1 允许任何域名使用
        corsConfiguration.addAllowedHeader("*"); // 2 允许任何头
        corsConfiguration.addAllowedMethod("*"); // 3 允许任何方法(post、get 等)
        return corsConfiguration;
    }
    /**
     * 创建 CorsFilter 对象
     * @return CorsFilter
     */
    @Bean
    public CorsFilter corsFilter() {
        UrlBasedCorsConfigurationSource source = new
                UrlBasedCorsConfigurationSource();
        source.registerCorsConfiguration("/**", buildConfig()); //拦截所有请求
        return new CorsFilter(source);
    }
}
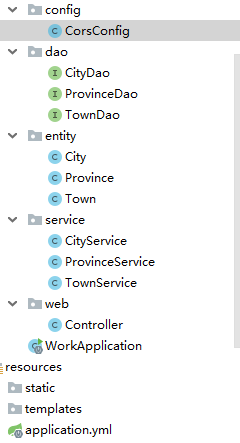
至此,项目结构完成如图
10、测试:
使用Postman进行测试

测试完成,后台代码编写完成。
前台开发:
在进行前台开发前,一定要确认已安装了node.js和Vue-cli
webpack+vue2.0+nodeJs搭建环境
现在,我们进入前台页面的开发,这里我使用的前台开发软件为VScode,使用的前端框架为Vue
1、搭建Vue-cli脚手架并创建一个基于 webpack 模板的新项目:
2、启动项目确保项目初始化没有问题
3、安装axios 插件和安装 Element 插件 :
安装axios:npm install --save axios vue-axios
安装Element:npm i element-ui -S
4、引入 Element 和 axios
在 src 文件夹下的程序入口 main.js 中写入以下内容:
// The Vue build version to load with the `import` command
// (runtime-only or standalone) has been set in webpack.base.conf with an alias.
import Vue from 'vue'
import App from './App'
import router from './router'
import axios from 'axios'
import VueAxios from 'vue-axios'
import ElementUI from 'element-ui'
import 'element-ui/lib/theme-chalk/index.css'
Vue.use(VueAxios, axios)
Vue.use(ElementUI)

Vue.config.productionTip = false

/* eslint-disable no-new */
new Vue({
  el: '#app',
  router,
  components: { App },
  template: '<App/>'
})
5、编写Vue文件及数据请求方法:
<template>
  <div>
    <el-select v-model="provinceCode" placeholder="省份">
      <el-option
        v-for="item in AddressProvince"
        :key="item.code"
        :label="item.name"
        :value="item.code"
      ></el-option>
    </el-select>

    <el-select v-model="cityCode" placeholder="城市">
      <el-option v-for="item in AddressCity" :key="item.code" :label="item.name" :value="item.code"></el-option>
    </el-select>
    <el-select v-model="value" placeholder="区域">
      <el-option v-for="item in AddressTown" :key="item.code" :label="item.name" :value="item.code"></el-option>
    </el-select>
  </div>
</template>

<script>
const axios = require('axios')
export default {
  name: 'HelloWorld',
  data () {
    return {
      AddressCity: [],
      AddressProvince: [],
      AddressTown: [],
      provinceCode: '',
      cityCode: '',
      value: ''
    }
  },
  watch: {// 监控一个值的变换
    provinceCode: { //
      handler () {
        this.findByprovinceCode()
      }
    },
    cityCode: {//
      handler () {
        this.findBycityCode()
      }
    }
  },
  created () {
    this.init()
  },
  methods: {
    handleChange (value) {
      console.log(value)
    },
    init () {
      var app = this
      axios.get('http://localhost:8181/findprovince').then(resp => {
        // handle success
        app.AddressProvince = resp.data
      })
        .catch(function (error) {
          // handle error
          console.log(error)
        })
    },

    findByprovinceCode () {
      var app = this
      this.cityCode = []
      axios.get('http://localhost:8181/findcity?provinceCode=' + this.provinceCode).then(resp => {
        // handle success
        app.AddressCity = resp.data
        console.log(resp.data)
      })
        .catch(function (error) {
          // handle error
          console.log(error)
        })
    },
    findBycityCode () {
      var app = this
      this.value = []
      axios.get('http://localhost:8181/findtown?cityCode=' + this.cityCode).then(resp => {
        // handle success
        app.AddressTown = resp.data
      })
        .catch(function (error) {
          // handle error
          console.log(error)
        })
    }
  }
}
</script>

<!-- Add "scoped" attribute to limit CSS to this component only -->
<style scoped>
</style>
6、启动后台项目与前台项目进行测试
最终结果如下:


 344
344


 被折叠的 条评论
为什么被折叠?
被折叠的 条评论
为什么被折叠?
 到【灌水乐园】发言


