


1. thymeleaf
Thymelaef 是通过他特定语法对 html 的标记做渲染的一个视图层技术
1.1 引入thymeleaf
1)引入thymeleaf的依赖
<!-- 引入模板引擎 -->
<dependency>
    <groupId>org.springframework.boot</groupId>
    <artifactId>spring-boot-starter-thymeleaf</artifactId>
</dependency>
2)如果thymeleaf的版本过低,可以手动设置修改,例如;
<properties>
	<java.version>1.8</java.version>
	<thymeleaf.verson>3.0.2.RELEASE</thymeleaf.verson>
	<!-- 布局功能的支持版本 thymeleaf的3版本对应layout的2
		thymeleaf的2版本对应layout的1
	-->
	<thymeleaf-layout-dialect.verson>2.1.1</thymeleaf-layout-dialect.verson>
</properties>
1.2 thymeleaf使用
通过查看boot的autoconfig,找到thymeleaf下的配置类ThymeleafProperties,从中可以知道只要我们把HTML页面放在classpath:/templates/,thymeleaf就能自动渲染;

注意:templates该目录是安全的目录,也就是说该目录下的内容,外界不能直接访问,只能通过Controller层做视图渲染再跳转
1.2.1 导入 thymeleaf名称空间
我们可以在templates目录下放一个html文件,再导入thymeleaf的名称空间,写thymeleaf的时候,就可以有语法提示了
<!DOCTYPE html>
<html lang="en" xmlns:th="http://www.thymeleaf.org">
<head>
    <meta charset="UTF-8">
    <title>Title</title>
</head>
<body>

</body>
</html>
1.2.2 使用
1)controller
package com.bjc.controller;

import org.springframework.stereotype.Controller;
import org.springframework.ui.Model;
import org.springframework.web.bind.annotation.RequestMapping;

@Controller
public class ThymeleafTestController {

	@RequestMapping("/success")
	public String success(Model model){
		model.addAttribute("hello","你好");
		return "test";
	}

}
2)模板文件
<!DOCTYPE html>
<html lang="en" xmlns:th="http://www.thymeleaf.org">
<head>
    <meta charset="UTF-8">
    <title>Title</title>
</head>
<body>
    <h1>成功</h1>
    <!-- th:text  将div里面的文本内容设置为 -->
    <div th:text="${hello}"></div>
</body>
</html>
3)运行

1.3 thymeleaf语法
1.3.1 字符串操作
1)th:text
在页面中输出值
<span th:text="Hello"></span>注意:该标签会转义内容,也就是不会显示标签的样式
2) th:value
可以将一个值放入到 input 标签的 value 中
<input type="text" name="username" th:value="张三">注意:
1)在Thymeleaf中,标记后面必须带双引号,不能带单引号
2)在thymeleaf中提供了可以从URL中提取参数的对象param,使用起来很简单,直接param.参数名即可,例如:
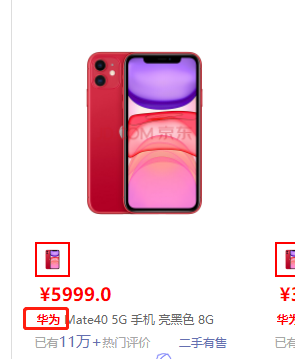
<input id="keyword_input" type="text" placeholder="手机" th:value="${param.keyword}"/>3)th:utext
功能与th:text一样,但是该标签不会转义,会显示标签样式。
<a href="#" title="" th:utext="${product.getSkuTitle()}" >
                                    Apple iPhone 7 Plus (A1661) 32G 黑色 移动联通电信4G手机
                                </a>
效果如图:
1.3.2 thymeleaf内置对象
1)#strings
1.1)判断字符串是否为空——isEmpty
语法:
${#strings.isEmpty(key)}注意:
1, 调用内置对象一定要用#
2, 大部分的内置对象都以 s 结尾。例如:strings、 numbers、 dates
例如:如果msg为空返回true,否则返回false
<input type="text" name="username" th:value="${#strings.isEmpty(msg)}">1.2)判断字符串是否包含指定字符串——contains
判断字符串是否包含指定的子串, 如果包含返回 true, 否则返回 false
${#strings.contains(msg,'T')}1.3)以某个字符串开头——startsWith
判断当前字符串是否以子串开头, 如果是返回 true, 否则返回 false
${#strings.startsWith(msg,'a')}1.4)是否以子串结尾——endsWith
判断当前字符串是否以子串结尾, 如果是返回 true, 否则返回 false
${#strings.endsWith(msg,'a')}1.5)返回字符串的长度——length
${#strings.length(msg)}1.6)查找子串的位置——indexOf
查找子串的位置, 并返回该子串的下标, 如果没找到则返回-1
${#strings.indexOf(msg,'h')}1.7)截取子串——substring
截取子串, 与 java中的 String 类下 SubString 用法相同
${#strings.substring(msg,13)}
${#strings.substring(msg,13,15)}
1.8)字符串转大小写
${#strings.toUpperCase(msg)}
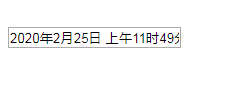
${#strings.toLowerCase(msg)}2)日期格式化处理对象——$dates
格式化日期, 默认的以浏览器默认语言为格式化标准
语法:
${#dates.format(key)}例如:
<input type="text" name="date" th:value="${#dates.format(date)}" />注意:date是model中的一个时间对象

运行结果:
2.1) 按照自定义的格式做日期转换
语法:
${#dates.format(key,partten)}例如:
<input type="text" name="date" th:value="${#dates.format(date,'yyyy-MM-dd')}" />2.2)取年月日
语法:
${#dates.year(key)}
${#dates.month(key)}
${#dates.day(key)}
1.3.3 条件判断
1)th:if
例如:
<span th:if="${gender == 'm'}"> 男 </span>
<span th:if="${gender == 'f'}"> 男 </span>
2)th:switch
例如:
<div th:switch="${gender}">
	<span th:case="m"> 男</span>
	<span th:case="f"> 女</span>
</div>
1.3.4 迭代遍历——th:each
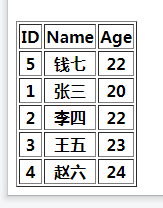
1)迭代list集合
<table border="1">
	<tr>
		<th>ID</th>
		<th>Name</th>
		<th>Age</th>
	</tr>
	<tr th:each="user : ${users}">
		<th th:text="${user.userid}"></th>
		<th th:text="${user.username}"></th>
		<th th:text="${user.userage}"></th>
	</tr>
</table>
2)状态变量
语法:在循环变量的后面加上 ,变量名
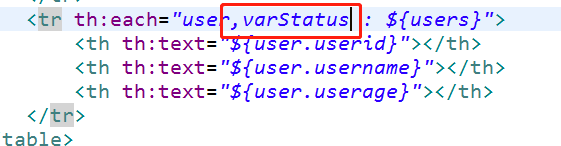
3)状态变量属
1. index:索引,从0开始
2. count:计数器,从1开始计数
3. size:迭代器大小
4. even:布尔值,当前行是否是双数
5. odd:布尔值,当前行是否是单数
6. first:布尔值,当前行是否是第一行
7. last:布尔值,当前行是否是最后一行
例如:
<table border="1">
	<tr>
		<th>ID</th>
		<th>Name</th>
		<th>Age</th>
		<th>index</th>
		<th>count</th>
		<th>size</th>
		<th>even</th>
		<th>odd</th>
		<th>first</th>
		<th>last</th>
	</tr>
	<tr th:each="user,varStatus : ${users}">
		<th th:text="${user.userid}"></th>
		<th th:text="${user.username}"></th>
		<th th:text="${user.userage}"></th>
		<th th:text="${varStatus.index}"></th>
		<th th:text="${varStatus.count}"></th>
		<th th:text="${varStatus.size}"></th>
		<th th:text="${varStatus.even}"></th>
		<th th:text="${varStatus.odd}"></th>
		<th th:text="${varStatus.first}"></th>
		<th th:text="${varStatus.last}"></th>
	</tr>
</table>
运行结果:

4)迭代Map集合
我们迭代Map集合的时候,需要迭代两次,第一次是取数据域中的map集合,然后第二次迭代出map的实体对象entry,然后可以根据entry获取key和value了
<table border="1">
	<tr>
		<th>ID</th>
		<th>Name</th>
		<th>Age</th>
	</tr>
	<tr th:each="userMap : ${map}">
		<th th:each="entry : ${userMap}" th:text="${entry.value.userid}"></th>
		<th th:each="entry : ${userMap}" th:text="${entry.value.username}"></th>
		<th th:each="entry : ${userMap}" th:text="${entry.value.userage}"></th>
	</tr>
</table>
运行结果:
注意:每一个UserMapper都是一个键值对,我们既可以通过${entry.value}拿到值,也可以通过${entry.key}
拿到键。
1.3.5 获取作用域对象中的数据
1)HttpServletRequest
Request:<span th:text="${#httpServletRequest.getAttribute('req')}"></span><br/>2)HttpSession
Session:<span th:text="${session.sess}"></span><br/>3)ServletContext
在上下文context中设置值:
request.getSession().getServletContext().setAttribute("app","Application");
Application:<span th:text="${application.app}"></span>1.3.2 常用的属性
| 属性 | 含义 |
| th:insert | 片段包含,类似于jsp:include |
| th:replace | |
| th:each | 循环遍历,类似于c:forEach |
| th:if | 条件判断,类似于c:if |
| th:unless | |
| th:switch | |
| th:case | |
| th:object | 变量声明,类似于c:set |
| th:with | |
| th:attr | 任意属性修改,支持prepend(前添加)与append(后追加) |
| th:attrprepend | |
| th:attrappend | |
| th:value | 修改制定属性默认值 |
| th:href | |
| th:src | |
| th:text | 修改标签体内容,转义特殊字符 |
| th:utext | 修改标签体内容,不转义特殊字符 |
| th:fragment | 声明片段 |
| th:remove | 移除片段 |
1) th:href
<link href="asserts/css/bootstrap.min.css" rel="stylesheet" th:href="@{/webjars/bootstrap/4.0.0/css/bootstrap.css}">2) th:each
<tr th:each="emp:${emps}">
	<td th:text="${emp.id}"></td>
	<td th:text="${emp.lastName}"></td>
	<td th:text="${emp.email}"></td>
	<td th:text="${emp.gender} == 1 ? '男' : '女'"></td>
	<td th:text="${emp.department}"></td>
	<td th:text="${emp.birth}"></td>
	<td>
		<button class="btn btn-sm btn-primary">修改</button>
		<button class="btn btn-sm btn-danger">删除</button>
	</td>
</tr>
3) th:HTML任意属性
我们可以在html页面的任意标签上加上th:改标签的任意属性来替换原生属性的值。
例如:
1)th:text:改变当前元素里面的文本内容;
2)th:任意的HTML属性
<!DOCTYPE html>
<html lang="en" xmlns:th="http://www.thymeleaf.org">
<head>
    <meta charset="UTF-8">
    <title>Title</title>
</head>
<body>
    <h1>成功</h1>
    <!-- th:text  将div里面的文本内容设置为 -->
    <div id="div01" class="divclass" th:text="${hello}" th:id="${id}" th:class="${class}"></div>
</body>
</html>
我们可以使用th:id和th:class分别改变原div中的id与class的属性值,其中id与class都是后端传过来的值
运行结果:

4)th:field实现数据回显示
我们知道th:value可以将一个字符串放到input的value当中,但是,它不能做数据的回显示,数据的回显需要使用th:field。
用法:
th:field="${user.id}"th:field后面跟的是model对象中的值
1.4 表达式
1.4.1 基本表达式——${}
我们可以使用${}的方式获取变量值,其实现本子是OGNL表达式,所以我们可以使用一些OGNL的骚操作。
1)获取对象的属性、调用方法
${person.father.name}2)使用内置的基本对象
<span th:text="${#locale.country}">US</span>locale就是一个内置对象
常用的内置对象:
#ctx : the context object.
#vars: the context variables.
#vars: the context variables.
#locale : the context locale.
#request : (only in Web Contexts) the HttpServletRequest object.
#response : (only in Web Contexts) the HttpServletResponse object.
#session : (only in Web Contexts) the HttpSession object.
#servletContext : (only in Web Contexts) the ServletContext object
3)内置的一些工具对象
#execInfo : information about the template being processed.
#messages : methods for obtaining externalized messages inside variables expressions, in the
same way as they would be obtained using #{…} syntax.
#uris : methods for escaping parts of URLs/URIs
#conversions : methods for executing the configured conversion service (if any).
#dates : methods for java.util.Date objects: formatting, component extraction, etc.
#calendars : analogous to #dates , but for java.util.Calendar objects.
#numbers : methods for formatting numeric objects.
#strings : methods for String objects: contains, startsWith, prepending/appending, etc.
#objects : methods for objects in general.
#bools : methods for boolean evaluation.
#arrays : methods for arrays.
#lists : methods for lists.
#sets : methods for sets.
#maps : methods for maps.
#aggregates : methods for creating aggregates on arrays or collections.
#ids : methods for dealing with id attributes that might be repeated (for example, as a
result of an iteration)
1.4.2 选择表达式—— *{}
和${}在功能上是一样,是用于配合th:object来使用的
例如:
<div th:object="${session.user}">
	<p>Name: <span th:text="*{firstName}">Sebastian</span>.</p>
	<p>Surname: <span th:text="*{lastName}">Pepper</span>.</p>
	<p>Nationality: <span th:text="*{nationality}">Saturn</span>.</p>
</div>
1.4.3 获取国际化内容——#{}
<p>
Today is: <span th:text="${#calendars.format(today,'dd MMMM yyyy')}">13 May 2011</span>
</p>
1.4.4 定义URL——@{}
在Thymeleaf中,对于url的处理,它有一套自己的表达式,它可以作用在我们的HTML页面当中的所有跟url相关的属性上,比如说链接
基本语法:@{}
例如:
<!-- Will produce 'http://localhost:8080/gtvg/order/details?orderId=3' (plus rewriting) -->
<a href="details.html"
th:href="@{http://localhost:8080/gtvg/order/details(orderId=${o.id})}">view</a>
<!-- Will produce '/gtvg/order/details?orderId=3' (plus rewriting) -->
<a href="details.html" th:href="@{/order/details(orderId=${o.id})}">view</a>
<!-- Will produce '/gtvg/order/3/details' (plus rewriting) -->
<a href="details.html" th:href="@{/order/{orderId}/details(orderId=${o.id})}">view</a>
1)绝对路径
<a th:href="@{http://www.baidu.com}">点击</a>2)相对路径
对于相对路径的写法有两种
2.1 相对于当前项目的根目录(/)
<a th:href="@{/show}">点击2</a> <br/>2.2 相对于服务器的根(~)
这个怎么理解了?比方说咱们在同一个tomcat下的webapps目录下有两个项目A和B,我们想在A项目中访问B项目的资源,这时候已经跨项目了,但是又都处于同一个tomcat下,那么这个时候,我们就可以使用相对服务器的根目录了。
~ 就表示当前项目的服务器的根目录
例如:
<a th:href="@{~/B/show}">点击2</a> <br/>3)在url中实现参数传递
在Thymeleaf中url的传参也很简单,我们除了可以使用传统的?传参之外,还可以使用Thymeleaf提供的语法,只需要在路径后面加上小括号,在小括号中写参数=值即可。
例如:
<a th:href="@{/show1(id=123)}">点击2</a> <br/>如果传递多个参数,用逗号分隔
<a th:href="@{/show1(id=123,name=张三)}">点击2</a>4)在 url 中通过 restful 风格进行参数传递
<a th:href="@{/show2/1}">点击2</a>  <br/>

<table>
		<tr>
			<td>用户id</td>
			<td>姓名</td>
			<td>年龄</td>
			<td>操作</td>
		</tr>
		<tr th:each="user,varStatus : ${users}">
			<th th:text="${user.id}"></th>
			<th th:text="${user.username}"></th>
			<th th:text="${user.age}"></th>
			<th > <a th:href="@{/user/find/}+${user.id}">修改</a> </th>
		</tr>
	</table>
1.4.5 片段引入——~{}
<div th:insert="~{commons :: main}">...</div>1.4.6 行内表达式
语法:[[基础表达式]]
例如:
<p>Hello, [[${session.user.name}]]</p>1.5 相关配置
1.5.1 禁用模板引擎缓存
spring.thymeleaf.cache=false1.6 公共页面片段抽取
1.6.1 抽取步骤
1)抽取公共片段
2)在页面中引入片段
格式:
~{templatename::selector}:模板名::选择器
~{templatename::fragmentname}:模板名::片段名
1.6.2 使用th:fragment抽取
使用th:fragment抽取只需要在公共元素的标签上加上该属性并取一个名字即可,例如:

1.6.3 使用选择器
我们也可以给公共元素片段取一个id名称,在需要复用的地方直接引用即可,例如:

1.6.4 公共元素引入的两种方式
1)模板名::片段名

2)模板名::选择器

1.6.5 三种引入公共片段的th属性
公共部分抽取:
<footer th:fragment="copy">
© 2011 The Good Thymes Virtual Grocery
</footer>1) th:insert
作用:将公共片段整个插入到声明引入的元素中
例如:
引入方式:<div th:insert="footer :: copy"></div>
引入页面生成效果:
<div>
<footer>
© 2011 The Good Thymes Virtual Grocery
</footer>
</div>2) th:replace
作用:将声明引入的元素替换为公共片段
例如:
引入方式:<div th:replace="footer :: copy"></div>
引入页面生成效果:
<footer>
© 2011 The Good Thymes Virtual Grocery
</footer>3) th:include
作用:将被引入的片段的内容包含进这个标签中
例如:
引入方式:<div th:include="footer :: copy"></div>
引入页面生成效果:
<div>
© 2011 The Good Thymes Virtual Grocery
</div>1.7 参数化片段签名
我们可以在引入的时候传递参数,如图:

之后,我们就可以在公共片段中的某个地方使用这个参数值做一些逻辑判断了,例如;

1.8 解决异常
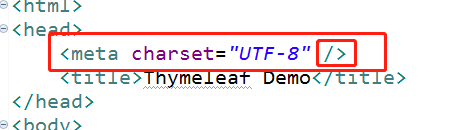
我们在运行项目的可能会报错

这是因为Thymeleaf要求我们的html标记必须遵守语法严谨的形式,也就是有开始标签,也要有结束标签,所以解决方式可以根据提示,将标签按照严谨的语法补充完整
解决方式有两种
1.8.1 方式一
将meta标签补充完整
1.8.2 方式二:修改jar版本
第一种方式虽然可以解决,但是不够方便,我们在开发中其实是很难以做到按照严谨规范编写html页面的,所以,我们通常不会采用这种方式,而是通过更改jar的版本的方式,我们发现,在引入的Thymeleaf依赖中,Thymeleaf的核心jar是thymeleaf-2.1.6.RELEASE.jar,版本是2.1.6,而thymeleaf-layout-dialect-1.4.0.jar的版本是1.4.0的,也就是说在Thymeleaf2的版本下,对于html标记的处理不够人性化,所以,我们可以通过高版本的Thymeleaf来解决这个问题,修改到哪个版本了,只需要将thymeleaf核心jar修改到3.0及以上的版本,thymeleaf-layout-dialect修改到2.0及以上版本即可。
<thymeleaf.version>3.0.2.RELEASE</thymeleaf.version>
<thymeleaf-layout-dialect.version>2.0.4</thymeleaf-layout-dialect.version>
然后再次运行,发现页面正常显示

注意:我们需要设置Thymeleaf的版本为高版本的
2. SpringBoot 整合 Freemarker
操作步骤:
1)引入依赖坐标
<!-- freemarker 启动器的坐标 -->
<dependency>
    <groupId>org.springframework.boot</groupId>
    <artifactId>spring-boot-starter-freemarker</artifactId>
</dependency>
2)借助HBuilder做freemarker的开发
注意:springBoot要求模板形式的视图层技术的文件必须放在src/main/resources目录下,并且模板文件需要统一放在一个叫做templates的目录下,如图所示:
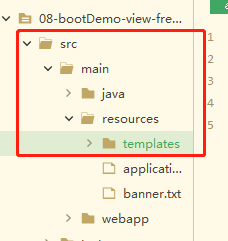
3)新建模板文件
<html>
	<head>
		<title>展示用户数据</title>
		<meta charset="utf-8"></meta>
	</head>

	<body>
		<table border="1" align="center" width="50%">
			<tr>
				<th>id</th>
				<th>姓名</th>
				<th>年龄</th>
			</tr>
			<#list users as user >
				<tr>
					<td>${user.userid}</td>
					<td>${user.username}</td>
					<td>${user.userage}</td>
				</tr>
			</#list>
		</table>
	</body>

</html>
4)创建Controller
package com.bjc;

import java.util.List;
import java.util.stream.Collectors;
import java.util.stream.Stream;

import org.springframework.stereotype.Controller;
import org.springframework.ui.Model;
import org.springframework.web.bind.annotation.RequestMapping;

@Controller
public class UserController {
	/**
	 * 处理请求产生数据
	 */
	@RequestMapping("/showUser")
	public String showUser(Model model) {
		List<User> userList = Stream.of(
				new User("张三",1,20),
				new User("李四",2,22),
				new User("王五",3,23),
				new User("赵六",4,24),
				new User("钱七",5,22)
				).collect(Collectors.toList());

		// 数据封装
		model.addAttribute("users", userList);

		// 跳转到视图
		return "userlist";
	}
}
5)创建启动类
package com.bjc;

import org.springframework.boot.SpringApplication;
import org.springframework.boot.autoconfigure.SpringBootApplication;

@SpringBootApplication
public class App {

	public static void main(String[] args) {
		SpringApplication.run(App.class, args);
	}

}
6)启动工程,测试
在浏览器中输入网址:http://localhost:8080/showUser 如图:

总结:
可以发现,在springBoot中使用freemarker相当的简单,我们只需要在指定位置编写好模板文件即可。回顾一下再SSM项目中,我们使用freemarker技术是怎么做的。
1)首先我们需要得到一个page对象configuration
2)然后设置该文件所在的目录
3)之后获取模板对象
4)创建数据模型
5)最后才是创建输出流写入文件
代码如下:
package com.bjc.demo;

import java.io.File;
import java.io.FileWriter;
import java.io.Writer;
import java.util.ArrayList;
import java.util.Date;
import java.util.HashMap;
import java.util.List;
import java.util.Map;

import freemarker.template.Configuration;
import freemarker.template.Template;

public class FreemarkerTest {
	public static void main(String[] args) throws Exception {

		// 1. 创建一个page对象
		Configuration configuration = new Configuration(Configuration.getVersion());

		// 2. 设置输出文件编码
		configuration.setDefaultEncoding("utf-8");

		// 3. 设置模板文件所在的目录
		configuration.setDirectoryForTemplateLoading(new File("D:\\pinyougou\\freemarkerDemo\\src\\main\\resources"));

		// 4. 获取模板对象
		Template template = configuration.getTemplate("test.ftl");

		// 5. 创建数据模型
		Map map = new HashMap();
		map.put("name", "张三");
		map.put("message", "欢迎登录,本次登录时间是:" + new Date());
		map.put("success", false);

		List goodsList=new ArrayList();
		Map goods1=new HashMap();
		goods1.put("name", "苹果");
		goods1.put("price", 5.8);
		Map goods2=new HashMap();
		goods2.put("name", "香蕉");
		goods2.put("price", 2.5);
		Map goods3=new HashMap();
		goods3.put("name", "橘子");
		goods3.put("price", 3.2);
		goodsList.add(goods1);
		goodsList.add(goods2);
		goodsList.add(goods3);
		map.put("goodsList", goodsList);

		map.put("today", new Date());
		map.put("point", 1314926);

		// 6. 创建一个输出流对象,参数为目标文件地址
		Writer out = new FileWriter("d:\\test.html");

		// 7. 执行模板对象方法,生成文件到磁盘
		template.process(map, out );

		// 8. 关闭流对象
		out.close();
	}
}
可以发现,使用Boot开发freemarker可以大大的简化我们的开发步骤,我们可以将ftl模板文件当做我们的html页面来使用就可以了,无需多余的开发任务。


 489
489


 被折叠的 条评论
为什么被折叠?
被折叠的 条评论
为什么被折叠?
 到【灌水乐园】发言


