


 Spring进行bean管理可以通过XML、注解和Java配置三种方式,注解方式简化了XML配置,提高了开发效率和可维护性。@Component、@Service、@Repository和@Controller等注解用于标记Bean。通过@@Autowired进行依赖注入,@Qualifier和@Value用于更精确的注入控制。完全注解开发可通过@Configuration和@ComponentScan实现,无需XML配置。
目录
思维导图
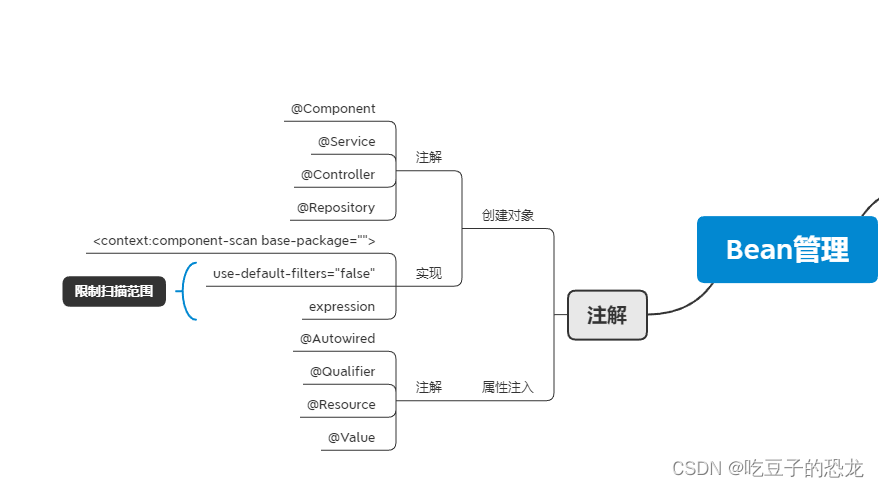
Spring进行bean管理有三种方式
①、XML配置:在XML配置文件中,可以使用<bean>元素来定义Bean对象。可以指定Bean的类名、属性值、依赖关系等信息。Spring容器会根据配置文件中的定义,使用反射机制创建Bean对象,并将其放入容器中进行管理
②、注解:包括@Component、@Service、@Repository和@Controller等。Spring容器会扫描类路径下的所有注解,并根据注解的信息创建相应的Bean对象。
③、Java配置:可定义一个带有@Configuration注解的配置类,可以使用@Bean注解来指定Bean的创建方式和依赖关系。Spring容器会根据配置类中的定义,使用反射机制创建Bean对象。
这篇文章着重使用注解的方式来介绍bean的管理,那注解开发的好处是什么呢?
-
简化配置减少 XML 配置文件的数量和复杂度,提高配置的可读性和维护性。注解可以直接应用在代码中更加便捷
-
提高开发效率:减少样板代码的编写,比于XML 配置方式,注解更加简洁和直观,可以更快地完成开发任务
-
易于理解和维护:注解是直接应用在代码中的,通过注解,可以清晰地看到代码中的依赖关系和配置信息
Spring针对Bean管理中创建对象提供的注解有哪些?
@Component:普通
@Service:业务逻辑层
@Controller:controller层
@Repository:dao层
用注解的方式是为什么?
简化xml方式开发,只需要注解就可以完成在配置文件中的配置
如何实现注解开发?
创建对象
组件扫描
package com.atguigu.spring5.ComponentScan;
import org.springframework.stereotype.Component;
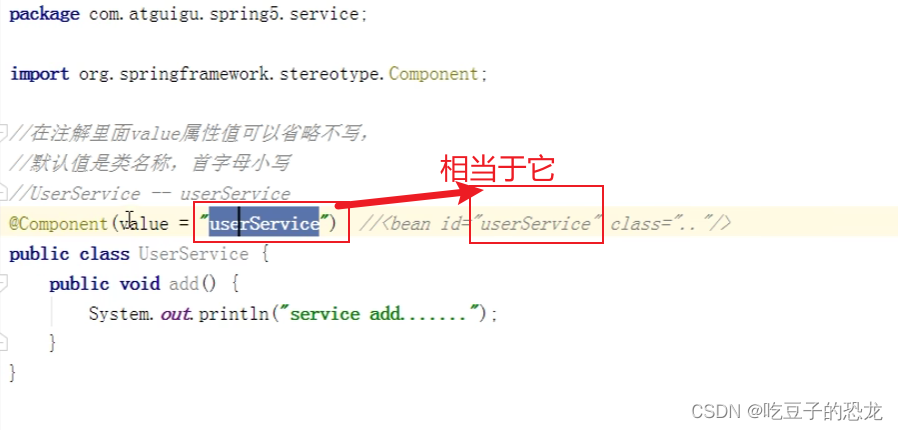
//value可以不写,如果不写默认是类名的首字母小写
@Component(value = "user")
public class User {
public void add() {
System.out.println("aaaa");
}
}
package com.atguigu.spring5.ComponentScan;

import org.springframework.context.ApplicationContext;
import org.springframework.context.support.ClassPathXmlApplicationContext;

public class Main {
    public static void main(String[] args) {
        ApplicationContext content= new ClassPathXmlApplicationContext("beans.xml");
        User user = content.getBean("user", User.class);
        user.add();
    }
}
<?xml version="1.0" encoding="UTF-8"?>
<beans xmlns="http://www.springframework.org/schema/beans"
       xmlns:xsi="http://www.w3.org/2001/XMLSchema-instance"
       xmlns:p="http://www.springframework.org/schema/p"
       xmlns:context="http://www.springframework.org/schema/context"
       xsi:schemaLocation="http://www.springframework.org/schema/beans http://www.springframework.org/schema/beans/spring-beans.xsd
                            http://www.springframework.org/schema/context http://www.springframework.org/schema/context/spring-context.xsd">


    <!--    开启组件扫描
    如果扫描多个包,多个包使用逗号隔开
    扫描包上层目录-->
    <!--   表示: 扫描包中的所有类-->
    <context:component-scan base-package="com.atguigu.spring5">
    </context:component-scan>

    <!--    use-default-filters=“false”:表示现在不使用默认filter,自己配置filter
    context:include-filter,设置扫描哪些内容-->
    <!--    表示:  只扫描注解带Controller的类-->
    <context:component-scan base-package="com.atguigu.spring5" use-default-filters="false">
        <context:include-filter type="annotation" expression="org.springframework.stereotype.Controller"/>
    </context:component-scan>

    <!--    下面配置扫描包所有内容
    context:include-filter,设置扫描哪些内容-->
    <!--    表示:  除了Controller其余类都扫描-->
    <context:component-scan base-package="com.atguigu.spring5">
        <context:exclude-filter type="annotation" expression="org.springframework.stereotype.Controller"/>-filter
        type="" expression=""/>
    </context:component-scan>
</beans>
属性注入
@Autowired:根据类型注入,用于自动装配依赖对象。通过该注解,Spring会自动在容器中查找匹配的Bean,并将其注入到被注解的属性中。
@Qualifier:根据名称进行注入,当存在多个符合条件的Bean时,可以与@Autowired一起使用,用于指定具体要注入的Bean的名称。
@Value:可以根据类型或名称注入,用于注入简单类型的属性值,可以直接将配置文件中的值注入到属性中。
@Resource:与@Autowired类似,也用于自动装配依赖对象,但是它更加灵活,可以通过name属性指定具体要注入的Bean的名称
javax:java扩展包
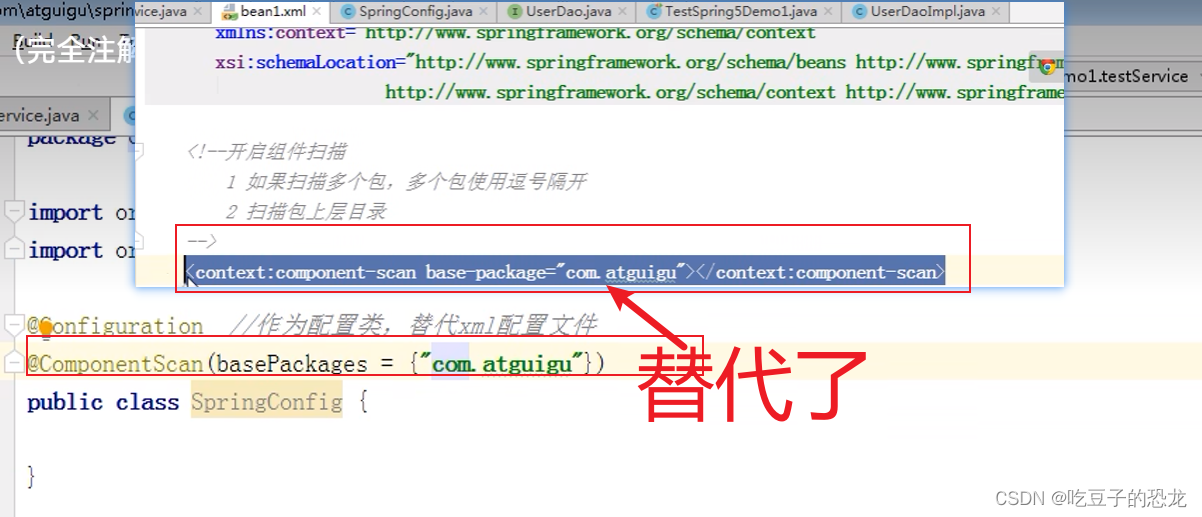
完全注解开发
Configuration:作为配置类,替代xml配置文件
package com.atguigu.spring5.SpringConfiguration;

import org.springframework.context.annotation.ComponentScan;
import org.springframework.context.annotation.Configuration;
import org.springframework.stereotype.Component;
import org.springframework.stereotype.Controller;

@Configuration
@ComponentScan(basePackages = {"com.atguigu.spring5"})
public class SpringConfigure {

}
package com.atguigu.spring5.ScopeTest;

import org.springframework.stereotype.Component;

@Component
public class Book {
    private String bname;
    private String bauthor;

    public void setBname(String bname) {
        this.bname = bname;
    }

    public void setBauthor(String bauthor) {
        this.bauthor = bauthor;
    }

    public static void main(String[] args) {
        Book book = new Book();
        book.setBname("abc");
    }

    public void testDemo() {
        System.out.println(bname + "---" + "aaa");
    }

}
package com.atguigu.spring5.SpringConfiguration;

import com.atguigu.spring5.ScopeTest.Book;
import org.springframework.context.ApplicationContext;
import org.springframework.context.annotation.AnnotationConfigApplicationContext;
import org.springframework.context.support.ClassPathXmlApplicationContext;


public class Main {
    public static void main(String[] args) {
//        加载配置类
        ApplicationContext context = new AnnotationConfigApplicationContext(SpringConfigure.class);
//        创建实例
        Book book = context.getBean("book", Book.class);
//        调用方法
        book.testDemo();
    }
}
输出结果:


 被折叠的 条评论
为什么被折叠?
被折叠的 条评论
为什么被折叠?
 到【灌水乐园】发言


