


文章目录
问题陈述
使用计算机视觉技术和英特尔AI分析工具套件为自动驾驶车辆开发实时对象检测模型。参赛团队需要创建一个深度学习模型,用于准确检测行人、车辆、交通标志和交通信号等对象。该模型需要具有高准确度和低延迟,能够满足自动驾驶车辆安全导航的需求。

硬件信息
我们使用Intel-oneAPI官方提供的服务器来进行模型训练,其硬件信息如下图:

CPU为英特尔生产的Xeon Platinum 8375C型号,主频为2.90GHz。Xeon Platinum系列是面向数据中心的高性能处理器,适用于服务器和工作站等高性能计算场景。CPU个数为两个,每个有32个CPU核心。
数据集介绍及处理
原数据集介绍
本项目使用的数据集由Intel-oneAPI官方指定,数据集为城市景观数据集,这个数据集包含高分辨率的城市场景图像,专门用于城市场景语义理解任务。该数据集包含 30 类对象(行人、汽车、公共汽车、自行车等的 5,000 幅图像,并带有精细注释。本文训练和测试使用下列两个数据集文件:原始图片leftlm8bit trainvaltest.zip和标记文件gtFine trainvaltest.zip,如下图所示。
由于下载的测试集中的数据有些问题,我们将训练集中tubingen、ulm、weimar、zurich四个城市的数据作为测试集。
其中leftImg8bit文件夹包含了图片原图,在gtFine文件夹中包含了对应各图片的场景信息的Json文件,如:

其中包含了图片中物体的类别以及其坐标值。
数据集转换
由于VOC数据集自2005年发布以来,经过了长时间的发展和改进,拥有较为完善的标注和评估体系。这使得VOC数据格式更适合于我们的目标检测任务,考虑到这一点,我们决定将数据集格式转换为VOC格式,即:
这里的JPEGImages文件夹中存储了原图片,Annotations文件夹中将原Json格式的图片描述转换成为XML格式:

ImageSets文件夹中存储了对于数据集的划分情况,其中的txt文件记录了训练集、测试集、验证集中分到的图片名称。
数据集转换代码流程
首先,在如下代码中,我们将cityscapes数据集中训练集的json文件转换为xml文件(voc数据集格式),在构成新的标签文件时选择了十个目标类。
#选择十个类进行训练和检测,此外将cityscapes数据集中的json文件转换为xml文件(voc数据集格式)

def position(pos):
    # 该函数用来找出xmin,ymin,xmax,ymax即bbox包围框
    x = []
    y = []
    nums = len(pos)
    for i in range(nums):
        x.append(pos[i][0])
        y.append(pos[i][1])
    x_max = max(x)
    x_min = min(x)
    y_max = max(y)
    y_min = min(y)
    b = (float(x_min), float(y_min), float(x_max), float(y_max))
    return b

def convert_annotation(image_id):

        load_f = open(rootdir + '/' + image_id + "_gtFine_polygons.json", 'r')  # 导入json标签的路径
        load_dict = json.load(load_f)
        out_file = open(rootdir + '/' + '%s_leftImg8bit.txt' % (image_id), 'w')  # 输出标签的路径
        #加的
        print('txt文件生成了,路径是:'+rootdir + '/' + image_id +'_leftImg8bit.txt'+'\n')
        objects = load_dict['objects']
        nums = len(objects)

        cls_id = ''
        for i in range(0, nums):
            labels = objects[i]['label']
            if (labels in ['person', 'rider', 'car', 'truck', 'bus', 'train', 'motorcycle', 'bicycle',"traffic light","traffic sign"]): #这里我需要用到的类别是这10类
                print(labels+'\n')
                pos = objects[i]['polygon']
                bb = position(pos)
                cls_id = labels
                out_file.write(cls_id + "," + ",".join([str(a) for a in bb]) + '\n')
        if cls_id == '':
            print('no label json:', "%s_gtFine_polygons.json" % (image_id))


def images_id(orgin_picture_dir):  # 获取训练集每个图像的名称  (orgin_picture_dir训练集图像的路径)
    a = []
    for parent, dirnames, filenames in os.walk(orgin_picture_dir):
        for filename in filenames:
            #print('函数images_id:'+filename)
            filename = filename.split('_leftImg8bit.png')[0]
            a.append(filename)
    return a


def xml_newdir(orgin_picture_dir, rootdir, new_rootdir):
    img_basenames = os.listdir(orgin_picture_dir)
    img_names = []
    for item in img_basenames:
        temp1, temp2 = os.path.splitext(item)  # 分别提取图片名称和图片后缀名称(具有_leftImg8bit)
        img_names.append(temp1)
        #print(img_names)
    for img in img_names:  # img是没有后缀的pic名称
        im = Image.open((orgin_picture_dir + img + '.png'))
        width, height = im.size

        # open the crospronding txt file
        gt = open(rootdir + '/' + img + '.txt').read().splitlines()

        # write in xml file
        xml_file = open((new_rootdir + '/' + img + '.xml'), 'w')
        xml_file.write('<annotation>\n')
        xml_file.write('    <folder>CITYSCAPE</folder>\n')
        xml_file.write('    <filename>' + str(img) + '.png' + '</filename>\n')
        xml_file.write('    <size>\n')
        xml_file.write('        <width>' + str(width) + '</width>\n')
        xml_file.write('        <height>' + str(height) + '</height>\n')
        xml_file.write('        <depth>3</depth>\n')
        xml_file.write('    </size>\n')

        # write the region of image on xml file
        for img_each_label in gt:
            spt = img_each_label.split(',')  # 这里如果txt里面是以逗号‘,’隔开的,那么就改为spt = img_each_label.split(',')。
            xml_file.write('    <object>\n')
            if str(spt[0])=='traffic light':
                spt[0]='traffic_light'
            if str(spt[0])=='traffic sign':
                spt[0]='traffic_sign'
            xml_file.write('        <name>' + str(spt[0]) + '</name>\n')
            xml_file.write('        <pose>Unspecified</pose>\n')
            xml_file.write('        <truncated>0</truncated>\n')
            xml_file.write('        <difficult>0</difficult>\n')
            xml_file.write('        <bndbox>\n')
            xml_file.write('            <xmin>' + str(spt[1]) + '</xmin>\n')
            xml_file.write('            <ymin>' + str(spt[2]) + '</ymin>\n')
            xml_file.write('            <xmax>' + str(spt[3]) + '</xmax>\n')
            xml_file.write('            <ymax>' + str(spt[4]) + '</ymax>\n')
            xml_file.write('        </bndbox>\n')
            xml_file.write('    </object>\n')
        xml_file.write('</annotation>')


if __name__ == '__main__':
    city_name = os.listdir('/home/user/zy/cityscapesScripts-master/gtFine/val')
    #print(city_name)
    for city in city_name:
        rootdir = '/home/user/zy/cityscapesScripts-master/gtFine/val/' + city   # json所在路径
        orgin_picture_dir = '/home/user/zy/cityscapesScripts-master/leftImg8bit/valcg/' + city +'/'    #cityscape的train所在路径
        names = images_id(orgin_picture_dir)
        for image_id in names:
            # print(image_id+"\n")
            convert_annotation(image_id)
            #xml_generator(orgin_picture_dir, rootdir)

            new_rootdir = '/home/user/zy/ssd-tensorflow-master/cityscapes/Annotations/'  # 新路径
            if os.path.exists(new_rootdir):#去掉了+city
                pass
            else:
                os.makedirs(new_rootdir)#去掉了+city
        xml_newdir(orgin_picture_dir, rootdir, new_rootdir)#new_rootdir后面去掉了+city
接下来,生成ImageSets/Main/train.txt文件,文件中包含了所有训练集图片名称,且不包含后缀。该文件用于对应图片及图片对应的标签文件。
# 制作cityscape数据集的:/ImageSets/Main/train.txt、test.txt、val.txt
# 批量读取文件名(不带后缀)(加入前缀train/city_name/pic_name)

import os
file_path = "/home/user/zy/cityscapesScripts-master/leftImg8bit/traincg/"
citys = os.listdir(file_path)
for city in citys:
    pic_path = file_path + city + "/"
    pic_path_list = os.listdir(pic_path)
    for file_list in pic_path_list:
        if file_list.endswith('png') or file_list.endswith('PNG'):
            with open("/home/user/zy/ssd-tensorflow-master/cityscapes/ImageSets/Main/train.txt", "a") as f:
                f.write(file_list.split("_leftImg8bit.png")[0] + "\n")
接下来将训练集中的所有图片转移到JPEGImages路径下。
import os
import shutil
# 设置输入和输出文件夹路径
input_folder = '/home/user/zy/cityscapesScripts-master/leftImg8bit/traincg/'
output_folder = '/home/user/zy/ssd-tensorflow-master/cityscapes/JPEGImages/'
# 创建输出文件夹
if not os.path.exists(output_folder):
    os.makedirs(output_folder)
# 遍历输入文件夹下的所有城市文件夹
for city_folder in os.listdir(input_folder):
    city_folder_path = os.path.join(input_folder, city_folder)

    # 遍历城市文件夹下的所有图片文件
    for file in os.listdir(city_folder_path):
        if file.endswith('.png'):  # 只复制png格式的图片文件
            file_path = os.path.join(city_folder_path, file)
            output_file_path = os.path.join(output_folder, file)
            shutil.copy(file_path, output_file_path)
print("复制完成!")
以上流程是完成训练集格式的转变,只要将相应的路径名称等稍作修改就可同理得到voc格式的验证集和测试集。
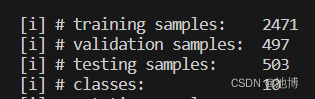
最终处理好的各集样本数量如下:
解决方案一——Faster-RCNN模型介绍及代码分析
Faster RCNN是一种经典的双阶段目标检测算法,对比于单阶段的目标检测算法,Faster RCNN更加复杂,具有更高的检测精度,但同时其速度较慢。
模型架构图
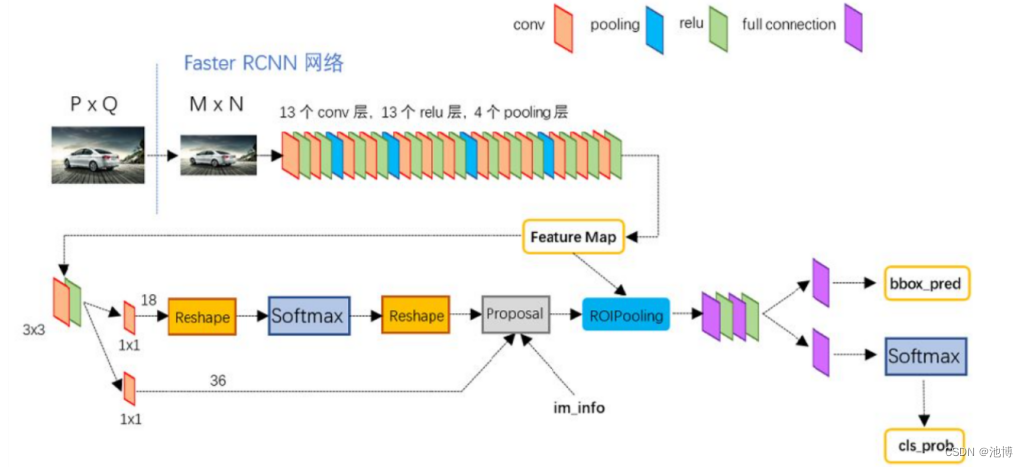
一副图像在输入Faster RCNN网络之前,图像会进行resize,图像的整体比例不会改变,因此不会出现图像失真的情况,之后经过主干特征提取网络进行特征提取,本项目使用的主干特征提取网络是ResNet50,在经过主干特征提取网络后会获得共享特征层(Feature Map),之后会进入3x3的卷积或者直接进入ROI pooling层,前者会首先对输入的共享特征层进行一个3x3的卷积,对3x3卷积后的结果进行两个1x1的卷积,两个1x1的卷积通道数分别是18和36,其作用是判断先验框中是否真实包含物体,并对先验框的位置进行调整,将先验框转变为建议框,获得的建议框会和共享特征层进行结合,传入ROIpooling层中,ROIpooling层会根据建议框对共享特征层进行截取,并对截取的所有局部特征层进行分区域的池化,来保证我们获得的所有局部特征层的shape相同,之后利用我们获得的所有局部特征层来进行分类预测和回归预测,回归预测的结果会直接对建议框进行调整,获得最终的预测框,分类预测会去判断建议框内部是否真实的包含物体,并对物体进行分类,最终我们获得了具有识别物体种类功能的预测框。
主干特征提取网络概述
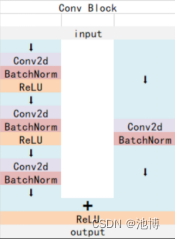
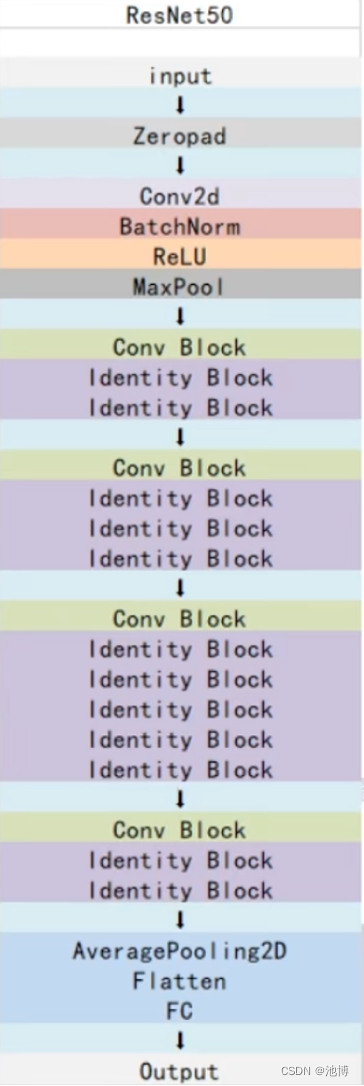
我使用的主干特征提取网络是ResNet50,两个基本的块:分别名为Conv Block和Identity Block。
Conv Block的结构如下:
Identity Block的结构如下:
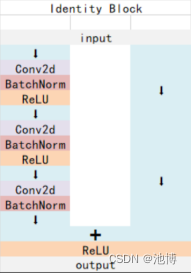
这两个都是残差网络结构,二者最大的区别就是残差边上是否存在卷积,Conv Block的残差边上有卷积和标准化,而Identity Block的残差边上没有操作,当残差边上有卷积的时候,可以通过改变卷积的步长和通道数来控制输出特征层的维度,而残差边上没有卷积则意味着输入维度和输出维度一定相同,因此Conv Block的作用是改变网络的维度,Identity Block是用来加深网络的。
在ResNet的bottleneck layer中,首先利用1x1的卷积压缩通道数,之后利用3x3的卷积进行特征提取,再利用1x1的卷积拓张通道数。
class Bottleneck(nn.Module):
    expansion = 4
    def __init__(self, inplanes, planes, stride=1, downsample=None):
        super(Bottleneck, self).__init__()
        self.conv1 = nn.Conv2d(inplanes, planes, kernel_size=1, stride=stride, bias=False)
        self.bn1 = nn.BatchNorm2d(planes) #首先利用1*1的卷积压缩通道数

        self.conv2 = nn.Conv2d(planes, planes, kernel_size=3, stride=1, padding=1, bias=False)
        self.bn2 = nn.BatchNorm2d(planes) #再利用3*3的卷积进行特征提取

        self.conv3 = nn.Conv2d(planes, planes * 4, kernel_size=1, bias=False)
        self.bn3 = nn.BatchNorm2d(planes * 4) #再利用1*1的卷积拓张通道数

        self.relu = nn.ReLU(inplace=True)
        self.downsample = downsample
        self.stride = stride
在forward函数中,先进行利用1x1的卷积压缩通道数,之后利用3x3的卷积进行特征提取,再利用1x1的卷积拓张通道数。若残差边上有卷积,就会对残差边进行卷积然后和输出进行相加,若没有,就会直接进行相加。
    def forward(self, x):#首先进行1*1,3*3,1*1
        residual = x

        out = self.conv1(x)
        out = self.bn1(out)
        out = self.relu(out)

        out = self.conv2(out)
        out = self.bn2(out)
        out = self.relu(out)

        out = self.conv3(out)
        out = self.bn3(out)
        #如果残差边上有卷积的话,就对残差边进行卷积然后和输出进行相加;如果残差边上没有卷积,直接进行相加
        if self.downsample is not None:
            residual = self.downsample(x)

        out += residual
        out = self.relu(out)

        return out
在构建ResNet50的时候,传入了一个数组[3,4,6,3],其对应了我们ResNet的结构,即3,4,6,3个Block,input的图片进行了卷积核大小为7x7,步长为2,通道数为64的卷积,假设输入的图片大小为600x600x3,在卷积后获得的特征层为300x300x64,之后进行标准化与激活函数,之后进行步长为2的最大池化,此时特征层的shape为150x150x64,之后进行Conv Block和Identity Block的堆叠,之后进行了对于特征提取部分以及分类部分的一个分割,即将前几次压缩后的内容以及激活函数等赋给features,将第五次压缩的内容和平均池化的内容赋给classifier。
def resnet50(pretrained = False):
    model = ResNet(Bottleneck, [3, 4, 6, 3])
    if pretrained:
        state_dict = load_state_dict_from_url("https://download.pytorch.org/models/resnet50-19c8e357.pth", model_dir="./model_data")
        model.load_state_dict(state_dict)
    #----------------------------------------------------------------------------#
    #   获取特征提取部分,从conv1到model.layer3,最终获得一个38,38,1024的特征层
    #----------------------------------------------------------------------------#
    features    = list([model.conv1, model.bn1, model.relu, model.maxpool, model.layer1, model.layer2, model.layer3])
    #----------------------------------------------------------------------------#
    #   获取分类部分,从model.layer4到model.avgpool
    #----------------------------------------------------------------------------#
    classifier  = list([model.layer4, model.avgpool])

    features    = nn.Sequential(*features)
    classifier  = nn.Sequential(*classifier)
    return features, classifier
ResNet50的整体结构如下:
获得proposal建议框
在获取共享特征层(Feature Map)后分为两步,一个是和ROIPooling结合使用、另一个是进行一次3x3的卷积后,进行一个18通道的1x1卷积,还有一个36通道的1x1卷积。在Faster-RCNN中,num_priors也就是先验框的数量是9,所以两个1x1卷积的结果实际上也就是:9 x 4的卷积用于预测共享特征层上每一个网格点上每一个先验框的变化情况。9 x 2的卷积用于预测共享特征层上每一个网格点上的每一个预测框内部是否包含了物体。9 x 4的卷积的结果会对这些先验框进行调整,获得一个新的框。9 x 2的卷积会判断上述获得的新框是否包含物体。
    def forward(self, x, img_size, scale=1.):
        n, _, h, w = x.shape
        #   先进行一个3x3的卷积,可理解为特征整合
        x = F.relu(self.conv1(x))
        #   回归预测对先验框进行调整
        rpn_locs = self.loc(x)
        rpn_locs = rpn_locs.permute(0, 2, 3, 1).contiguous().view(n, -1, 4)
        #   分类预测先验框内部是否包含物体
        rpn_scores = self.score(x)
        rpn_scores = rpn_scores.permute(0, 2, 3, 1).contiguous().view(n, -1, 2)
        #   进行softmax概率计算,每个先验框只有两个判别结果
        #   内部包含物体或者内部不包含物体,rpn_softmax_scores[:, :, 1]的内容为包含物体的概率
        rpn_softmax_scores  = F.softmax(rpn_scores, dim=-1)
        rpn_fg_scores       = rpn_softmax_scores[:, :, 1].contiguous()
        rpn_fg_scores       = rpn_fg_scores.view(n, -1)
先进行3x3的卷积进行特征整合,回归预测是36通道的卷积,分类预测是18通道的卷积,分类预测中第0维度的内容即batch_size,第一维度的内容即是每一个先验框,最后一个维度用来判断先验框内部是否包含物体,之后对获得的rpn_scores进行softmax,即将框内是否有物体转变成概率的表示,之后再进行reshape。
对Proposal建议框加以利用(RoiPoolingConv)
让我们对建议框有一个整体的理解:
事实上建议框就是对图片哪一个区域有物体存在进行初步筛选。
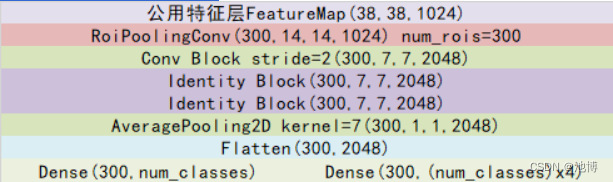
通过主干特征提取网络,我们可以获得一个公用特征层,当输入图片为600x600x3的时候,它的shape是38x38x1024,然后建议框会对这个公用特征层进行截取。
其实公用特征层里面的38x38对应着图片里的38x38个区域,38x38中的每一个点相当于这个区域内部所有特征的浓缩。
建议框会对这38x38个区域进行截取,也就是认为这些区域里存在目标,然后将截取的结果进行resize,resize到14x14x1024的大小。
然后再对每个建议框再进行Resnet原有的第五次压缩。压缩完后进行一个平均池化,再进行一个Flatten,最后分别进行一个num_classes的全连接和(num_classes)x4全连接。
num_classes的全连接用于对最后获得的框进行分类,(num_classes)x4全连接用于对相应的建议框进行调整。
通过这些操作,我们可以获得所有建议框的调整情况,和这个建议框调整后框内物体的类别。
事实上,在上一步获得的建议框就是ROI的先验框。
对Proposal建议框加以利用的过程与shape变化如图所示:
建议框网络的训练
公用特征层如果要获得建议框的预测结果,需要再进行一次3x3的卷积后,进行一个2通道的1x1卷积,还有一个36通道的1x1卷积。
在Faster-RCNN中,num_priors也就是先验框的数量就是9,所以两个1x1卷积的结果实际上也就是:
9 x 4的卷积 用于预测 公用特征层上 每一个网格点上 每一个先验框的变化情况。
9 x 2的卷积 用于预测 公用特征层上 每一个网格点上 每一个预测框内部是否包含了物体。
也就是说,我们直接利用Faster-RCNN建议框网络预测到的结果,并不是建议框在图片上的真实位置,需要解码才能得到真实位置。
而在训练的时候,我们需要计算loss函数,这个loss函数是相对于Faster-RCNN建议框网络的预测结果的。我们需要把图片输入到当前的Faster-RCNN建议框的网络中,得到建议框的结果;同时还需要进行编码,这个编码是把真实框的位置信息格式转化为Faster-RCNN建议框预测结果的格式信息。
也就是,我们需要找到 每一张用于训练的图片的每一个真实框对应的先验框,并求出如果想要得到这样一个真实框,我们的建议框预测结果应该是怎么样的。
从建议框预测结果获得真实框的过程被称作解码,而从真实框获得建议框预测结果的过程就是编码的过程。
因此我们只需要将解码过程逆过来就是编码过程了。
实现代码如下:
def bbox_iou(bbox_a, bbox_b):
    if bbox_a.shape[1] != 4 or bbox_b.shape[1] != 4:
        print(bbox_a, bbox_b)
        raise IndexError
    tl = np.maximum(bbox_a[:, None, :2], bbox_b[:, :2])
    br = np.minimum(bbox_a[:, None, 2:], bbox_b[:, 2:])
    area_i = np.prod(br - tl, axis=2) * (tl < br).all(axis=2)
    area_a = np.prod(bbox_a[:, 2:] - bbox_a[:, :2], axis=1)
    area_b = np.prod(bbox_b[:, 2:] - bbox_b[:, :2], axis=1)
    return area_i / (area_a[:, None] + area_b - area_i)

def bbox2loc(src_bbox, dst_bbox):
    width = src_bbox[:, 2] - src_bbox[:, 0]
    height = src_bbox[:, 3] - src_bbox[:, 1]
    ctr_x = src_bbox[:, 0] + 0.5 * width
    ctr_y = src_bbox[:, 1] + 0.5 * height

    base_width = dst_bbox[:, 2] - dst_bbox[:, 0]
    base_height = dst_bbox[:, 3] - dst_bbox[:, 1]
    base_ctr_x = dst_bbox[:, 0] + 0.5 * base_width
    base_ctr_y = dst_bbox[:, 1] + 0.5 * base_height

    eps = np.finfo(height.dtype).eps
    width = np.maximum(width, eps)
    height = np.maximum(height, eps)

    dx = (base_ctr_x - ctr_x) / width
    dy = (base_ctr_y - ctr_y) / height
    dw = np.log(base_width / width)
    dh = np.log(base_height / height)

    loc = np.vstack((dx, dy, dw, dh)).transpose()
    return loc

class AnchorTargetCreator(object):
    def __init__(self, n_sample=256, pos_iou_thresh=0.7, neg_iou_thresh=0.3, pos_ratio=0.5):
        self.n_sample       = n_sample
        self.pos_iou_thresh = pos_iou_thresh
        self.neg_iou_thresh = neg_iou_thresh
        self.pos_ratio      = pos_ratio

    def __call__(self, bbox, anchor):
        argmax_ious, label = self._create_label(anchor, bbox)
        if (label > 0).any():
            loc = bbox2loc(anchor, bbox[argmax_ious])
            return loc, label
        else:
            return np.zeros_like(anchor), label

    def _calc_ious(self, anchor, bbox):
        #----------------------------------------------#
        #   anchor和bbox的iou
        #   获得的ious的shape为[num_anchors, num_gt]
        #----------------------------------------------#
        ious = bbox_iou(anchor, bbox)

        if len(bbox)==0:
            return np.zeros(len(anchor), np.int32), np.zeros(len(anchor)), np.zeros(len(bbox))
        #---------------------------------------------------------#
        #   获得每一个先验框最对应的真实框  [num_anchors, ]
        #---------------------------------------------------------#
        argmax_ious = ious.argmax(axis=1)
        #---------------------------------------------------------#
        #   找出每一个先验框最对应的真实框的iou  [num_anchors, ]
        #---------------------------------------------------------#
        max_ious = np.max(ious, axis=1)
        #---------------------------------------------------------#
        #   获得每一个真实框最对应的先验框  [num_gt, ]
        #---------------------------------------------------------#
        gt_argmax_ious = ious.argmax(axis=0)
        #---------------------------------------------------------#
        #   保证每一个真实框都存在对应的先验框
        #---------------------------------------------------------#
        for i in range(len(gt_argmax_ious)):
            argmax_ious[gt_argmax_ious[i]] = i

        return argmax_ious, max_ious, gt_argmax_ious

    def _create_label(self, anchor, bbox):
        # ------------------------------------------ #
        #   1是正样本,0是负样本,-1忽略
        #   初始化的时候全部设置为-1
        # ------------------------------------------ #
        label = np.empty((len(anchor),), dtype=np.int32)
        label.fill(-1)

        # ------------------------------------------------------------------------ #
        #   argmax_ious为每个先验框对应的最大的真实框的序号         [num_anchors, ]
        #   max_ious为每个真实框对应的最大的真实框的iou             [num_anchors, ]
        #   gt_argmax_ious为每一个真实框对应的最大的先验框的序号    [num_gt, ]
        # ------------------------------------------------------------------------ #
        argmax_ious, max_ious, gt_argmax_ious = self._calc_ious(anchor, bbox)

        # ----------------------------------------------------- #
        #   如果小于门限值则设置为负样本
        #   如果大于门限值则设置为正样本
        #   每个真实框至少对应一个先验框
        # ----------------------------------------------------- #
        label[max_ious < self.neg_iou_thresh] = 0
        label[max_ious >= self.pos_iou_thresh] = 1
        if len(gt_argmax_ious)>0:
            label[gt_argmax_ious] = 1

        # ----------------------------------------------------- #
        #   判断正样本数量是否大于128,如果大于则限制在128
        # ----------------------------------------------------- #
        n_pos = int(self.pos_ratio * self.n_sample)
        pos_index = np.where(label == 1)[0]
        if len(pos_index) > n_pos:
            disable_index = np.random.choice(pos_index, size=(len(pos_index) - n_pos), replace=False)
            label[disable_index] = -1

        # ----------------------------------------------------- #
        #   平衡正负样本,保持总数量为256
        # ----------------------------------------------------- #
        n_neg = self.n_sample - np.sum(label == 1)
        neg_index = np.where(label == 0)[0]
        if len(neg_index) > n_neg:
            disable_index = np.random.choice(neg_index, size=(len(neg_index) - n_neg), replace=False)
            label[disable_index] = -1

        return argmax_ious, label
Roi网络的训练
通过上一步已经可以对建议框网络进行训练了,建议框网络会提供一些位置的建议,在ROI网络部分,其会将建议框根据进行一定的截取,并获得对应的预测结果,事实上就是将上一步建议框当作了ROI网络的先验框。
因此,我们需要计算所有建议框和真实框的重合程度,并进行筛选,如果某个真实框和建议框的重合程度大于0.5则认为该建议框为正样本,如果重合程度小于0.5则认为该建议框为负样本
因此我们可以对真实框进行编码,这个编码是相对于建议框的,也就是,当我们存在这些建议框的时候,我们的ROI预测网络需要有什么样的预测结果才能将这些建议框调整成真实框。
每次训练我们都放入128个建议框进行训练,同时要注意正负样本的平衡。
实现代码如下:
class ProposalTargetCreator(object):
    def __init__(self, n_sample=128, pos_ratio=0.5, pos_iou_thresh=0.5, neg_iou_thresh_high=0.5, neg_iou_thresh_low=0):
        self.n_sample = n_sample
        self.pos_ratio = pos_ratio
        self.pos_roi_per_image = np.round(self.n_sample * self.pos_ratio)
        self.pos_iou_thresh = pos_iou_thresh
        self.neg_iou_thresh_high = neg_iou_thresh_high
        self.neg_iou_thresh_low = neg_iou_thresh_low

    def __call__(self, roi, bbox, label, loc_normalize_std=(0.1, 0.1, 0.2, 0.2)):
        roi = np.concatenate((roi.detach().cpu().numpy(), bbox), axis=0)
        # ----------------------------------------------------- #
        #   计算建议框和真实框的重合程度
        # ----------------------------------------------------- #
        iou = bbox_iou(roi, bbox)

        if len(bbox)==0:
            gt_assignment = np.zeros(len(roi), np.int32)
            max_iou = np.zeros(len(roi))
            gt_roi_label = np.zeros(len(roi))
        else:
            #---------------------------------------------------------#
            #   获得每一个建议框最对应的真实框  [num_roi, ]
            #---------------------------------------------------------#
            gt_assignment = iou.argmax(axis=1)
            #---------------------------------------------------------#
            #   获得每一个建议框最对应的真实框的iou  [num_roi, ]
            #---------------------------------------------------------#
            max_iou = iou.max(axis=1)
            #---------------------------------------------------------#
            #   真实框的标签要+1因为有背景的存在
            #---------------------------------------------------------#
            gt_roi_label = label[gt_assignment] + 1

        #----------------------------------------------------------------#
        #   满足建议框和真实框重合程度大于neg_iou_thresh_high的作为负样本
        #   将正样本的数量限制在self.pos_roi_per_image以内
        #----------------------------------------------------------------#
        pos_index = np.where(max_iou >= self.pos_iou_thresh)[0]
        pos_roi_per_this_image = int(min(self.pos_roi_per_image, pos_index.size))
        if pos_index.size > 0:
            pos_index = np.random.choice(pos_index, size=pos_roi_per_this_image, replace=False)

        #-----------------------------------------------------------------------------------------------------#
        #   满足建议框和真实框重合程度小于neg_iou_thresh_high大于neg_iou_thresh_low作为负样本
        #   将正样本的数量和负样本的数量的总和固定成self.n_sample
        #-----------------------------------------------------------------------------------------------------#
        neg_index = np.where((max_iou < self.neg_iou_thresh_high) & (max_iou >= self.neg_iou_thresh_low))[0]
        neg_roi_per_this_image = self.n_sample - pos_roi_per_this_image
        neg_roi_per_this_image = int(min(neg_roi_per_this_image, neg_index.size))
        if neg_index.size > 0:
            neg_index = np.random.choice(neg_index, size=neg_roi_per_this_image, replace=False)

        #---------------------------------------------------------#
        #   sample_roi      [n_sample, ]
        #   gt_roi_loc      [n_sample, 4]
        #   gt_roi_label    [n_sample, ]
        #---------------------------------------------------------#
        keep_index = np.append(pos_index, neg_index)

        sample_roi = roi[keep_index]
        if len(bbox)==0:
            return sample_roi, np.zeros_like(sample_roi), gt_roi_label[keep_index]

        gt_roi_loc = bbox2loc(sample_roi, bbox[gt_assignment[keep_index]])
        gt_roi_loc = (gt_roi_loc / np.array(loc_normalize_std, np.float32))

        gt_roi_label = gt_roi_label[keep_index]
        gt_roi_label[pos_roi_per_this_image:] = 0
        return sample_roi, gt_roi_loc, gt_roi_label
Faster-RCNN模型运行部署
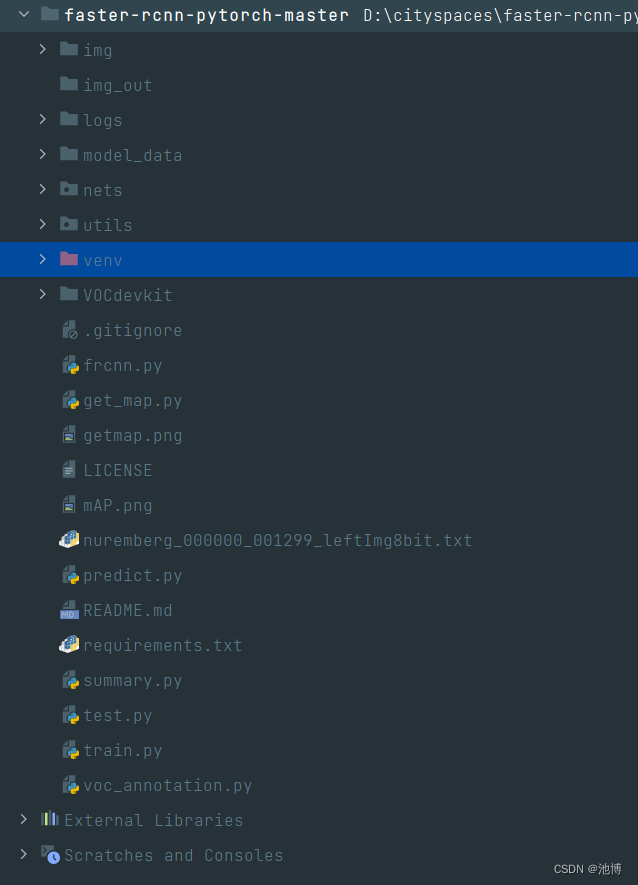
项目的结构如下图:
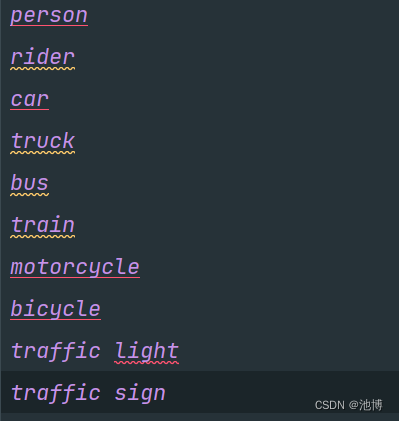
其中VOCdevkit文件夹用来存放VOC数据集,在model_data文件夹下的voc_classes.txt中需要指定区分的类别,本项目区分的类别如下:
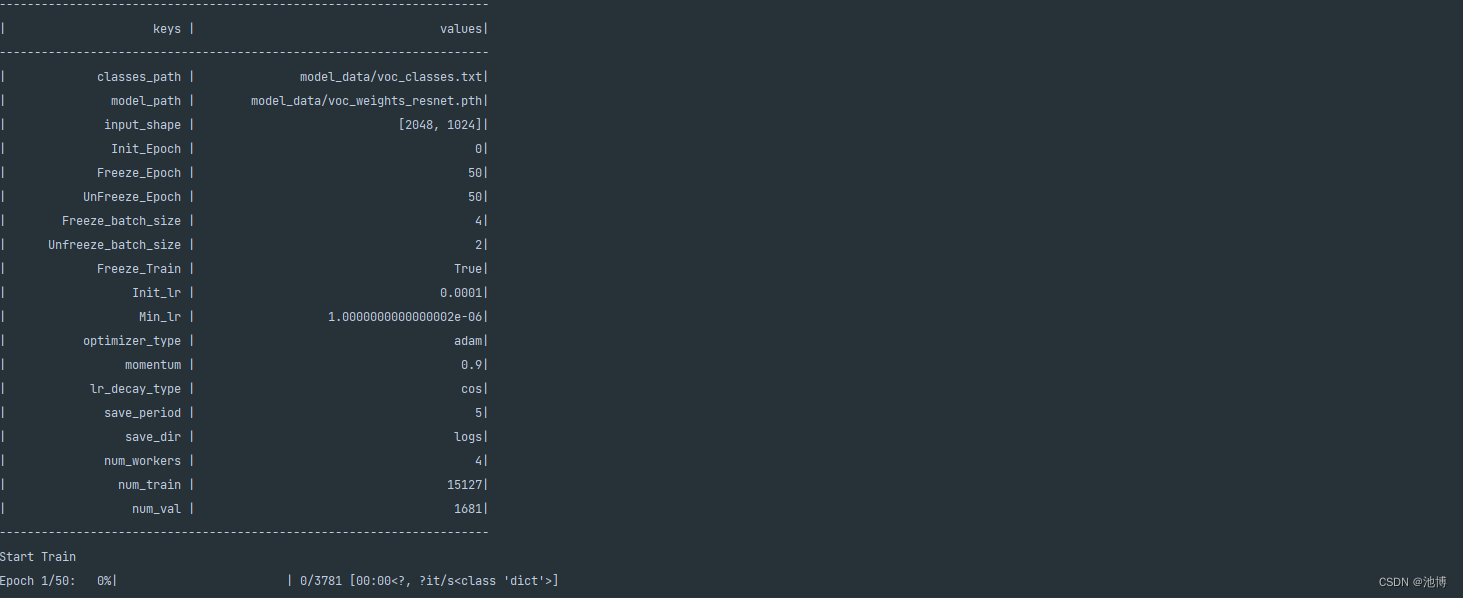
之后修改模型训练的参数:
class FRCNN(object):
    _defaults = {

        "model_path"    : "logs/last_epoch_weights.pth",
        "classes_path"  : 'model_data/voc_classes.txt',
        #   网络的主干特征提取网络,resnet50或者vgg
        "backbone"      : "resnet50",
        #   只有得分大于置信度的预测框会被保留下来
        "confidence"    : 0.5,
        #   非极大抑制所用到的nms_iou大小
        "nms_iou"       : 0.3,
        #   用于指定先验框的大小
        'anchors_size'  : [8, 16, 32],
        #   是否使用Cuda
        "cuda"          : False,
    }
在准备好数据集并且运行voc_annotation.py,生成对应的训练集、验证集、测试集之后即可开始训练,训练过程如下:
解决方案一性能评估
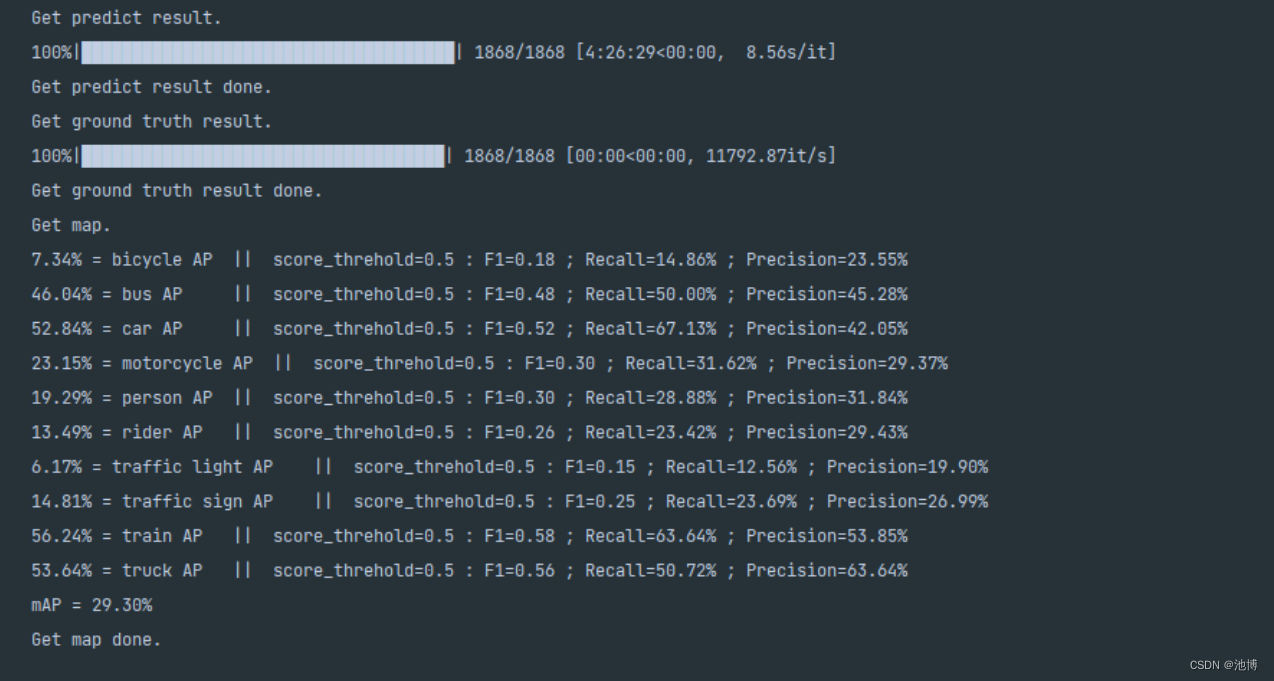
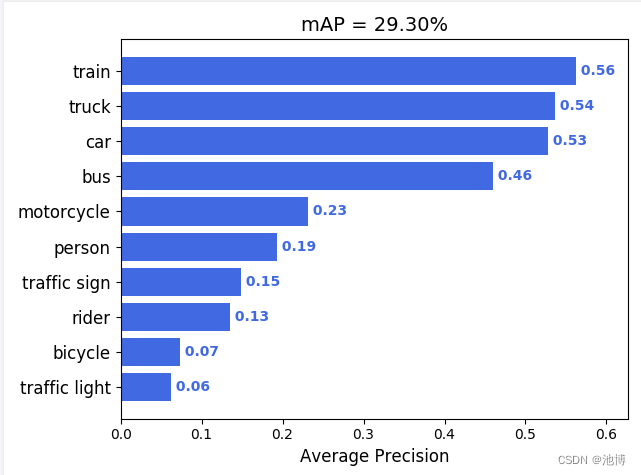
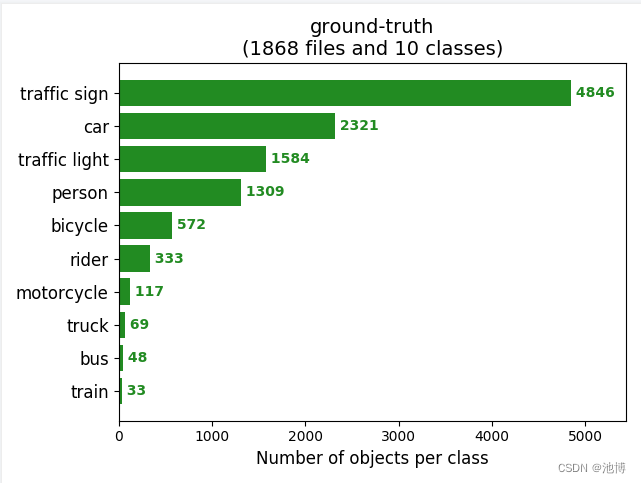
在训练完成后,传入训练好的模型,运行get_map.py来对模型进行评估,运行结果如下,同时生成了其他各项指标的可视化:
生成的map柱状图如下(即PA):
ground-truth如下:
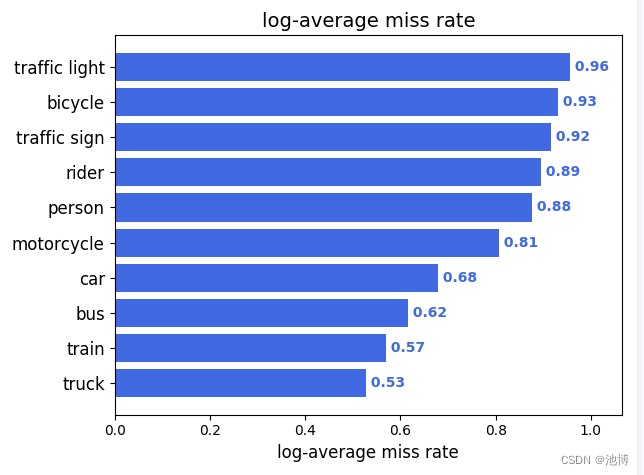
log-average miss rate如下:
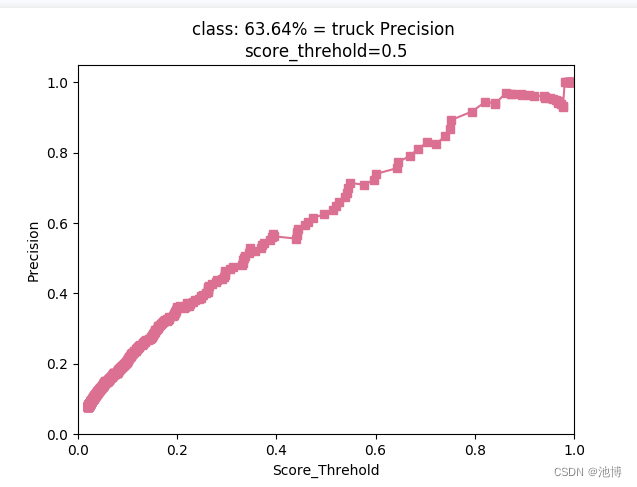
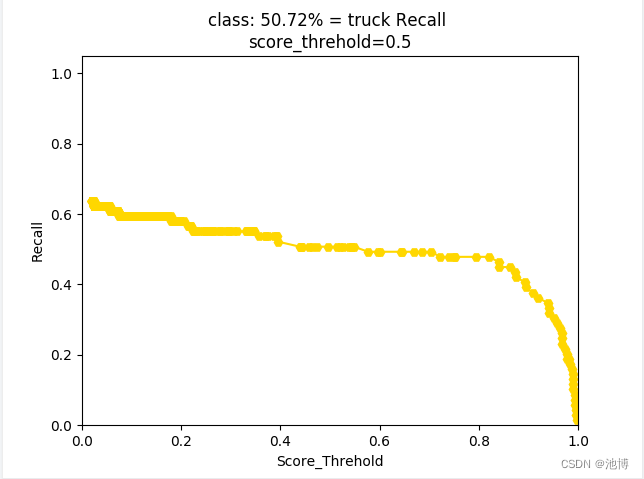
对于每一类别,其查全率以及查准率都绘制了相应的图片(这里以truck为例):
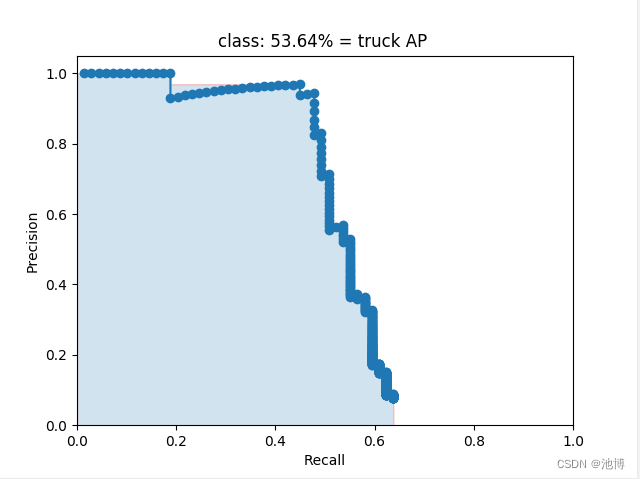
对于每一类别,都生成了对应的P-R图(这里以truck为例):
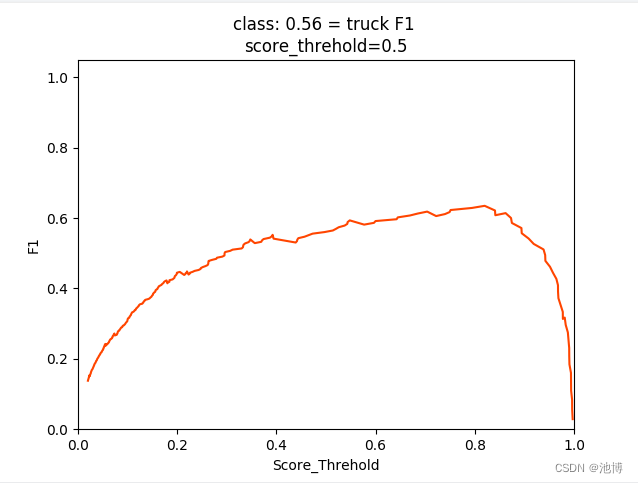
对于每一个类别,都生成了对应的F1曲线图(这里以truck为例):
利用oneAPI里的Pytorch 扩展(ipex)训练
IPEX的全称是Intel® Extension for PyTorch,它通过最新的功能优化扩展了 PyTorch,优化利用英特尔 CPU 上的 AVX-512 矢量神经网络指令 (AVX512 VNNI) 和英特尔® 高级矩阵扩展 (英特尔® AMX) 以及英特尔独立 GPU 上的英特尔 Xe 矩阵扩展 (XMX) AI 引擎,从而进一步提升了英特尔硬件的性能。
IPEX的使用非常方便快捷,只需导入intel_extension_for_pytorch包后将model传入optimize函数中:
import intel_extension_for_pytorch as ipex
model = ipex.optimize(model)
之后我们通过python的标准库time记录了训练时间,并比对了使用IPEX前后的性能:
| 训练时间 | |
|---|---|
| 初始模型 | 25h58min13s |
| 使用IPEX后的模型 | 25h11min46s |
通过训练时间的比对,可以得知IPEX对于模型的训练起到了一定的加速作用。
使用neural compressor工具训练
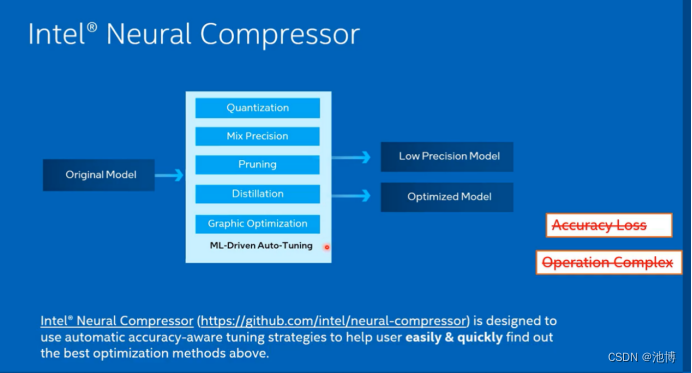
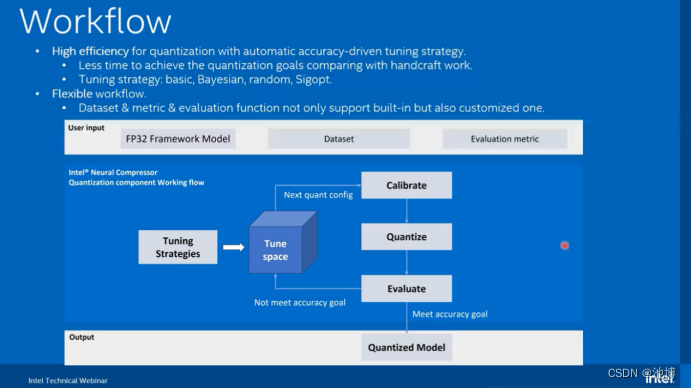
Intel®Neural Compressor是一个用于模型压缩的开源Python库,可减少模型大小并提高cpu或gpu上的DL推理性能。它支持PyTorch模型的训练后静态和动态量化。它支持自动精度驱动的调优策略,方便用户生成量化模型。用户可以很容易地应用静态、动态和意识训练量化方法,同时给出预期的精度标准。Intel®Neural Compressor旨在为主流框架(如TensorFlow, PyTorch, ONNX Runtime和MXNet)以及Intel扩展(如Intel Extension for TensorFlow和Intel Extension for PyTorch)提供流行的模型压缩技术,如量化,修剪(稀疏性),蒸馏和神经架构搜索。
官网的介绍
使用如下命令安装该工具:
pip install neural-compressor -i https://pypi.tuna.tsinghua.edu.cn/simple/
为了进一步降低使用难度,我们使用了neural coder。
Neural Coder——Visual Studio Code Extension方式
Neural Coder是Intel®Neural Compressor下的新组件,通过一键式设备切换(例如,CUDA到CPU)和优化启用自动代码更改,进一步简化了深度学习模型的部署。随后,Neural Coder还可以对从自动启用中获得的所有适用优化集执行自动基准测试,并评估最佳的开箱即用性能。
Neural Coder利用静态程序分析技术和启发式优化规则,简化各种深度学习优化api的使用,提高AI模型的计算效率,改善一般AI客户的用户体验。
Neural Coder帮助我们将深度学习优化自动编码到脚本中。
该工具使用的方法有以下三种:
-
Jupyter Lab Extension/Visual Studio Code Extension
这使用户能够在Jupyter Lab编码平台上编写深度学习模型时使用Neural Coder。用户可以简单地在JupyterLab的扩展管理器中搜索jupyter-lab-neural-compressor,并一键安装Neural Coder。教程 -
Python Launcher
Neural Coder可以用作Python启动器。用户可以运行Python深度学习模型代码,通过简单地在Python命令行中添加内联前缀-m neural_coder来自动启用优化。教程 -
Python API
Neural Coder有3个面向用户的api: enable, bench和superbench。详情。我们提供了一个支持深度学习优化特性的列表。特别是对于量化,我们提供了一个自动量化API,可以帮助自动启用深度学习模型上的量化,并自动评估模型上的最佳性能,而无需手动编码。支持的特性包括训练后静态量化、训练后动态量化和混合精度。教程
在当前解决方案中,我们使用了Visual Studio Code Extension方式:
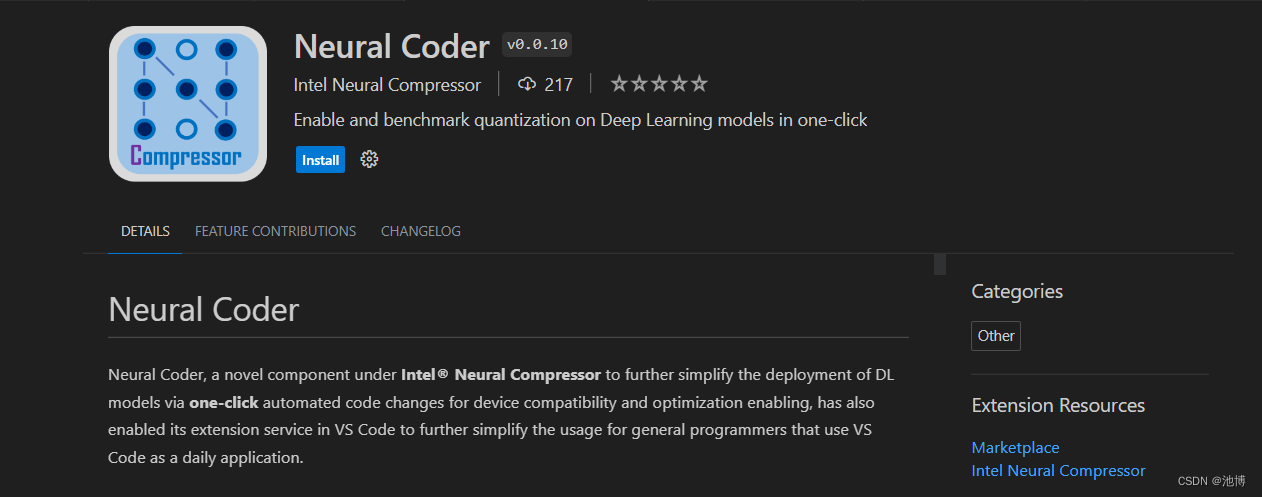
首先,在插件商店中搜索VS code插件,如下:
安装插件后,我们重启一下VS Code,通过SSH链接到远程基于linux的服务器,因为Neural Coder需要基于linux的环境。接着再次进入扩展商店搜索该插件,可以看到下图:
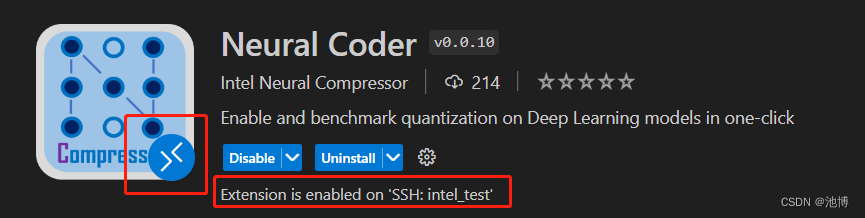
证明该插件可以使用在我们的远程连接上。
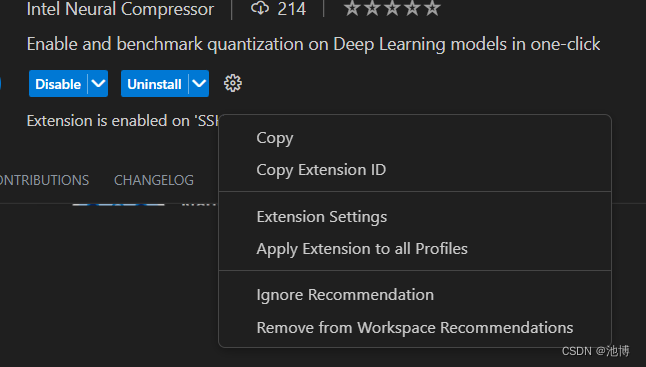
接着点开设置
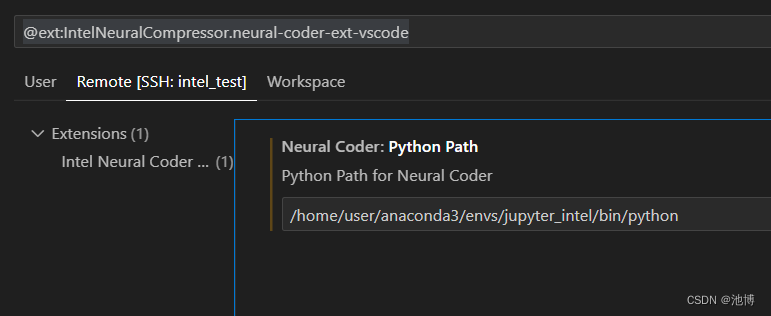
在Extenson Settings中设置路径
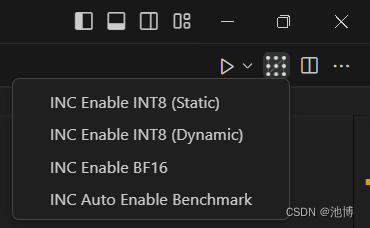
可以在右上角看到以下图标:

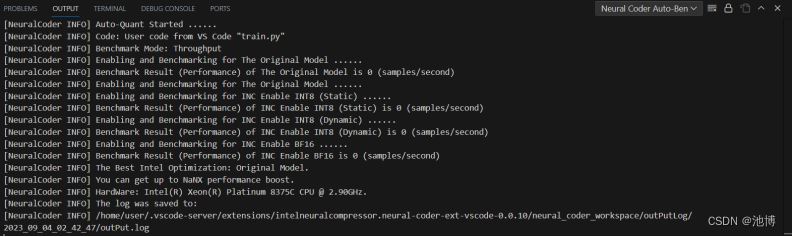
点击后我们选择了INC Auto Enable Benchmark:
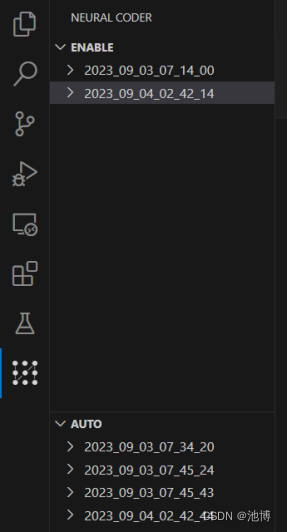
之后可以得到下图:
解决方案二——SSD模型介绍及代码分析
SSD算法的全名是Single Shot MultiBox Detector,Single shot指明了SSD算法属于one-stage方法,MultiBox指明了SSD是多框预测。与Faster R-CNN先通过CNN得到候选框,然后进行分类和回归相比,SSD可以一步完成检测,速度较快。
模型架构图
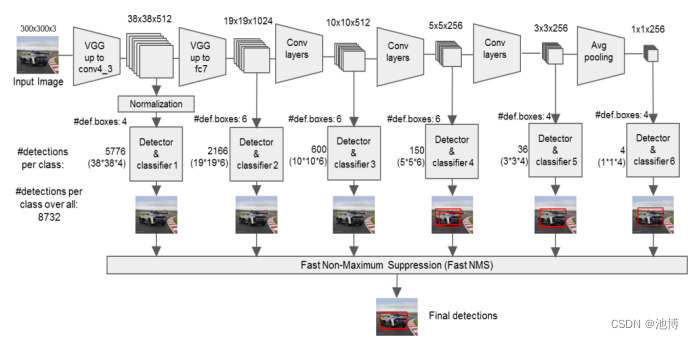
SSD首先使用一个预训练的卷积神经网络作为基础网络,这里选用的是vgg16,用于提取多个尺度的图像特征,通过在网络中逐层进行卷积和池化操作,得到一系列特征图。接下来,SSD将不同层次的特征图进行融合,以便同时检测不同尺度的目标,然后选择几个特定层次的特征图用于目标检测。在每个融合后的特征图上,SSD根据不同尺度和长宽比设计一组默认框(default boxes),这些默认框在不同特征图上进行采样,并与特征图上的位置进行匹配,从而实现了对不同位置和尺度目标的检测。SSD通过每个默认框对应的位置和特征图上的像素值,同时预测目标的类别和位置,预测得到的检测框还会经过非极大值抑制去除重叠,输出最终结果。
SSD采用VGG16作为基础模型,然后在VGG16的基础上新增了卷积层来获得更多的特征图以用于检测。
SSD网络有两种:SSD 300和SSD 512,用于不同的输入尺寸。下文主要以 SSD 300为例进行分析。
网络结构
算法步骤:
1、输入一幅图片(300x300),将其输入到预训练好的分类网络中来获得不同大小的特征映射。修改了传统的VGG16网络:将VGG16的FC6和FC7层转化为卷积层,如上图的Conv6和Conv7;去掉所有的Dropout层和FC8层;添加了Atrous算法;将Pool5从2x2-S2变换到3x3-S1;
2、抽取Conv4_3、Conv7、Conv8_2、Conv9_2、Conv10_2、Conv11_2层的feature map,然后分别在这些feature map层上面的每一个点构造6个不同尺度大小的bbox,然后分别进行检测和分类,生成多个bbox;
3、将不同feature map获得的bbox结合起来,经过NMS(非极大值抑制)方法来抑制掉一部分重叠或者不正确的bbox,生成最终的bbox集合(即检测结果)。
代码流程
首先在使用数据集之前,由于SSD模型要求图片形状为方形,若输入长方形图片,模型会自动缩放,会引起图片畸变,影响精度。根据已有的一些经验,我们选择对图形进行扩展,在cityscpaes中长为2048宽为1024的图片的下方,补充长为2048宽为1024的白色长方形,补成2048*2048的图片,代价是会引起目标特征相对于图的比例缩小,影响小特征的检测。
def images_id(orgin_picture_dir,output_folder):  # 获取训练集每个图像的名称  (orgin_picture_dir训练集图像的路径)
    a = []
    # 获取输入文件夹中的所有文件
    file_list = os.listdir(orgin_picture_dir)
    # 遍历每个照片并进行处理
    for file_name in file_list:
        # 拼接输入文件和输出文件的完整路径
        input_path = os.path.join(orgin_picture_dir, file_name)
        output_path = os.path.join(output_folder, file_name)
        # 打开图像文件
        image = Image.open(input_path)
        # 创建一个新的2048*2048大小的图像
        new_image = Image.new("RGB", (2048, 2048), (255, 255, 255))
        # 将原始图像粘贴到新图像中
        new_image.paste(image, (0, 0))
        # 保存新图像
        new_image.save(output_path)
        print("保存了"+file_name+"\n")

    # for parent, dirnames, filenames in os.walk(orgin_picture_dir):
    #     for filename in filenames:
    #         print(filename)
    #         filename = filename.split('_leftImg8bit.png')[0]
    #         a.append(filename)
    # return a

if __name__ == '__main__':
    city_name = os.listdir('/home/user/zy/cityscapesScripts-master/gtFine/val/')
    print(city_name)
    for city in city_name:
        # rootdir = '/home/zy/cityscapesScripts-master/gtFine/train/' + city + '/'  # json所在路径
        orgin_picture_dir = '/home/user/zy/cityscapesScripts-master/leftImg8bit/val/' + city + '/'   #cityscape的train所在路径
        output_folder = "/home/user/zy/cityscapesScripts-master/leftImg8bit/valcg/"+ city + '/'
        names = images_id(orgin_picture_dir,output_folder)
        # for image_id in names:
        #     print(image_id)
图片处理好后,在输入模型时,模型会自动将图片缩小为512*512大小。
接下来构建模型。
首先,下载预训练好的vgg16模型。
import zipfile
import tarfile
import shutil
import os
from urllib.request import urlretrieve
from tqdm import tqdm

class DLProgress(tqdm):
    last_block = 0

    #---------------------------------------------------------------------------
    def hook(self, block_num=1, block_size=1, total_size=None):
        self.total = total_size
        self.update((block_num - self.last_block) * block_size)
        self.last_block = block_num

vgg_archive = 'vgg.zip'
progress_hook='tqdm'
url = 'https://s3-us-west-1.amazonaws.com/udacity-selfdrivingcar/vgg.zip'
if not os.path.exists(vgg_archive):
    if callable(progress_hook):
        urlretrieve(url, vgg_archive, progress_hook)
    else:
        with DLProgress(unit='B', unit_scale=True, miniters=1) as pbar:
            urlretrieve(url, vgg_archive, pbar.hook)

            # -------------------------------------------------------------------
            # Extract vgg
            # -------------------------------------------------------------------
        zip_archive = zipfile.ZipFile(vgg_archive, 'r')
        zip_archive.extractall("/vggnew")
        zip_archive.close()
构建网络:
with tf.Session() as sess:
        print('[i] Creating the model...')
        n_train_batches = int(math.ceil(td.num_train/args.batch_size))
        n_valid_batches = int(math.ceil(td.num_valid/args.batch_size))

        global_step = None
        if start_epoch == 0:
            lr_values = args.lr_values.split(';')
            try:
                lr_values = [float(x) for x in lr_values]
            except ValueError:
                print('[!] Learning rate values must be floats')
                sys.exit(1)

            lr_boundaries = args.lr_boundaries.split(';')
            try:
                lr_boundaries = [int(x) for x in lr_boundaries]
            except ValueError:
                print('[!] Learning rate boundaries must be ints')
                sys.exit(1)

            ret = compute_lr(lr_values, lr_boundaries)
            learning_rate, global_step = ret

        net = SSDVGG(sess, td.preset)
        if start_epoch != 0:
            net.build_from_metagraph(metagraph_file, checkpoint_file)
            net.build_optimizer_from_metagraph()
        else:
            net.build_from_vgg(args.vgg_dir, td.num_classes)
            net.build_optimizer(learning_rate=learning_rate,
                                global_step=global_step,
                                weight_decay=args.weight_decay,
                                momentum=args.momentum)

        initialize_uninitialized_variables(sess)
处理数据以供模型使用:
def annotate(data_dir, samples, colors, sample_name):
    """
    Draw the bounding boxes on the sample images
    :param data_dir: the directory where the dataset's files are stored
    :param samples:  samples to be processed
    :param colors:   a dictionary mapping class name to a BGR color tuple
    :param colors:   name of the sample
    """
    result_dir = data_dir+'/annotated/'+sample_name.strip()+'/'
    if not os.path.exists(result_dir):
        os.makedirs(result_dir)

    for sample in tqdm(samples, desc=sample_name, unit='samples'):
        img    = cv2.imread(sample.filename)
        basefn = os.path.basename(sample.filename)
        for box in sample.boxes:
            draw_box(img, box, colors[box.label])
        cv2.imwrite(result_dir+basefn, img)

#-------------------------------------------------------------------------------
def build_sampler(overlap, trials):
    return SamplerTransform(sample=True, min_scale=0.3, max_scale=1.0,
                            min_aspect_ratio=0.5, max_aspect_ratio=2.0,
                            min_jaccard_overlap=overlap, max_trials=trials)

#-------------------------------------------------------------------------------
def build_train_transforms(preset, num_classes, sampler_trials, expand_prob):
    #---------------------------------------------------------------------------
    # Resizing
    #---------------------------------------------------------------------------
    tf_resize = ResizeTransform(width=preset.image_size.w,
                                height=preset.image_size.h,
                                algorithms=[cv2.INTER_LINEAR,
                                            cv2.INTER_AREA,
                                            cv2.INTER_NEAREST,
                                            cv2.INTER_CUBIC,
                                            cv2.INTER_LANCZOS4])

    #---------------------------------------------------------------------------
    # Image distortions
    #---------------------------------------------------------------------------
    tf_brightness = BrightnessTransform(delta=32)
    tf_rnd_brightness = RandomTransform(prob=0.5, transform=tf_brightness)

    tf_contrast = ContrastTransform(lower=0.5, upper=1.5)
    tf_rnd_contrast = RandomTransform(prob=0.5, transform=tf_contrast)

    tf_hue = HueTransform(delta=18)
    tf_rnd_hue = RandomTransform(prob=0.5, transform=tf_hue)

    tf_saturation = SaturationTransform(lower=0.5, upper=1.5)
    tf_rnd_saturation = RandomTransform(prob=0.5, transform=tf_saturation)

    tf_reorder_channels = ReorderChannelsTransform()
    tf_rnd_reorder_channels = RandomTransform(prob=0.5,
                                              transform=tf_reorder_channels)

    #---------------------------------------------------------------------------
    # Compositions of image distortions
    #---------------------------------------------------------------------------
    tf_distort_lst = [
        tf_rnd_contrast,
        tf_rnd_saturation,
        tf_rnd_hue,
        tf_rnd_contrast
    ]
    tf_distort_1 = ComposeTransform(transforms=tf_distort_lst[:-1])
    tf_distort_2 = ComposeTransform(transforms=tf_distort_lst[1:])
    tf_distort_comp = [tf_distort_1, tf_distort_2]
    tf_distort = TransformPickerTransform(transforms=tf_distort_comp)

    #---------------------------------------------------------------------------
    # Expand sample
    #---------------------------------------------------------------------------
    tf_expand = ExpandTransform(max_ratio=4.0, mean_value=[104, 117, 123])
    tf_rnd_expand = RandomTransform(prob=expand_prob, transform=tf_expand)

    #---------------------------------------------------------------------------
    # Samplers
    #---------------------------------------------------------------------------
    samplers = [
        SamplerTransform(sample=False),
        build_sampler(0.1, sampler_trials),
        build_sampler(0.3, sampler_trials),
        build_sampler(0.5, sampler_trials),
        build_sampler(0.7, sampler_trials),
        build_sampler(0.9, sampler_trials),
        build_sampler(1.0, sampler_trials)
    ]
    tf_sample_picker = SamplePickerTransform(samplers=samplers)

    #---------------------------------------------------------------------------
    # Horizontal flip
    #---------------------------------------------------------------------------
    tf_flip = HorizontalFlipTransform()
    tf_rnd_flip = RandomTransform(prob=0.5, transform=tf_flip)

    #---------------------------------------------------------------------------
    # Transform list
    #---------------------------------------------------------------------------
    transforms = [
        ImageLoaderTransform(),
        tf_rnd_brightness,
        tf_distort,
        tf_rnd_reorder_channels,
        tf_rnd_expand,
        tf_sample_picker,
        tf_rnd_flip,
        LabelCreatorTransform(preset=preset, num_classes=num_classes),
        tf_resize
    ]
    return transforms

#-------------------------------------------------------------------------------
def build_valid_transforms(preset, num_classes):
    tf_resize = ResizeTransform(width=preset.image_size.w,
                                height=preset.image_size.h,
                                algorithms=[cv2.INTER_LINEAR])
    transforms = [
        ImageLoaderTransform(),
        LabelCreatorTransform(preset=preset, num_classes=num_classes),
        tf_resize
    ]
    return transforms

#-------------------------------------------------------------------------------
def main():
    #---------------------------------------------------------------------------
    # Parse the commandline
    #---------------------------------------------------------------------------
    parser = argparse.ArgumentParser(description='Process a dataset for SSD')
    parser.add_argument('--data-source', default='cityscapes',
                        help='data source')#default='pascal_voc'
    parser.add_argument('--data-dir', default='cityscapes',
                        help='data directory')#default='pascal-voc'
    parser.add_argument('--validation-fraction', type=float, default=0.025,
                        help='fraction of the data to be used for validation')#!!!!!!!!!!!!!!!!!
    parser.add_argument('--expand-probability', type=float, default=0.5,
                        help='probability of running sample expander')
    parser.add_argument('--sampler-trials', type=int, default=50,
                        help='number of time a sampler tries to find a sample')
    parser.add_argument('--annotate', type=str2bool, default='True',
                        help="Annotate the data samples")
    parser.add_argument('--compute-td', type=str2bool, default='True',
                        help="Compute training data")#默认true
    parser.add_argument('--preset', default='vgg512',
                        choices=['vgg300', 'vgg512'],
                        help="The neural network preset")#default='vgg300'
    parser.add_argument('--process-test', type=str2bool, default='True',
                        help="process the test dataset")
    args = parser.parse_args()

    print('[i] Data source:          ', args.data_source)
    print('[i] Data directory:       ', args.data_dir)
    print('[i] Validation fraction:  ', args.validation_fraction)
    print('[i] Expand probability:   ', args.expand_probability)
    print('[i] Sampler trials:       ', args.sampler_trials)
    print('[i] Annotate:             ', args.annotate)
    print('[i] Compute training data:', args.compute_td)
    print('[i] Preset:               ', args.preset)
    print('[i] Process test dataset: ', args.process_test)

    #---------------------------------------------------------------------------
    # Load the data source
    #---------------------------------------------------------------------------
    print('[i] Configuring the data source...')
    try:
        source = load_data_source(args.data_source)
        source.load_trainval_data(args.data_dir, args.validation_fraction)
        if args.process_test:
            source.load_test_data(args.data_dir)
        print('[i] # training samples:   ', source.num_train)
        print('[i] # validation samples: ', source.num_valid)
        print('[i] # testing samples:    ', source.num_test)
        print('[i] # classes:            ', source.num_classes)
    except (ImportError, AttributeError, RuntimeError) as e:
        print('[!] Unable to load data source:', str(e))
        return 1

    #---------------------------------------------------------------------------
    # Annotate samples
    #---------------------------------------------------------------------------
    if args.annotate:
        print('[i] Annotating samples...')
        annotate(args.data_dir, source.train_samples, source.colors, 'train')
        annotate(args.data_dir, source.valid_samples, source.colors, 'valid')
        if args.process_test:
            annotate(args.data_dir, source.test_samples,  source.colors, 'test ')

    #---------------------------------------------------------------------------
    # Compute the training data
    #---------------------------------------------------------------------------
    if args.compute_td:
        preset = get_preset_by_name(args.preset)
        with open(args.data_dir+'/train-samples.pkl', 'wb') as f:
            pickle.dump(source.train_samples, f)
        with open(args.data_dir+'/valid-samples.pkl', 'wb') as f:
            pickle.dump(source.valid_samples, f)

        with open(args.data_dir+'/training-data.pkl', 'wb') as f:
            data = {
                'preset': preset,
                'num-classes': source.num_classes,
                'colors': source.colors,
                'lid2name': source.lid2name,
                'lname2id': source.lname2id,
                'train-transforms': build_train_transforms(preset,
                                       source.num_classes, args.sampler_trials,
                                       args.expand_probability ),
                'valid-transforms': build_valid_transforms(preset,
                                                           source.num_classes)
            }
            pickle.dump(data, f)

    return 0
训练模型:
print('[i] Training...')
        for e in range(start_epoch, args.epochs):
            training_imgs_samples = []
            validation_imgs_samples = []

            #-------------------------------------------------------------------
            # Train
            #-------------------------------------------------------------------
            generator = td.train_generator(args.batch_size, args.num_workers)
            description = '[i] Train {:>2}/{}'.format(e+1, args.epochs)
            for x, y, gt_boxes in tqdm(generator, total=n_train_batches,
                                       desc=description, unit='batches'):

                if len(training_imgs_samples) < 3:
                    saved_images = np.copy(x[:3])

                feed = {net.image_input: x,
                        net.labels: y}
                result, loss_batch, _ = sess.run([net.result, net.losses,
                                                  net.optimizer],
                                                 feed_dict=feed)

                if math.isnan(loss_batch['confidence']):
                    print('[!] Confidence loss is NaN.')

                training_loss.add(loss_batch, x.shape[0])

                if e == 0: continue

                for i in range(result.shape[0]):
                    boxes = decode_boxes(result[i], anchors, 0.5, td.lid2name)
                    boxes = suppress_overlaps(boxes)
                    training_ap_calc.add_detections(gt_boxes[i], boxes)

                    if len(training_imgs_samples) < 3:
                        training_imgs_samples.append((saved_images[i], boxes))

            #-------------------------------------------------------------------
            # Validate
            #-------------------------------------------------------------------
            generator = td.valid_generator(args.batch_size, args.num_workers)
            description = '[i] Valid {:>2}/{}'.format(e+1, args.epochs)

            for x, y, gt_boxes in tqdm(generator, total=n_valid_batches,
                                       desc=description, unit='batches'):
                feed = {net.image_input: x,
                        net.labels: y}
                result, loss_batch = sess.run([net.result, net.losses],
                                              feed_dict=feed)

                validation_loss.add(loss_batch,  x.shape[0])

                if e == 0: continue

                for i in range(result.shape[0]):
                    boxes = decode_boxes(result[i], anchors, 0.5, td.lid2name)
                    boxes = suppress_overlaps(boxes)
                    validation_ap_calc.add_detections(gt_boxes[i], boxes)

                    if len(validation_imgs_samples) < 3:
                        validation_imgs_samples.append((np.copy(x[i]), boxes))

            #-------------------------------------------------------------------
            # Write summaries
            #-------------------------------------------------------------------
            training_loss.push(e+1)
            validation_loss.push(e+1)

            net_summary = sess.run(net_summary_ops)
            summary_writer.add_summary(net_summary, e+1)

            APs = training_ap_calc.compute_aps()
            mAP = APs2mAP(APs)
            training_ap.push(e+1, mAP, APs)

            APs = validation_ap_calc.compute_aps()
            mAP = APs2mAP(APs)
            validation_ap.push(e+1, mAP, APs)

            training_ap_calc.clear()
            validation_ap_calc.clear()

            training_imgs.push(e+1, training_imgs_samples)
            validation_imgs.push(e+1, validation_imgs_samples)

            summary_writer.flush()

            #-------------------------------------------------------------------
            # Save a checktpoint
            #-------------------------------------------------------------------
            if (e+1) % args.checkpoint_interval == 0:
                checkpoint = '{}/e{}.ckpt'.format(args.name, e+1)
                saver.save(sess, checkpoint)
                print('[i] Checkpoint saved:', checkpoint)

        checkpoint = '{}/final.ckpt'.format(args.name)
        saver.save(sess, checkpoint)
        print('[i] Checkpoint saved:', checkpoint)
用训练好的模型在测试集上进行目标检测:
def sample_generator(samples, image_size, batch_size):
image_size = (image_size.w, image_size.h)
for offset in range(0, len(samples), batch_size):
files = samples[offset:offset+batch_size]
images = []
idxs = []
for i, image_file in enumerate(files):
image = cv2.resize(cv2.imread(image_file), image_size)
images.append(image.astype(np.float32))
idxs.append(offset+i)
yield np.array(images), idxs
#-------------------------------------------------------------------------------
def main():
#---------------------------------------------------------------------------
# Parse commandline
#---------------------------------------------------------------------------
parser = argparse.ArgumentParser(description='SSD inference')
parser.add_argument("files", nargs="*")
parser.add_argument('--name', default='train_intel',
help='project name')#test\train
parser.add_argument('--checkpoint', type=int, default=-1,
help='checkpoint to restore; -1 is the most recent')
parser.add_argument('--training-data',
default='cityscapes/training-data.pkl',
help='Information about parameters used for training')
parser.add_argument('--output-dir', default='test-output',
help='directory for the resulting images')
parser.add_argument('--annotate', type=str2bool, default='False',
help="Annotate the data samples")
parser.add_argument('--dump-predictions', type=str2bool, default='False',
help="Dump raw predictions")
parser.add_argument('--compute-stats', type=str2bool, default='True',
help="Compute the mAP stats")
parser.add_argument('--data-source', default='cityscapes',
help='Use test files from the data source')#None
parser.add_argument('--data-dir', default='cityscapes',
help='Use test files from the data source')
parser.add_argument('--batch-size', type=int, default=32,
help='batch size')
parser.add_argument('--sample', default='test',
choices=['test', 'trainval'], help='sample to run on')
parser.add_argument('--threshold', type=float, default=0.5,
help='confidence threshold')
parser.add_argument('--pascal-summary', type=str2bool, default='False',
help='dump the detections in Pascal VOC format')
args = parser.parse_args()
#---------------------------------------------------------------------------
# Print parameters
#---------------------------------------------------------------------------
print('[i] Project name: ', args.name)
print('[i] Training data: ', args.training_data)
print('[i] Batch size: ', args.batch_size)
print('[i] Data source: ', args.data_source)
print('[i] Data directory: ', args.data_dir)
print('[i] Output directory: ', args.output_dir)
print('[i] Annotate: ', args.annotate)
print('[i] Dump predictions: ', args.dump_predictions)
print('[i] Sample: ', args.sample)
print('[i] Threshold: ', args.threshold)
print('[i] Pascal summary: ', args.pascal_summary)
#---------------------------------------------------------------------------
# Check if we can get the checkpoint
#---------------------------------------------------------------------------
state = tf.train.get_checkpoint_state(args.name)
if state is None:
print('[!] No network state found in ' + args.name)
return 1
try:
checkpoint_file = state.all_model_checkpoint_paths[args.checkpoint]
except IndexError:
print('[!] Cannot find checkpoint ' + str(args.checkpoint_file))
return 1
metagraph_file = checkpoint_file + '.meta'
if not os.path.exists(metagraph_file):
print('[!] Cannot find metagraph ' + metagraph_file)
return 1
#---------------------------------------------------------------------------
# Load the training data
#---------------------------------------------------------------------------
try:
with open(args.training_data, 'rb') as f:
data = pickle.load(f)
preset = data['preset']
colors = data['colors']
lid2name = data['lid2name']
num_classes = data['num-classes']
image_size = preset.image_size
anchors = get_anchors_for_preset(preset)
except (FileNotFoundError, IOError, KeyError) as e:
print('[!] Unable to load training data:', str(e))
return 1
#---------------------------------------------------------------------------
# Load the data source if defined
#---------------------------------------------------------------------------
compute_stats = False
source = None
if args.data_source:
print('[i] Configuring the data source...')
try:
source = load_data_source(args.data_source)
if args.sample == 'test':
source.load_test_data(args.data_dir)
num_samples = source.num_test
samples = source.test_samples
else:
source.load_trainval_data(args.data_dir, 0)
num_samples = source.num_train
samples = source.train_samples
print('[i] # samples: ', num_samples)
print('[i] # classes: ', source.num_classes)
except (ImportError, AttributeError, RuntimeError) as e:
print('[!] Unable to load data source:', str(e))
return 1
if args.compute_stats:
compute_stats = True
#---------------------------------------------------------------------------
# Create a list of files to analyse and make sure that the output directory
# exists
#---------------------------------------------------------------------------
files = []
if source:
for sample in samples:
files.append(sample.filename)
if not source:
if args.files:
files = args.files
if not files:
print('[!] No files specified')
return 1
files = list(filter(lambda x: os.path.exists(x), files))
if files:
if not os.path.exists(args.output_dir):
os.makedirs(args.output_dir)
#---------------------------------------------------------------------------
# Print model and dataset stats
#---------------------------------------------------------------------------
print('[i] Compute stats: ', compute_stats)
print('[i] Network checkpoint:', checkpoint_file)
print('[i] Metagraph file: ', metagraph_file)
print('[i] Image size: ', image_size)
print('[i] Number of files: ', len(files))
#---------------------------------------------------------------------------
# Create the network
#---------------------------------------------------------------------------
if compute_stats:
ap_calc = APCalculator()
if args.pascal_summary:
pascal_summary = PascalSummary()
with tf.Session() as sess:
print('[i] Creating the model...')
net = SSDVGG(sess, preset)
net.build_from_metagraph(metagraph_file, checkpoint_file)
#-----------------------------------------------------------------------
# Process the images
#-----------------------------------------------------------------------
generator = sample_generator(files, image_size, args.batch_size)
n_sample_batches = int(math.ceil(len(files)/args.batch_size))
description = '[i] Processing samples'
for x, idxs in tqdm(generator, total=n_sample_batches,
desc=description, unit='batches'):
feed = {net.image_input: x,
net.keep_prob: 1}
enc_boxes = sess.run(net.result, feed_dict=feed)
#-------------------------------------------------------------------
# Process the predictions
#-------------------------------------------------------------------
for i in range(enc_boxes.shape[0]):
boxes = decode_boxes(enc_boxes[i], anchors, args.threshold,
lid2name, None)
boxes = suppress_overlaps(boxes)[:200]
filename = files[idxs[i]]
basename = os.path.basename(filename)
#---------------------------------------------------------------
# Annotate samples
#---------------------------------------------------------------
if args.annotate:
img = cv2.imread(filename)
for box in boxes:
draw_box(img, box[1], colors[box[1].label])
fn = args.output_dir+'/'+basename
cv2.imwrite(fn, img)
#---------------------------------------------------------------
# Dump the predictions
#---------------------------------------------------------------
if args.dump_predictions:
raw_fn = args.output_dir+'/'+basename+'.npy'
np.save(raw_fn, enc_boxes[i])
#---------------------------------------------------------------
# Add predictions to the stats calculator and to the Pascal
# summary
#---------------------------------------------------------------
if compute_stats:
ap_calc.add_detections(samples[idxs[i]].boxes, boxes)
if args.pascal_summary:
pascal_summary.add_detections(filename, boxes)
#---------------------------------------------------------------------------
# Compute and print the stats
#---------------------------------------------------------------------------
if compute_stats:
aps = ap_calc.compute_aps()
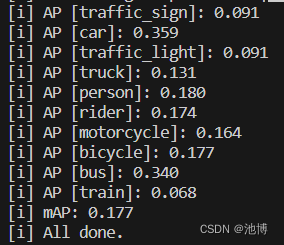
for k, v in aps.items():
print('[i] AP [{0}]: {1:.3f}'.format(k, v))
print('[i] mAP: {0:.3f}'.format(APs2mAP(aps)))
#---------------------------------------------------------------------------
# Write the pascal summary files
#---------------------------------------------------------------------------
if args.pascal_summary:
pascal_summary.write_summary(args.output_dir)
print('[i] All done.')
return 0
训练时各参数如下:

在测试集上检验训练效果,模型性能如下:
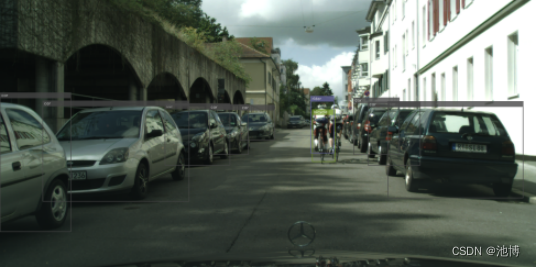
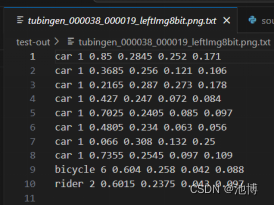
下面展示两张目标检测后有了标记的图片,已经对应的目标框坐标等输出:
使用intel-extension-for-tensorflow[cpu]工具
intel-extension-for-tensorflow正是对现有的开源TensorFlow库的扩展,该库针对英特尔®架构的高性能进行了独特的优化。它与现有的TensorFlow公共API兼容,这允许开发人员以最少的代码更改来保持与原始API相同的体验。intel-extension-for-tensorflow[cpu]是基于TensorFlow Pluggable Device接口,将英特尔CPU、GPU和其他设备带入TensorFlow开源社区,用于AI工作负载加速,并提供英特尔GPU支持和实验性英特尔CPU支持,他还将一些优化上传到开源的TensorFlow中。
我们加入intel-extension-for-tensorflow[cpu]工具,因为我们的设备没有gpu,所以不安装intel-extension-for-tensorflow[gpu],若二者都要安装时,它们不能装在一块,不然会有不知名错误。
我们执行如下命令安装intel-extension-for-tensorflow[cpu]包(没有镜像源的话很大可能会安装失败):
pip install intel-extension-for-tensorflow[cpu] -i https://pypi.tuna.tsinghua.edu.cn/simple/
运行环境中装好原版加插件,不需要修改代码,intel-extension-for-tensorflow[cpu](即ITEX)会自动被触发。如果想要显式调用也可以。
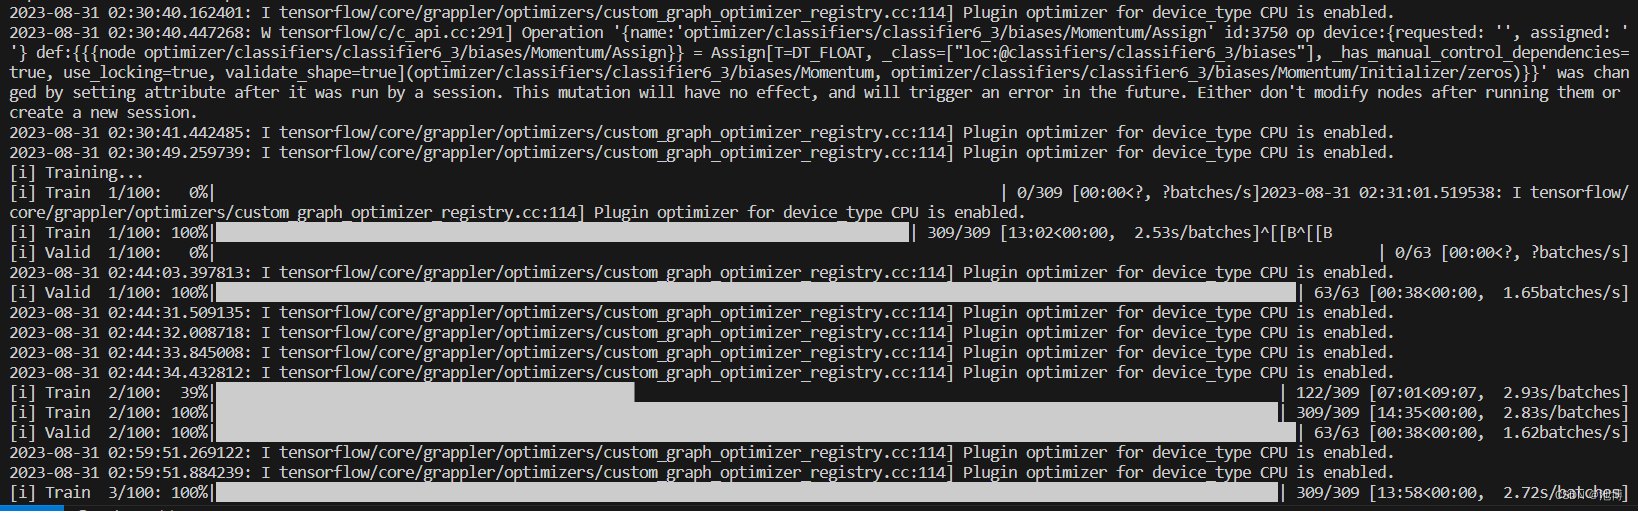
运行训练代码,会的得到以下输出:
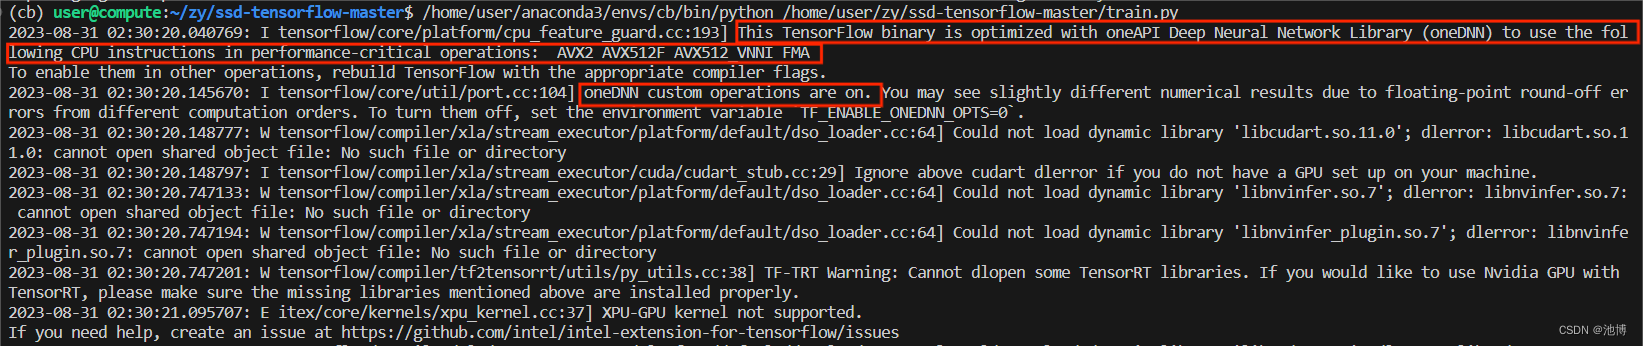
可以看到,intel-extension-for-tensorflow[cpu]已经被触发了。
我们还输入以下命令查看运行程序时是在用cpu还是用gpu:
DNNL_VERBOSE=1 python train.py
其中train.py可以换成任何想要运行的代码文件。
运行后的输出如下:
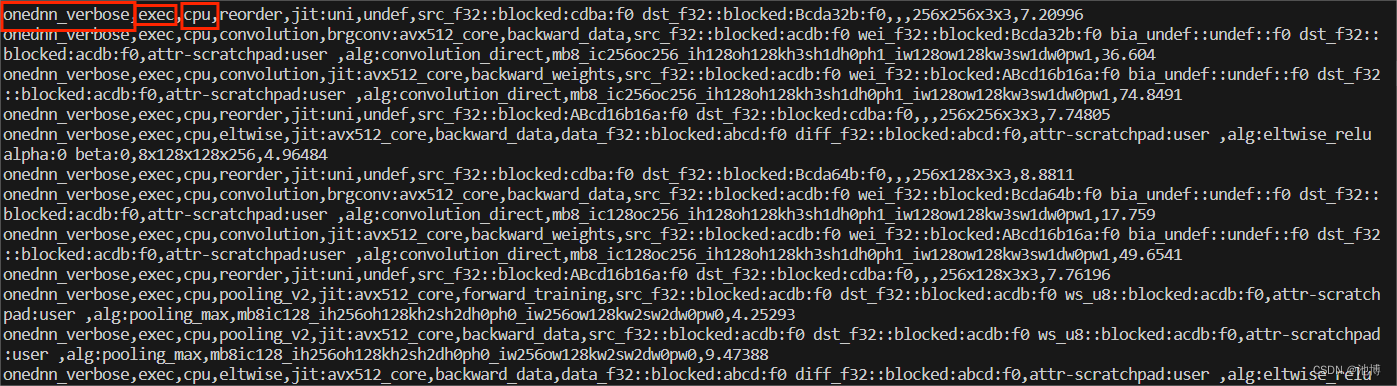
可见,是在CPU上运行。
Neural Coder——Python Launcher方式
我们以Python Launcher方式使用了neural coder:
在运行训练代码时使用如下命令:
python -m neural_coder /home/user/zy/ssd-tensorflow-master/train.py
运行后输出如下:
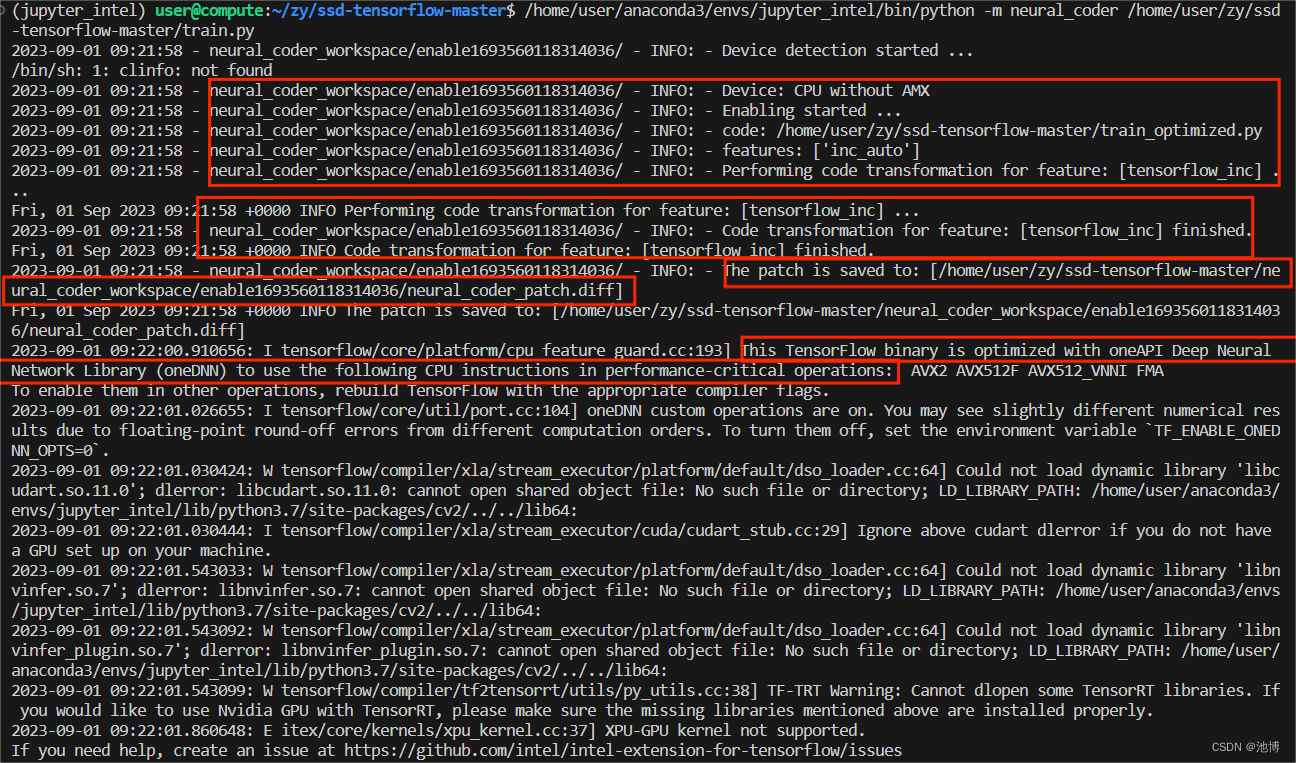
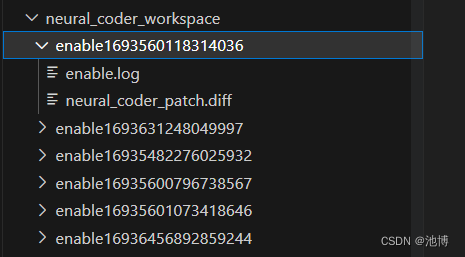
证明已经开始使用Neural Coder。同时会生成一个neural_coder_workspace文件夹,如下
训练结果如下:
解决方案二性能评估及使用neural coder工具前后模型性能对比
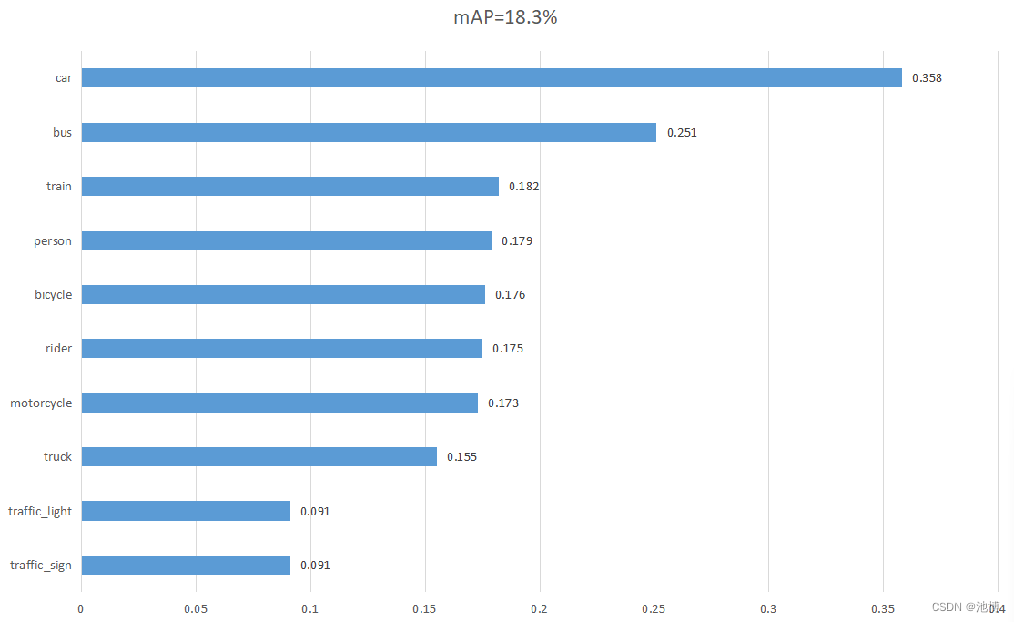
SSD模型像素精度(Pixel Accuracy,PA)数值可视化:
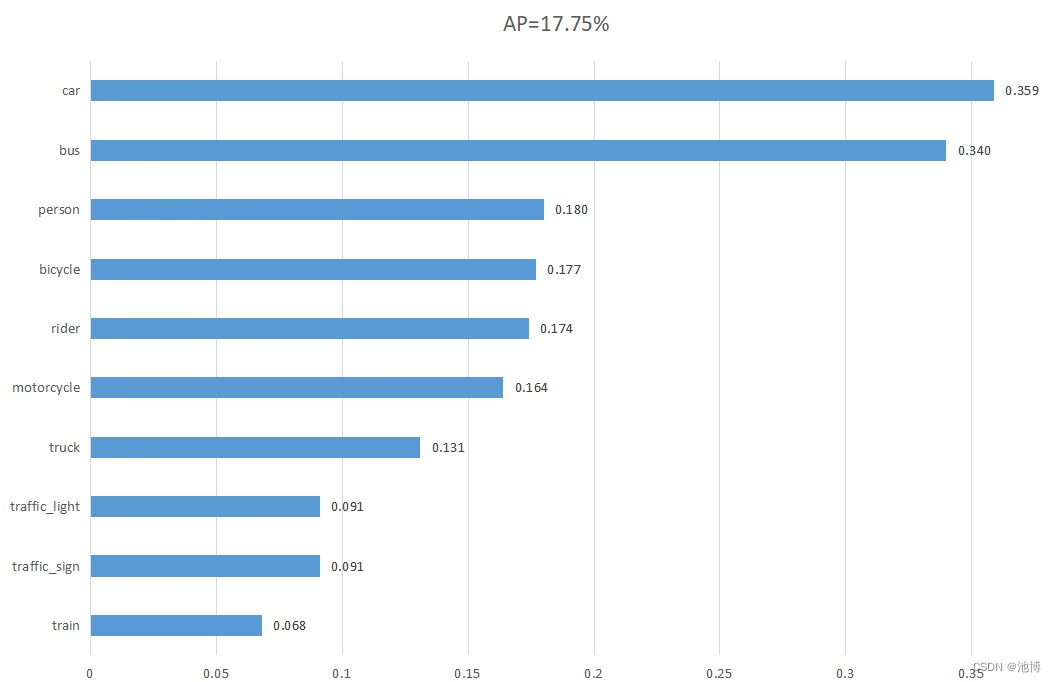
使用了neural coder后的像素精度(Pixel Accuracy,PA)数值可视化:
我们将SSD和使用了neural coder的SSD模型进行对比:
| 训练时间 | mAP | 测试速度 | |
|---|---|---|---|
| 初始模型SSD | 17h39m58s | 18.3% | 0.123s/张 |
| 使用neural coder后的SSD | 17h20m12s | 17.7% | 0.118s/张 |
| mAP | AP_car | AP_traffice_sign | AP_traffic_light | AP_truck | AP_person | AP_rider | AP_motorcycle | AP_bicycle | AP_bus | AP_train | |
|---|---|---|---|---|---|---|---|---|---|---|---|
| 初始模型SSD | 0.183 | 0.358 | 0.091 | 0.091 | 0.155 | 0.179 | 0.175 | 0.173 | 0.176 | 0.251 | 0.182 |
| 使用neural coder后的SSD | 0.177 | 0.359 | 0.091 | 0.091 | 0.131 | 0.180 | 0.174 | 0.164 | 0.177 | 0.340 | 0.068 |
与没有使用任何oneAPI工具的初始模型的训练结果相比较,使用了neural coder后的SSD模型训练时间略有缩短,但同时模型性能略有下降。两种模型的性能都受到了各参数的影响,比如值为100的epoch。同时模型性能也受到图片本身的影响。因为我们为了将图片修改为适合SSD模型的形状,在原始数据集图片下方添加了20481024大小的白色图片,拼接后的图片为20482048的方形,此外图片送入模型后还会自动缩小为512*512大小,可想而知这样检测性能会降低很多,尤其是小目标受到的影响更大。
两种解决方案的性能对比
我们将Faster-RCNN、使用了ipex的Faster-RCNN、SSD和使用了neural coder的SSD这四个模型的训练和测试效果进行对比:
| 训练时间 | mAP | 测试速度 | |
|---|---|---|---|
| 初始模型Faster-RCNN | 25h58m13s | 29.3% | 0.281s/张 |
| 使用ipex后的Faster-RCNN | 25h11m46s | 28.7% | 0.278s/张 |
| 初始模型SSD | 17h39m58s | 18.3% | 0.123s/张 |
| 使用neural coder后的SSD | 17h20m12s | 17.7% | 0.118s/张 |
可以看到SSD算法的准确率要比Faster R-CNN算法的准确率低,我们认为主要原因还是图片被加入了太多无效像素的原因。两者的epoch值都过小,若继续调整参数,模型的性能也会更好。
此外,SSD算法的推理速度要比Faster R-CNN算法快。这主要是因为SSD是一种单阶段的目标检测算法,可以在单个神经网络中同时进行目标检测和定位。而Faster R-CNN是一种两阶段的目标检测算法,需要先生成候选区域,然后再对候选区域进行分类和定位,因此相对而言速度较慢。
模型改进
- 解决方案一中我们使用了特征网络ResNet,ResNet 依然是很好的基础网络,ResNeXT可能性能上比他好一点,但不是很主流,通过将Faster-RCNN中的VGG16替换成ResNet可以提高performance,不仅是detection,在segmentation,video analysis,recognition等其他领域,使用更深的ResNet都可以得到稳定的提升。但在速度方面,ResNet比VGG16更慢,同时需要训练的次数也更多。这也是我们未来需要考虑的点。
- 未来我们将加入FPN(Feature Pyramid Networks,特征金字塔网络)结构,该结构通过增加一条从上到下的特征上采样路径,将高层语义信息融合于更低层的细节信息。它也被广泛用于解决目标检测任务存在目标多尺度的问题。
- 未来我们也将尝试加入两种FPN的改进结构,即PAN和BiFPN。PAN是在FPN的基础上增加一条从下到上的特征下采样路径,将低层丰富的空间细节信息传递并融合到更高层。BiFPN是在PAN的基础上删除一些贡献较小的结点,通过增加横向的跳跃连接再次加大特征融合的程度,最关键的改进在于为特征融合的各输入赋予不同权值。
- 未来我们也将参考“DeepText: A Unified Framework for Text Proposal Generation and Text Detection in Natural Images”这篇文章提出的ROI分类方法:multi-layer roi-pooling。里面的contribution比较琐碎,但有一点小改进经过验证相当有效,就是roi分别在conv4,conv5上做roi-pooling,合并后再进行分类。这样基本不增加计算量,又能利用更高分辨率的conv4。
- 未来我们也将尝试 Soft-NMS方法。传统的NMS方法是根据重叠区域的大小将得分低的框删除,而Soft-NMS则先利用计算出的较为缓和的函数对框的得分进行降权,然后再根据剩余框的得分进行排序,最后按照类似于传统NMS的方式进行筛选,这样保留了更多的框,从而提高了检测的精度。
环境依赖
| 版本 | |
|---|---|
| 操作系统 | ubuntu18.04 |
| 编程语言 | python3.7.16 |
| 框架 | tensorflow2.11.0、torch1.13.0+cpu |
| 工具库 | intel-extension-for-tensorflow1.1.0;neural-compressor2.2.1;intel-extension-for-pytorch1.13.100;opencv-python4.8.0.76 |
参赛总结及经验分享
在参加Intel OneAPI目标检测比赛的过程中,我们积累了丰富的经验和收获了宝贵的成果。这次比赛是一个很好的机会,让我们深入了解了目标检测领域的最新技术和算法。
在目标检测领域,有许多经典的模型可供选择,如Faster R-CNN, YOLO,SSD等。在比赛中,我们花了一些时间研究了不同的模型,并选择了适合本任务的模型。选择合适的模型是成功的关键之一。
在训练过程中,数据的预处理和增强是非常重要的。我们对数据进行了归一化、裁剪、旋转和翻转等操作,以增加数据的多样性和模型的鲁棒性。
此外,我们使用了一些优化技术,如学习率调整、批量归一化和正则化等。这些技术有助于提高模型的性能和泛化能力。此外,我们还尝试了不同的损失函数和优化器,以找到最佳的组合。
在训练完成后,我们对模型进行了评估和调优。我使用了一些常见的评估指标,如准确率、召回率和F1分数等,来评估模型的性能。根据评估结果,我们对模型进行了一些调整和优化,以提高其性能。
在模型的训练以及预测的过程中,我们充分利用了Intel OneAPI软件开发工具套件,在使用过程中,我们总结出了intel OneAPI的几点重要优势:1. Intel OneAPI提供了统一的编程接口和模型,使开发者能够在不同的硬件平台上进行跨架构的软件开发。开发者可以使用相同的代码和工具,在不同的Intel处理器、FPGA和其他加速器上进行开发,从而简化了开发流程。2. Intel OneAPI针对各种硬件平台进行了优化,可以充分发挥硬件设备的计算能力。无论是在CPU、GPU还是FPGA上,Intel OneAPI都可以提供高性能的计算和加速。3. Intel OneAPI提供了一系列的开发工具,包括编译器、调试器、性能分析器等,使开发者能够更方便地进行软件开发和调试。这些工具具有友好的用户界面和丰富的功能,可以帮助开发者提高开发效率和代码质量。4. Intel OneAPI提供了多种优化技术和方法,可以帮助开发者提高代码的性能和效率。从硬件优化到算法优化,Intel OneAPI都提供了相应的工具和指导,使开发者能够充分发挥硬件设备的性能。5.Intel OneAPI拥有广泛的生态系统支持,包括丰富的文档、教程和示例代码,以及活跃的社区和支持论坛。开发者可以从这些资源中获取帮助和支持,加速自己的开发过程。
通过参加这次比赛,我们不仅学到了许多目标检测的知识和技术,还提高了自己的问题解决能力和团队合作能力。
也希望通过我们的分享可以让更多的开发人员接触到Intel OneAPI,也祝intel OneAPI的开发团队越做越好!
非常感谢Intel OneAPI团队提供了这个学习和交流的平台 !
参考链接
最后分享一些我们在完成项目时用到的与oneAPI有关的链接:
https://github.com/intel/neural-compressor
https://github.com/intel/neural-compressor/blob/master/neural_coder/docs/SupportMatrix.md
https://github.com/intel/neural-compressor/tree/master/neural_coder
https://github.com/intel/neural-compressor/blob/master/neural_coder/docs/PythonLauncher.md
https://www.intel.com/content/www/us/en/developer/articles/technical/introduction-to-intel-extension-for-tensorflow.html
https://www.intel.com/content/www/us/en/developer/tools/oneapi/neural-compressor.html
https://www.intel.com/content/www/us/en/docs/oneapi-ai-analytics-toolkit/get-started-guide-linux/2023-2/overview.html
https://github.com/intel/neural-compressor/blob/master/neural_coder/README.md#getting-started
https://github.com/intel/neural-compressor/blob/master/neural_coder/extensions/neural_compressor_ext_lab/README.md
观看的教学视频链接:


 被折叠的 条评论
为什么被折叠?
被折叠的 条评论
为什么被折叠?
 到【灌水乐园】发言


