


🍨 本文为[🔗365天深度学习训练营]内部限免文章(版权归 *K同学啊* 所有)
🍖 作者:[K同学啊]
本周任务:
●1.请根据本文 TensorFlow 代码(训练营内部阅读),编写出相应的 Pytorch 代码
●2.了解残差结构
●3.是否可以将残差模块融入到C3当中(自由探索)
前言
深度残差网络ResNet(deep residual network)在2015年由何恺明等提出,因为它简单与实用并存,随后很多研究都是建立在ResNet-50或者ResNet-101基础上完成的。本文实现了在Pytorch框架下的ResNet50算法。
参考文章:Deep Residual Learning for Image Recognition.pdf 【何恺明】
数据集:./data/bird_photos/
ResNet50算法已被收录在torchvision.models中,代码如下:
from torchvision import models

resnet50 = models.resnet50(pretrained=False)

device = torch.device("cuda:0" if torch.cuda.is_available() else "cpu")

model.to(device)

summary.summary(model, (3, 224, 224))
----------------------------------------------------------------
Layer (type) Output Shape Param #
================================================================
Conv2d-1 [-1, 64, 112, 112] 9,472
Conv2d-2 [-1, 64, 112, 112] 9,472
BatchNorm2d-3 [-1, 64, 112, 112] 128
BatchNorm2d-4 [-1, 64, 112, 112] 128
ReLU-5 [-1, 64, 112, 112] 0
ReLU-6 [-1, 64, 112, 112] 0
MaxPool2d-7 [-1, 64, 56, 56] 0
MaxPool2d-8 [-1, 64, 56, 56] 0
Conv2d-9 [-1, 64, 56, 56] 4,160
BatchNorm2d-10 [-1, 64, 56, 56] 128
ReLU-11 [-1, 64, 56, 56] 0
Conv2d-12 [-1, 64, 56, 56] 36,928
BatchNorm2d-13 [-1, 64, 56, 56] 128
ReLU-14 [-1, 64, 56, 56] 0
...
BatchNorm2d-167 [-1, 512, 7, 7] 1,024
ReLU-168 [-1, 512, 7, 7] 0
Conv2d-169 [-1, 2048, 7, 7] 1,050,624
BatchNorm2d-170 [-1, 2048, 7, 7] 4,096
ReLU-171 [-1, 2048, 7, 7] 0
IdentityBlock-172 [-1, 2048, 7, 7] 0
AvgPool2d-173 [-1, 2048, 1, 1] 0
Linear-174 [-1, 4] 8,196
Softmax-175 [-1, 4] 0
================================================================
Total params: 23,544,708
Trainable params: 23,544,708
Non-trainable params: 0
----------------------------------------------------------------
Input size (MB): 0.57
Forward/backward pass size (MB): 282.91
Params size (MB): 89.82
Estimated Total Size (MB): 373.30
----------------------------------------------------------------
class ResNet(nn.Module):
    def __init__(
        self,
        block: Type[Union[BasicBlock, Bottleneck]],
        layers: List[int],
        num_classes: int = 1000,
        zero_init_residual: bool = False,
        groups: int = 1,
        width_per_group: int = 64,
        replace_stride_with_dilation: Optional[List[bool]] = None,
        norm_layer: Optional[Callable[..., nn.Module]] = None,
    ) -> None:
        super().__init__()
        _log_api_usage_once(self)
        if norm_layer is None:
            norm_layer = nn.BatchNorm2d
        self._norm_layer = norm_layer

        self.inplanes = 64
        self.dilation = 1
        if replace_stride_with_dilation is None:
            # each element in the tuple indicates if we should replace
            # the 2x2 stride with a dilated convolution instead
            replace_stride_with_dilation = [False, False, False]
        if len(replace_stride_with_dilation) != 3:
            raise ValueError(
                "replace_stride_with_dilation should be None "
                f"or a 3-element tuple, got {replace_stride_with_dilation}"
            )
        self.groups = groups
        self.base_width = width_per_group
        self.conv1 = nn.Conv2d(3, self.inplanes, kernel_size=7, stride=2, padding=3, bias=False)
        self.bn1 = norm_layer(self.inplanes)
        self.relu = nn.ReLU(inplace=True)
        self.maxpool = nn.MaxPool2d(kernel_size=3, stride=2, padding=1)
        self.layer1 = self._make_layer(block, 64, layers[0])
        self.layer2 = self._make_layer(block, 128, layers[1], stride=2, dilate=replace_stride_with_dilation[0])
        self.layer3 = self._make_layer(block, 256, layers[2], stride=2, dilate=replace_stride_with_dilation[1])
        self.layer4 = self._make_layer(block, 512, layers[3], stride=2, dilate=replace_stride_with_dilation[2])
        self.avgpool = nn.AdaptiveAvgPool2d((1, 1))
self.fc = nn.Linear(512 * block.expansion, num_classes)希望偷懒的读者可以直接在库中调用并通过修改resnet50.fc、resnet50.layer的方式修改超参数
比如我希望把全连接的输出nn.Linear(512 * block.expansion, num_classes)改成softmax,以方便输出的是个概率分布,复写一下即可
resnet50.fc = nn.Sequential(
    nn.Linear(512*4, 4),
    nn.Softmax(dim=1)
)
当然本文主要目的是自己编写Pytorch代码。
一、环境配置
调用torch
import torch
from torchvision import datasets, transforms
import torch.nn as nn
import time
import numpy as np
import matplotlib.pyplot as plt

import torchsummary as summary

from collections import OrderedDict
设置GPU
device = torch.device("cuda:0" if torch.cuda.is_available() else "cpu")如果以上字段报错,说明CUDA和Torch版本不兼容,需要重新安装
安装适合版本的CUDA和Torch版本
第一步:确认显卡支持的最大支持的版本并安装CUDA
win+R 调出CMD,敲入nvidia-smi,Version最大支持12.2,
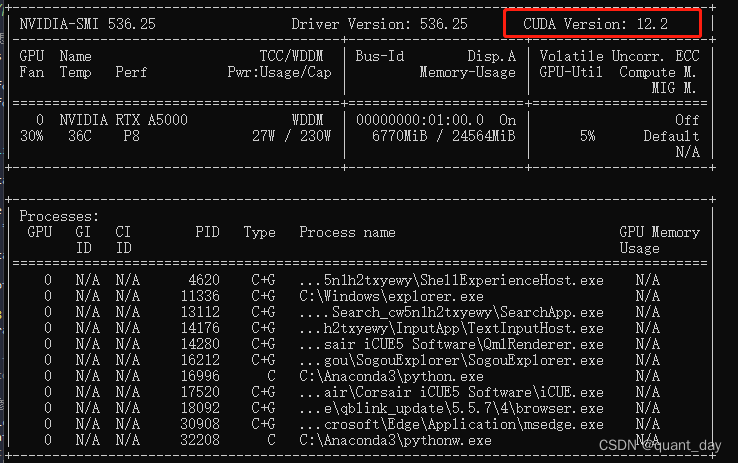
但由于最新跟torch匹配的版本是1.18,
点击CUDA官网:CUDA Toolkit 12.1 Update 1 Downloads | NVIDIA Developer
查看过往版本

找到1.18
安装对应系统的版本,windows10,本地安装3.0G
安装时需要注意:在“安装选项”这一栏选择:自定义安装(以上非常重要不然得重新安装)
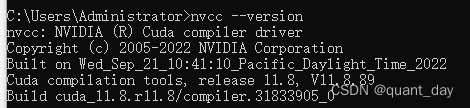
安装完成后 nvcc--version 确认安装完成
第二步:安装CUDA对应的torch及torchvision
本文强烈建议使用离线安装,更加明确一些,官网在线安装包总是有莫名其妙的不兼容问题,删除重置了几次(不建议直接pip/conda install torch)
离线安装:https://download.pytorch.org/whl/torch_stable.html
py3.9版本 windows系统对应cuda118如下所示
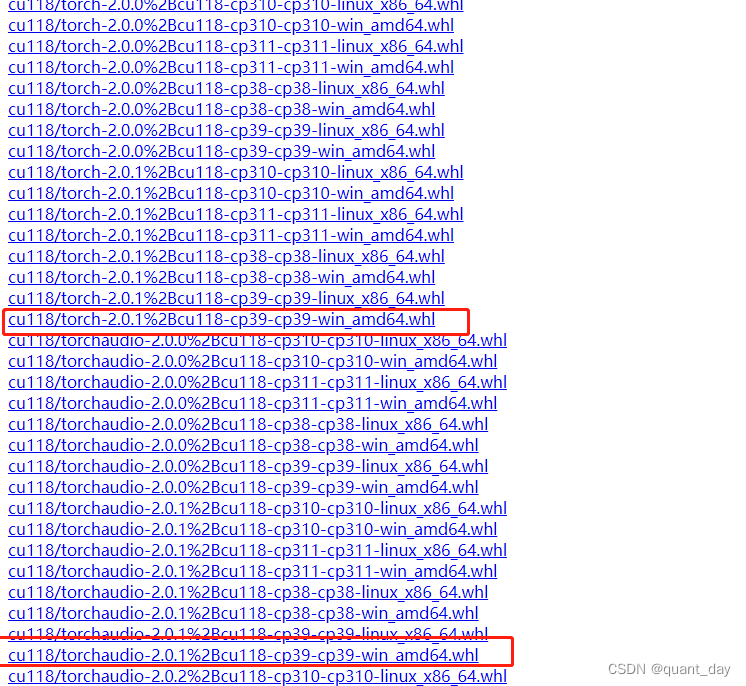
下载到本地之后pip install cu118/torch-2.0.1%2Bcu118-cp39-cp39-win_amd64.whl安装
安装如果报错一般是pip没更新问题,更新一下即可。
3.确认安装完成并调用CUDA
import torch

print(torch.__version__)

print(torch.cuda.is_available())

device = torch.device("cuda:0" if torch.cuda.is_available() else "cpu")
Torch not compiled with CUDA enabled,参考文章:报错:Torch not compiled with CUDA enabled看这一篇就足够了_torch和cuda不匹配_铁刘的博客-CSDN博客
二、读取数据集
本地数据在百度网盘下载:百度网盘 请输入提取码(提取码:0mhm)
放在本地'./pytorch_data/bird_photos'中
2.1 读数据归一化问题
阅读参数文章,在tf实现中并没有归化的过程,但torch框架中基本都有归一化的过程,理论上归一化之后的收敛速度更快,本文此次先做初步分析,未来有时间再对比归一化与不归一化的收敛情况
transforms.Compose函数有三个参数Resize, ToTensor, Normalize,Resize跟 ToTensor好理解
Resize是中心裁剪到固定大小, ToTensor是转化为张量,
data_dir = './pytorch_data/bird_photos'

# 归一化参数是怎么来的, tf模型中没有归一化这个过程会不会导致结果不一致?
raw_transforms = transforms.Compose(
        [
        transforms.Resize(224),#中心裁剪到224*224
        transforms.ToTensor(),#转化成张量)
])

def random_split_imagefolder(data_dir, transforms, random_split_rate=0.8):

    _total_data = datasets.ImageFolder(data_dir, transform=transforms)

    train_size = int(random_split_rate * len(_total_data))
    test_size = len(_total_data) - train_size

    _train_datasets, _test_datasets =  torch.utils.data.random_split(_total_data, [train_size, test_size])

    return _total_data, _train_datasets, _test_datasets

batch_size = 8
total_data, train_datasets, test_datasets = random_split_imagefolder(data_dir, raw_transforms, 0.8)
但Normalize(mean,std)参考网上文章
有transforms.Normalize([0.485, 0.456, 0.406],#归一化
[0.229, 0.224, 0.225]
transforms.Normalize([0.5, 0.5, 0.5],#归一化
[0.5, 0.5, 0.5]两种归一化参数
理论上Normalize(mean,std)的mean跟std需要根据数据集确认,所以写了一个获取真实mean跟std的函数
# 获取真实均值-标准差
N_CHANNELS = 3
mean = torch.zeros(N_CHANNELS)
std = torch.zeros(N_CHANNELS)
for inputs, _labels in (total_data):
    for i in range(N_CHANNELS):
        mean[i] += inputs[i,:,:].mean()
        std[i] += inputs[i,:,:].std()
mean.div_(len(total_data))
std.div_(len(total_data))
print(mean, std)

# 真实均值-标准差重新读取数据
real_transforms = transforms.Compose(
        [
        transforms.Resize(224),#中心裁剪到224*224
        transforms.ToTensor(),#转化成张量
        transforms.Normalize(mean, std)
])
total_data, train_datasets, test_datasets = random_split_imagefolder(data_dir, real_transforms, 0.8)
数据的mean,std是tensor([0.4958, 0.4984, 0.4068]) tensor([0.2093, 0.2026, 0.2170]),跟默认值一点点差距
2.2 新的数据集打印一些内容
一共是4类鸟,为方便后续将预测值转为标签用dict(zip(class_names_dict.values(), class_names_dict.keys()))转置key跟values
# 记录一些类型参数
class_names_dict = total_data.class_to_idx
print(total_data.class_to_idx)
# {'Bananaquit': 0, 'Black Skimmer': 1, 'Black Throated Bushtiti': 2, 'Cockatoo': 3}
# 常理上如果要找到对应预测类型的名称可能对换下更加方便
class_names_dict = dict(zip(class_names_dict.values(), class_names_dict.keys()))
N_classes = len(class_names_dict)
print(class_names_dict)
# {0: 'Bananaquit', 1: 'Black Skimmer', 2: 'Black Throated Bushtiti', 3: 'Cockatoo'}
2.3.取一个批次的数据展示
imgs, labels = next(iter(train_data))
print(imgs.shape)

import numpy as np
plt.figure(figsize=(12, 6))
for i, img in enumerate(imgs):
    # 获取label
    label_classes = labels[i].item()
    # 维度缩减
    npimg = img.numpy().transpose((1,2,0))
    sub_ax = plt.subplot(2, 4, i+1)
    sub_ax.set_xlabel(class_names_dict[label_classes])
    plt.imshow(npimg, cmap=plt.cm.binary)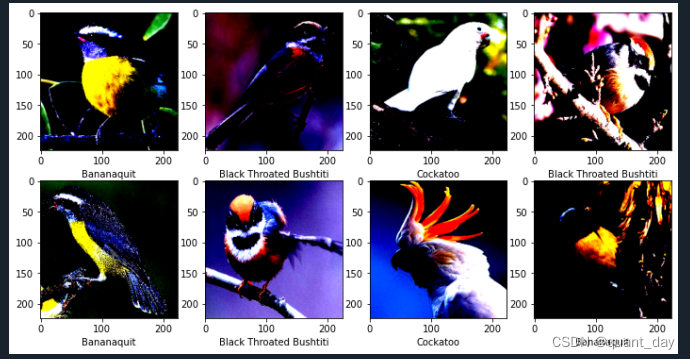
归一化之后图像跟原图片有些区别
三、编写 残差网络(ResNet50)
残差网络是为了解决神经网络隐藏层过多时,而引起的网络退化问题。退化(degradation)问题是指:当网络隐藏层变多时,网络的准确度达到饱和然后急剧退化,而且这个退化不是由于过拟合引起的。
3.1 ResNet50 介绍
ResNet50 有两个基础模块 ConvBlock 和 IdentityBlock 模块
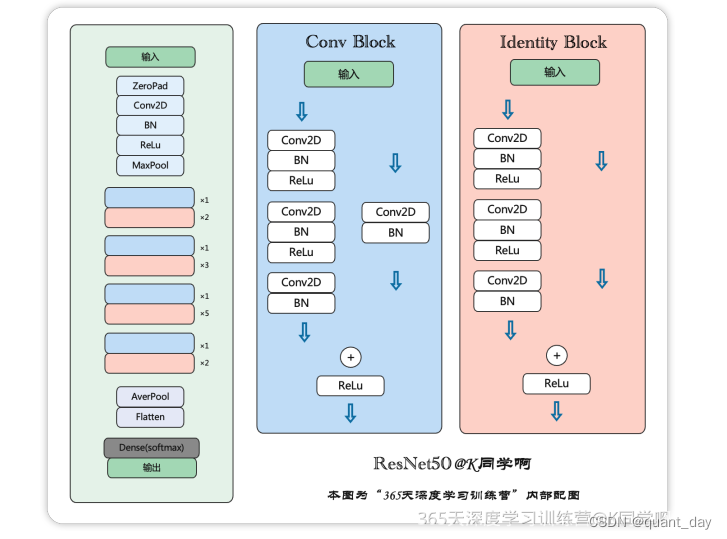
其实很好理解,就是在原来的基础上加了
layer_n_m = conv_block * conv_size(n) + identity_block * identity_size(m)
n=[1,1,1,1], m= [2,5,3,2]
我们先解决ConvBlock 和 IdentityBlock 模块
3.2 ConvBlock 和 IdentityBlock 模块
class IdentityBlock(nn.Module):

    def __init__(self, in_channel, kl_size, filters):
        super(IdentityBlock, self).__init__()

        filter1, filter2, filter3 = filters
        self.cov1 = nn.Conv2d(in_channels=in_channel, out_channels=filter1, kernel_size=1, stride=1, padding=0)
        self.bn1 = nn.BatchNorm2d(num_features=filter1)
        self.relu = nn.ReLU(inplace=True)

        self.cov2 = nn.Conv2d(in_channels=filter1, out_channels=filter2, kernel_size=kl_size, stride=1, padding=1)
        self.bn2 = nn.BatchNorm2d(num_features=filter2)

        self.cov3 = nn.Conv2d(in_channels=filter2, out_channels=filter3, kernel_size=1, stride=1, padding=0)
        self.bn3 = nn.BatchNorm2d(num_features=filter3)

    def forward(self, x):

        identity = self.cov1(x)
        identity = self.bn1(identity)
        identity = self.relu(identity)

        identity = self.cov2(identity)
        identity = self.bn2(identity)
        identity = self.relu(identity)

        identity = self.cov3(identity)
        identity = self.bn3(identity)

        x = x + identity
        x = self.relu(x)

        return x

class ConvBlock(nn.Module):

    def __init__(self, in_channel, kl_size, filters, stride_size=2):
        super(ConvBlock, self).__init__()

        filter1, filter2, filter3 = filters
        self.cov1 = nn.Conv2d(in_channels=in_channel, out_channels=filter1, kernel_size=1, stride=stride_size, padding=0)
        self.bn1 = nn.BatchNorm2d(num_features=filter1)
        self.relu = nn.ReLU(inplace=True)

        self.cov2 = nn.Conv2d(in_channels=filter1, out_channels=filter2, kernel_size=kl_size, stride=1, padding=1)
        self.bn2 = nn.BatchNorm2d(num_features=filter2)

        self.cov3 = nn.Conv2d(in_channels=filter2, out_channels=filter3, kernel_size=1, stride=1, padding=0)
        self.bn3 = nn.BatchNorm2d(num_features=filter3)

        self.short_cut = nn.Conv2d(in_channels=in_channel, out_channels=filter3, kernel_size=1, stride=stride_size, padding=0)

    def forward(self, x):

        identity = self.cov1(x)
        identity = self.bn1(identity)
        identity = self.relu(identity)

        identity = self.cov2(identity)
        identity = self.bn2(identity)
        identity = self.relu(identity)

        identity = self.cov3(identity)
        identity = self.bn3(identity)

        short_cut = self.short_cut(x)
        x = identity + short_cut
        x = self.relu(x)

        return x
不难看出ConvBlock 和 IdentityBlock 模块的异同在于
ConvBlock跟IdentityBlock 都有identity的过程
identity即 (cov-bn-relu) -> (cov-bn-relu) -> (cov-bn)
都是把identity的残差结果加回 ( input_tensor ) 中去
但ConvBlock先对于IdentityBlock 不一样的是 加回的内容 是input_tensor (cov-bn) 后的值
3.3 构建ResNet-50网络模型
有了上面的ConvBlock 和 IdentityBlock 模块
class Resnet50_Model(nn.Module):
    def __init__(self):
        super(Resnet50_Model, self).__init__()
        self.in_channels = 3
        self.layers = [2, 3, 5, 2]
        # ============= 基础层
        # 方法1
        self.cov0 = nn.Conv2d(self.in_channels, out_channels=64, kernel_size=7, stride=2, padding=3)
        self.bn0 = nn.BatchNorm2d(num_features=64)
        self.relu0 = nn.ReLU(inplace=False)
        self.maxpool0 = nn.MaxPool2d(kernel_size=3, stride=2, padding=1)

        self.basic_layer = nn.Sequential(
            self.cov0,
            self.bn0,
            self.relu0,
            self.maxpool0
            )

        self.layer1 = nn.Sequential(
            ConvBlock(64, 3, [64, 64, 256], 1),
            IdentityBlock(256, 3, [64, 64, 256]),
            IdentityBlock(256, 3, [64, 64, 256]),
            )

        self.layer2 = nn.Sequential(
            ConvBlock(256, 3, [128, 128, 512]),
            IdentityBlock(512, 3, [128, 128, 512]),
            IdentityBlock(512, 3, [128, 128, 512]),
            IdentityBlock(512, 3, [128, 128, 512]),
            )

        self.layer3 = nn.Sequential(
            ConvBlock(512, 3, [256, 256, 1024]),
            IdentityBlock(1024, 3, [256, 256, 1024]),
            IdentityBlock(1024, 3, [256, 256, 1024]),
            IdentityBlock(1024, 3, [256, 256, 1024]),
            IdentityBlock(1024, 3, [256, 256, 1024]),
            IdentityBlock(1024, 3, [256, 256, 1024]),
            )

        self.layer4 = nn.Sequential(
            ConvBlock(1024, 3, [512, 512, 2048]),
            IdentityBlock(2048, 3, [512, 512, 2048]),
            IdentityBlock(2048, 3, [512, 512, 2048]),
            )

        # 输出网络
        self.avgpool = nn.AvgPool2d((7, 7))
        # classfication layer
        # 7*7均值后2048个参数
        self.fc = nn.Sequential(nn.Linear(2048, N_classes),
                                nn.Softmax(dim=1))


    def forward(self, x):

        x = self.basic_layer(x)


        x = self.layer1(x)
        x = self.layer2(x)
        x = self.layer3(x)
        x = self.layer4(x)

        x = self.avgpool(x)
        x = torch.flatten(x, 1)
        x = self.fc(x)

        return x
以上
3.3.1 关于基础层的写法
网上参考了一些torch写法有种可以参考,但集成及复写的便利程度不一样,提供几种写法
        # 方法1
        self.cov0 = nn.Conv2d(self.in_channels, out_channels=64, kernel_size=7, stride=2, padding=3)
        self.bn0 = nn.BatchNorm2d(num_features=64)
        self.relu0 = nn.ReLU(inplace=False)
        self.maxpool0 = nn.MaxPool2d(kernel_size=3, stride=2, padding=1)

        self.basic_layer = nn.Sequential(
            self.cov0,
            self.bn0,
            self.relu0,
            self.maxpool0
            )

        # 方法2:更简洁
        self.basic_layer = nn.Sequential(
            nn.Conv2d(self.in_channels, out_channels=64, kernel_size=7, stride=2, padding=3),
            nn.BatchNorm2d(num_features=64),
            nn.ReLU(inplace=False),
            nn.MaxPool2d(kernel_size=3, stride=2, padding=1)
            )

        # 方法3:再智能化一些
        self.features = nn.Sequential(OrderedDict([
            ("cov0", nn.Conv2d(self.in_channels, out_channels=64, kernel_size=7, stride=2, padding=3)),
            ("bn0", nn.BatchNorm2d(num_features=64)),
            ("relu0", nn.ReLU(inplace=False)),
            ("maxpool0", nn.MaxPool2d(kernel_size=3, stride=2, padding=1))
            ]))
方法3理论上是可以集成的,未来有时间再弄
3.3.2 关于layer层的写法
有写一个make_layer的函数,这里参考torchvision.models的写法,但运行上有些BUG,之后再补充
集成后
        x = self.make_layer(x, [1, self.layers[0]], [64, 256], [64, 64, 256], 1)
        x = self.make_layer(x, [1, self.layers[1]], [256, 512], [128, 128, 512])
        x = self.make_layer(x, [1, self.layers[2]], [512, 1024], [256, 256, 1024])
        x = self.make_layer(x, [1, self.layers[3]], [1024, 2048], [512, 512, 2048])
参考代码
    def _make_layer(self, block, planes, blocks, stride=1, dilate=False):
        norm_layer = self._norm_layer
        downsample = None
        previous_dilation = self.dilation
        if dilate:
            self.dilation *= stride
            stride = 1
        if stride != 1 or self.inplanes != planes * block.expansion:
            downsample = nn.Sequential(
                conv1x1(self.inplanes, planes * block.expansion, stride),
                norm_layer(planes * block.expansion),
            )

        layers = []
        layers.append(block(self.inplanes, planes, stride, downsample, self.groups,
                            self.base_width, previous_dilation, norm_layer))
        self.inplanes = planes * block.expansion
        for _ in range(1, blocks):
            layers.append(block(self.inplanes, planes, groups=self.groups,
                                base_width=self.base_width, dilation=self.dilation,
                                norm_layer=norm_layer))

        return nn.Sequential(*layers)
四、运行测试代码
def train_and_test(model, loss_func, optimizer, epochs=25):

    device = torch.device("cuda:0" if torch.cuda.is_available() else "cpu")
    model.to(device)
    summary.summary(model, (3, 224, 224))

    record = []
    best_acc = 0.0
    best_epoch = 0

    for epoch in range(epochs):#训练epochs轮
            epoch_start = time.time()
            print("Epoch: {}/{}".format(epoch + 1, epochs))

            model.train()#训练

            train_loss = 0.0
            train_acc = 0.0
            valid_loss = 0.0
            valid_acc = 0.0

            for i, (inputs, labels) in enumerate(train_data):
                inputs = inputs.to(device)
                labels = labels.to(device)
                #print(labels)
                # 记得清零
                optimizer.zero_grad()

                outputs = model(inputs)

                loss = loss_func(outputs, labels)

                loss.backward()

                optimizer.step()

                train_loss += loss.item() * inputs.size(0)
                if i%10==0:
                    print("train data: {:01d} / {:03d} outputs: {}".format(i, len(train_data), outputs.data[0]))
                ret, predictions = torch.max(outputs.data, 1)
                correct_counts = predictions.eq(labels.data.view_as(predictions))

                acc = torch.mean(correct_counts.type(torch.FloatTensor))

                train_acc += acc.item() * inputs.size(0)

            with torch.no_grad():
                model.eval()#验证

                for j, (inputs, labels) in enumerate(test_data):
                    inputs = inputs.to(device)
                    labels = labels.to(device)

                    outputs = model(inputs)

                    loss = loss_func(outputs, labels)

                    valid_loss += loss.item() * inputs.size(0)
                    if j%10==0:
                        print("val data: {:01d} / {:03d} outputs: {}".format(j, len(test_data), outputs.data[0]))
                    ret, predictions = torch.max(outputs.data, 1)
                    correct_counts = predictions.eq(labels.data.view_as(predictions))

                    acc = torch.mean(correct_counts.type(torch.FloatTensor))

                    valid_acc += acc.item() * inputs.size(0)

            avg_train_loss = train_loss / train_data_size
            avg_train_acc = train_acc / train_data_size

            avg_valid_loss = valid_loss / test_data_size
            avg_valid_acc = valid_acc / test_data_size


            record.append([avg_train_loss, avg_valid_loss, avg_train_acc, avg_valid_acc])

            if avg_valid_acc > best_acc  :#记录最高准确性的模型
                best_acc = avg_valid_acc
                best_epoch = epoch + 1

            epoch_end = time.time()

            print("Epoch: {:03d}, Training: Loss: {:.4f}, Accuracy: {:.4f}%, \n\t\tValidation: Loss: {:.4f}, Accuracy: {:.4f}%, Time: {:.4f}s".format(
                    epoch + 1, avg_valid_loss, avg_train_acc * 100, avg_valid_loss, avg_valid_acc * 100,
                    epoch_end - epoch_start))
            print("Best Accuracy for validation : {:.4f} at epoch {:03d}".format(best_acc, best_epoch))

    return model, record
运行测试代码
if __name__=='__main__':
epochs = 25
model = Resnet50_Model()
loss_func = nn.CrossEntropyLoss()
optimizer = torch.optim.Adam(model.parameters(),lr=0.0001)
model, record = train_and_test(model, loss_func, optimizer, epochs)
torch.save(model, './Best_Resnet50.pth')
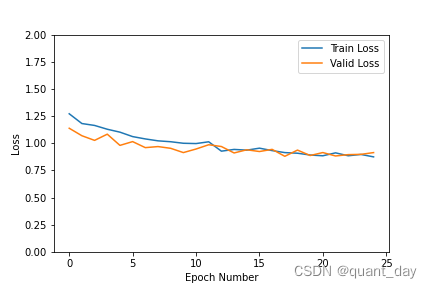
record = np.array(record)
plt.plot(record[:, 0:2])
plt.legend(['Train Loss', 'Valid Loss'])
plt.xlabel('Epoch Number')
plt.ylabel('Loss')
plt.ylim(0, 1.5)
plt.savefig('Loss.png')
plt.show()
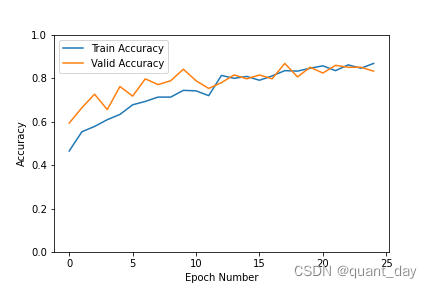
plt.plot(record[:, 2:4])
plt.legend(['Train Accuracy', 'Valid Accuracy'])
plt.xlabel('Epoch Number')
plt.ylabel('Accuracy')
plt.ylim(0, 1)
plt.savefig('Accuracy.png')
plt.show()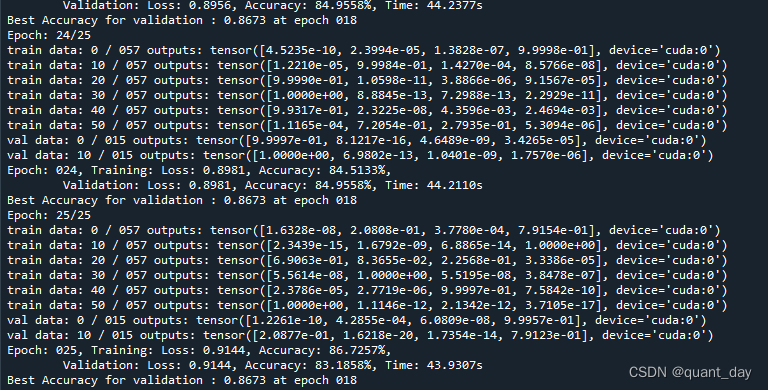


 4763
4763


 被折叠的 条评论
为什么被折叠?
被折叠的 条评论
为什么被折叠?
 到【灌水乐园】发言


