


谷粒商城笔记合集
| 分布式基础篇 | 分布式高级篇 | 高可用集群篇 |
|---|---|---|
| ===简介&环境搭建=== | ===Elasticsearch=== | |
| 项目简介与分布式概念(第一、二章) | Elasticsearch:全文检索(第一章) | |
| 基础环境搭建(第三章) | ===商品服务开发=== | |
| ===整合SpringCloud=== | 商品服务 & 商品上架(第二章) | |
| 整合SpringCloud、SpringCloud alibaba(第四、五章) | ===商城首页开发=== | |
| ===前端知识=== | 商城业务:首页整合、Nginx 域名访问、性能优化与压力测试 (第三、四、五章) | |
| 前端开发基础知识(第六章) | 缓存与分布式锁(第六章) | |
| ===商品服务开发=== | ===商城检索开发=== | |
| 商品服务开发:基础概念、三级分类(第七、八章) | 商城业务:商品检索(第七章) | |
| 商品服务开发:品牌管理(第九章) | ||
| 商品服务开发:属性分组、平台属性(第十、十一章) | ||
| 商品服务:商品维护(第十二、十三章) | ||
| ===仓储服务开发=== | ||
| 仓储服务:仓库维护(第十四章) | ||
| 基础篇总结(第十五章) |
六、缓存与分布式锁⚠️
6.1 缓存⚠️
6.1.1 使用概述
为了系统性能的提升,我们一般都会将部分数据放入缓存中,加速访问,而 db 承担数据落盘工作
哪些数据适合放入缓存?
- 即时性、数据一致性要求不高的
- 访问量大且更新频率不高的数据(读多、写少)
举例:电商类应用、商品分类,商品列表等适合缓存并加一个失效时间(根据数据更新频率来定)后台如果发布一个商品、买家需要 5 分钟才能看到新商品一般还是可以接受的。
使用方式:伪代码
data = cche.load(b); //从缓存中加载数据
if(data == null) {
    data = db.load(id); // 从数据库加载数据
    cache.put(id,data); // 保存到 cache中
}
return data;
注意:在开发中,凡是放到缓存中的数据我们都应该制定过期时间,使其可以在系统即使没有主动更新数据也能自动触发数据加载的流程,避免业务奔溃导致的数据永久不一致的问题

6.1.2 本地缓存&分布式缓存⚠️
本地缓存在分布式下的问题⚠️

分布式缓存⚠️
- 集群或分片:理论上无限量的容量提升,打破本地缓存的容量限制
- 使用简单,单独维护
- 可以做到高可用,高性能

6.2 API:三级分类 整合Redis💡

-
引入依赖
https://docs.spring.io/spring-boot/docs/current/reference/html/using.html#using.build-systems.starters
<!-- Redis --> <dependency> <groupId>org.springframework.boot</groupId> <artifactId>spring-boot-starter-data-redis</artifactId> </dependency> -
配置:application.yaml
配置类:org.springframework.boot.autoconfigure.data.redis.RedisProperties
spring: redis: host: 114.132.162.129 password: bilimall port: 6379 -
测试使用:cn.lzwei.bilimall.product.BilimallProductApplicationTests
自动注入:org.springframework.boot.autoconfigure.data.redis.RedisAutoConfiguration
@RunWith(SpringRunner.class)
@SpringBootTest
public class BilimallProductApplicationTests {
    @Resource
    StringRedisTemplate stringRedisTemplate;

	//redis测试
    @Test
    public void testStringValueOperations(){
        ValueOperations<String, String> valueOperations = stringRedisTemplate.opsForValue();
        valueOperations.set("hello","redis_"+ UUID.randomUUID().toString());
        String hello = valueOperations.get("hello");
        System.out.println(hello);
    }
}
redis_f5aeb308-06bd-4b73-b4b5-c52b3ff29803 -
cn.lzwei.bilimall.product.web.IndexController:首页分类数据添加缓存
/** * 首页控制器 */ @Controller public class IndexController { @Resource CategoryService categoryService; /** * 获取分类数据,添加缓存:用于渲染二级、三级分类 */ @ResponseBody @GetMapping(value = "/index/catalog.json") public Map<String, List<CategoryLevel2Vo>> getCategoryLevel2(){ Map<String, List<CategoryLevel2Vo>> categorys=categoryService.getCatalogJson(); return categorys; } } -
CategoryService:首页分类数据添加缓存
public interface CategoryService extends IService<CategoryEntity> { /** * 获取分类数据,添加缓存:用于渲染二级、三级分类 */ Map<String, List<CategoryLevel2Vo>> getCatalogJson(); } -
CategoryServiceImpl:首页分类数据添加缓存
@Service("categoryService") public class CategoryServiceImpl extends ServiceImpl<CategoryDao, CategoryEntity> implements CategoryService { @Resource StringRedisTemplate stringRedisTemplate; /** * 获取分类数据,添加缓存:用于渲染二级、三级分类 */ @Override public Map<String, List<CategoryLevel2Vo>> getCatalogJson() { //1.从缓存中获取 String catalogJson = stringRedisTemplate.opsForValue().get("catalogJson"); //2.缓存中没有 if(StringUtils.isEmpty(catalogJson)){ //2.1、从数据库获取 Map<String, List<CategoryLevel2Vo>> categoryLevel2 = getCategoryLevel2(); //2.2、转换为json字符串存进缓存中 String jsonString = JSON.toJSONString(categoryLevel2); stringRedisTemplate.opsForValue().set("catalogJson",jsonString); //2.3、返回 return categoryLevel2; } //3.缓存中有解析为java对象后返回 Map<String, List<CategoryLevel2Vo>> result = JSON.parseObject(catalogJson, new TypeReference<Map<String, List<CategoryLevel2Vo>>>() { }); return result; } //从数据库查询 public Map<String, List<CategoryLevel2Vo>> getCategoryLevel2() { //缓存所有三级分类数据 List<CategoryEntity> categoryEntities = baseMapper.selectList(null); //1.获取一级分类:将一级分类转换为map进行遍历,自定义key、value List<CategoryEntity> categoryLevel1s = getParent_cid(categoryEntities,0l); Map<String, List<CategoryLevel2Vo>> collect=null; if(categoryLevel1s!=null){ collect = categoryLevel1s.stream().collect(Collectors.toMap(level1 -> level1.getCatId().toString(), level1 -> { //2.通过一级分类id获取二级分类列表进行遍历:封装成CategoryLevel2Vo集合 List<CategoryEntity> level2s = getParent_cid(categoryEntities,level1.getCatId()); List<CategoryLevel2Vo> Level2Vos = null; if (level2s != null) { //遍历二级分类:封装成CategoryLevel2Vo Level2Vos = level2s.stream().map(level2 -> { CategoryLevel2Vo categoryLevel2Vo = new CategoryLevel2Vo(level2.getCatId().toString(), level2.getName(), level1.getCatId().toString(), null); //3.通过二级分类id获取三级分类列表:封装成CategoryLevel3Vo集合 List<CategoryEntity> level3s = getParent_cid(categoryEntities,level2.getCatId()); if (level3s != null) { //遍历三级分类:封装成CategoryLevel3Vo List<CategoryLevel2Vo.CategoryLevel3Vo> level3Vos = level3s.stream().map(level3 -> { CategoryLevel2Vo.CategoryLevel3Vo categoryLevel3Vo = new CategoryLevel2Vo.CategoryLevel3Vo(level2.getCatId().toString(), level3.getCatId().toString(), level3.getName()); return categoryLevel3Vo; }).collect(Collectors.toList()); categoryLevel2Vo.setCatalog3List(level3Vos); } return categoryLevel2Vo; }).collect(Collectors.toList()); } return Level2Vos; })); } return collect; } //通过 parent_id 获取分类数据 private List<CategoryEntity> getParent_cid(List<CategoryEntity> categoryEntities,Long parentId) { List<CategoryEntity> collect = categoryEntities.stream().filter(item -> item.getParentCid().equals(parentId) ).collect(Collectors.toList()); return collect; } } -
启动nginx,访问接口:http://bilimall.com/index/catalog.json
6.3 压测异常:堆外内存溢出⚠️💡
6.3.1 异常出现
使用 JMeter 对接口 http://bilimall.com/index/catalog.json 进行压力测试,发现 直接内存(堆外内存) 溢出。

java.lang.OutOfMemoryError: Cannot reserve 46137344 bytes of direct buffer memory (allocated: 59236353, limit: 104857600)
	at java.base/java.nio.Bits.reserveMemory(Bits.java:178) ~[na:na]
	...
6.3.2 异常分析
-
springboot 2.0 以后默认使用lettuce作为操作redis的客户端,lettuce使用netty进行网络通信
-
lettuce默认直接内存容量为64m,但是由于lettuce对于直接内存回收处理不完善的原因,导致直接内存溢出
可以通过 -XX:MaxDirectMemorySize=<size> 进行直接内存容量设置
class Bits {
    private static volatile long MAX_MEMORY = VM.maxDirectMemory();

    static void reserveMemory(long size, long cap) {
        //1.进行内存分配判断
        if (tryReserveMemory(size, cap)) {
            return;
        }
        ...
        try {
            ... //一系列重试机制
            System.gc();
            ... //一系列重试机制
            //2.重试内存分配失败抛出异常
            throw new OutOfMemoryError
                ("Cannot reserve "
                 + size + " bytes of direct buffer memory (allocated: "
                 + RESERVED_MEMORY.get() + ", limit: " + MAX_MEMORY +")");

        } finally {...}
    }

    //1.内存分配判断
    private static boolean tryReserveMemory(long size, long cap) {
        // -XX:MaxDirectMemorySize limits the total capacity rather than the
        // actual memory usage, which will differ when buffers are page
        // aligned.
        long totalCap;
        while (cap <= MAX_MEMORY - (totalCap = TOTAL_CAPACITY.get())) {
            if (TOTAL_CAPACITY.compareAndSet(totalCap, totalCap + cap)) {
                RESERVED_MEMORY.addAndGet(size);
                COUNT.incrementAndGet();
                return true;
            }
        }
        return false;
    }
}
public class VM {
    private static long directMemory = 64 * 1024 * 1024;
    //可以通过 -XX:MaxDirectMemorySize=\<size\> 进行直接内存容量设置
    public static void saveProperties(Map<String, String> props) {
        // Set the maximum amount of direct memory.  This value is controlled
        // by the vm option -XX:MaxDirectMemorySize=<size>.
        // The maximum amount of allocatable direct buffer memory (in bytes)
        // from the system property sun.nio.MaxDirectMemorySize set by the VM.
        // If not set or set to -1, the max memory will be used
        // The system property will be removed.
        String s = props.get("sun.nio.MaxDirectMemorySize");
        if (s == null || s.isEmpty() || s.equals("-1")) {
            // -XX:MaxDirectMemorySize not given, take default
            directMemory = Runtime.getRuntime().maxMemory();
        } else {
            long l = Long.parseLong(s);
            if (l > -1)
                directMemory = l;
        }
    }
}
6.3.2 异常解决

-
升级 lettuce 客户端
-
切换使用 jedis(暂时使用此方案)
redisTemplate 为spring对 lettuce、jedis 的再封装
-
剔除 spring-boot-starter-data-redis 中 lettuce 的依赖:pom.xml
<!-- Redis --> <dependency> <groupId>org.springframework.boot</groupId> <artifactId>spring-boot-starter-data-redis</artifactId> <exclusions> <exclusion> <groupId>io.lettuce</groupId> <artifactId>lettuce-core</artifactId> </exclusion> </exclusions> </dependency> -
导入 jedis 依赖
<!-- Jedis --> <dependency> <groupId>redis.clients</groupId> <artifactId>jedis</artifactId> </dependency> -
修改 jedis 连接池配置,减少由于网络吞吐量低造成的连接超时
spring: redis: jedis: pool: max-active: 8 max-idle: 8 -
重新启动 商品服务 ,再次对接口进行压测。异常减少
6.4 高并发下的缓存失效问题👇
6.4.1 缓存穿透
- 将空结果进行缓存

6.4.2 缓存雪崩
- 过期时间设置为随机值

6.4.3 缓存穿透
- 查询数据库加锁

分布式下如何加锁

6.5 API:本地锁解决缓存失效💡
6.5.1 初步解决:加本地锁💡
cn.lzwei.bilimall.product.service.impl.CategoryServiceImpl
- 添加空值缓存,解决缓存穿透
- 添加随机过期时间,解决缓存雪崩问题
- 查询数据库加锁,解决缓存击穿问题
@Service("categoryService")
public class CategoryServiceImpl extends ServiceImpl<CategoryDao, CategoryEntity> implements CategoryService {
    @Resource
    StringRedisTemplate stringRedisTemplate;

    /**
     * 获取分类数据,添加缓存:用于渲染二级、三级分类
     * TODO 产生堆外内存溢出 OutOfMemoryError
     */
    @Override
    public Map<String, List<CategoryLevel2Vo>> getCatalogJson() {
        //1.从缓存中获取
        String catalogJson = stringRedisTemplate.opsForValue().get("catalogJson");
        //2.缓存中没有
        if(StringUtils.isEmpty(catalogJson)){
            System.out.println("---没有缓存数据,需要查询数据库!---");
            //2.1、从数据库获取
            Map<String, List<CategoryLevel2Vo>> categoryLevel2 = getCategoryLevel2();
            //2.2、转换为json字符串存进缓存中
            String jsonString = JSON.toJSONString(categoryLevel2);
            //改动:判空并解决缓存穿透
            if(StringUtils.isEmpty(jsonString)){
                //改动:添加随机过期时间解决缓存雪崩
                stringRedisTemplate.opsForValue().set("catalogJson","isNull",new Random().nextInt(180)+60,TimeUnit.SECONDS);
            }else{
                stringRedisTemplate.opsForValue().set("catalogJson",jsonString,new Random().nextInt(18)+6,TimeUnit.HOURS);
            }
            //2.3、返回
            return categoryLevel2;
        }
        System.out.println("---缓存中存在数据,直接返回---");
        //3.缓存中有解析为java对象后返回
        Map<String, List<CategoryLevel2Vo>> result = JSON.parseObject(catalogJson, new TypeReference<Map<String, List<CategoryLevel2Vo>>>() {
        });
        return result;
    }
    //从数据库查询
    public Map<String, List<CategoryLevel2Vo>> getCategoryLevel2() {
        //改动:加锁查询数据库
        synchronized (this){
            //改动:双重验证。如果前面的线程已经查询数据了且放到缓存中了,那么查缓存后直接返回
            String catalogJson = stringRedisTemplate.opsForValue().get("catalogJson");
            if(!StringUtils.isEmpty(catalogJson)){
                Map<String, List<CategoryLevel2Vo>> result = JSON.parseObject(catalogJson, new TypeReference<Map<String, List<CategoryLevel2Vo>>>() {
                });
                return result;
            }
            System.out.println("---查询数据库---");
            //缓存所有三级分类数据
            List<CategoryEntity> categoryEntities = baseMapper.selectList(null);
            //1.获取一级分类:将一级分类转换为map进行遍历,自定义key、value
            List<CategoryEntity> categoryLevel1s = getParent_cid(categoryEntities,0l);
            Map<String, List<CategoryLevel2Vo>> collect=null;
            if(categoryLevel1s!=null){
                collect = categoryLevel1s.stream().collect(Collectors.toMap(level1 -> level1.getCatId().toString(), level1 -> {
                    //2.通过一级分类id获取二级分类列表进行遍历:封装成CategoryLevel2Vo集合
                    List<CategoryEntity> level2s = getParent_cid(categoryEntities,level1.getCatId());
                    List<CategoryLevel2Vo> Level2Vos = null;
                    if (level2s != null) {
                        //遍历二级分类:封装成CategoryLevel2Vo
                        Level2Vos = level2s.stream().map(level2 -> {
                            CategoryLevel2Vo categoryLevel2Vo = new CategoryLevel2Vo(level2.getCatId().toString(), level2.getName(), level1.getCatId().toString(), null);
                            //3.通过二级分类id获取三级分类列表:封装成CategoryLevel3Vo集合
                            List<CategoryEntity> level3s = getParent_cid(categoryEntities,level2.getCatId());
                            if (level3s != null) {
                                //遍历三级分类:封装成CategoryLevel3Vo
                                List<CategoryLevel2Vo.CategoryLevel3Vo> level3Vos = level3s.stream().map(level3 -> {
                                    CategoryLevel2Vo.CategoryLevel3Vo categoryLevel3Vo = new CategoryLevel2Vo.CategoryLevel3Vo(level2.getCatId().toString(), level3.getCatId().toString(), level3.getName());
                                    return categoryLevel3Vo;
                                }).collect(Collectors.toList());
                                categoryLevel2Vo.setCatalog3List(level3Vos);
                            }
                            return categoryLevel2Vo;
                        }).collect(Collectors.toList());
                    }
                    return Level2Vos;
                }));
            }
            return collect;
        }
    }
    //通过 parent_id 获取分类数据
    private List<CategoryEntity> getParent_cid(List<CategoryEntity> categoryEntities,Long parentId) {
        List<CategoryEntity> collect = categoryEntities.stream().filter(item -> item.getParentCid().equals(parentId)
        ).collect(Collectors.toList());
        return collect;
    }
}
6.5.2 出现问题:查询了两次数据库💡
清除redis缓存,重启服务后进行压测:出现了两次数据库查询
原因分析:因为先释放了锁,再添加缓存

6.5.2 处理问题:先放缓存再释放锁💡

cn.lzwei.bilimall.product.service.impl.CategoryServiceImpl
@Service("categoryService")
public class CategoryServiceImpl extends ServiceImpl<CategoryDao, CategoryEntity> implements CategoryService {
    @Resource
    StringRedisTemplate stringRedisTemplate;

    @Override
    public Map<String, List<CategoryLevel2Vo>> getCatalogJson() {
        //1.从缓存中获取
        String catalogJson = stringRedisTemplate.opsForValue().get("catalogJson");
        //2.缓存中没有
        if(StringUtils.isEmpty(catalogJson)){
            System.out.println("---没有缓存数据,需要查询数据库!---");
            //2.1、从数据库获取
            Map<String, List<CategoryLevel2Vo>> categoryLevel2 = getCategoryLevel2();
            //2.2、返回
            return categoryLevel2;
        }
        System.out.println("---缓存中存在数据,直接返回---");
        //3.缓存中有解析为java对象后返回
        Map<String, List<CategoryLevel2Vo>> result = JSON.parseObject(catalogJson, new TypeReference<Map<String, List<CategoryLevel2Vo>>>() {
        });
        return result;
    }
    //从数据库查询
    public Map<String, List<CategoryLevel2Vo>> getCategoryLevel2() {
        //加锁查询数据库
        synchronized (this){
            //双重验证:如果前面的线程已经查询数据了且放到缓存中了,那么查缓存后直接返回
            String catalogJson = stringRedisTemplate.opsForValue().get("catalogJson");
            if(!StringUtils.isEmpty(catalogJson)){
                Map<String, List<CategoryLevel2Vo>> result = JSON.parseObject(catalogJson, new TypeReference<Map<String, List<CategoryLevel2Vo>>>() {
                });
                return result;
            }
            System.out.println("---查询数据库---");
            //缓存所有三级分类数据
            List<CategoryEntity> categoryEntities = baseMapper.selectList(null);
            //1.获取一级分类:将一级分类转换为map进行遍历,自定义key、value
            List<CategoryEntity> categoryLevel1s = getParent_cid(categoryEntities,0l);
            Map<String, List<CategoryLevel2Vo>> collect=null;
            if(categoryLevel1s!=null){
                collect = categoryLevel1s.stream().collect(Collectors.toMap(level1 -> level1.getCatId().toString(), level1 -> {
                    //2.通过一级分类id获取二级分类列表进行遍历:封装成CategoryLevel2Vo集合
                    List<CategoryEntity> level2s = getParent_cid(categoryEntities,level1.getCatId());
                    List<CategoryLevel2Vo> Level2Vos = null;
                    if (level2s != null) {
                        //遍历二级分类:封装成CategoryLevel2Vo
                        Level2Vos = level2s.stream().map(level2 -> {
                            CategoryLevel2Vo categoryLevel2Vo = new CategoryLevel2Vo(level2.getCatId().toString(), level2.getName(), level1.getCatId().toString(), null);
                            //3.通过二级分类id获取三级分类列表:封装成CategoryLevel3Vo集合
                            List<CategoryEntity> level3s = getParent_cid(categoryEntities,level2.getCatId());
                            if (level3s != null) {
                                //遍历三级分类:封装成CategoryLevel3Vo
                                List<CategoryLevel2Vo.CategoryLevel3Vo> level3Vos = level3s.stream().map(level3 -> {
                                    CategoryLevel2Vo.CategoryLevel3Vo categoryLevel3Vo = new CategoryLevel2Vo.CategoryLevel3Vo(level2.getCatId().toString(), level3.getCatId().toString(), level3.getName());
                                    return categoryLevel3Vo;
                                }).collect(Collectors.toList());
                                categoryLevel2Vo.setCatalog3List(level3Vos);
                            }
                            return categoryLevel2Vo;
                        }).collect(Collectors.toList());
                    }
                    return Level2Vos;
                }));
            }
            //修改:先添加到缓存
            String jsonString = JSON.toJSONString(collect);
            if(StringUtils.isEmpty(jsonString)){
                stringRedisTemplate.opsForValue().set("catalogJson","isNull",new Random().nextInt(180)+60,TimeUnit.SECONDS);
            }else{
                stringRedisTemplate.opsForValue().set("catalogJson",jsonString,new Random().nextInt(18)+6,TimeUnit.HOURS);
            }
            return collect;
        }
    }
    //通过 parent_id 获取分类数据
    private List<CategoryEntity> getParent_cid(List<CategoryEntity> categoryEntities,Long parentId) {
        List<CategoryEntity> collect = categoryEntities.stream().filter(item -> item.getParentCid().equals(parentId)
        ).collect(Collectors.toList());
        return collect;
    }
}
6.6 本地锁出现问题:分布式下👇

-
删除 商品服务 配置文件所有的端口号配置,注意包括nacos注册中心的
-
拷贝出商品服务的配置创建多个微服务,并为他们设置不同的端口号

-
启动所有 商品服务 并情况控制台,进行压测发现问题。并发数越高问题越容易出现。
6.7 API:分布式锁解决缓存失效💡
6.7.1 原理

**理解:**就先当1000个人去占一个厕所,厕所只能有一个人占到这个坑,占到这个坑其他人就只能在外面等待,等待一段时间后可以再次来占坑,业务执行后,释放锁,那么其他人就可以来占这个坑
6.7.2 解决⚠️
redis中文文档:http://www.redis.cn/commands/set.html

-
阶段一:锁删除没有保障->过期时间
-
阶段二:原子性设置过期锁
-
阶段三:删除别人的锁->UUID验证
-
阶段四:原子性验证并删除锁
-
最终阶段:解决锁提前过期->足够的过期时间

-
cn.lzwei.bilimall.product.web.IndexController:获取分类数据渲染首页(缓存+分布式锁)
/** * 首页控制器 */ @Controller public class IndexController { @Resource CategoryService categoryService; /** * 获取分类数据,添加缓存:用于渲染二级、三级分类 */ @ResponseBody @GetMapping(value = "/index/catalog.json") public Map<String, List<CategoryLevel2Vo>> getCategoryLevel2(){ Map<String, List<CategoryLevel2Vo>> categorys=categoryService.getCatalogJsonAddCache(); return categorys; } } -
CategoryService:获取分类数据渲染首页(缓存+分布式锁)
public interface CategoryService extends IService<CategoryEntity> { /** * 获取分类数据,添加缓存:用于渲染二级、三级分类 */ Map<String, List<CategoryLevel2Vo>> getCatalogJsonAddCache(); } -
CategoryServiceImpl:获取分类数据渲染首页(缓存+分布式锁)
@Service("categoryService")
public class CategoryServiceImpl extends ServiceImpl<CategoryDao, CategoryEntity> implements CategoryService {

    @Resource
    StringRedisTemplate stringRedisTemplate;

    /**
     * 获取分类数据,添加缓存:用于渲染二级、三级分类
     * TODO 产生堆外内存溢出 OutOfMemoryError。暂时使用 jedis 解决
     */
    @Override
    public Map<String, List<CategoryLevel2Vo>> getCatalogJsonAddCache() {
        //1.从缓存中获取
        String catalogJson = stringRedisTemplate.opsForValue().get("catalogJson");
        //2.缓存中没有
        if(StringUtils.isEmpty(catalogJson)){
            System.out.println("---没有缓存数据,需要查询数据库!---");
            //2.1、从数据库获取
            Map<String, List<CategoryLevel2Vo>> categoryLevel2 = getCategoryWithRedisLock();
            //2.2、返回
            return categoryLevel2;
        }
        System.out.println("---缓存中存在数据,直接返回---");
        //3.缓存中有解析为java对象后返回
        Map<String, List<CategoryLevel2Vo>> result = JSON.parseObject(catalogJson, new TypeReference<Map<String, List<CategoryLevel2Vo>>>() {
        });
        return result;
    }
    //加分布式锁:去数据库查询
    public Map<String, List<CategoryLevel2Vo>> getCategoryWithRedisLock() {
        //1.生成锁的唯一标识
        String token=UUID.randomUUID().toString();
        //2.加过期锁,原子操作:解决阶段一、阶段二、阶段五
        Boolean lock = stringRedisTemplate.opsForValue().setIfAbsent("lock", token, 300, TimeUnit.SECONDS);
        //3.加锁成功,查询数据库
        if (lock){
            Map<String, List<CategoryLevel2Vo>> categoryFromDB=null;
            try{
                //3.1、查询数据库
                categoryFromDB = getCategoryFromDB();
            }catch (Exception e){
                e.printStackTrace();
            }finally {
                //3.2、释放锁:原子操作:解决阶段三、阶段四
                String script="if redis.call(\"get\",KEYS[1]) == ARGV[1]\n" +
                        "then\n" +
                        "    return redis.call(\"del\",KEYS[1])\n" +
                        "else\n" +
                        "    return 0\n" +
                        "end";
                stringRedisTemplate.execute(new DefaultRedisScript<Long>(script,Long.class), Arrays.asList("lock"), token);
                //3.3、返回数据
                return categoryFromDB;
            }
        }else {
            //4.加锁失败,重试:添加延迟时间
            try {
                Thread.sleep(100);
            } catch (InterruptedException e) {
                e.printStackTrace();
            }
            return getCategoryWithRedisLock();
        }
    }
    //加本地锁:去数据库查询
    public Map<String, List<CategoryLevel2Vo>> getCategoryWithLocalLock() {
        //加锁查询数据库
        synchronized (this){
            return getCategoryFromDB();
        }
    }
    //查询数据库并封装数据
    private Map<String, List<CategoryLevel2Vo>> getCategoryFromDB() {
        //双重验证:如果前面的线程已经查询数据了且放到缓存中了,那么查缓存后直接返回
        String catalogJson = stringRedisTemplate.opsForValue().get("catalogJson");
        if(!StringUtils.isEmpty(catalogJson)){
            Map<String, List<CategoryLevel2Vo>> result = JSON.parseObject(catalogJson, new TypeReference<Map<String, List<CategoryLevel2Vo>>>() {
            });
            return result;
        }
        System.out.println("---查询数据库---");
        //缓存所有三级分类数据
        List<CategoryEntity> categoryEntities = baseMapper.selectList(null);
        //1.获取一级分类:将一级分类转换为map进行遍历,自定义key、value
        List<CategoryEntity> categoryLevel1s = getParent_cid(categoryEntities,0l);
        Map<String, List<CategoryLevel2Vo>> collect=null;
        if(categoryLevel1s!=null){
            collect = categoryLevel1s.stream().collect(Collectors.toMap(level1 -> level1.getCatId().toString(), level1 -> {
                //2.通过一级分类id获取二级分类列表进行遍历:封装成CategoryLevel2Vo集合
                List<CategoryEntity> level2s = getParent_cid(categoryEntities,level1.getCatId());
                List<CategoryLevel2Vo> Level2Vos = null;
                if (level2s != null) {
                    //遍历二级分类:封装成CategoryLevel2Vo
                    Level2Vos = level2s.stream().map(level2 -> {
                        CategoryLevel2Vo categoryLevel2Vo = new CategoryLevel2Vo(level2.getCatId().toString(), level2.getName(), level1.getCatId().toString(), null);
                        //3.通过二级分类id获取三级分类列表:封装成CategoryLevel3Vo集合
                        List<CategoryEntity> level3s = getParent_cid(categoryEntities,level2.getCatId());
                        if (level3s != null) {
                            //遍历三级分类:封装成CategoryLevel3Vo
                            List<CategoryLevel2Vo.CategoryLevel3Vo> level3Vos = level3s.stream().map(level3 -> {
                                CategoryLevel2Vo.CategoryLevel3Vo categoryLevel3Vo = new CategoryLevel2Vo.CategoryLevel3Vo(level2.getCatId().toString(), level3.getCatId().toString(), level3.getName());
                                return categoryLevel3Vo;
                            }).collect(Collectors.toList());
                            categoryLevel2Vo.setCatalog3List(level3Vos);
                        }
                        return categoryLevel2Vo;
                    }).collect(Collectors.toList());
                }
                return Level2Vos;
            }));
        }
        String jsonString = JSON.toJSONString(collect);
        if(StringUtils.isEmpty(jsonString)){
            stringRedisTemplate.opsForValue().set("catalogJson","isNull",new Random().nextInt(180)+60,TimeUnit.SECONDS);
        }else{
            stringRedisTemplate.opsForValue().set("catalogJson",jsonString,new Random().nextInt(18)+6,TimeUnit.HOURS);
        }
        return collect;
    }
    //通过 parent_id 获取分类数据
    private List<CategoryEntity> getParent_cid(List<CategoryEntity> categoryEntities,Long parentId) {
        List<CategoryEntity> collect = categoryEntities.stream().filter(item -> item.getParentCid().equals(parentId)
        ).collect(Collectors.toList());
        return collect;
    }
}
-
6.8 Redisson⚠️
6.8.1 概述
官网文档上详细说明了:不推荐使用 setnx来实现分布式锁,应该参考 the Redlock algorithm 的实现
http://www.redis.cn/commands/set.html

在Java 语言环境下使用 Redisson
https://redis.io/docs/manual/patterns/distributed-locks/

redisson github:https://github.com/redisson/redisson
redisson 中文文档:https://github.com/redisson/redisson/wiki/%E7%9B%AE%E5%BD%95
6.8.2 整合⚠️
在 Maven 仓库中搜索 Redisson:https://mvnrepository.com/artifact/org.redisson/redisson

-
在 商品服务 中引入依赖
<!-- reidsson:作为分布式锁、分布式对象等功能的框架 --> <dependency> <groupId>org.redisson</groupId> <artifactId>redisson</artifactId> <version>3.19.0</version> </dependency> -
程序化配置
https://github.com/redisson/redisson/wiki/%E7%9B%AE%E5%BD%95

-
cn.lzwei.bilimall.product.config.MyRedissonConfig
@Configuration public class MyRedissonConfig { @Bean(destroyMethod = "shutdown") public RedissonClient redissonClient() throws IOException { //1.创建配置 Config config = new Config(); config.useSingleServer() .setAddress("redis://114.132.162.129:6379") .setPassword("bilimall") .setConnectionMinimumIdleSize(10); //2.使用配置创建客户端 RedissonClient redisson = Redisson.create(config); return redisson; } } -
测试:cn.lzwei.bilimall.product.BilimallProductApplicationTests
@RunWith(SpringRunner.class)
@SpringBootTest
public class BilimallProductApplicationTests {

    @Resource
    RedissonClient redissonClient;

    @Test
    public void testRedissonClient(){
        System.out.println(redissonClient);
    }
}
org.redisson.Redisson@257d3968
6.8.3 Rdisson - Lock
https://github.com/redisson/redisson/wiki/8.-%E5%88%86%E5%B8%83%E5%BC%8F%E9%94%81%E5%92%8C%E5%90%8C%E6%AD%A5%E5%99%A8
1)getLock.lock()
- 阻塞式等待:默认超时时间30s
- 锁的自动续期:如果业务超长,运行期间自动给锁续上新的30s。不用担心业务时间长,锁自动过期被删除
- 锁的自动删除:加锁的业务只要运行完成,就不会给当前锁续期,即使不手动解锁,锁默认在30s以后自动删除
@RequestMapping("/hello")
@ResponseBody
public String hello(){
    // 1、获取一把锁,只要锁得名字一样,就是同一把锁
    RLock lock = redission.getLock("my-lock");

    // 2、加锁
    lock.lock(); // 阻塞式等待,默认加的锁都是30s时间

    try {
        System.out.println("加锁成功,执行业务..." + Thread.currentThread().getId());
        Thread.sleep(3000);
    } catch (Exception e) {
    } finally {
        // 解锁 将设解锁代码没有运行,reidsson会不会出现死锁
        System.out.println("释放锁...." + Thread.currentThread().getId());
        lock.unlock();
    }

    return "hello";
}
原理
-
lock():过期时间设置为 -1
public void lock() { try { this.lock(-1L, (TimeUnit)null, false); } catch (InterruptedException var2) { throw new IllegalStateException(); } } -
lock(long , TimeUnit , boolean ):尝试获取锁
private void lock(long leaseTime, TimeUnit unit, boolean interruptibly) throws InterruptedException { long threadId = Thread.currentThread().getId(); Long ttl = this.tryAcquire(-1L, leaseTime, unit, threadId); if (ttl != null) { ... try { while(true) { ttl = this.tryAcquire(-1L, leaseTime, unit, threadId); if (ttl == null) { return; } } }... } } -
tryAcquire(long , long , TimeUnit , long ):尝试异步获取锁
private Long tryAcquire(long waitTime, long leaseTime, TimeUnit unit, long threadId) { return (Long)this.get(this.tryAcquireAsync(waitTime, leaseTime, unit, threadId)); } -
tryAcquireAsync(long ,long ,TimeUnit ,long ):判断是否指定了过期时间然后尝试异步获取锁
private <T> RFuture<Long> tryAcquireAsync(long waitTime, long leaseTime, TimeUnit unit, long threadId) { RFuture ttlRemainingFuture; if (leaseTime != -1L) { ttlRemainingFuture = this.tryLockInnerAsync(waitTime, leaseTime, unit, threadId, RedisCommands.EVAL_LONG); } else //1.没有指定过期时间:使用续期看门狗的默认时间,this.lockWatchdogTimeout = 30000L; //2.尝试异步获取锁 ttlRemainingFuture = this.tryLockInnerAsync(waitTime, this.internalLockLeaseTime, TimeUnit.MILLISECONDS, threadId, RedisCommands.EVAL_LONG); } CompletionStage<Long> f = ttlRemainingFuture.thenApply((ttlRemaining) -> { if (ttlRemaining == null) { if (leaseTime != -1L) { this.internalLockLeaseTime = unit.toMillis(leaseTime); } else { //没有指定过期时间,添加定时任务进行续期 //每10秒进行续期:this.internalLockLeaseTime / 3L, TimeUnit.MILLISECONDS //this.lockWatchdogTimeout = 30000L; this.scheduleExpirationRenewal(threadId); } } return ttlRemaining; }); return new CompletableFutureWrapper(f); } -
tryLockInnerAsync(long ,long ,TimeUnit ,long ,RedisStrictCommand<T> ):执行脚本
<T> RFuture<T> tryLockInnerAsync(long waitTime, long leaseTime, TimeUnit unit, long threadId, RedisStrictCommand<T> command) {
    return this.evalWriteAsync(this.getRawName(), LongCodec.INSTANCE, command, "if (redis.call('exists', KEYS[1]) == 0) then redis.call('hincrby', KEYS[1], ARGV[2], 1); redis.call('pexpire', KEYS[1], ARGV[1]); return nil; end; if (redis.call('hexists', KEYS[1], ARGV[2]) == 1) then redis.call('hincrby', KEYS[1], ARGV[2], 1); redis.call('pexpire', KEYS[1], ARGV[1]); return nil; end; return redis.call('pttl', KEYS[1]);", Collections.singletonList(this.getRawName()), new Object[]{unit.toMillis(leaseTime), this.getLockName(threadId)});
}
2)getLock.lock(long,TimeUnit)
- 指定过期时间
- 不会自动续期
- 锁的自动删除:指定时间后自动删除
@RequestMapping("/hello")
@ResponseBody
public String hello(){
    // 1、获取一把锁,只要锁得名字一样,就是同一把锁
    RLock lock = redission.getLock("my-lock");

    lock.lock(10, TimeUnit.SECONDS); //10s 后自动删除
    // 1、如果我们传递了锁的超时时间,就发送给 redis 执行脚本,进行占锁,默认超时就是我们指定的时间
    // 2、如果我们未 指定锁的超时时间,就是用 30 * 1000 LockWatchchdogTimeout看门狗的默认时间、
    //      只要占锁成功,就会启动一个定时任务,【重新给锁设置过期时间,新的过期时间就是看门狗的默认时间】,每隔10s就自动续期
    //      internalLockLeaseTime【看门狗时间】 /3,10s

    //最佳实践
    // 1、lock.lock(10, TimeUnit.SECONDS);省掉了整个续期操作,手动解锁

    try {
        System.out.println("加锁成功,执行业务..." + Thread.currentThread().getId());
        Thread.sleep(3000);
    } catch (Exception e) {
    } finally {
        // 解锁 将设解锁代码没有运行,reidsson会不会出现死锁
        System.out.println("释放锁...." + Thread.currentThread().getId());
        lock.unlock();
    }

    return "hello";
}
-
lock(long , unit)
public void lock(long leaseTime, TimeUnit unit) { try { this.lock(leaseTime, unit, false); } catch (InterruptedException var5) { throw new IllegalStateException(); } } -
lock(long , TimeUnit , boolean ):尝试获取锁
private void lock(long leaseTime, TimeUnit unit, boolean interruptibly) throws InterruptedException { long threadId = Thread.currentThread().getId(); Long ttl = this.tryAcquire(-1L, leaseTime, unit, threadId); if (ttl != null) { ... try { while(true) { ttl = this.tryAcquire(-1L, leaseTime, unit, threadId); if (ttl == null) { return; } } }... } } -
tryAcquire(long , long , TimeUnit , long ):尝试异步获取锁
private Long tryAcquire(long waitTime, long leaseTime, TimeUnit unit, long threadId) { return (Long)this.get(this.tryAcquireAsync(waitTime, leaseTime, unit, threadId)); } -
tryAcquireAsync(long ,long ,TimeUnit ,long ):判断是否指定了过期时间
private <T> RFuture<Long> tryAcquireAsync(long waitTime, long leaseTime, TimeUnit unit, long threadId) { RFuture ttlRemainingFuture; if (leaseTime != -1L) { //尝试异步获取锁 ttlRemainingFuture = this.tryLockInnerAsync(waitTime, leaseTime, unit, threadId, RedisCommands.EVAL_LONG); } else { ttlRemainingFuture = this.tryLockInnerAsync(waitTime, this.internalLockLeaseTime, TimeUnit.MILLISECONDS, threadId, RedisCommands.EVAL_LONG); } CompletionStage<Long> f = ttlRemainingFuture.thenApply((ttlRemaining) -> { if (ttlRemaining == null) { if (leaseTime != -1L) { //使用过期时间 this.internalLockLeaseTime = unit.toMillis(leaseTime); } else { this.scheduleExpirationRenewal(threadId); } } return ttlRemaining; }); return new CompletableFutureWrapper(f); } -
tryLockInnerAsync(long ,long ,TimeUnit ,long ,RedisStrictCommand<T> ):执行脚本
<T> RFuture<T> tryLockInnerAsync(long waitTime, long leaseTime, TimeUnit unit, long threadId, RedisStrictCommand<T> command) {
    return this.evalWriteAsync(this.getRawName(), LongCodec.INSTANCE, command, "if (redis.call('exists', KEYS[1]) == 0) then redis.call('hincrby', KEYS[1], ARGV[2], 1); redis.call('pexpire', KEYS[1], ARGV[1]); return nil; end; if (redis.call('hexists', KEYS[1], ARGV[2]) == 1) then redis.call('hincrby', KEYS[1], ARGV[2], 1); redis.call('pexpire', KEYS[1], ARGV[1]); return nil; end; return redis.call('pttl', KEYS[1]);", Collections.singletonList(this.getRawName()), new Object[]{unit.toMillis(leaseTime), this.getLockName(threadId)});
}
3)getReadWriteLock
保证一定能读取到最新数据,修改期间,写锁是一个排他锁(互斥锁,独享锁)读锁是一个共享锁
- 读 + 读: 相当于无锁,并发读,只会在 reids中记录好,所有当前的读锁,他们都会同时加锁成功
- 写 + 读: 等待写锁释放
- 写 + 写: 阻塞方式
- 读 + 写: 有读锁,写也需要等待
/**
 * 只要有写的存在,都必须等待
 * @return String
 */
@RequestMapping("/write")
@ResponseBody
public String writeValue() {

    RReadWriteLock lock = redission.getReadWriteLock("rw_lock");
    String s = "";
    RLock rLock = lock.writeLock();
    try {
        // 1、改数据加写锁,读数据加读锁
        rLock.lock();
        System.out.println("写锁加锁成功..." + Thread.currentThread().getId());
        s = UUID.randomUUID().toString();
        try { TimeUnit.SECONDS.sleep(3); } catch (InterruptedException e) { e.printStackTrace(); }
        redisTemplate.opsForValue().set("writeValue",s);
    } catch (Exception e) {
        e.printStackTrace();
    } finally {
        rLock.unlock();
        System.out.println("写锁释放..." + Thread.currentThread().getId());
    }
    return s;
}

@RequestMapping("/read")
@ResponseBody
public String readValue() {
    RReadWriteLock lock = redission.getReadWriteLock("rw_lock");
    RLock rLock = lock.readLock();
    String s = "";
    rLock.lock();
    try {
        System.out.println("读锁加锁成功..." + Thread.currentThread().getId());
        s = (String) redisTemplate.opsForValue().get("writeValue");
        try { TimeUnit.SECONDS.sleep(3); } catch (InterruptedException e) { e.printStackTrace(); }
    } catch (Exception e) {
        e.printStackTrace();
    } finally {
        rLock.unlock();
        System.out.println("读锁释放..." + Thread.currentThread().getId());
    }
    return s;
}
https://github.com/redisson/redisson/wiki/8.-%E5%88%86%E5%B8%83%E5%BC%8F%E9%94%81%E5%92%8C%E5%90%8C%E6%AD%A5%E5%99%A8
来看下官网的解释

4)getCountDownLatch
- 和 JUC 的 CountDownLatch 一致
- await():等待计数为0,继续执行业务
- countDown():计数减1,当计数减为0后 await 就会放行
/**
 * 放假锁门
 * 5个班级走完,我们可以锁门了
 * @return
 */
@GetMapping("/lockDoor")
@ResponseBody
public String lockDoor() throws InterruptedException {
    RCountDownLatch door = redission.getCountDownLatch("door");
    door.trySetCount(5);
    door.await();//等待闭锁都完成

    return "放假了....";
}
@GetMapping("/gogogo/{id}")
@ResponseBody
public String gogogo(@PathVariable("id") Long id) {
    RCountDownLatch door = redission.getCountDownLatch("door");
    door.countDown();// 计数器减一

    return id + "班的人走完了.....";
}

5)getSemaphore
- 类似 JUC 中的 Semaphore
- 可用于分布式限流
- tryAcquire():车位减 1
- release():车位加 1
/**
 * 车库只有3个车位
 */
@GetMapping("/park")
@ResponseBody
public String park() throws InterruptedException {
    RSemaphore park = redission.getSemaphore("park");
    boolean b = park.tryAcquire();//获取一个信号,获取一个值,占用一个车位

    return "ok=" + b;
}

@GetMapping("/go")
@ResponseBody
public String go() {
    RSemaphore park = redission.getSemaphore("park");

    park.release(); //释放一个车位

    return "ok";
}

6.9 缓存数据一致性问题:数据被修改
6.9.1 双写模式

脏数据问题
- 两个线程写数据库,最终只有一个线程更新缓存成功
- 如果后写数据库的线程先更新缓存成功,就会造成脏数据。(即缓存中不是数据库的最新数据)
这是暂时性的脏数据问题,但是在数据文档、缓存过期后,又能得到最新的正确数据

6.9.2 失效模式

脏数据问题

6.9.5 Canal

6.9.4 总结
无论是双写模式还是失效模式,都会到这缓存不一致的问题,即多个实力同时更新会出事,怎么办?
- 1、如果是用户纯度数据(订单数据、用户数据),这并发几率很小,几乎不用考虑这个问题,缓存数据加上过期时间,每隔一段时间触发读的主动更新即可
- 2、如果是菜单,商品介绍等基础数据,也可以去使用 canal 订阅,binlog 的方式
- 3、缓存数据 + 过期时间也足够解决大部分业务对缓存的要求
- 4、通过加锁保证并发读写,写写的时候按照顺序排好队,读读无所谓,所以适合读写锁,(业务不关心脏数据,允许临时脏数据可忽略)
总结:
- 我们能放入缓存的数据本来就不应该是实时性、一致性要求超高的。所以缓存数据的时候加上过期时间,保证每天拿到当前的最新值即可
- 我们不应该过度设计,增加系统的复杂性
- 遇到实时性、一致性要求高的数据,就应该查数据库,即使慢点
6.10 优化:Reidsson优化分布式锁💡
CategoryServiceImpl
//加分布式锁:去数据库查询并更新缓存
public Map<String, List<CategoryLevel2Vo>> getCategoryWithRedisLock() {
    //1.获取锁
    RLock lock = redissonClient.getLock("catalogJson-lock");
    lock.lock();
    //2.加锁成功,查询数据库
    Map<String, List<CategoryLevel2Vo>> categoryFromDB = null;
    try{
        categoryFromDB=getCategoryFromDB();
    }finally {
        //3.释放锁
        lock.unlock();
    }
    return categoryFromDB;
}
6.11 Spring Cache⚠️
6.11.1 简介
https://docs.spring.io/spring-framework/docs/5.3.25/reference/html/integration.html#cache
- Spring 从3.1开始定义了
org.springframework.cache.Cache和org.sprngframework.cache.CacheManager接口睐统一不同的缓存技术 - 并支持使用
JCache(JSR-107)注解简化我们的开发 - Cache 接口为缓存的组件规范定义,包含缓存的各种操作集合
Cache接口下 Spring 提供了各种 XXXCache的实现,如RedisCache、EhCache,ConcrrentMapCache等等, - 每次调用需要缓存功能实现方法的时候,
Spring会检查指定参数的目标方法是否已经被调用过,如果有就直接从缓存中获取方法调用后的结果,如果没有就调用方法并缓存结果后返回给用户,下次直接调用从缓存中获取 - 使用
Sprng缓存抽象时我们需要关注的点有以下两点- 确定方法需要被缓存以及他们的的缓存策略
- 从缓存中读取之前缓存存储的数据
6.11.2 相关注解
对于缓存声明,Spring的缓存抽象提供了一组Java注解

1)@Cacheable
触发将数据保存到缓存的操作
- 每一个需要缓存的数据我们都需要指定放到哪个名字的缓存【缓存分区的划分【按照业务类型划分】】
- @Cacheable({“category”})
- 代表当前方法的结果需要缓存,如果缓存中有,方法不调用
- 如果缓存中没有,调用方法,最后将方法的结果放入缓存
- 默认行为:
- 建议进行的自定义操作:
- 指定缓存的key名:key属性指定,接收一个 SpEl 表达式
- 指定缓存数据的存活时间:配置文件中修改ttl
- 将数据保存为json格式
表达式语法
https://docs.spring.io/spring-framework/docs/5.3.25/reference/html/integration.html#cache-spel-context
| Name | Location | Description | Example |
|---|---|---|---|
methodName | Root object | 被调用的方法的名称 | #root.methodName |
method | Root object | 被调用的方法 | #root.method.name |
target | Root object | 被调用的目标对象 | #root.target |
targetClass | Root object | 被调用的目标的类 | #root.targetClass |
args | Root object | 用于调用目标的参数(作为数组) | #root.args[0] |
caches | Root object | 对其运行当前方法的缓存集合 | #root.caches[0].name |
| Argument name | Evaluation context | 任何方法参数的名称。如果名称不可用(可能是因为没有调试信息),参数名称也可以在“#a<#arg >”下使用,其中“#arg”代表参数索引(从“0”开始)。 | #iban or #a0 (you can also use #p0 or #p<#arg> notation as an alias). |
result | Evaluation context | 方法调用的结果(要缓存的值)。仅在“除非”表达式、“缓存放置”表达式(计算“键”)或“缓存收回”表达式(当“beforeInvocation”为“false”时)中可用。对于支持的包装器(如“optional ”),“# result”指的是实际的对象,而不是包装器。 | #result |
2)@CacheEvict
触发将数据从缓存删除的操作
3)@CachePut
不影响方法执行更新缓存
4)@Caching
组合以上多个操作
5)@CacheConfig
在类级别共享缓存的相同配置
6.11.3 整合⚠️
从3.1版本开始,Spring 框架就支持透明地向现有 Spring 应用程序添加缓存。与事务支持类似,缓存抽象允许在对代码影响最小的情况下一致地使用各种缓存解决方案。从 Spring 4.1 开始,缓存抽象在JSR-107注释和更多定制选项的支持下得到了显著扩展。
-
在 商品服务 中添加依赖:pom.xml
<!-- spring-cache --> <dependency> <groupId>org.springframework.boot</groupId> <artifactId>spring-boot-starter-cache</artifactId> </dependency> -
在 商品服务 的主启动类上添加注解开启缓存功能:@EnableCaching
-
在 商品服务 中配置缓存类型:application.properties
spring.cache.type=redis #指定默认的过期时间 spring.cache.redis.time-to-live=3600000 -
CategoryServiceImpl:简单测试首页渲染获取一级分类数据的缓存
@Service("categoryService") public class CategoryServiceImpl extends ServiceImpl<CategoryDao, CategoryEntity> implements CategoryService { /** * 首页渲染:获取一级分类数据 */ @Cacheable(value = "category",key = "#root.methodName") //key= category::getCategoryLevel1 @Override public List<CategoryEntity> getCategoryLevel1() { System.out.println("getCategoryLevel1"); List<CategoryEntity> categoryEntities = baseMapper.selectList(new QueryWrapper<CategoryEntity>().eq("parent_cid", 0)); return categoryEntities; } } -
整合成功:多次访问首页,只查询一次数据库


6.12 优化:自定义Spring Cache缓存配置💡

原理:CacheAutoConfiguration会导入 RedisCacheConfiguration。自动配置好了缓存管理器:RedisCacheManager
- CacheAutoConfiguration ->RedisCacheConfiguration ->自动配置了 RedisCacheManager ->初始化所有的缓存 -> 每个缓存决定使用什么配置 ->
- 如果redisCacheConfiguration有就用已有的,没有就用默认的 ->
- 想改缓存的配置,只需要把容器中放一个 RedisCacheConfiguration 即可 ->
- 就会应用到当前 RedisCacheManager管理所有缓存分区中
步骤
-
CategoryServiceImpl
@Service("categoryService") public class CategoryServiceImpl extends ServiceImpl<CategoryDao, CategoryEntity> implements CategoryService { /** * 首页渲染:获取一级分类数据 */ @Cacheable(value = "category",key = "#root.methodName") @Override public List<CategoryEntity> getCategoryLevel1() { System.out.println("getCategoryLevel1"); List<CategoryEntity> categoryEntities = baseMapper.selectList(new QueryWrapper<CategoryEntity>().eq("parent_cid", 0)); return categoryEntities; //return null; } } -
cn.lzwei.bilimall.product.config.MyCacheConfig
@EnableConfigurationProperties(CacheProperties.class) @Configuration public class MyCacheConfig { /** * 配置文件中的东西没有用上 * 1、原来的配置吻技安绑定的配置类是这样子的 * @ConfigurationProperties(prefix = "Spring.cache") * 2、要让他生效 * @EnableConfigurationProperties(CacheProperties.class) * @param cacheProperties * @return */ @Bean RedisCacheConfiguration redisCacheConfiguration(CacheProperties cacheProperties){ RedisCacheConfiguration config = RedisCacheConfiguration.defaultCacheConfig(); //1.键序列化器:string config = config.serializeKeysWith(RedisSerializationContext.SerializationPair.fromSerializer(StringRedisSerializer.UTF_8)); //2.值序列化器:json config = config.serializeValuesWith(RedisSerializationContext.SerializationPair.fromSerializer(new GenericJackson2JsonRedisSerializer())); //3.使用配置文件的配置 CacheProperties.Redis redisProperties = cacheProperties.getRedis(); if (redisProperties.getTimeToLive() != null) { config = config.entryTtl(redisProperties.getTimeToLive()); } if (redisProperties.getKeyPrefix() != null) { config = config.prefixKeysWith(redisProperties.getKeyPrefix()); } if (!redisProperties.isCacheNullValues()) { config = config.disableCachingNullValues(); } if (!redisProperties.isUseKeyPrefix()) { config = config.disableKeyPrefix(); } return config; } } -
application.properties
spring.cache.type=redis
spring.cache.redis.time-to-live=3600000
spring.cache.redis.cache-null-values=true
#如果指定了前缀就用我们指定的前缀,如果没有就默认使用缓存的名字作为前缀
#spring.cache.redis.key-prefix=Cache_
#如果为false,则不添加前缀,本例直接使用方法名作为key
spring.cache.redis.use-key-prefix=true
6.13 优化:Spring Cache首页缓存💡

-
cn.lzwei.bilimall.product.web.IndexController:首页访问控制器
/** * 首页控制器 */ @Controller public class IndexController { @Resource CategoryService categoryService; /** * 首页访问:获取一级分类数据 */ @GetMapping(value = {"/","/index.html"}) public String index(Model model){ //首页渲染:获取一级分类数据 List<CategoryEntity> categoryEntities=categoryService.getCategoryLevel1(); model.addAttribute("categorys",categoryEntities); return "index"; } /** * 获取分类数据,添加缓存:用于渲染二级、三级分类 */ @ResponseBody @GetMapping(value = "/index/catalog.json") public Map<String, List<CategoryLevel2Vo>> getCategoryLevel2(){ Map<String, List<CategoryLevel2Vo>> categorys=categoryService.getCatalogJsonBySpringCache(); return categorys; } } -
CategoryService:首页数据缓存
public interface CategoryService extends IService<CategoryEntity> { /** * 首页渲染:获取一级分类数据 */ List<CategoryEntity> getCategoryLevel1(); /** * 使用Spring Cache优化首页分类数据的获取 */ Map<String, List<CategoryLevel2Vo>> getCatalogJsonBySpringCache(); } -
CategoryServiceImpl:首页数据缓存
@Service("categoryService")
public class CategoryServiceImpl extends ServiceImpl<CategoryDao, CategoryEntity> implements CategoryService {

    @Resource
    CategoryBrandRelationService categoryBrandRelationService;

    /**
     * 使用Spring Cache优化首页分类数据的获取
     */
    @Cacheable(value = "category",key = "#root.methodName")
    @Override
    public Map<String, List<CategoryLevel2Vo>> getCatalogJsonBySpringCache() {
        System.out.println("---查询数据库---");
        //缓存所有三级分类数据
        List<CategoryEntity> categoryEntities = baseMapper.selectList(null);
        //1.获取一级分类:将一级分类转换为map进行遍历,自定义key、value
        List<CategoryEntity> categoryLevel1s = getParent_cid(categoryEntities,0l);
        Map<String, List<CategoryLevel2Vo>> collect=null;
        if(categoryLevel1s!=null){
            collect = categoryLevel1s.stream().collect(Collectors.toMap(level1 -> level1.getCatId().toString(), level1 -> {
                //2.通过一级分类id获取二级分类列表进行遍历:封装成CategoryLevel2Vo集合
                List<CategoryEntity> level2s = getParent_cid(categoryEntities,level1.getCatId());
                List<CategoryLevel2Vo> Level2Vos = null;
                if (level2s != null) {
                    //遍历二级分类:封装成CategoryLevel2Vo
                    Level2Vos = level2s.stream().map(level2 -> {
                        CategoryLevel2Vo categoryLevel2Vo = new CategoryLevel2Vo(level2.getCatId().toString(), level2.getName(), level1.getCatId().toString(), null);
                        //3.通过二级分类id获取三级分类列表:封装成CategoryLevel3Vo集合
                        List<CategoryEntity> level3s = getParent_cid(categoryEntities,level2.getCatId());
                        if (level3s != null) {
                            //遍历三级分类:封装成CategoryLevel3Vo
                            List<CategoryLevel2Vo.CategoryLevel3Vo> level3Vos = level3s.stream().map(level3 -> {
                                CategoryLevel2Vo.CategoryLevel3Vo categoryLevel3Vo = new CategoryLevel2Vo.CategoryLevel3Vo(level2.getCatId().toString(), level3.getCatId().toString(), level3.getName());
                                return categoryLevel3Vo;
                            }).collect(Collectors.toList());
                            categoryLevel2Vo.setCatalog3List(level3Vos);
                        }
                        return categoryLevel2Vo;
                    }).collect(Collectors.toList());
                }
                return Level2Vos;
            }));
        }
        return collect;
    }
    /**
     * 首页渲染:获取一级分类数据
     */
    @Cacheable(value = "category",key = "#root.methodName")
    @Override
    public List<CategoryEntity> getCategoryLevel1() {
        System.out.println("getCategoryLevel1");
        List<CategoryEntity> categoryEntities = baseMapper.selectList(new QueryWrapper<CategoryEntity>().eq("parent_cid", 0));
        return categoryEntities;
//        return null;
    }
}
6.14 优化:Spring Cache解决缓存击穿💡
- 读模式(只是本地锁)
- 缓存穿透:spring.cache.redis.cache-null-values=true
- 缓存击穿:@Cacheable(sync = true)
- 缓存雪崩:spring.cache.redis.time-to-live=3600000
/**
 *  原理:
 *    CacheManager(RedisManager) -> Cache(RedisCache) ->Cache负责缓存的读写
 */
@Service("categoryService")
public class CategoryServiceImpl extends ServiceImpl<CategoryDao, CategoryEntity> implements CategoryService {

    /**
     * 使用Spring Cache优化首页分类数据的获取
     */
    @Cacheable(value = "category",key = "#root.methodName",sync = true)
    @Override
    public Map<String, List<CategoryLevel2Vo>> getCatalogJsonBySpringCache() {
        System.out.println("---查询数据库---");
        //缓存所有三级分类数据
        List<CategoryEntity> categoryEntities = baseMapper.selectList(null);
        //1.获取一级分类:将一级分类转换为map进行遍历,自定义key、value
        List<CategoryEntity> categoryLevel1s = getParent_cid(categoryEntities,0l);
        Map<String, List<CategoryLevel2Vo>> collect=null;
        if(categoryLevel1s!=null){
            collect = categoryLevel1s.stream().collect(Collectors.toMap(level1 -> level1.getCatId().toString(), level1 -> {
                //2.通过一级分类id获取二级分类列表进行遍历:封装成CategoryLevel2Vo集合
                List<CategoryEntity> level2s = getParent_cid(categoryEntities,level1.getCatId());
                List<CategoryLevel2Vo> Level2Vos = null;
                if (level2s != null) {
                    //遍历二级分类:封装成CategoryLevel2Vo
                    Level2Vos = level2s.stream().map(level2 -> {
                        CategoryLevel2Vo categoryLevel2Vo = new CategoryLevel2Vo(level2.getCatId().toString(), level2.getName(), level1.getCatId().toString(), null);
                        //3.通过二级分类id获取三级分类列表:封装成CategoryLevel3Vo集合
                        List<CategoryEntity> level3s = getParent_cid(categoryEntities,level2.getCatId());
                        if (level3s != null) {
                            //遍历三级分类:封装成CategoryLevel3Vo
                            List<CategoryLevel2Vo.CategoryLevel3Vo> level3Vos = level3s.stream().map(level3 -> {
                                CategoryLevel2Vo.CategoryLevel3Vo categoryLevel3Vo = new CategoryLevel2Vo.CategoryLevel3Vo(level2.getCatId().toString(), level3.getCatId().toString(), level3.getName());
                                return categoryLevel3Vo;
                            }).collect(Collectors.toList());
                            categoryLevel2Vo.setCatalog3List(level3Vos);
                        }
                        return categoryLevel2Vo;
                    }).collect(Collectors.toList());
                }
                return Level2Vos;
            }));
        }
        return collect;
    }
    /**
     * 首页渲染:获取一级分类数据。使用Spring Cache优化
     */
    @Cacheable(value = "category",key = "#root.methodName",sync = true)
    @Override
    public List<CategoryEntity> getCategoryLevel1() {
        System.out.println("getCategoryLevel1");
        List<CategoryEntity> categoryEntities = baseMapper.selectList(new QueryWrapper<CategoryEntity>().eq("parent_cid", 0));
        return categoryEntities;
//        return null;
    }
}
6.15 优化:Spring Cache解决缓存一致性💡
- 写模式(只是本地锁)
- 读写加锁(类似修改数据时加 redisson 的读写锁,但是这里只是本地锁)
- 引入canal,感知到MySQL的更新去更新数据库
- 读多写多,直接去数据库查询就行
总结:
- 常规数据(读多写少,即时性,一致性要求不高的数据)完全可以使用SpringCache 写模式( 只要缓存数据有过期时间就足够了)
- 特殊数据():特殊设计
-
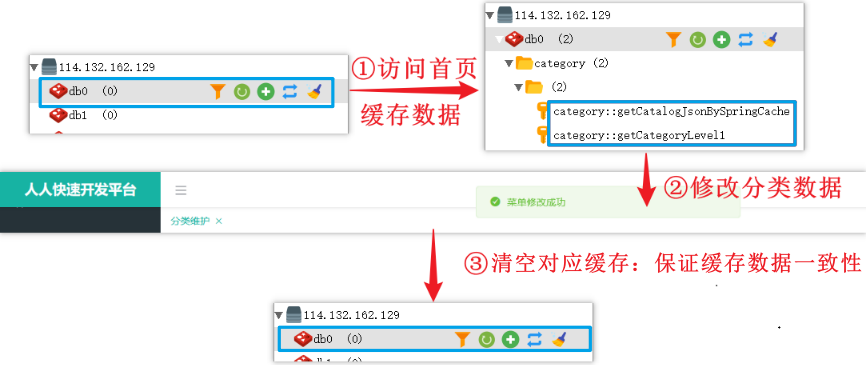
cn.lzwei.bilimall.product.app.CategoryController:分类修改,并更新在其他表中的冗余字段,缓存一致性
@RestController @RequestMapping("product/category") public class CategoryController { @Autowired private CategoryService categoryService; /** * 分类修改:并更新在其他表中的冗余字段,缓存一致性 */ @RequestMapping("/update") public R update(@RequestBody CategoryEntity category){ categoryService.updateCascade(category); return R.ok(); } } -
CategoryService:解决首页缓存一致性
public interface CategoryService extends IService<CategoryEntity> { /** * 分类修改:并更新在其他表中的冗余字段,缓存一致性 */ void updateCascade(CategoryEntity category); } -
CategoryServiceImpl:解决首页缓存一致性
@Service("categoryService")
public class CategoryServiceImpl extends ServiceImpl<CategoryDao, CategoryEntity> implements CategoryService {

    @Resource
    CategoryBrandRelationService categoryBrandRelationService;

    /**1、同时进行多种缓存操作 @Caching
    @Caching(evict = {
      @CacheEvict(value = {"category"},key = "'getCategoryLevel1'"),
      @CacheEvict(value = {"category"},key = "'getCatalogJsonBySpringCache'")
    })*/
    //2、@CacheEvict 失效模式:指定删除某个分区下的所有数据 @CacheEvict(value = {"category"},allEntries = true)
    //存储同一类型的数据,都可以指定成同一分区,分区名默认就是缓存的前缀
    @CacheEvict(allEntries = true,cacheNames = "category")
    @Transactional
    @Override
    public void updateCascade(CategoryEntity category) {
        this.updateById(category);
        //1.更新 品牌分类关联表
        Long catId = category.getCatId();
        String name = category.getName();
        categoryBrandRelationService.updateCategory(catId,name);
        //TODO 分类修改:更新在其他表中的冗余字段
    }
}
6.16 Spring Cache 总结
Spring-Cache的不足分析:
- 读模式(只是本地锁)
- 缓存穿透:spring.cache.redis.cache-null-values=true
- 缓存击穿:@Cacheable(sync = true)
- 缓存雪崩:spring.cache.redis.time-to-live=3600000
- 写模式(只是本地锁)(缓存与数据库不一致)
- 读写加锁(类似修改数据时加 redisson 的读写锁,但是这里只是本地锁)
- 引入canal,感知到MySQL的更新去更新数据库
- 读多写多,直接去数据库查询就行
总结:
- 常规数据(读多写少,即时性,一致性要求不高的数据)完全可以使用SpringCache 写模式( 只要缓存数据有过期时间就足够了)
- 特殊数据():特殊设计


 342
342


 被折叠的 条评论
为什么被折叠?
被折叠的 条评论
为什么被折叠?
 到【灌水乐园】发言


