


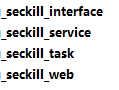
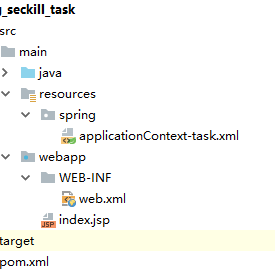
秒杀子模块搭建
搭建interface,不使用骨架
略。
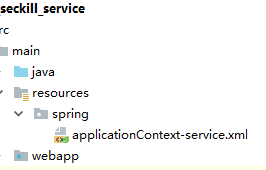
搭建service,使用骨架
1、在resources中添加配置文件
applicationContext-service.xml
applicationContext-service.xml全文如下:(包括dubbo配置,线程池配置和)
<?xml version="1.0" encoding="UTF-8"?>
<beans xmlns="http://www.springframework.org/schema/beans"
	xmlns:xsi="http://www.w3.org/2001/XMLSchema-instance" xmlns:p="http://www.springframework.org/schema/p"
	xmlns:context="http://www.springframework.org/schema/context"
	xmlns:dubbo="http://code.alibabatech.com/schema/dubbo" xmlns:mvc="http://www.springframework.org/schema/mvc"
	xsi:schemaLocation="http://www.springframework.org/schema/beans http://www.springframework.org/schema/beans/spring-beans.xsd
        http://www.springframework.org/schema/mvc http://www.springframework.org/schema/mvc/spring-mvc.xsd
        http://code.alibabatech.com/schema/dubbo http://code.alibabatech.com/schema/dubbo/dubbo.xsd
        http://www.springframework.org/schema/context http://www.springframework.org/schema/context/spring-context.xsd">

	<!-- 访问dubbo要占用的当前主机端口,默认端口不写是20880 -->
	<dubbo:protocol name="dubbo" port="20889"></dubbo:protocol>
	<dubbo:application name="myApplication-seckill-service" />
	<dubbo:registry address="zookeeper://192.168.25.128:2181" />
	<dubbo:annotation package="com.myApplication.seckill.service.impl" />

	<!-- 线程池配置 -->
	<bean id="executor" class="org.springframework.scheduling.concurrent.ThreadPoolTaskExecutor">
		<!-- 核心线程数,默认为1 -->
		<property name="corePoolSize" value="10" />
		<!--最大线程数,默认为Integer.MAX_VALUE -->
		<property name="maxPoolSize" value="50" />
		<!--队列最大长度,一般需要设置值>=notifyScheduledMainExecutor.maxNum;默认为Integer.MAX_VALUE -->
		<property name="queueCapacity" value="10000" />
		<!--线程池维护线程所允许的空闲时间,默认为60s -->
		<property name="keepAliveSeconds" value="300" />
		<!--线程池对拒绝任务(无线程可用)的处理策略,目前只支持AbortPolicy、CallerRunsPolicy;默认为后者
		1. CallerRunsPolicy :这个策略重试添加当前的任务,他会自动重复调用 execute() 方法,直到成功。
		2. AbortPolicy :对拒绝任务抛弃处理,并且抛出异常。
		-->
		<property name="rejectedExecutionHandler">
			<bean class="java.util.concurrent.ThreadPoolExecutor$CallerRunsPolicy" />
		</property>
	</bean>


	<!--雪花算法,解决多表之间的id问题,是自增唯一,但不是连续-->
	<!--后边的两个value,第一个表示第几个数据中心,第二个表示第几台工作机器-->
	<bean id="idWorker" class="util.IdWorker">
		<!-- 工作机器ID:值范围是0-31  数据中心ID:值范围是0-31,两个参数可以不写 -->
		<constructor-arg index="0" value="1"></constructor-arg>
		<constructor-arg index="1" value="0"></constructor-arg>
	</bean>

</beans>
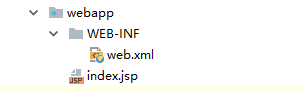
2、在WEB-INF中添加web.xml配置文件web.xml
web.xml全文如下:(配置文件加载、监听器)
注意:在加载配置文件时,classpath*代表将依赖中的对应配置文件也加载;
<?xml version="1.0" encoding="UTF-8"?>
<web-app xmlns:xsi="http://www.w3.org/2001/XMLSchema-instance"
	xmlns="http://java.sun.com/xml/ns/javaee"
	xsi:schemaLocation="http://java.sun.com/xml/ns/javaee http://java.sun.com/xml/ns/javaee/web-app_2_5.xsd"
	version="2.5">

	<!-- 加载spring容器 -->
	<context-param>
		<param-name>contextConfigLocation</param-name>
		<param-value>classpath*:spring/applicationContext*.xml</param-value>
	</context-param>
	<listener>
		<listener-class>org.springframework.web.context.ContextLoaderListener</listener-class>
	</listener>


</web-app>
3、在pom文件中,添加tomcat设置。
 <build>
        <plugins>
            <plugin>
                <groupId>org.apache.tomcat.maven</groupId>
                <artifactId>tomcat7-maven-plugin</artifactId>
                <version>2.2</version>
                <configuration>
                    <!-- 指定端口 -->
                    <port>9009</port>
                    <!-- 请求路径 -->
                    <path>/</path>
                </configuration>
            </plugin>
        </plugins>
    </build>
注意bug:
如果在seckillOrderServiceImpl启动时出现:
java.io.IOException: invalid constant type: 15
解决办法:
在本类的pom文件中添加依赖:
org.javassist
javassist
3.18.2-GA
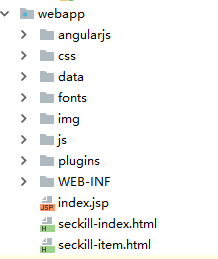
搭建web,使用骨架
1、在webapp中引入静态原型
2、在web.xml中添加配置文件扫描的设置
解决post乱码问题。
servlet核心控制器
security和过滤器链
全文如下:
<?xml version="1.0" encoding="UTF-8"?>
<web-app xmlns:xsi="http://www.w3.org/2001/XMLSchema-instance"
	xmlns="http://java.sun.com/xml/ns/javaee"
	xsi:schemaLocation="http://java.sun.com/xml/ns/javaee http://java.sun.com/xml/ns/javaee/web-app_2_5.xsd"
	version="2.5">
	<!-- 解决post乱码 -->
	<filter>
		<filter-name>CharacterEncodingFilter</filter-name>
		<filter-class>org.springframework.web.filter.CharacterEncodingFilter</filter-class>
		<init-param>
			<param-name>encoding</param-name>
			<param-value>utf-8</param-value>
		</init-param>
		<init-param>
			<param-name>forceEncoding</param-name>
			<param-value>true</param-value>
		</init-param>
	</filter>
	<filter-mapping>
		<filter-name>CharacterEncodingFilter</filter-name>
		<url-pattern>/*</url-pattern>
	</filter-mapping>

	<servlet>
		<servlet-name>springmvc</servlet-name>
		<servlet-class>org.springframework.web.servlet.DispatcherServlet</servlet-class>
		<!-- 指定加载的配置文件 ,通过参数contextConfigLocation加载 -->
		<init-param>
			<param-name>contextConfigLocation</param-name>
			<param-value>classpath:spring/springmvc.xml</param-value>
		</init-param>
	</servlet>

	<servlet-mapping>
		<servlet-name>springmvc</servlet-name>
		<url-pattern>*.do</url-pattern>
	</servlet-mapping>

	<context-param>
		<param-name>contextConfigLocation</param-name>
		<param-value>classpath:spring/spring-security.xml</param-value>
	</context-param>
	<listener>
		<listener-class>org.springframework.web.context.ContextLoaderListener</listener-class>
	</listener>

	<filter>
		<filter-name>springSecurityFilterChain</filter-name>
		<filter-class>org.springframework.web.filter.DelegatingFilterProxy</filter-class>
	</filter>
	<filter-mapping>
		<filter-name>springSecurityFilterChain</filter-name>
		<url-pattern>/*</url-pattern>
	</filter-mapping>

	<welcome-file-list>
		<welcome-file>seckill-index.html</welcome-file>
	</welcome-file-list>

</web-app>
3、在resources中添加配置文件spring-security.xml和springmvc.xml
spring-security.xml中配置的是security框架和cas单点登录配置。在springmvc中配置的是dubbo服务的引用,和mvc注解支持。
spring-security.xml全文如下:
<?xml version="1.0" encoding="UTF-8"?>
<beans:beans xmlns="http://www.springframework.org/schema/security"
	xmlns:beans="http://www.springframework.org/schema/beans" xmlns:xsi="http://www.w3.org/2001/XMLSchema-instance"
	xsi:schemaLocation="http://www.springframework.org/schema/beans
						http://www.springframework.org/schema/beans/spring-beans.xsd
						http://www.springframework.org/schema/security
						http://www.springframework.org/schema/security/spring-security.xsd">

	<http pattern="/css/**" security="none"></http>
	<http pattern="/js/**" security="none"></http>
	<http pattern="/img/**" security="none"></http>
	<http pattern="/plugins/**" security="none"></http>
	<http pattern="/seckill*.html" security="none"></http>
	<!-- 添加购物车可以不用登录,存到cookie中 -->

	<!--   entry-point-ref  入口点引用 -->
	<http use-expressions="false" entry-point-ref="casProcessingFilterEntryPoint">
		<intercept-url pattern="/seckillOrder/add.do" access="IS_AUTHENTICATED_ANONYMOUSLY"/>
        <intercept-url pattern="/seckillGoods/findOne.do" access="IS_AUTHENTICATED_ANONYMOUSLY"/>
        <intercept-url pattern="/seckillGoods/findSeckillList.do" access="IS_AUTHENTICATED_ANONYMOUSLY"/>
        <intercept-url pattern="/**" access="ROLE_USER"/>
        <csrf disabled="true"/>
        <!-- custom-filter为过滤器, position 表示将过滤器放在指定的位置上,before表示放在指定位置之前  ,after表示放在指定的位置之后  -->
        <custom-filter ref="casAuthenticationFilter"  position="CAS_FILTER" />
        <custom-filter ref="requestSingleLogoutFilter" before="LOGOUT_FILTER"/>
        <custom-filter ref="singleLogoutFilter" before="CAS_FILTER"/>
    </http>

  	<!-- CAS入口点 开始 -->
    <beans:bean id="casProcessingFilterEntryPoint" class="org.springframework.security.cas.web.CasAuthenticationEntryPoint">
        <!-- cas登录服务器登录URL -->
        <beans:property name="loginUrl" value="http://localhost:8080/cas/login"/>
        <beans:property name="serviceProperties" ref="serviceProperties"/>
    </beans:bean>
    <beans:bean id="serviceProperties" class="org.springframework.security.cas.ServiceProperties">
        <!--service 配置自身工程的根地址+/login/cas   -->
        <beans:property name="service" value="http://localhost:9109/login/cas"/>
    </beans:bean>
    <!-- CAS入口点 结束 -->


    <!-- 认证过滤器 开始 -->
    <beans:bean id="casAuthenticationFilter" class="org.springframework.security.cas.web.CasAuthenticationFilter">
        <beans:property name="authenticationManager" ref="authenticationManager"/>
    </beans:bean>
		<!-- 认证管理器 -->
	<authentication-manager alias="authenticationManager">
		<authentication-provider  ref="casAuthenticationProvider">
		</authentication-provider>
	</authentication-manager>
		<!-- 认证提供者 -->
	<beans:bean id="casAuthenticationProvider"     class="org.springframework.security.cas.authentication.CasAuthenticationProvider">
        <beans:property name="authenticationUserDetailsService">
            <beans:bean class="org.springframework.security.core.userdetails.UserDetailsByNameServiceWrapper">
                <beans:constructor-arg ref="userDetailService" />
            </beans:bean>
        </beans:property>
        <beans:property name="serviceProperties" ref="serviceProperties"/>
        <!-- ticketValidator 为票据验证器 -->
        <beans:property name="ticketValidator">
            <beans:bean class="org.jasig.cas.client.validation.Cas20ServiceTicketValidator">
                <!-- 设置cas票据验证地址 -->
                <beans:constructor-arg index="0" value="http://localhost:8080/cas"/>
            </beans:bean>
        </beans:property>
        <beans:property name="key" value="an_id_for_this_auth_provider_only"/>
    </beans:bean>
     <!-- springScurity认证类 -->
	<beans:bean id="userDetailService" class="com.pinyougou.user.service.UserDetailServiceImpl"/>

	<!-- 认证过滤器 结束 -->


	<!-- 单点登出  开始  -->
    <beans:bean id="singleLogoutFilter" class="org.jasig.cas.client.session.SingleSignOutFilter"/>
    <beans:bean id="requestSingleLogoutFilter" class="org.springframework.security.web.authentication.logout.LogoutFilter">
        <beans:constructor-arg value="http://localhost:8080/cas/logout?service=http://localhost:9109/"/>
        <beans:constructor-arg>
            <beans:bean class="org.springframework.security.web.authentication.logout.SecurityContextLogoutHandler"/>
        </beans:constructor-arg>
        <!-- 将本地/logout/cas和 64行退出后的部分进行绑定 -->
        <beans:property name="filterProcessesUrl" value="/logout/cas"/>
    </beans:bean>
    <!-- 单点登出  结束 -->

</beans:beans>
springmvc.xml全文如下:
<?xml version="1.0" encoding="UTF-8"?>
<beans xmlns="http://www.springframework.org/schema/beans"
	xmlns:xsi="http://www.w3.org/2001/XMLSchema-instance" xmlns:p="http://www.springframework.org/schema/p"
	xmlns:context="http://www.springframework.org/schema/context"
	xmlns:dubbo="http://code.alibabatech.com/schema/dubbo" xmlns:mvc="http://www.springframework.org/schema/mvc"
	xsi:schemaLocation="http://www.springframework.org/schema/beans http://www.springframework.org/schema/beans/spring-beans.xsd
        http://www.springframework.org/schema/mvc http://www.springframework.org/schema/mvc/spring-mvc.xsd
        http://code.alibabatech.com/schema/dubbo http://code.alibabatech.com/schema/dubbo/dubbo.xsd
        http://www.springframework.org/schema/context http://www.springframework.org/schema/context/spring-context.xsd">

	<mvc:annotation-driven>
		<mvc:message-converters register-defaults="true">
			<bean
				class="com.alibaba.fastjson.support.spring.FastJsonHttpMessageConverter">
				<property name="supportedMediaTypes" value="application/json" />
				<property name="features">
					<array>
						<value>WriteMapNullValue</value>
						<value>WriteDateUseDateFormat</value>
					</array>
				</property>
			</bean>
		</mvc:message-converters>
	</mvc:annotation-driven>

	<!-- 引用dubbo 服务 -->
	<dubbo:application name="pinyougou-seckill-web" />
	<dubbo:registry address="zookeeper://192.168.25.128:2181" />
	<dubbo:annotation package="com.pinyougou.seckill.controller" />

</beans>
商家维护秒杀商品列表实现
思路说明:
前端需要后端返回数据,显示在商家后台(shop-web)的秒杀商品管理中。
在商家后台管理shop-web模块中引用search.do的查询方法,在后端控制器controller中改造search方法,传入sellerid(商家名称),sellerid通过springsecurity来获取。在实现类中的对应search的方法中,将seckillGoods的sellerId设置进去。然后将模糊查询条件改为准确查询(去掉两个百分号)。这样就实现了查询当前商家下的所有秒杀商品列表。
springTesk的demo
定时任务demo演示。
1、在pom文件中设置tomcat。
    <build>
        <plugins>
            <plugin>
                <groupId>org.apache.tomcat.maven</groupId>
                <artifactId>tomcat7-maven-plugin</artifactId>
                <version>2.2</version>
                <configuration>
                    <!-- 指定端口 -->
                    <port>9010</port>
                    <!-- 请求路径 -->
                    <path>/</path>
                </configuration>
            </plugin>
        </plugins>
    </build>
2、在resources配置文件中添加配置文件

applicationContext-task.xml中配置了两个东西,一个是包扫描,用来扫描定时任务的实现类,一个是注解驱动。
<?xml version="1.0" encoding="UTF-8"?>
<beans xmlns="http://www.springframework.org/schema/beans"
	xmlns:xsi="http://www.w3.org/2001/XMLSchema-instance"
	xmlns:p="http://www.springframework.org/schema/p"
	xmlns:context="http://www.springframework.org/schema/context"
	xmlns:task="http://www.springframework.org/schema/task"
	xsi:schemaLocation="http://www.springframework.org/schema/beans
						http://www.springframework.org/schema/beans/spring-beans.xsd
       				 	http://www.springframework.org/schema/context
       				 	http://www.springframework.org/schema/context/spring-context.xsd
        				http://www.springframework.org/schema/task
        				http://www.springframework.org/schema/task/spring-task.xsd">

	 <!-- 包扫描 -->
     <context:component-scan base-package="com.pinyougou.seckill.task"></context:component-scan>
     <!-- 开启注解驱动 -->
     <task:annotation-driven/>
</beans>
3、在web.xml文件中配置了加载配置文件来生成spring容器的配置和监听器。

注意:在classpath后有*号,代表将pom文件中的所有依赖中的配置文件都加载。
4、在实现类中创建方法,使用Scheduled注解,cron表达式也叫七子域表达式

定时任务将秒杀添加到redis
@Component
public class SeckillTask {

    @Autowired
    private RedisTemplate redisTemplate;

    @Autowired
    private TbSeckillGoodsMapper seckillGoodsMapper;

    /**
     * 定时查询数据库将秒杀商品添加到redis中
     * Scheduled定时任务 cron表达式(七子域表达式)
     * <p>
     * 秒 分 时 日 月 周   (quartz中有 年 域)
     * <p>
     * quartz也可以省略年 写六位
     */
    @Scheduled(cron = "0/3 * * * * ?")
    public void seckillGoodsToRedis() {
       /* SimpleDateFormat simpleDateFormat  = new SimpleDateFormat("yyyy年MM月dd日 hh:mm:ss");
        System.out.println(simpleDateFormat.format(new Date()));*/

        //定时查询数据库中符合条件的商品加入数据库中
       // String name = SecurityContextHolder.getContext().getAuthentication().getName();
        TbSeckillGoodsExample example = new TbSeckillGoodsExample();
        example.createCriteria().andEndTimeGreaterThan(new Date())
                .andStartTimeLessThanOrEqualTo(new Date())
                .andStatusEqualTo("1")
                .andStockCountGreaterThanOrEqualTo(0)
                ;

        List<TbSeckillGoods> seckillGoods = seckillGoodsMapper.selectByExample(example);
        //将所有商品加入到redis中
        for (TbSeckillGoods seckillGood : seckillGoods) {

            System.out.println("存入redis的商品是:"+seckillGood.getId());

            redisTemplate.boundHashOps("seckill_goods").put(seckillGood.getId(),seckillGood);

            System.out.println("从redis取出的商品是:"+((TbSeckillGoods)redisTemplate.boundHashOps("seckill_goods").get(seckillGood.getId())).getId());

            //为了解决超卖问题,将每个商品添加到redis的list中(让什么无所谓,可以是id,我们只要判断不是null即可)
            for (Integer i = 0; i < seckillGood.getStockCount(); i++) {
                redisTemplate.boundListOps("seckill_goods_queue_"+seckillGood.getId()).leftPush(seckillGood.getId());
            }
        }
        System.out.println("=====导入商品数:"+seckillGoods.size());
    }
}
商品从redis中获取显示在页面上
1、在seckill-web的controller中添加查询方法findSeckillList
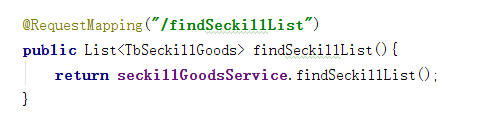
2、在对应的impl实现类实现方法,这里需要获取所有商家的所有秒杀商品显示在页面上,所以获取values即可。

前端秒杀倒计时
app.controller('seckillController',function($scope,$location,seckillService,$interval){

	$scope.findSeckillList = function(){
		seckillService.findSeckillList().success(
				function(response){
					$scope.seckillList = response;
				}
		)
	}

	$scope.findOne = function(){
		var id = $location.search()['goodsId'];
		if(id!=null){
			seckillService.findOne(id).success(
					function(response){
						$scope.entity = response;

						 //计算出剩余时间
			            var endTime = new Date($scope.entity.endTime).getTime();
			            var nowTime = new Date().getTime();

			            //剩余时间
			            $scope.secondes =Math.floor( (endTime-nowTime)/1000 );

			            var time =$interval(function () {
			                if($scope.secondes>0){
			                    //时间递减
			                    $scope.secondes--;
			                    //时间格式化
			                    $scope.timeString=convertTimeString($scope.secondes);
			                }else{
			                    //结束时间递减
			                    $interval.cancel(time);
			                }
			            },1000);
					}
			)
		}

	}

	//距离结束时间
	convertTimeString=function (allseconds) {
	    //计算天数(所有秒数除每天的秒数) 通过Math.floor向下取整
	    var days = Math.floor(allseconds/(60*60*24));

	    //小时      (所有秒数- 天数的所有秒数,剩下的秒数除以 一小时有多少秒) 通过Math.floor向下取整
	    var hours =Math.floor( (allseconds-(days*60*60*24))/(60*60) );

	    //分钟     (所有秒数 - 天数的秒数 - 小时的秒数 ,最后的秒数除以 一分钟有多少秒)
	    var minutes = Math.floor( (allseconds-(days*60*60*24)-(hours*60*60))/60 );

	    //秒
	    var seconds = allseconds-(days*60*60*24)-(hours*60*60)-(minutes*60);

	    //拼接时间
	    var timString="";
	    if(days>0){
	        timString=days+"天:";
	    }
	    if(hours<10){
	    	hours = "0" + hours;
	    }
	    if(minutes<10){
	    	minutes = "0" + minutes;
	    }
	    if(seconds<10){
	    	seconds = "0" + seconds;
	    }

	    return timString+=hours+":"+minutes+":"+seconds;
	}

	//秒杀下单saveSeckillOrder
	$scope.saveSeckillOrder = function(){
		//保存订单后->跳转到支付
		seckillService.saveSeckillOrder($scope.entity.id).success(
				function(response){
					if(response.success){
						alert("下单成功,进行支付操作")
					}else{
						alert(response.message);
					}
				}
		)
	}
})
秒杀下单保存到数据库
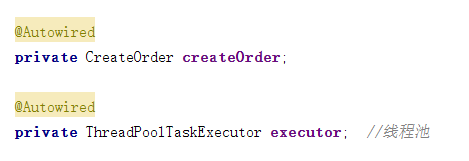
秒杀模块并发量肯定会非常高,所以,在处理秒杀下单操作时,不能在本类中insert操作。需要开子线程,在子线程中保存数据库。
1、在创建添加新的订单时,需要传入一个参数,即具体商品的id(即sku的id,即生成的秒杀商品的自增id(数据库中有,第一列),注意不是goodsId)
一会还会修改这个方法传入的参数,需要添加一个userId,后边会说到。
(粘贴的是添加userId后的方法)

2、需要根据传入的id,从redis中的商品数量-1,然后再存入到redis中。


3、根据从redis中取出的goods来创建order订单。(id使用了雪花算法)

4、为了保证秒杀执行效率,所以不在本类中进行插入操作。
在redis中新建list对象,通过leftPush和在子线程中的rightPop顺次取出order对象,保存数据库。
先将子线程类引入,将线程池ThreadPoolTaskExecutor引入

子线程保存数据库
在这个service实现类中创建子线程类,实现Runnable接口
@Component
public class CreateOrder implements Runnable {

    @Autowired
    private RedisTemplate redisTemplate;

    @Autowired
    private TbSeckillGoodsMapper seckillGoodsMapper;

    @Autowired
    private TbSeckillOrderMapper seckillOrderMapper;

    @Override
    public void run() {
        //从redis中取出order
        TbSeckillOrder order = (TbSeckillOrder) redisTemplate.boundListOps("seckill_order").rightPop();
        //保存订单
        seckillOrderMapper.insert(order);

        //将seckill_goods的库存量-1 保存到数据库(在主线程中的-1操作是操作的redis中的库存量)
        TbSeckillGoods goods = seckillGoodsMapper.selectByPrimaryKey(order.getSeckillId());
        goods.setStockCount(goods.getStockCount()-1);
        //更新goods信息
        seckillGoodsMapper.updateByPrimaryKey(goods);
    }
}
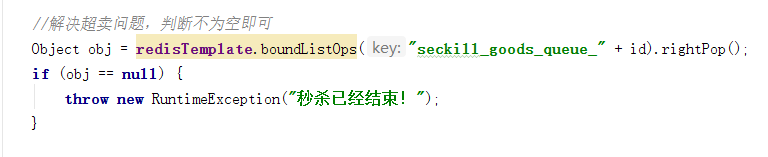
超卖问题
1、在redis存入秒杀商品时,根据id将所有的商品每一个都添加到redis中的list中,存入的数据是什么无所谓,这里传入的是seckillgoodsId。
(具体代码在上边写了)
2、在创建订单的seckillOrderServiceImpl类中,根据id取出每一个存入的商品数据,只要判断不为空即可,代表还有商品。
抢购过商品之后的用户不可以重复抢购
如果redis中的商品数量-1时代表已经购买成功,将此时的用户id存入redis的set(不可重复)中。然后在本类的最上边(在redis弹出商品之前)进行判断,如果已经存在该用户的id,抛出已经购买的异常。


验证秒杀订单保存数据库减少秒杀商品数量的演示
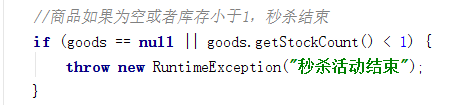
如果从redis中取出的goods是null或者goods的库存数小于1,抛出异常:秒杀活动结束。
如果商品的库存数位0,从redis中移除商品

在controller中,判断是否登录,如果未登录,提示去登录。
注意:在这里需要在security配置文件中注意不能将所有的方法放行,将需要的方法放行即可。我们需要让security拦截一部分,让我们登录。


 844
844


 被折叠的 条评论
为什么被折叠?
被折叠的 条评论
为什么被折叠?
 到【灌水乐园】发言


