


步骤:
第一步:在pom文件中添加依赖
<!-- 引⼊freemarker模板引擎的依赖 -->
 <dependency>
 <groupId>org.springframework.boot</groupId>
 <artifactId>spring-boot-starter-freemarker</artifactId>
 </dependency>
第二步:在application.properties中添加配置
# 是否开启thymeleaf缓存,本地为false,⽣产建议为true
spring.freemarker.cache=false
spring.freemarker.charset=UTF-8
spring.freemarker.allow-request-override=false
spring.freemarker.check-template-location=true

#类型
spring.freemarker.content-type=text/html
spring.freemarker.expose-request-attributes=true
spring.freemarker.expose-session-attributes=true

#⽂件后缀
spring.freemarker.suffix=.ftl
#路径
spring.freemarker.template-loader-path=classpath:/templates/
第三步:在templas文件夹下建立fm文件夹再在fm文件夹下建立user,然后在文价夹中创建index.ftl文件(可以先创建html文件获取内容模板然后再改名)

第四步:编写Controller调用模板引擎
代码:
//注意因为是调用页面所以不使用ResetController
@Controller
@RequestMapping("freemarker")
public class FreemakerController {
//加载之前的配置文件信息
    @Autowired
    private PayConfig_test payConfig_test;

    @GetMapping("test")
    public String index(ModelMap modelMap){
        modelMap.addAttribute("setting",payConfig_test);

        //不用加后缀因为配置文件已经加了后缀
        return "fm/user/index";
    }
}
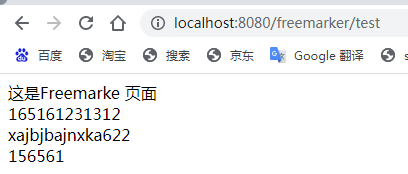
测试结果:


 20万+
20万+


 被折叠的 条评论
为什么被折叠?
被折叠的 条评论
为什么被折叠?
 到【灌水乐园】发言


