


文章目录
- 1.flashcp升级:查看当前跑的image是在物理上的哪块flash:cat /run/media/slot(0是主,1是从)
- 2.busctl/redfish升级:只有离线用.mtd(bin)文件,其他都用.mtd.tar
- 3.web升级代码流程:journalctl -u xyz.openbmc_project.Software.Version查升级状态, 也可用ps | grep flashcp,tail -f /var/log/redfish,升级时如果遇到machine name不匹配的错误, 修改/etc/os-release中OPENBMC_TARGET_MACHINE变量
- 4.dual flash:一块flash挂了,BMC会自动切换到另一块flash上启动 (最底层依赖FMC/SPI0中的CS0和CS1)
- 5.安全启动:解压mtd.all.tar(包含release note等)后再解压里面的.tar(包含image-...)
1.flashcp升级:查看当前跑的image是在物理上的哪块flash:cat /run/media/slot(0是主,1是从)
# upgrade_bmc:通过/run/media/slot确认当前在跑的BMC然后根据脚本入参确认需要升级的flash,然后通过flashcp把对应的tmp/deploy/images/<platform>: image-u-boot,image-kernel(uimage),image-rofs,image-rwfs烧录到对应的分区里(/dev/mtdX)

# image-bmc或flash-<platform>  →  obmc-phosphor-image-<platform>-<timestamp>.static.mtd  # BMC完整的flash镜像文件
# image-u-boot  →  u-boot.bin  # OpenBMC bootloader
# image-kernel  →  fitImage-obmc-phosphor-initramfs-<platform>.bin  # OpenBMC内核FIT映像(包括内核、设备树和initramfs)
# image-rofs  →  obmc-phosphor-image-<platform>.squashfs-xz  # 只读的OpenBmc文件系统,放rootfs, 可在内存中修改,重启恢复
# image-rwfs  →  rwfs.jffs2   # 持续更改的OpenBmc读写文件系统,jffs2格式,随便放,相当于fb openbmc的/mnt/data和/var/log,重启保持

pidfile_bmc="/var/run/update_bmc.pid"
tmp_image="/tmp/tmp_image"
image="/tmp/tmp_image/image-"  # 需要删除解压后文件的前缀即删除imglist中image-
imglist="image-u-boot image-kernel image-rofs image-rwfs"
current_image=$(cat /run/media/slot)
usage()
{
    program=$(basename "$0")
    echo "Usage: $program"
    echo "$program <master/slave> ./image.bin   master:The first flash in physics"
}
check_duplicate_process()
{
    exec 9<>"$pidfile_bmc"
    flock -n 9 || (echo "Another process is running" ; exit 1)
    ret=$?
    if [ $ret -eq 1 ]; then
        exit 1
    fi
    pid=$$
    echo $pid >&9
}
check_parameter()
{
    if [ "$#" -ne "2" ] || [[ "$image_m_s" != "master"  &&  "$image_m_s" != "slave" ]] ;then
        usage
        exit 1
    fi
}
tar_image()
{
    rm -rf $tmp_image
    mkdir $tmp_image
    tar -vxf $image_patch -C $tmp_image >/dev/null  # 解压tar包
}
findmtd() {
    m=$(grep -xl "$1" /sys/class/mtd/*/name)
    m=${m%/name}
    m=${m##*/}
    echo $m
}
image_m_s=$1    # master/slave
image_patch=$2   # image.bin , bin文件也可是压缩文件
check_duplicate_process
check_parameter "$@"
tar_image "$@"
if [[ "$image_m_s" == "master" && "$current_image" == "0" ]] || [[ "$image_m_s" == "slave" && "$current_image" == "1" ]]; then
    for f in $imglist  # update first flash in physics
    do
        f=$tmp_image/$f
        if test ! -s $f
        then
            echo "Skipping empty update of ${f#$image}."
            continue
        fi
        m=$(findmtd ${f#$image})  # m=mtd1...
        echo "Updating ${f#$image}..."
        flashcp -v $f /dev/$m
    done
elif [[ "$image_m_s" == "master" && "$current_image" == "1" ]] || [[ "$image_m_s" == "slave" && "$current_image" == "0" ]]; then
    for f in $imglist  # update second flash in physics
    do
        f=$tmp_image/$f
        if test ! -s $f
        then
            echo "Skipping empty update of ${f#$image}."
            continue
        fi
        m=$(findmtd alt-${f#$image})
        echo "Updating alt-${f#$image}..."
        flashcp -v $f /dev/$m
    done
else
    echo "Error current_image=$current_image"
fi
rm -rf $tmp_image
reboot
2.busctl/redfish升级:只有离线用.mtd(bin)文件,其他都用.mtd.tar
Image_ID=$(ls /tmp/images/) # .tar拷贝到/tmp/images/,如果被移除则直接拷贝到/run/initramfs/并tar -xf解压并rm -rf image-*sig删除签名文件
busctl set-property xyz.openbmc_project.Software.BMC.Updater /xyz/openbmc_project/software/$Image_ID xyz.openbmc_project.Software.Activation RequestedActivation s xyz.openbmc_project.Software.Activation.RequestedActivations.Active # reboot(rm -rf /run/systemd/system/reboot.target.d/reboot-guard.conf,不能自动重启参考【c/c++2】systemd章节)会自动升级
# 主从切换:busctl set-property xyz.openbmc_project.Software.BMC.Updater /xyz/openbmc_project/software/434f3e07 xyz.openbmc_project.Software.RedundancyPriority Priority y 0 。使能对应的BMC后,bmc会立刻重启。Priority优先级即当前在跑的image是0,没在跑的image是1。
root@bmc-maca4bf018d152a:~# busctl tree xyz.openbmc_project.Software.BMC.Updater
`-/xyz
`-/xyz/openbmc_project
`-/xyz/openbmc_project/software
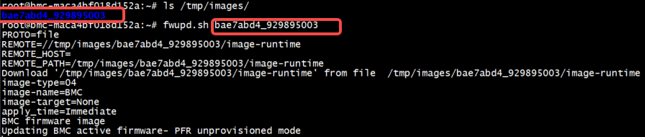
|-/xyz/openbmc_project/software/bae7abd4_718548925 (将要升级的)
`-/xyz/openbmc_project/software/bmc_active (正在运行的)
# redfish_update_BMC.sh
#!/bin/sh
usage() {
echo "Usage: update BMC thought redfish or BMC factory reset"
echo "Examples:"
echo " $(basename $0) 10.75.159.18 imagefile"
echo " $(basename $0) 10.75.159.18 f"
echo " $(basename $0) 10.75.159.18 imagefile f"
}
# curl: Failed to connect to 10.75.159.87 port 443: Connection refused: bmcweb后台没有启动即https服务未启
bmc=$1 # bmc ip,POST创建新资源,PATCH更新资源
token=`curl -k -H "Content-Type: application/json" -X POST https://$bmc/login -d '{"username" : "root", "password" : "0penBmc"}' | grep token | awk '{print $2;}' | tr -d '"'`
uri=$(curl -k -H "X-Auth-Token: $token" https://$bmc/redfish/v1/UpdateService |grep '"HttpPushUri"' | awk -F '"' '{print $4;}')
echo "token=$token uri=$uri" #打印log
# 1.恢复出厂设置不升级(删除文件系统中的一些后期文件,立刻重启BMC系统):redfish_update_BMC.sh 10.75.137.72 f
if [ $# -eq 2 ] && [ "$2" = "f" ]; then
curl -k -H "X-Auth-Token: $token" -X POST https://$bmc/redfish/v1/Managers/bmc/Actions/Manager.ResetToDefaults -d '{"ResetToDefaultsType": "ResetAll"}'
# 2.保留配置升级(升级完FW后立刻自动重启后生效, Immediate改为OnReset即升级完FW后等待下一次重启后生效):redfish_update_BMC.sh 10.75.137.72 ./obmc-phosphor-image-sr.static.mtd.tar
elif [ $# -eq 2 ]; then
curl -k -H "X-Auth-Token: $token" -X PATCH -d '{"HttpPushUriOptions": {"HttpPushUriApplyTime": {"ApplyTime": "Immediate"}}}' https://$bmc/redfish/v1/UpdateService
sleep 1
curl -k -H "X-Auth-Token: $token" -H "Content-Type: application/octet-stream" -X POST -T $2 https://$bmc$uri #升级的FW将被拷贝到/tmp/image/下-->对应的接收函数时bmcweb模块的handleUpdateServicePost函数底层也是调用Activation Dbus
# 3.不保留配置升级:redfish_update_BMC.sh 10.75.137.72 ./obmc-phosphor-image-sr.static.mtd.tar f
elif [ $# -eq 3 ] && [ "$3" = "f" ]; then
# 上面3个curl一起
else
usage
fi
恢复出厂curl访问redfish最终会通过工具fw_setenv(添加:PREFERRED_PROVIDER_u-boot-fw-utils ?= “u-boot-fw-utils-aspeed-sdk” )设置uboot的openbmconce变量:utils::execute("/sbin/fw_setenv", "openbmconce", "factory-reset")。在BMC启动过程中会启动obmc-init.sh脚本获取openbmconce变量值来确认是否恢复出厂设置(本质是删除flash中的RW分区:flash_eraseall /dev/$rwfs)。uboot操作完env要test -n $envflag || setenv envflag 1 && saveenv(保证只第一次saveenv写进u-boot-env分区)。

修改ocp_openbmc/poky/meta/recipes-core/os-release/os-release.bb的VERSION_ID或classes/openbmc_version.bbclass(version = “…”)就可获得不同版本号。
build$ strings ./tmp/deploy/images/obmc-hq/flash-obmc-hq  | grep U-Boot
U-Boot 2016.07 v1.0a.00 (Mar 07 2024 - 06:54:47 +0000)
build$ cat ./tmp/work/obmc_hq-fb-linux-gnueabi/obmc-hq-image/1.0-r0/rootfs/etc/os-release(issue, version, /proc/version看内核版本)
3.web升级代码流程:journalctl -u xyz.openbmc_project.Software.Version查升级状态, 也可用ps | grep flashcp,tail -f /var/log/redfish,升级时如果遇到machine name不匹配的错误, 修改/etc/os-release中OPENBMC_TARGET_MACHINE变量
3.1 webui:根据网页提示定位到webui-vue/src/locales/en-US.json中updateStartedMessage
根据this.infoToast(updateStartedMessage)再定位到webui-vue/src/views/Operations/Firmware/FirmwareFormUpdate.vue中updateFirmware方法中的firmware/uploadFirmware方法

// webui-vue/src/store/modules/Operations/FirmwareStore.js
const FirmwareStore = {
	...
    async uploadFirmware({ state, dispatch }, image) {
      if (state.applyTime !== 'Immediate') {  // 强制设为立即重启
        await dispatch('setApplyTimeImmediate');
      }
      return await api
        .post(state.httpPushUri, image, { // httpPushUri赋值/redfish/v1/UpdateService,post方法
          headers: { 'Content-Type': 'application/octet-stream' },
        })
        .catch((error) => {
          console.log(error);
          throw new Error(i18n.t('pageFirmware.toast.errorUpdateFirmware'));
        });
    },
}
3.2 redfish:webui-vue通过redfish调用bmcweb
// bmcweb/redfish-core/include/redfish.hpp
namespace redfish
{
class RedfishService
{
  public:
    explicit RedfishService(App& app)
    {
    	requestRoutesUpdateService(app);  // 执行./bmcweb会调用,创建RedfishService对象时,此构造函数会自动调用
    }
// bmcweb/redfish-core/lib/update_service.hpp
inline void requestRoutesUpdateService(App& app)
{
...
asyncResp->res.jsonValue["HttpPushUri"] ="/redfish/v1/UpdateService/update";
...
BMCWEB_ROUTE(app, "/redfish/v1/UpdateService/")
.privileges(redfish::privileges::postUpdateService)
.methods(boost::beast::http::verb::post)(
handleUpdateServicePost(app, req, asyncResp); // post方法
inline void handleUpdateServicePost(App& app, const crow::Request& req,
const std::shared_ptr<bmcweb::AsyncResp>& asyncResp)
{
if (boost::iequals(contentType, "application/octet-stream")) // webui中设置过
{
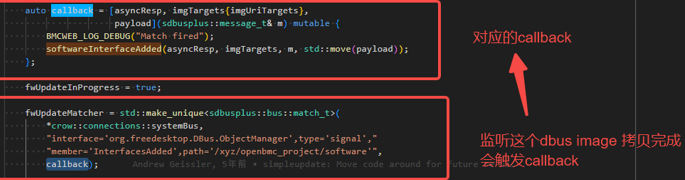
monitorForSoftwareAvailable(asyncResp, req, "/redfish/v1/UpdateService",
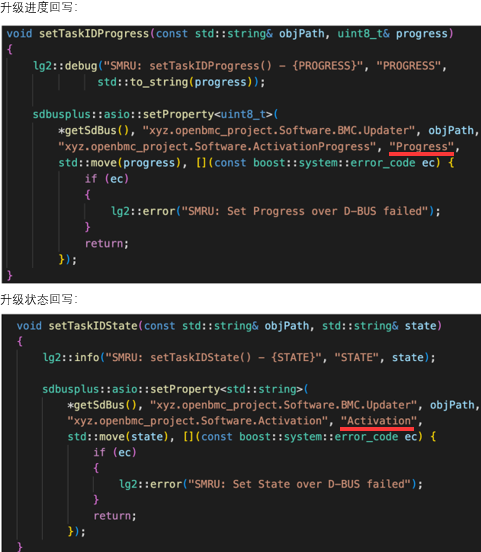
httpPushUriTargets); // 里面调用softwareInterfaceAdded方法再调用xyz.openbmc_project.Software.Activation的属性:auto Activation::activation(Activations value)
uploadImageFile(asyncResp->res, req.body());
}
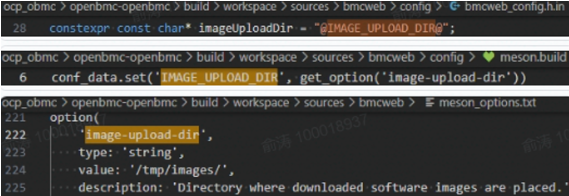
inline void uploadImageFile(crow::Response& res, std::string_view body) // 接收FW放到/tmp/images下
{
std::filesystem::path filepath(imageUploadDir + bmcweb::getRandomUUID());
如下在monitorForSoftwareAvailable函数中。
3.3 dubs:bmcweb通过dbus调用phosphor-software-manager
// phosphor-software-manager/item_updater_main.cpp
int main()
{
	// 这行实例化调用构造函数,构造函数调用processBMCImage,processBMCImage调用getBMCVersion读取/etc/os-release文件中VERSION_ID字段,读取不到该字段时进程会退出
	// 如下在dbus总线上注册
    bus.request_name(BUSNAME_UPDATER); // meson.build: conf.set_quoted('BUSNAME_UPDATER', 'xyz.openbmc_project.Software.BMC.Updater')
}
// phosphor-software-manager/activation.cpp
auto Activation::activation(Activations value) -> Activations
{
	flashWrite();  // 2种方法
	onFlashWriteSuccess();  // 里面有 if (Activation::checkApplyTimeImmediate() == true) {Activation::rebootBmc();}
}
// phosphor-software-manager/static/flash.cpp
void Activation::flashWrite()
{
#ifndef FWUPD_SCRIPT
#ifdef BMC_STATIC_DUAL_IMAGE   // 当前在从, 跑obmc-flash-bmc-alt@.service
    if (parent.runningImageSlot != 0)
    {
        // It's running on the secondary chip, update the primary one
        info("Flashing primary flash from secondary, id: {ID}", "ID",
             versionId);
        auto method = bus.new_method_call(SYSTEMD_BUSNAME, SYSTEMD_PATH,
                                          SYSTEMD_INTERFACE, "StartUnit");
        auto serviceFile = FLASH_ALT_SERVICE_TMPL + versionId + ".service";
        method.append(serviceFile, "replace");
        bus.call_noreply(method);
        return;
    }
#endif   当前在主,拷贝/tmp/images/xxx到/run/initramfs里
    // For static layout code update, just put images in /run/initramfs.
    // It expects user to trigger a reboot and an updater script will program the image to flash during reboot.
    // 如果可执行文件/run/initramfs/shutdown存在,在关机时systemd将使用它跳回initrd,shutdown脚本会检测/run/initramfs/下的image文件,如果有则使用flashcp烧录对应flash分区
    fs::path uploadDir(IMG_UPLOAD_DIR);
    fs::path toPath(PATH_INITRAMFS);
    for (const auto& bmcImage : parent.imageUpdateList)
    {
        std::error_code ec;
        fs::copy_file(uploadDir / versionId / bmcImage, toPath / bmcImage,
                      fs::copy_options::overwrite_existing, ec);
    }

#else  // FWUPD_SCRIPT
    auto method = bus.new_method_call(SYSTEMD_BUSNAME, SYSTEMD_PATH,
                                      SYSTEMD_INTERFACE, "StartUnit");
    method.append("fwupd@" + versionId + ".service", "replace");  // 该服务调fwupd.sh脚本用mtd-util工具烧录flash
    bus.call_noreply(method);
#endif // FWUPD_SCRIPT
}

编译image的时候需要使用intel默认的key编译code。不需要手动使用scripts/gen-bmc-sign-keys.py加密。因为升级BMC时,当前image的key和要升级的image的key需要使用同一套key才能正常在线升级。fwupd.sh里会hexdump image文件判断key。
3.4 initramfs:替代initrd(rd:ram disk,目的:为了内核中保留少量启动代码,将要加载的模块放在initrd即用户态中,不足:基于块设备/dev/initrd即需要内核有文件系统驱动,大小固定,小了导致init脚本放不下)
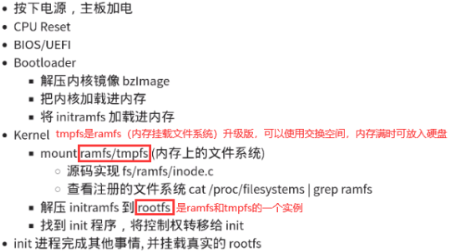
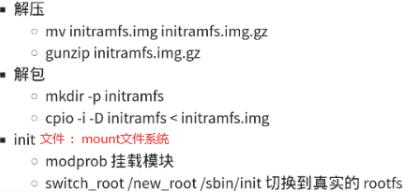
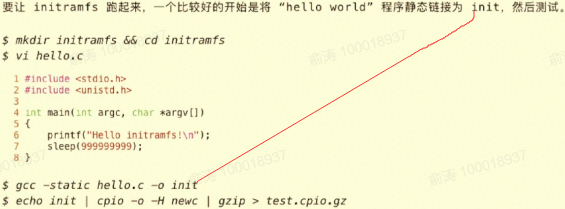
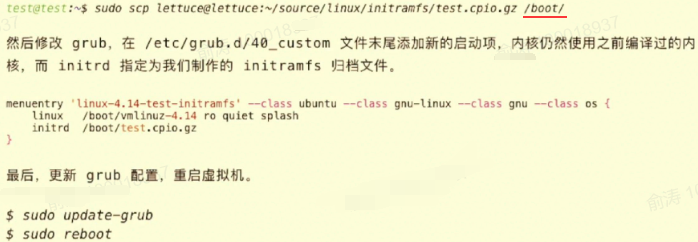
initramfs生成方式:ls | cpio -ov -H newc | gzip > ./initramfs.cpio.gz (ls显示是几个文件,cpio打包和tar一样),可编进内核,但是如果外部有initramfs,会覆盖内核中的。只是压缩包,不需要内核有文件系统驱动(initrd需要)。如下拆解:-D指定文件夹,chown,chgrp修改文件权限。
实验:/etc/default/grub:GRUB_CMDLINE_LINUX行添加console=tty0 console=ttyS0,115200n8(cat /proc/cmdline,update-grub)
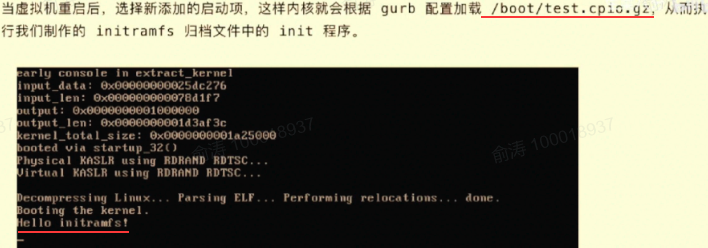
kernel_init_freeable通过调用prepare_namespace()来挂载根文件系统。根文件系统也是由命令行参数指定即U-Boot的bootargs环境变量。比如“root=/dev/mmcblk1p2 rootwait rw”就表示根文件系统在/dev/mmcblk1p2 中,也就是EMMC的分区2中。
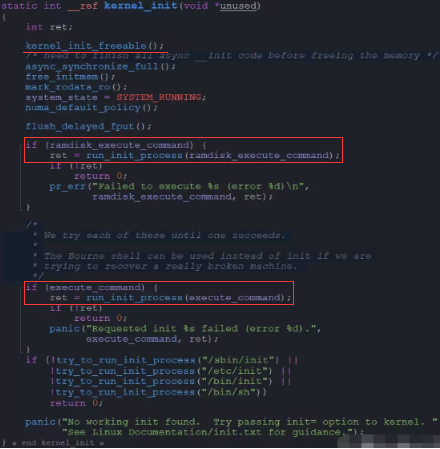
ramdisk_execute_command是值为“/init”即根目录下的init程序。该值也可通过U-Boot传递,在bootargs中使用“rdinit=xxx”即可,xxx 为具体的init程序名字。如果存在“/init”程序的话就通过函数run_init_process来运行此程序。
如果ramdisk_execute_command为空的话就看execute_command是否为空, execute_command的值是通过U-Boot传递,在bootargs中使用“init=xxxx”就可以了,比如“init=/linuxrc”表示根文件系统中的linuxrc就是要执行的用户空间init程序。
如果上面2个变量都为空,就依次查找“/sbin/init”…这四个相当于备用init程序。如果都没有找到用户空间的init程序,就提示错误发生,内核最终是需要和根文件系统打交道的,需要挂载根文件系统,并且执行根文件系统中的init程序,以此来进入用户态。
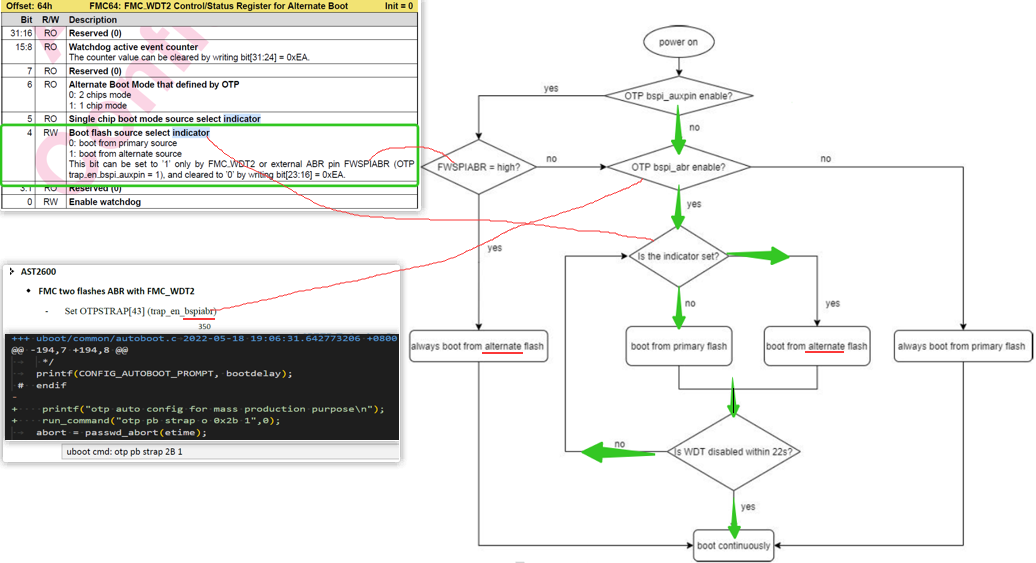
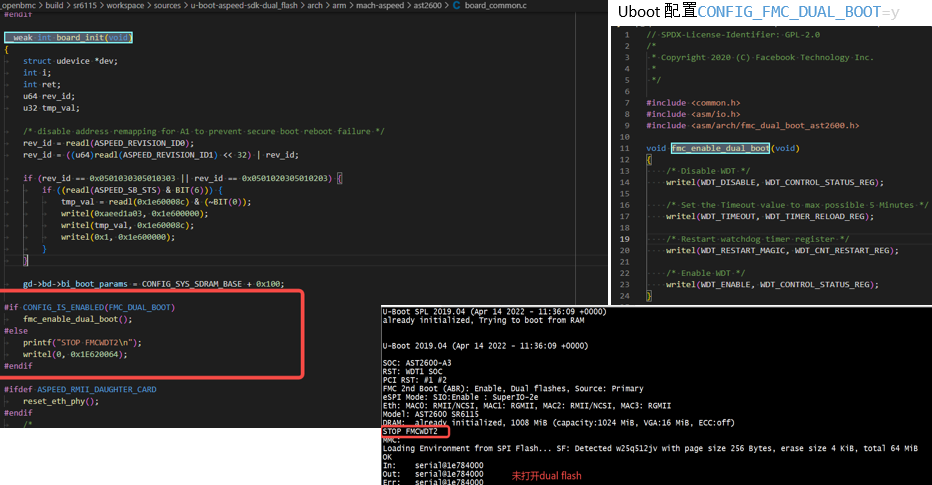
4.dual flash:一块flash挂了,BMC会自动切换到另一块flash上启动 (最底层依赖FMC/SPI0中的CS0和CS1)
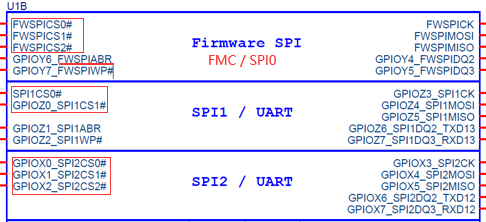
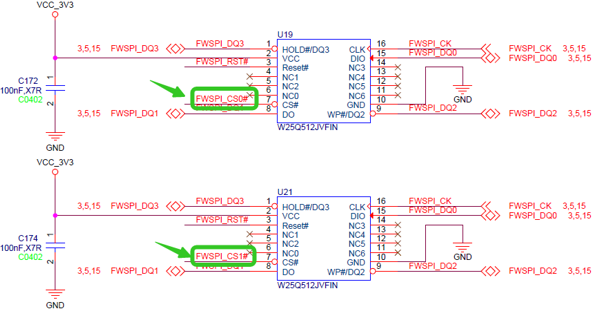
机器上电开机如果WDT2 enable的情况下,WDT2会有个22秒的超时时间,timeout后会切flash重启BMC。ABR(配置备用启动区),十进制[43]=0x2b,第1个enable也是OTP寄存器[54],uboot/cmd/otp.c提供otp命令。

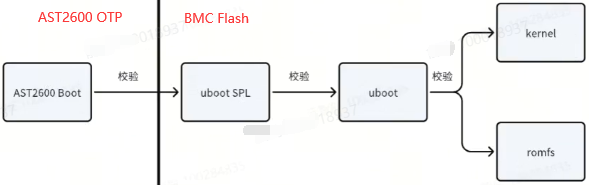
5.安全启动:解压mtd.all.tar(包含release note等)后再解压里面的.tar(包含image-…)
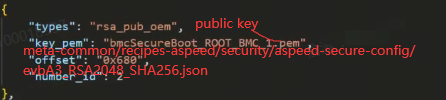
5.1 AST2600 OTP:OPT内会放置证书(直接包进OTP image)
aspeed也提供源码生成OTP image(https://github.com/AspeedTech-BMC/socsec)。
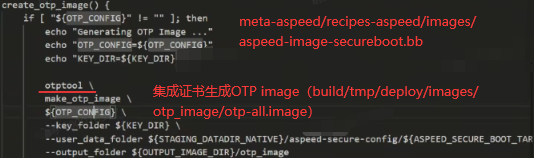
OTP image配置证书如下。
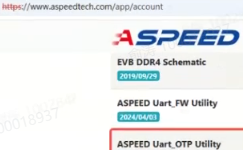
如下方式用UART烧写OPT文件,将芯片进入UART Boot状态。
5.2 uboot spl校验uboot程序:uboot校验kernel和rofs程序同理(bootm.c)
如下如果uboot没有签过名,会走红框。

如果使用没有签名的image,会卡在magic word这里(卡着一直不动导致WTD重启系统)。public key是从OTP中拿,拿到后去校验。

分区签名:如下第2步会替换fmh magic word(bmc image里每个mtd如kernel/romfs里的一段头部offset存储),第5步assemble组装打包,第3和6步手动签名:openssl dgst -sha256 -sign .../recipes-phosphor/flash/files/OpenBMC.priv(这个私钥需要与OTP中公钥一致,这里用的是OpenBMC调试公钥和私钥) -out secureboot/image-uboot-spl.sig secureboot/image-uboot-spl,第7步生成离线image。


 1487
1487

 被折叠的 条评论
为什么被折叠?
被折叠的 条评论
为什么被折叠?
 到【灌水乐园】发言


