


准备
- 安装好git bsah
- 全程git bash下完成命令
过程
安装node.js
一路next,直接安装完成
//检测是否成功
node -v
npm -v
安装hexo
1.在创建的文件夹blog下,打开git bash
npm install -g hexo-cli
安装cnmp(阿里开发,国内速度快)
npm install -g cnpm --registry=https://registry.npm.taobao.org
依旧用hexo -v cnpm -v查看一下版本
初始化
- 初始化一下hexo
hexo init myblog
显示结果最后两句为:

根据提示
cd myblog //进入myblog文件夹
npm install
报错npm ERR! code ELIFECYCLE
npm ERR! code ELIFECYCLE
npm ERR! errno 1
npm ERR! ejs@2.7.4 postinstall: ` node ./postinstall.js`
npm ERR! Exit status 1
npm ERR!
npm ERR! Failed at the ejs@2.7.4 postinstall script.
npm ERR! This is probably not a problem with npm. There is likely additional logging output above.
npm ERR! A complete log of this run can be found in:
npm ERR! C:\Users\Lenovo\AppData\Roaming\npm-cache_logs\2020-06-21T16_16_49_430Z-debug.log
如果不解决,继续往下走,hexo可以运行,但是打开 http://localhost:4000会发现没有格式,只有几行代码。
解决
继续输入
cnpm install
部分截图如下:

- 运行hexo
hexo g
hexo s
成功!
基础显示页面:

部署到github
准备
新建一个专门用来部署博客的仓库
过程
1.安装部署插件
cnpm install --save hexo-deployer-git
2.设置配置文件
在_config.yml中尾端,修改成下面样子:
# Deployment
## Docs: https://hexo.io/docs/deployment.html
deploy:
type: ‘git’
repo: https://github.com/two-fire/two-fire.github.io.git
branch: master
- 可以通过vim进入,
[[定位到文件首部,]]定位到尾部。
- 部署到远端
hexo d
成功!
例如我可通过https://two-fire.github.io/访问

换主题
- 下载主题
在github上找到喜欢的主题,克隆到themes
我找的是next主题
git clone https://github.com/iissnan/hexo-theme-next.git themes/next
- 配置到我的博客中
修改_config.yml文件中的theme为next
# Extensions
## Plugins: https://hexo.io/plugins/
## Themes: https://hexo.io/themes/
theme: landscape
- vim中可以通过
/something来查找,n下一个,N上一个
- 查看
重新清理,生成(generate),运行(server)
hexo clean
hexo g
hexo s
localhost:4000 发现已经改变。

- 推送到远端(deploy)
hexo d
成功之后可通过GitHub的地址访问。(更换主题可能有延迟)
主题的个性化打造
- 修改文章底部的那个带#号的标签
修改模板/themes/next/layout/_macro/post.swig,搜索 rel=“tag”>#,将 # 换成
2.在网站底部加上访问量
打开\themes\next\layout_partials\footer.swig文件,在<div class=“copyright”>前加上
<script async src="https://busuanzi.ibruce.info/busuanzi/2.3/busuanzi.pure.mini.js"></script>
等等……
博客内容完善
都可以在next官方文档和hexo官方文档中找到详细介绍
例如:
关于
-
hexo new page "about"在myblog/source下会新生成一个新的文件夹about,
在该文件夹下会有一个index.md文件,里面Front-matter中加上type: "about",在Front-matter下面用markdown格式书写想要写的内容即可。 -
在主题的 themes/next/_configy.yml 设置中将 menu中about前面的注释去掉
-
hexo cleanhexo d -g
等等……
点击侧边栏关于,分类等,发现hexo Cannot GET /%20/
解决:实习生小王的博客
%20 是空格的意思,把配置文件里 ||之前所有的空格删掉即可。
不一定每次遇到,上一次的博客搭建就没有这个问题。
还有一个问题,是新建必须命名tags,不能是tag。不然也会无法打开。
hexo g后 报错INFO Start processing ERROR Theme config load failed. ERROR Process
INFO Start processing ERROR Theme config load failed. ERROR Process
failed: _config.yml YAMLException: bad indentation of a mapping entry
at line 130, column 3:
GitHub: https://github.com/two-f …
^
at generateError (D:\OtherFiles\blog\myblog\node_modules\js-yaml\lib\js-yaml\loader.js:167:10)
at throwError (D:\OtherFiles\blog\myblog\node_modules\js-yaml\lib\js-yaml\loader.js:173:9)
at readBlockMapping (D:\OtherFiles\blog\myblog\node_modules\js-yaml\lib\js-yaml\loader.js:1107:7)
at composeNode (D:\OtherFiles\blog\myblog\node_modules\js-yaml\lib\js-yaml\loader.js:1359:12)
……
报错显示_config.yml 130行,对应找到发现是GitHub社交链接GitHub: https://github.com/two-fire || github处。原来,上面一行social:忘记取消注释了。
搜索
- 安装搜索
npm install hexo-generator-searchdb --save
- myblog中的_config.yml,增加:
search:
 path: search.xml
 field: post
 format: html
 limit: 10000
-
next主题中的全局配置文件_config.yml中,修改local_search的enable为true
-
git bash中,先在localhost上查看(比较快)
hexo clean
hexo g
在执行下一步:hexo s时候,发现报错Usage: hexo <command>
执行cnpm install 后,再hexo s发现成功。

(我使用的是next中的scheme: Pisces)
之后可以使用hexo d上传远端。
如果报错hexo d后 ERROR Deployer not found: git
如果遇到,可尝试:
npm install --save hexo-deployer-git
(以下摘自明月登楼博客)
其中的 npm install 可以加上参数 -save ,这样
- 会把依赖包安装到 node_modules 目录中
- 会在package.json的dependencies属性下添加依赖包的名称和版本号
- 之后运行npm install命令时,会自动安装依赖包到node_modules目录中
- 如果不加save参数的话,之后把X包安装到node_modules目录中,不会添加到 package.json 文件的 dependencies 属性中。
找到原因,是myblog的_config文件中的git用成了中文双引号“”,导致失败!
deploy:
  type: 'git'
接下来是还未找到原因时候的尝试,直到发现问题出在上面引号处停止。
显示run `npm audit fix` to fix them, or ` npm audit``for
details,执行npm audit fix如果报错npm ERR! Missing: hexo-renderer-ejs@^1.0.0
npm ERR! code ELOCKVERIFY npm ERR! Errors were found in your
package-lock.json, run npm install to fix them. npm ERR!
Missing: hexo-renderer-ejs@^1.0.0npm ERR! A complete log of this run can be found in: npm ERR!
C:\Users\Lenovo\AppData\Roaming\npm-cache_logs\2020-06-23T00_27_08_923Z-debug.log
进入package.json和package-lock.json,发现package.json的dependences是包含hexo-renderer-ejs@^1.0.0的
,但package-lock.json中没有hexo-renderer-ejs@^1.0.0。
- 查看hexo插件安装情况
npm ls --depth 0发现npm ERR! missing: hexo-renderer-ejs@^1.0.0, required by hexo-site@0.0.0
2.安装缺失的包npm install hexo-renderer-ejs --save如果报错npm ERR! Failed at the ejs@2.7.4 postinstall script ```c npm ERR! code ELIFECYCLE npm ERR! errno 1 npm ERR! ejs@2.7.4
postinstall: `node ./postinstall.js
npm ERR! Exit status 1 npm ERR! npm ERR! Failed at the ejs@2.7.4 postinstall script. npm ERR! This is probably not a problem with npm.There is likely additional logging output above. npm ERR! A complete log of this run can be found in: npm ERR! C:\Users\Lenovo\AppData\Roaming\npm-cache\_logs\2020-06-23T00_27_54_327Z-debug.log ```执行npm install ejs@2.7.4 --ignore-scripts后再执行后续操作。 (方法来自[熊二吃屁的博客](https://blog.csdn.net/m0_46493091/article/details/106891882)) 根据提示npm audit fix之后,再npm ls --depth 0不报错。 但是尝试npm install --save
hexo-deployer-git`依旧有问题,有两个漏洞: ```
- hexo-deployer-git@2.1.0 removed 2 packages, updated 1 package and audited 255 packages in 41.24s found 2 low severity vulnerabilities
runnpm audit fixto fix them, ornpm auditfor details ````npm
audit查看详情,显示:2 vulnerabilities require manual review. See the full report for details. 即2个漏洞需要手动检查。 有关详细信息,请参见完整报告。并给出了 Visit https://go.npm.me/audit-guide for additional guidance的建议。 网站内容是《审核程序包相关性是否存在安全漏洞》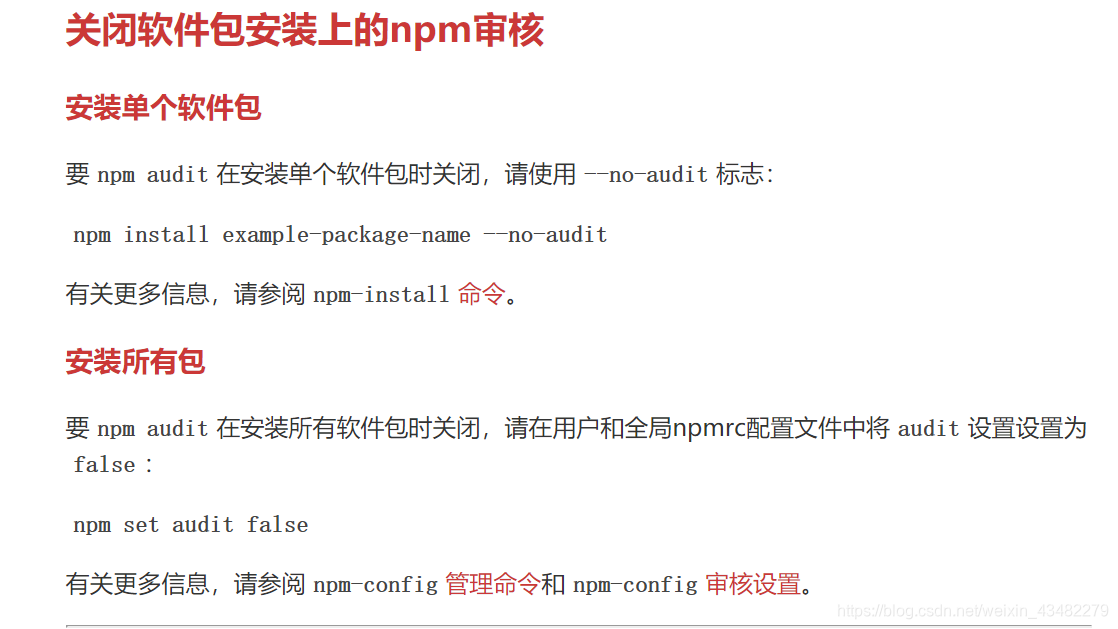 尝试关闭审核 ```npm set audit false npm install --save hexo-deployer-git ```再npm audit fix`没有出现报错。

写博客
- 创建新页面
hexo new 'filename'
在source/_posts路径下可以看到你创建的文章。
编辑文章,之后按照前面说的方式部署,在浏览器刷新就能看到你的文章了
编辑文章我用的VScode,有时候直接sublime3。想要直接在命令行输入“subl xxx”就打开文件,可以参考我的另一篇博文Git-Bash中设置命令
扩展
绑定域名参考(包含详细博客搭建):绑定域名


 被折叠的 条评论
为什么被折叠?
被折叠的 条评论
为什么被折叠?
 到【灌水乐园】发言


