


目录
1.Spring Bean作用域
默认情况下,所有的 Spring Bean 都是单例的,也就是说在整个 Spring 应用中, Bean 的实例只有一个。
我们可以在 < bean> 元素中添加 scope 属性来配置 Spring Bean 的作用范围。例如,如果每次获取 Bean 时,都需要一个新的 Bean 实例,那么应该将 Bean 的 scope 属性定义为 prototype,如果 Spring 需要每次都返回一个相同的 Bean 实例,则应将 Bean 的 scope 属性定义为 singleton。
Spring 5 共提供了 6 种 scope 作用域,如下表。
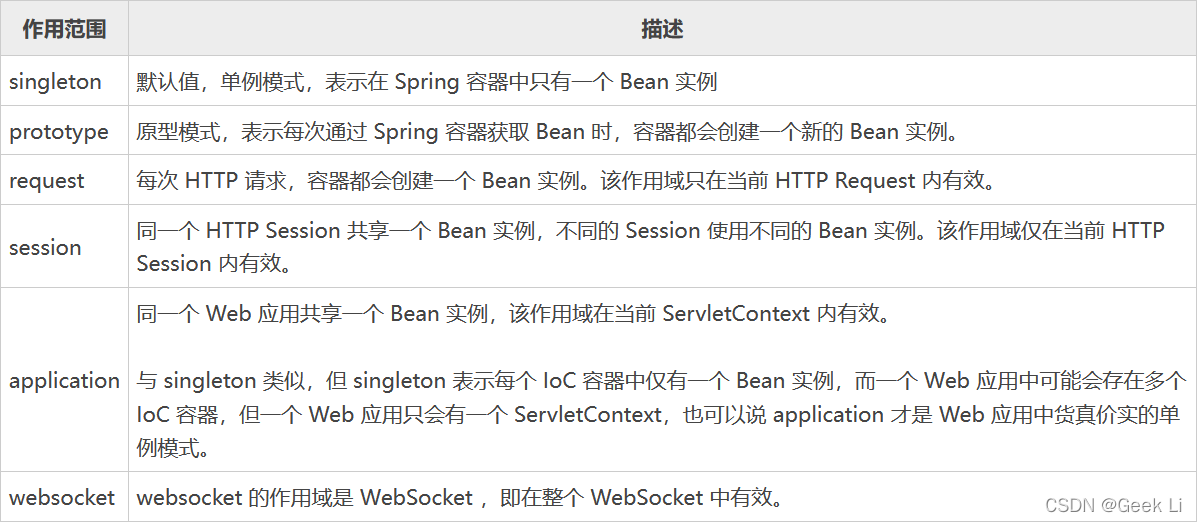
注意:在以上 6 种 Bean 作用域中,除了 singleton 和 prototype 可以直接在常规的 Spring IoC 容器(例如 ClassPathXmlApplicationContext)中使用外,剩下的都只能在基于 Web 的 ApplicationContext 实现(例如 XmlWebApplicationContext)中才能使用,否则就会抛出一个 IllegalStateException 的异常。
1.1 singleton
singleton 是 Spring 容器默认的作用域。当 Bean 的作用域为 singleton 时,Spring IoC 容器中只会存在一个共享的 Bean 实例。这个 Bean 实例将存储在高速缓存中,所有对于这个 Bean 的请求和引用,只要 id 与这个 Bean 定义相匹配,都会返回这个缓存中的对象实例。
如果一个 Bean 定义的作用域为 singleton ,那么这个 Bean 就被称为 singleton bean。在 Spring IoC 容器中,singleton bean 是 Bean 的默认创建方式,可以更好地重用对象,节省重复创建对象的开销。
在 Spring 配置文件中,可以使用 < bean> 元素的 scope 属性,将 Bean 的作用域定义成 singleton,其配置方式如下所示:
<bean id="..." class="..." scope="singleton"/>
1.2 prototype
如果一个 Bean 定义的作用域为 prototype,那么这个 Bean 就被称为 prototype bean。对于 prototype bean 来说,Spring 容器会在每次请求该 Bean 时,都创建一个新的 Bean 实例。
从某种意义上说,Spring IoC 容器对于 prototype bean 的作用就相当于 Java 的 new 操作符。它只负责 Bean 的创建,至于后续的生命周期管理则都是由客户端代码完成的.
在 Spring 配置文件中,可以使用 元素的 scope 属性将 Bean 的作用域定义成 prototype,其配置方式如下所示:
<bean id="..." class="..." scope="prototype"/>
2.Spring Bean生命周期
在传统的 Java 应用中,Bean 的生命周期很简单,使用 Java 关键字 new 进行 Bean 的实例化后,这个 Bean 就可以使用了。一旦这个 Bean 长期不被使用,Java 自动进行垃圾回收。
相比之下,Spring 中 Bean 的生命周期较复杂,大致可以分为以下 5 个阶段:
- Bean 的实例化
- Bean 属性赋值
- Bean 的初始化
- Bean 的使用
- Bean 的销毁
Spring 根据 Bean 的作用域来选择 Bean 的管理方式,
- 对于 singleton 作用域的 Bean 来说,Spring IoC 容器能够精确地控制 Bean 何时被创建、何时初始化完成以及何时被销毁;
- 对于 prototype 作用域的 Bean 来说,Spring IoC 容器只负责创建,然后就将 Bean 的实例交给客户端代码管理,Spring IoC 容器将不再跟踪其生命周期。
Spring 生命周期流程
Spring Bean 的完整生命周期从创建 Spring IoC 容器开始,直到最终 Spring IoC 容器销毁 Bean 为止,其具体流程如下图所示。
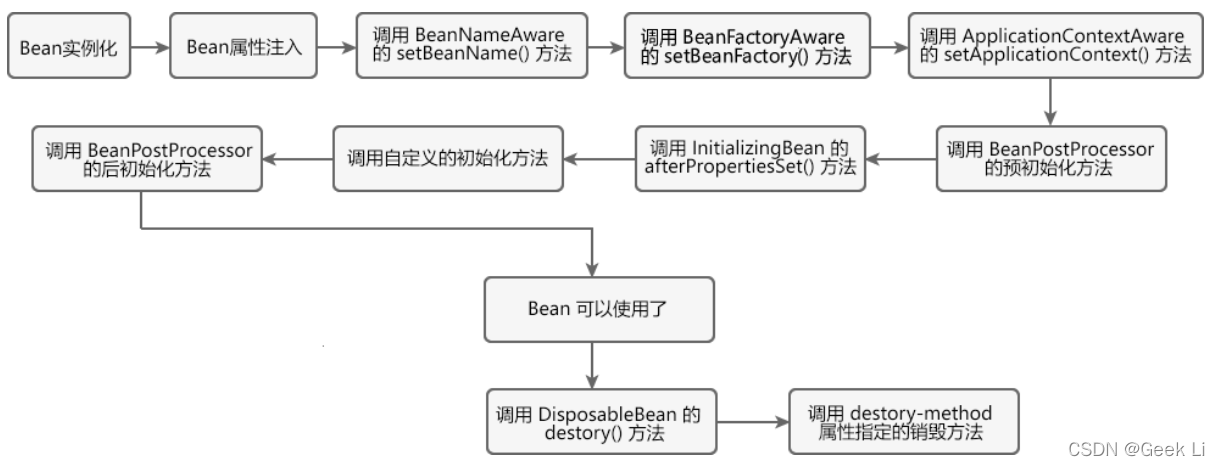
Bean 生命周期的整个执行过程描述如下。
- Spring 启动,查找并加载需要被 Spring 管理的 Bean,对 Bean 进行实例化。
- 对 Bean 进行属性注入。
- 如果 Bean 实现了 BeanNameAware 接口,则 Spring 调用 Bean 的 setBeanName() 方法传入当前 Bean 的 id 值。
- 如果 Bean 实现了 BeanFactoryAware 接口,则 Spring 调用 setBeanFactory() 方法传入当前工厂实例的引用。
- 如果 Bean 实现了 ApplicationContextAware 接口,则 Spring 调用 setApplicationContext() 方法传入当前 ApplicationContext 实例的引用。
- 如果 Bean 实现了 BeanPostProcessor 接口,则 Spring 调用该接口的预初始化方法 postProcessBeforeInitialzation() 对 Bean 进行加工操作,此处非常重要,Spring 的 AOP 就是利用它实现的。
- 如果 Bean 实现了 InitializingBean 接口,则 Spring 将调用 afterPropertiesSet() 方法。
- 如果在配置文件中通过 init-method 属性指定了初始化方法,则调用该初始化方法。
- 如果 BeanPostProcessor 和 Bean 关联,则 Spring 将调用该接口的初始化方法 postProcessAfterInitialization()。此时,Bean 已经可以被应用系统使用了。
- 如果在 中指定了该 Bean 的作用域为 singleton,则将该 Bean 放入 Spring IoC 的缓存池中,触发 Spring 对该 Bean 的生命周期管理;如果在 中指定了该 Bean 的作用域为 prototype,则将该 Bean 交给调用者,调用者管理该 Bean 的生命周期,Spring 不再管理该 Bean。
- 如果 Bean 实现了 DisposableBean 接口,则 Spring 会调用 destory() 方法销毁 Bean;如果在配置文件中通过 destory-method 属性指定了 Bean 的销毁方法,则 Spring 将调用该方法对 Bean 进行销毁。
自定义 Bean 的生命周期
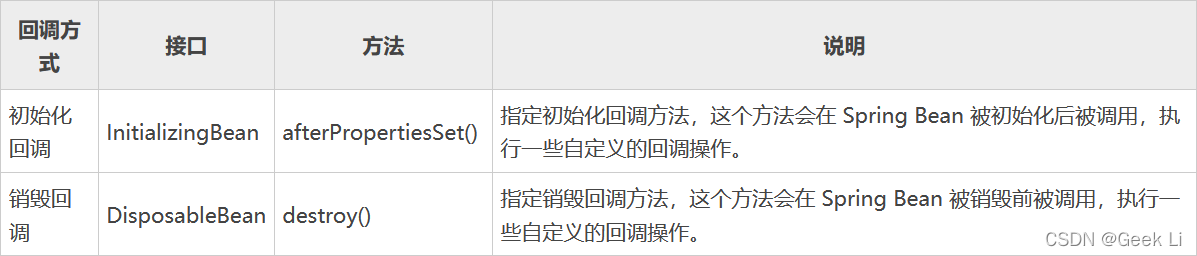
Bean 的生命周期回调方法主要有两种:
- 初始化回调方法:在 Spring Bean 被初始化后调用,执行一些自定义的回调操作。
- 销毁回调方法:在 Spring Bean 被销毁前调用,执行一些自定义的回调操作。
我们可以通过以下 3 种方式自定义 Bean 的生命周期回调方法:
- 通过接口实现
- 通过 XML 配置实现
- 使用注解实现
如果一个 Bean 中有多种生命周期回调方法时,优先级顺序为:注解 > 接口 > XML 配置。
通过接口实现
我们可以在 Spring Bean 的 Java 类中,通过实现 InitializingBean 和 DisposableBean 接口,指定 Bean 的生命周期回调方法。
注意:通常情况下,我们不建议通过这种方式指定生命周期回调方法,这是由于这种方式会导致代码的耦合性过高。
通过 XML 配置实现
我们还可以在 Spring 的 XML 配置中,通过 < bean> 元素中的 init-method 和 destory-method 属性,指定 Bean 的生命周期回调方法。

    <beans xmlns="http://www.springframework.org/schema/beans"
           xmlns:xsi="http://www.w3.org/2001/XMLSchema-instance"
           xsi:schemaLocation="http://www.springframework.org/schema/beans
       http://www.springframework.org/schema/beans/spring-beans-3.0.xsd">
        <!--通过 XML 配置指定生命周期回调方法-->
        <bean id="xmlLifeCycleBean" class="net.biancheng.c.XMLLifeCycleBean" init-method="init" destroy-method="destroy">
            <property name="webName" value="C语言中文网2"></property>
            <property name="url" value="c.biancheng.net"></property>
        </bean>
    </beans>
使用注解实现
我们还可以通过 JSR-250 的 @PostConstruct 和 @PreDestroy 注解,指定 Bean 的生命周期回调方法。

    /**
     * 初始化回调方法
     */
    @PostConstruct
    public void init() {
        LOGGER.info("通过 @PostConstruct 注解,指定初始化方法:init() 方法");
    }
    /**
     * 销毁回调方法
     */
    @PreDestroy
    public void destroy() {
        LOGGER.info("通过 @PreDestroy 注解,指定初始化方法:destroy() 方法");
    }
}
3.Spring后置处理器(BeanPostProcessor)
BeanPostProcessor 接口也被称为后置处理器,通过该接口可以自定义调用初始化前后执行的操作方法。
BeanPostProcessor 接口源码如下:
    public interface BeanPostProcessor {
        Object postProcessBeforeInitialization(Object bean, String beanName) throws BeansException;
        Object postProcessAfterInitialization(Object bean, String beanName) throws BeansException;
    }
该接口中包含了两个方法:
- postProcessBeforeInitialization() 方法:在 Bean 实例化、属性注入后,初始化前调用。
- postProcessAfterInitialization() 方法:在 Bean 实例化、属性注入、初始化都完成后调用。
当需要添加多个后置处理器实现类时,默认情况下 Spring 容器会根据后置处理器的定义顺序来依次调用。也可以通过实现 Ordered 接口的 getOrder 方法指定后置处理器的执行顺序。该方法返回值为整数,默认值为 0,取值越大优先级越低。
需要注意的是,postProcessBeforeInitialization 和 postProcessAfterInitialization 方法返回值不能为 null,否则会报空指针异常或者通过 getBean() 方法获取不到 Bean 实例对象。
postProcessBeforeInitialization 方法是在 Bean 实例化和属性注入后,自定义初始化方法前执行的。而 postProcessAfterInitialization 方法是在自定义初始化方法后执行的。由于 getOrder 方法返回值越大,优先级越低,因此 InitHelloWorld2 先执行。
4.Spring自动装配(基于注解)
Spring 通过注解实现自动装配的步骤如下:
- 引入依赖
- 开启组件扫描
- 使用注解定义 Bean
- 依赖注入
1.引入aop编程jar
<!--   引入spring aop依赖-->
        <dependency>
            <groupId>org.springframework</groupId>
            <artifactId>spring-aop</artifactId>
            <version>${spring-version}</version>
        </dependency>
        <dependency>
            <groupId>org.aspectj</groupId>
            <artifactId>aspectjrt</artifactId>
            <version>${aspect-version}</version>
        </dependency>
        <dependency>
            <groupId>org.aspectj</groupId>
            <artifactId>aspectjweaver</artifactId>
            <version>${aspect-version}</version>
        </dependency>
Spring 默认不使用注解装配 Bean,因此我们需要在 Spring 的 XML 配置中,通过 < context:component-scan> 元素开启 Spring Beans的自动扫描功能。开启此功能后,Spring 会自动从扫描指定的包(base-package 属性设置)及其子包下的所有类,如果类上使用了 @Component 注解,就将该类装配到容器中。
    <?xml version="1.0" encoding="UTF-8"?>
    <beans xmlns="http://www.springframework.org/schema/beans"
           xmlns:xsi="http://www.w3.org/2001/XMLSchema-instance"
           xmlns:context="http://www.springframework.org/schema/context"
           xsi:schemaLocation="http://www.springframework.org/schema/beans
        http://www.springframework.org/schema/beans/spring-beans-3.0.xsd
        http://www.springframework.org/schema/context
                http://www.springframework.org/schema/context/spring-context.xsd">
        <!--开启组件扫描功能-->
        <context:component-scan base-package="net.biancheng.c"></context:component-scan>
    </beans>
2. 启动面向切面编程代理
    在applicationContext.xml进行配置
    <!--  启动面向切面编程代理  -->
    <aop:aspectj-autoproxy/>
3. 定义切面类
3.1 加注解
3.2 定义切入点,定义切入点的表达式
3.3 定义advice
package com.xawl.aop;

import org.aspectj.lang.annotation.After;
import org.aspectj.lang.annotation.Aspect;
import org.aspectj.lang.annotation.Before;
import org.aspectj.lang.annotation.Pointcut;
import org.slf4j.Logger;
import org.slf4j.LoggerFactory;
import org.springframework.stereotype.Component;

/**
 * 业务的切面类
 */
@Component
@Aspect  //定义为切面类,此注解不可以省略
public class ServiceAspect {
    private final static Logger logger = LoggerFactory.getLogger(ServiceAspect.class);
    @Pointcut("execution(* com.xawl.service.GoodsService.findById(..))")
    private void serviceAspectMethod(){

    }
    @Before("serviceAspectMethod()")
    public void serviceAspectMethodBefore(){
        logger.info("开始调用业务类");
    }
    @After("serviceAspectMethod()")
    public void serviceAspectMethodAfter(){
        logger.info("调用业务类结束");
    }
}
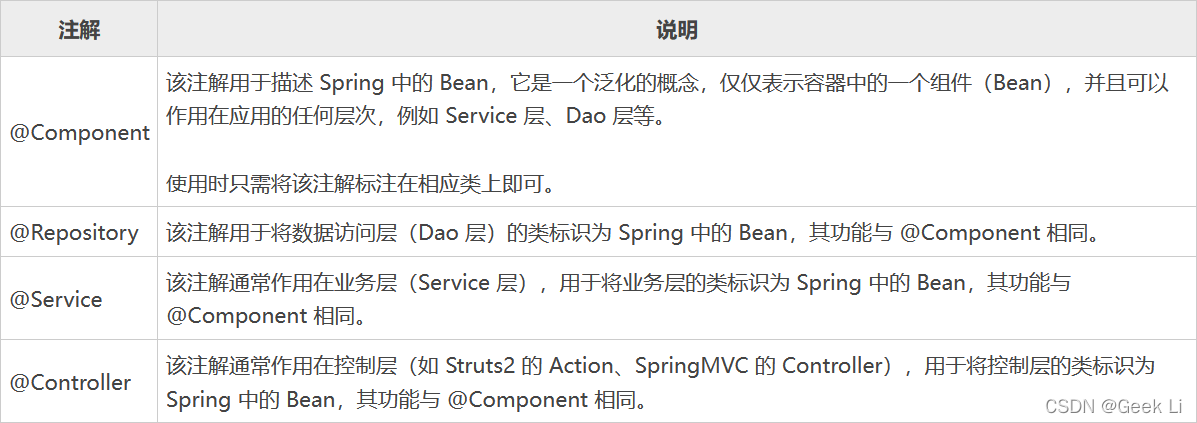
Spring 提供了以下多个注解,这些注解可以直接标注在 Java 类上,将它们定义成 Spring Bean。
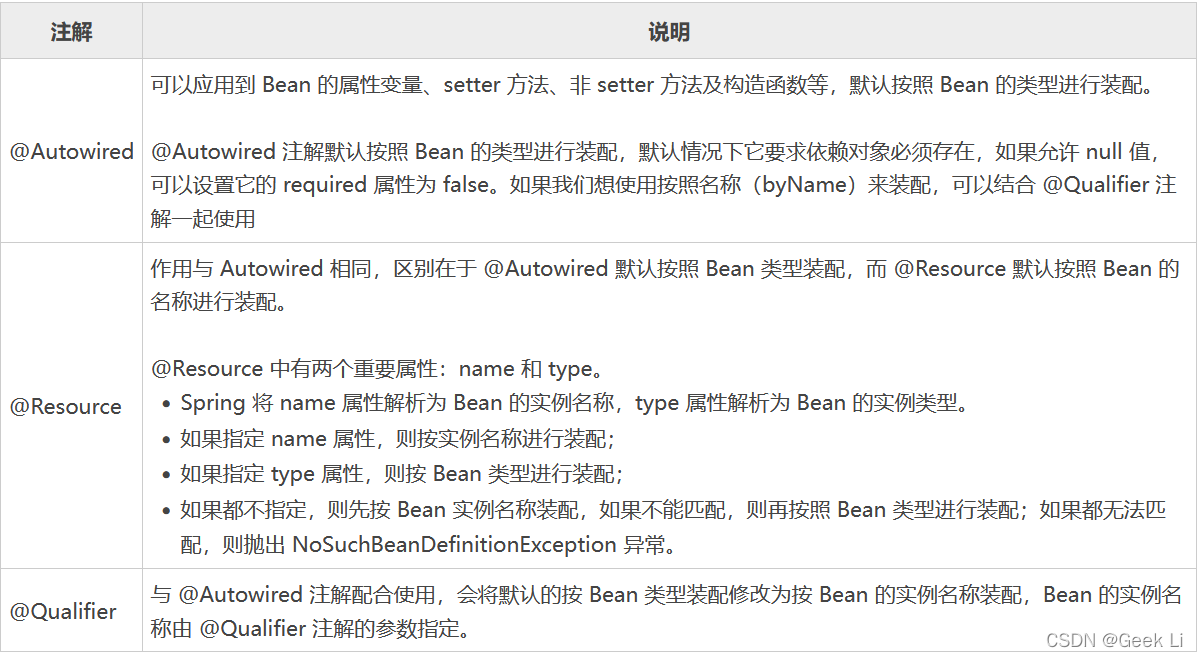
我们可以通过以下注解将定义好 Bean 装配到其它的 Bean 中。


 948
948


 被折叠的 条评论
为什么被折叠?
被折叠的 条评论
为什么被折叠?
 到【灌水乐园】发言


