目录
Spring Boot 中的 @ConfigurationProperties
前言
我们用springboot都知道有很多配置项,配置文件,比如application.properties。Spring Boot允许您将配置外部化,以便您可以在不同的环境中使用相同的应用程序代码。您可以使用各种外部配置源,包括Java财产文件、YAML文件、环境变量和命令行参数。
官方文档:
SpringBoot配置加载机制
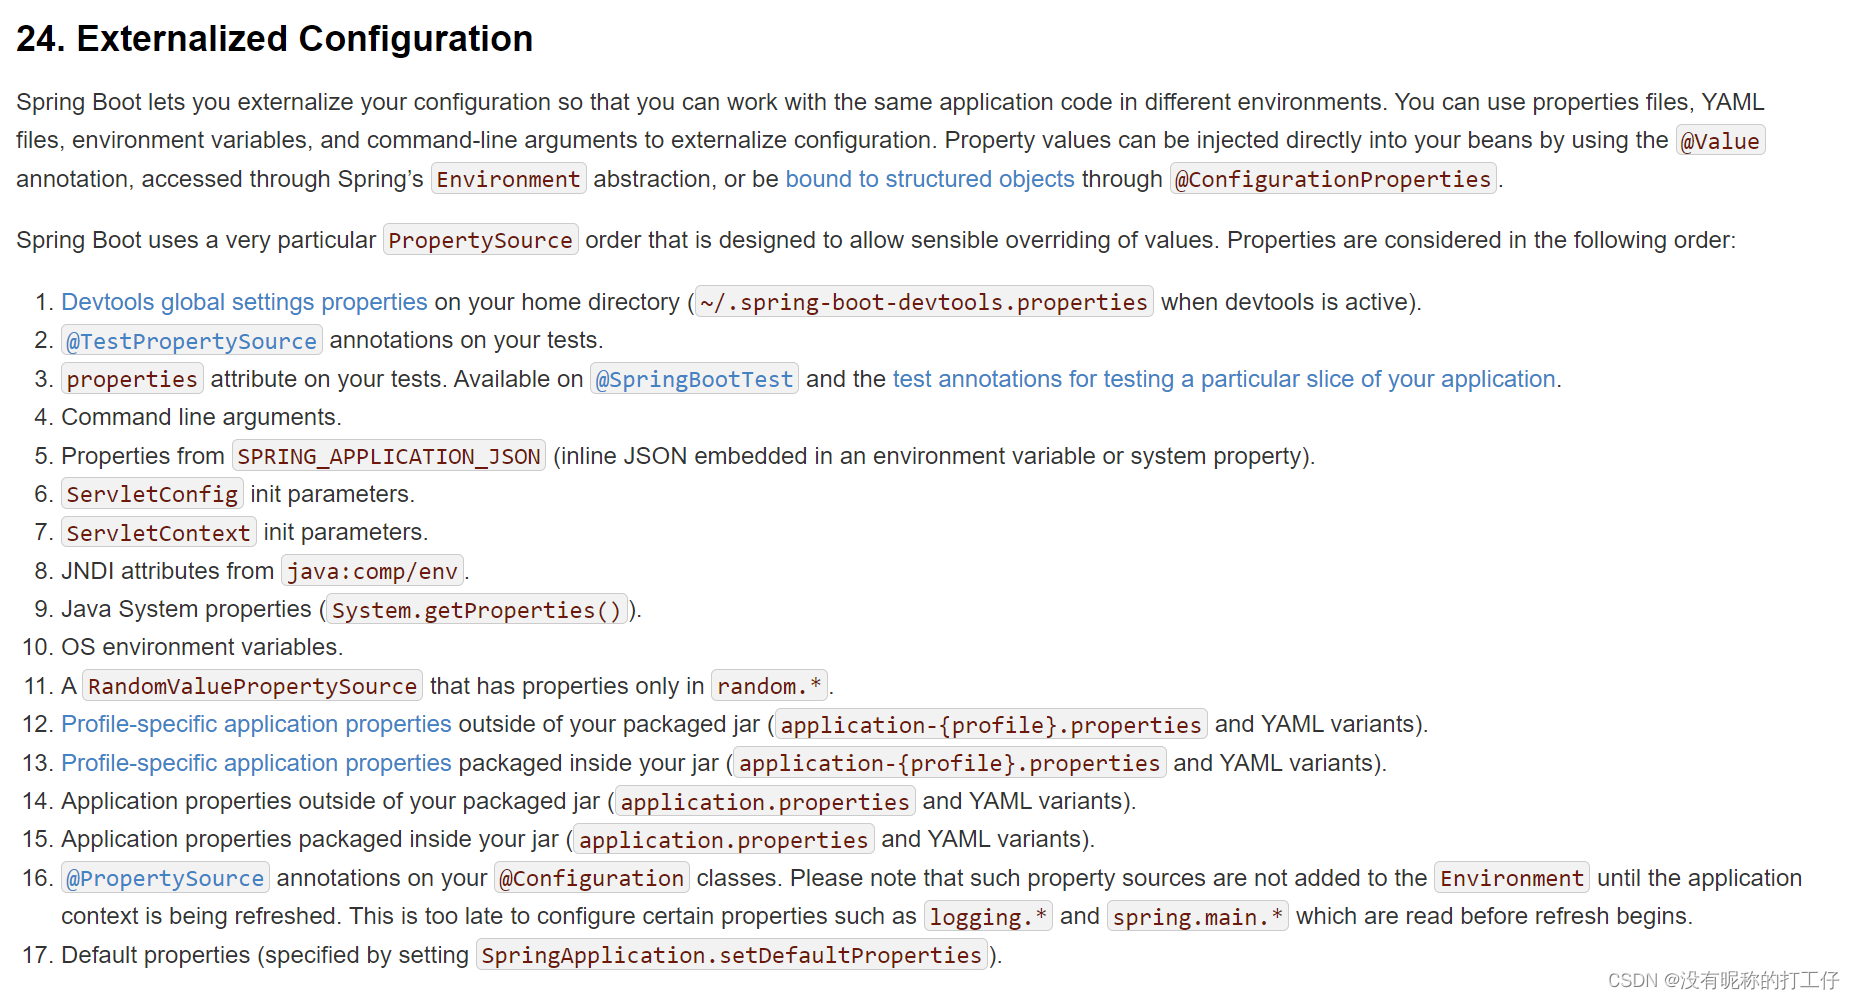
外化配置加载顺序
官方文档中文献

顺序从上到下
- 开启 DevTools 时,~/.spring-boot-devtools.properties
只要类路径上的文件发生更改,使用 spring-boot-devtools 的应用程序就会自动重新启动。在1DE中工作时,这可能是一个有用的功能,因为它为代码更改提供了非常快速的反循环。默认情况下,将监视类路径上指向文件央的任何条目的更改。请注意,某些资源( 如静态资产和视图模板 )无需重新启动应用程序。
- 测试类上的 @TestPropertySource 注解
- @SpringBootTest#properties 属性
- 命令⾏参数( --server.port=9000 )
我们可以通过( --server.port=9000 )命令行参数覆盖掉默认端口号8080
- SPRING_APPLICATION_JSON 中的属性
- ServletConfig 初始化参数
- ServletContext 初始化参数
- java:comp/env 中的 JNDI 属性
- System.getProperties()
( java -D) 参数指定的一些属性,可以通过(-D)来指定系统属性
- 操作系统环境变量
将Linux中设置的环境变量作为一个配置加载进了
- random.* 涉及到的 RandomValuePropertySource
RandomValuePropertySource可用于注入随机值(例如,进入机密或测试用例),可以生成整数、long、uuid或字符串
my.secret=${random.value}
my.number=${random.int}
my.bignumber=${random.long}
my.uuid=${random.uuid}
my.number.less.than.ten=${random.int(10)}
my.number.in.range=${random.int[1024,65536]}
- jar 包外部的 application-{profile}.properties 或 .yml
- jar 包内部的 application-{profile}.properties 或 .yml
- jar 包外部的 application.properties 或 .yml
- jar 包内部的 application.properties 或 .yml
- @Configuration 类上的 @PropertySource
- SpringApplication.setDefaultProperties() 设置的默认属性
application.properties默认位置
1、当前路径下
当前路径下:(/)
当前路径下config目录里:(./config)
2、CLASSPATH上面
CLASSPATH根目录:(/)
CLASSPATH下config目录里:(./config)
修改application.properties
修改名字:
spring.config.name=dev
指定路径下配置文件替换application.properties:
spring.config.location="D:/xxx文件夹/application.yml"追加配置文件:
spring.config.additional-location="D:/xxx文件夹"
命名风格
- Properties 文件YAML文件系统属性
短划线分隔
start.spring-boot.high-demo
驼峰式
start.springBoot.highDemo
下划线分隔start.spring_boot.high_demo
- 环境变量
全大写,下划线分隔
START_SPRINGBOOT_HIGHDEMO
Spring Boot 中的 @ConfigurationProperties
该注解可以将属性绑定到结构化对象上,即通过对象来做属性的绑定,并且支持 Relaxed Binding与安全的类型转换,通过在配置类上加上@EnableConfigurationProperties 注解开启ConfigurationProperties支持。
定制PropertySource
主要步骤
第一步、实现 PropertySource<T>。
第二布、从Environment 取得 PropertySources
第三步、将 PropertySource 添加到合适的位置
切入位置
EnvironmentPostProcessor
BeanFactoryPostProcessor
加载自定义properties文件
import lombok.extern.slf4j.Slf4j;
import org.springframework.boot.SpringApplication;
import org.springframework.boot.env.EnvironmentPostProcessor;
import org.springframework.boot.env.PropertiesPropertySourceLoader;
import org.springframework.core.env.ConfigurableEnvironment;
import org.springframework.core.env.MutablePropertySources;
import org.springframework.core.env.PropertySource;
import org.springframework.core.io.ClassPathResource;
import org.springframework.core.io.Resource;

@Slf4j
public class YapfEnvironmentPostProcessor implements EnvironmentPostProcessor {
    private PropertiesPropertySourceLoader loader = new PropertiesPropertySourceLoader();
    @Override
    public void postProcessEnvironment(ConfigurableEnvironment environment, SpringApplication application) {
        MutablePropertySources propertySources = environment.getPropertySources();
        Resource resource = new ClassPathResource("yapf.properties");
        try {
            PropertySource ps = loader.load("YetAnotherPropertiesFile", resource)
                    .get(0);
            propertySources.addFirst(ps);
        } catch (Exception e) {
            log.error("Exception!", e);
        }
    }
}
自定义文件(yapf.properties)
geektime.greeting=hello
测试:
import lombok.extern.slf4j.Slf4j;
import org.springframework.beans.factory.annotation.Value;
import org.springframework.boot.ApplicationArguments;
import org.springframework.boot.ApplicationRunner;
import org.springframework.boot.SpringApplication;
import org.springframework.boot.autoconfigure.SpringBootApplication;

@SpringBootApplication
@Slf4j
public class PropertySourceDemoApplication implements ApplicationRunner {
	@Value("${geektime.greeting}")
	private String greeting;

	public static void main(String[] args) {
		SpringApplication.run(PropertySourceDemoApplication.class, args);
	}

	@Override
	public void run(ApplicationArguments args) throws Exception {
		log.info("{}", greeting);
	}
}
注:原文内容来源于极客时间-丁雪丰 -玩转spring全家桶


 391
391


 被折叠的 条评论
为什么被折叠?


