


文章目录
Koa入门
1.1 中间件的使用
中间件是Koa的精髓,也是Koa最重要的一部分。
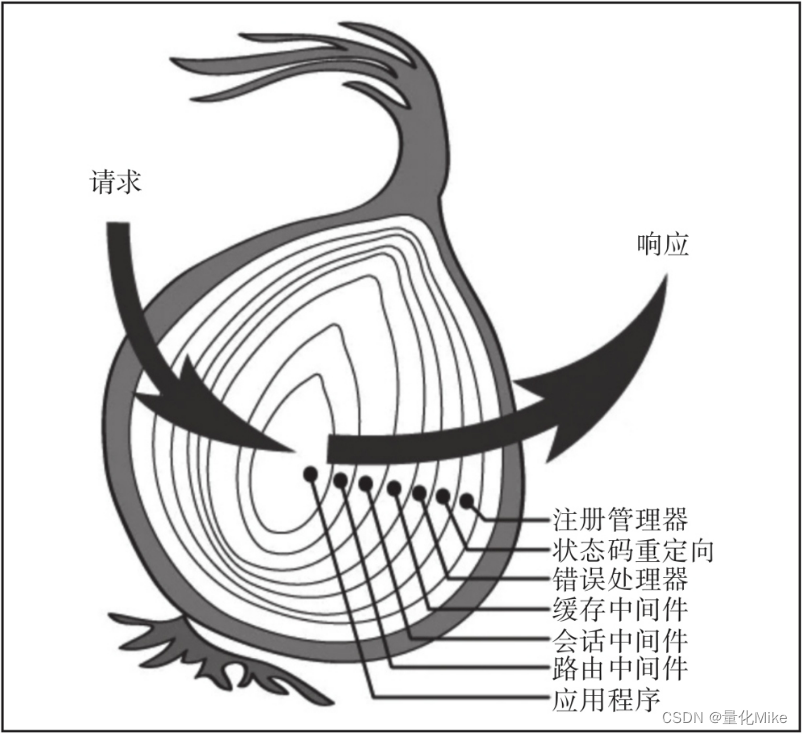
解释Koa中间件的功能和结构,请求从左侧进入,响应从右侧离开,中间件可以在每一层设置关卡,做不同类型的工作,这就是Koa的中间件原理。
const Koa = require('koa');
const app = new Koa();

app.use(async (ctx, next) => {  // 第一个中间件
  console.log('---1--->')
  await next()
  console.log('===6===>')
});

app.use(async (ctx, next) => {  // 第二个中间件
  console.log('---2--->')
  await next()
  console.log('===5===>')
});

app.use(async (ctx, next) => {  // 第三个中间件
  console.log('---3--->')
  await next()
  console.log('===4===>')
});

app.listen(4000, () => {
  console.log('server is running, port is 4000')
});
这里app.use()是一个回调函数,该回调函数有两个参数,一个是ctx,一个是next()函数,读者可以把app.use()理解为一个中间件,那么上述代码就有3个中间件了,每个中间件以await next()函数为分界,上面的代码对应洋葱模型的左侧,下面的代码对应洋葱模型的右侧。
PS D:\CODEFile\KoaServer\KoaDemo2> node .\index.js
server is running, port is 4000
---1--->
---2--->
---3--->
===4===>
===5===>
===6===>
比如收集请求,用于监控,或者收集日志做日志模块,方便排查问题等。
1.2 路由该怎么写
在介绍Koa路由的使用之前,先解释一下路由这个概念,路由(router)的广义概念是通过互联网把信息从源地址传输到目的地址的活动。在大前端领域内还有前端路由和后端路由的区别。
- 前端路由:浏览器提供了监听URL的相关事件,用于进行相关的处理。
- 后端路由:拿到请求对象里的URL,根据URL实现相应的逻辑。
关于Koa的路由,本节先介绍两种简单的路由实现方式:
- 一种是原生路由实现,即通过request对象的URL属性进行判断,做相应的逻辑处理;
- 另一种是使用koa-router中间件来实现路由。
1.2.1 原生路由
const Koa = require('koa');
const app = new Koa();

app.use(async (ctx) => {
  const url = ctx.request.url
  let content = ''
    switch (url) {
      case '/api/get/userInfo':
        content = '200: this is getUserInfo request'
        break;
      case '/api/update/userInfo':
        content = '200: this is updateUserInfo request'
        break;
      default:
        content = '404: no router match'
        break;
    }
    ctx.body = content
});

app.listen(4000);
console.log('server is running, port is 4000');
两个case处理两个不同的路由,用default来对路由进行兜底,如果没有匹配到,就返回404。这种写法不是很优雅,在实际项目中不这么写,一般会用Koa的中间件koa-router来实现路由。
1.2.2 利用koa-router中间件实现
安装koa-router的依赖: npm install koa-router --save
const Koa = require('koa')
const app = new Koa()
const Router = require('koa-router')

const router = new Router()

router.get('/api/get/userInfo', async ( ctx ) => {
  ctx.body = '200: this is getUserInfo request'
})

router.get('/api/update/userInfo', async ( ctx ) => {
  ctx.body = '200: this is updateUserInfo request'
})

// 加载路由中间件
app.use(router.routes()).use( async ( ctx ) => {
  ctx.body = '404: no router match'
})

app.listen(4000, () => {
  console.log('server is running, port is 4000')
})
其中代码等同为:
app.use(router.routes());
// 加载路由中间件
app.use( async ( ctx ) => {
  ctx.body = '404: no router match'
});

==================================>>>>>>>>等同于

// 加载路由中间件
app.use(router.routes()).use( async ( ctx ) => {
  ctx.body = '404: no router match'
});
1.2.3 文件路径匹配路由
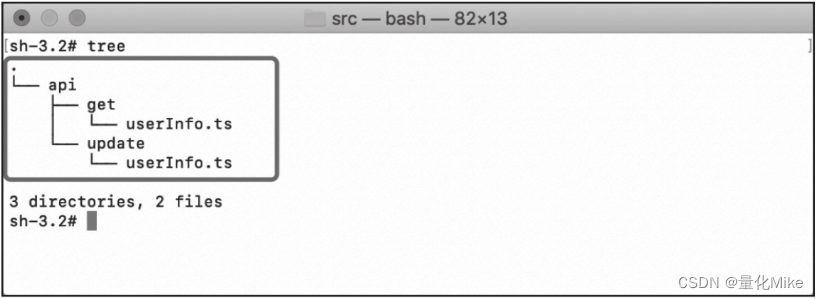
其实在一些中间层框架里,还有一种比较优雅的实现方式,是通过文件路径来匹配路由的。
目录的路径和路由是有映射关系的。
比如,还是以上述路由功能为例,路由文件目录如图2-3所示:
1.3 静态服务器
很多人会用Nginx、Apache等部署一个静态服务器,部署前端项目后,就可以在浏览器访问了。
其实静态服务器起到了提供一个读取静态文件(包括js、css、png等文件)、静态目录的作用。Koa也可以实现静态服务器的功能,本节带领读者部署一个介绍性的官网到Koa静态服务器上。
本节会介绍两种实现方式:
- 一种是利用Koa中间件实现,这种方式比较简单,可以用现成的包。
- 一种是原生方式实现,这种方式虽然比较复杂,但是能够还原静态服务器的一些本质,利于理解原理。
1.3.1 koa-static中间件使用
静态服务器功能可以利用Koa的中间件koa-static实现,读者可以通过官方文档(https://github.com/koajs/static) 进行了解。
安装koa-static:npm install koa-static --save
static目录下存放的是静态文件,index.js文件是Koa部分的逻辑实现。
const Koa = require('koa');
const path = require('path');
const static = require('koa-static');

const app = new Koa()

// 静态资源目录对于相对入口文件index.js的路径
const staticPath = './static'

app.use(static(
  path.join( __dirname,  staticPath)
))

app.listen(4000, () => {
  console.log('server is running, port is 4000')
})
1.3.2 实现一个静态服务器
- 通过请求的URL来读取静态文件。静态服务器通过请求把内容展示到页面上,只不过不同的静态资源,其mime type不同,能够对应起来即可。
- 通过一个map对静态资源类型和mime type做映射,再依据请求中的URL来读取对应的资源,再将其放回前端进行展示。
- 在JavaScript中,要善于利用map做代码优化,比如if else、switch case的逻辑,多数情况可以用map来重写,完善后的代码会更加优雅且易于维护。
const Koa = require('koa');
const fs = require('fs');
const path = require('path');

// 设置一个mime map, 因为本项目只涉及3种类型, 所以这里只列3种(map对象)
const MIMES_MAP = {
  'css': 'text/css',
  'html': 'text/html',
  'jpg': 'image/jpeg'
}

const app = new Koa()

// 静态资源目录对于相对入口文件index.js的路径
const staticPath = './static'

// 解析资源类型
function parseMime( url ) {
  let extName = path.extname( url )
  extName = extName ? extName.slice(1) : 'unknown'
  return  MIMES_MAP[extName]
}

app.use( async ( ctx ) => {
  // 静态资源目录在本地的绝对路径
  let fullStaticPath = path.join(__dirname, staticPath)

  // 获取静态资源内容, 有可能是文件内容、目录或404
  let content = fs.readFileSync(path.join(fullStaticPath,
    ctx.url), 'binary' )

  // 解析请求内容的类型
  let mime = parseMime(ctx.url)

  // 如果有对应的文件类型, 就配置上下文的类型
  if (mime) {
    ctx.type = mime
  }

  // 输出静态资源的内容
  if ( mime && mime.indexOf('image/') >= 0 ) {
    // 如果是图片, 则用Node原生res, 输出二进制数据
    ctx.res.writeHead(200)
    ctx.res.write(content, 'binary')
    ctx.res.end()
  } else {
    // 其他则输出文本
    ctx.body = content
  }
})

app.listen(4000, () => {
  console.log('server is running, port is 4000')
})
1.4 模板引擎
在Web开发的场景中,页面数据往往是后端提供的,前端开发者得到接口数据后,通过一定的逻辑处理,将其呈现到页面上。
在有很多相似页面且数量比较多的情况下,如果通过人工回填所有数据,会增加很多重复的工作,有没有一种机制能够解决这种问题呢?当然有,模板引擎就能解决这个问题。
Koa中使用模板引擎中间件:koa-views
常见的模板有ejs与pug
1.4.1 ejs模板使用
ejs是一套简单的模板语言,帮助我们利用JavaScript代码生成HTML页面。
ejs官网:https://ejs.bootcss.com/
ejs模板引擎:
<!DOCTYPE html>
<html>
<head>
    <title><%= title %></title>
</head>
<body>
    <h1><%= title %></h1>
    <p>Welcome to <%= title %></p>
</body>
</html>
Koa中的模板功能实现需要用到中间件koa-views。
const Koa = require('koa')
const views = require('koa-views')
const path = require('path')
const app = new Koa()

// 加载模板引擎
app.use(views(path.join(__dirname, './view'), {
  extension: 'ejs'
}))

app.use( async ( ctx ) => {
  let title = 'koa'
  await ctx.render('index', {
    title,
  })
})

app.listen(4000, () => {
  console.log('server is running, port is 4000')
})
如果直接运行上述代码会抛出异常,读者需要自行安装ejs,无论使用哪个模板引擎,都需要安装ejs。
1.4.2 pug模板使用
pug也是使用比较广泛的模板引擎。
pug官网:https://www.pugjs.cn/api/getting-started.html
// view/index.pug
doctype html
html
  head
    title Koa Server Pug
  body
    h1 #{title}
    p Welcome to #{title}
Koa的实现就是把ejs改成pug。
// index.js
const Koa = require('koa')
const views = require('koa-views')
const path = require('path')
const app = new Koa()

// 加载模板引擎
app.use(views(path.join(__dirname, './view'), {
  extension: 'pug'
}))
app.use( async ( ctx ) => {
  let title = 'koa'
  await ctx.render('index', {
    title,
  })
})

app.listen(4000, () => {
  console.log('server is running, port is 4000')
})
1.5 处理请求数据
1.5.1 get请求
在实际项目中,HTTP请求的场景是最普遍的。请求也包括很多类型,如get、post等。
后端收到这些请求后,需要解析参数,Koa本身可以解析get请求参数,不能解析post请求参数。本节介绍Koa如何应对各类请求场景。
const Koa = require('koa');
const Router = require('koa-router');

const app = new Koa();
const router = new Router();

router.get('/api/get/userInfo', async (ctx) => {
  const { name } = ctx.request.query
  ctx.body = `请求参数为${name}`
})

// 加载路由中间件
app.use(router.routes())

app.listen(4000, () => {
  console.log('server is running, port is 4000')
})
我们用postman做一下get请求测试,在链接 http://127.0.0.1:4000/api/get/userInfo?name=liujianghong 中query的参数为name=liujianghong,则上述代码的返回结果就是“请求参数为liujiang-hong。
1.5.2 post请求
由于Koa自身没有解析post请求参数的功能,因此需要安装一个Koa中间件koa-bodyparser。
使用koa-bodyparser中间件后,post请求的参数会被自动解析成JSON格式,这在实际项目中是非常实用的,如果用的是开源的BFF框架,那么该功能应该被集成到框架中了。
const Koa = require('koa');
const Router = require('koa-router');
const app = new Koa();
const bodyParser = require('koa-bodyparser');
const router = new Router();

app.use(bodyParser())
router.post('/api/get/userInfo', async (ctx) => {
  let { name } = ctx.request.body
  ctx.body = `请求参数为 ${name}`
})

// 加载路由中间件
app.use(router.routes())

app.listen(4000, () => {
  console.log('server is running, port is 4000')
})
1.6 Cookie和Session
HTTP无状态性。Cookie就是用来解决这个问题的。
ctx.cookies.get(name, [options]):读取上下文请求中的Cookie。
ctx.cookies.set(name, value, [options]):在上下文中写入Cookie。
const Koa = require('koa');
const Router = require('koa-router');

const app = new Koa();
const router = new Router();

router.get('/setCookie', async (ctx) => {
  ctx.cookies.set(
    'id',
    '123456',
    {
      domain: '127.0.0.1',     // Cookie所在的domain(域名)
      expires: new Date('2022-10-01'), // Cookie的失效时间
      httpOnly: false,         // 是否只在HTTP请求中获取
      overwrite: false                // 是否允许重写
    }
  )
  ctx.body = `设置成功`
});

router.get('/getCookie', async (ctx) => {
  const cookie = ctx.cookies.get('id')
  console.log(cookie)
  ctx.body = `cookie为:${cookie}`
});

// 加载路由中间件
app.use(router.routes());

app.listen(4000, () => {
  console.log('server is running, port is 4000')
});
1.7 跨域问题
在很多前端面试中经常会问,跨域是什么?它解决了什么样的痛点?
跨域问题通俗来讲,就是浏览器不能执行其他网站的脚本,这是由浏览器的同源策略造成的,是浏览器对JavaScript施加的安全限制。
所谓同源是指域名、协议、端口均相同。如果有一项不同,就不是同源,看下面几个例子:
http://www.123.com/index.html
http://www.123.com/server
---- PHP只有路径不同,非跨域。

http://www.123.com/index.html
http://www.456.com/server.php
---- 主域名不同:123/456,跨域。

http://abc.123.com/index.html
http://def.123.com/server.php
---- 子域名不同:abc/def,跨域。

http://www.123.com:8080/index.html
http://www.123.com:8081/server.php
---- 端口不同:8080/8081,跨域。

http://www.123.com/index.html
https://www.123.com/server.php
---- 协议不同:http/https,跨域。
特例:localhost和127.0.0.1虽然都指向本机,但也属于跨域。
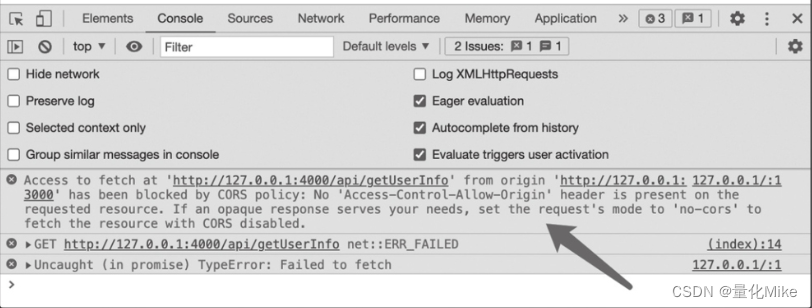
一个Web服务是 http://127.0.0.1:3000 ,要调用 http://127.0.0.1:4000 的接口,依据同源策略,这就是跨域调用。
<!——- static/index.html -->
<!DOCTYPE html>
<html>
<head>
  <meta charset="UTF-8">
  <title>跨域调用接口</title>
</head>
<body>
  <button onclick='getUserInfo()'>获取用户信息</button>
  <span id='data'></span>
</body>
<script>
  const getUserInfo = () => {
    //采用fetch发起请求
    const req = fetch('http://127.0.0.1:4000/api/getUserInfo', {
      method: 'get',
      headers: {
        'Content-Type': 'application/x-www-form-
          urlencoded'
      }
    })
    req.then(stream =>
      stream.text()
    ).then(res => {
      document.getElementById('data').innerText = res;
    })
  }
</script>
</html>
功能就是点击“获取用户信息”按钮,调用端口号为4000的服务接口。下面看一下端口号为4000的服务端代码。
const Koa = require('koa');
const cors = require('@koa/cors');
const Router = require('koa-router');

const app = new Koa()
const router = new Router()

router.get('/api/getUserInfo', async ( ctx ) => {
  ctx.body = 'liujianghong'
})

app.use(router.routes())

app.listen(4000, () => {
  console.log('server is running, port is 4000')
})
浏览器报错了,表示这个资源获取是跨域的。这就是浏览器出于安全考虑,做出的同源策略。
Koa解决同源策略的实质是校验请求头,这里有一个协商的过程,第一次请求过来,会问一下服务端:“你好!我是跨域请求你这边的资源,你同不同意?”只有服务端同意后,才可以跨域请求。
Koa官方提供了一个中间件@koa/cors用于解决这个问题,代码如下:
const Koa = require('koa')
const cors = require('@koa/cors');
const Router = require('koa-router')

const app = new Koa()
const router = new Router()

router.get('/api/getUserInfo', async ( ctx ) => {
  ctx.body = 'liujianghong'
})

// 加载cors中间件 该中间件:装载@koa/cors中间件一定要在koa-router之前
app.use(
	cors({
	  origin: '*'
	})
);

app.use(router.routes())

app.listen(4000, () => {
  console.log('server is running, port is 4000')
})
这里只增加了@koa/cors中间件,并且通过App装载就可以了。origin设置为“*”,代表任何URL都可以进行跨域请求。再次运行程序,发现跨域的请求可以正常访问后端数据了。
这里@koa/cors中间件还可以设置很多参数,比如允许哪些方法进行跨域请求,具体用法参考官方文档: https://github.com/koajs/cors 。
装载@koa/cors中间件一定要在koa-router之前,如果在请求过程中还没有进行cors设置,跨域问题会依然存在。
1.8 重写URL
问题场景:老项目需要重构或迁移,之前路由涉及的一些问题需要重新设计,很多项目依赖老项目,如果一刀切,所有路由的依赖都需要改。
这个时候,就需要考虑到URL重写了。也就是说,其他依赖的项目不用改动,重构后的项目中,如果还是之前的URL,就重写成新的URL进行请求。
[外链图片转存失败,源站可能有防盗链机制,建议将图片保存下来直接上传(img-MFlOAhrF-1666616993406)(https://www.showdoc.com.cn/server/api/attachment/visitFile?sign=f3f9b60fa59549dfa4659b519ce9086b&file=file.png)]
Koa的实现以官方提供的中间件koa-rewrite为例:
const Koa = require('koa');
const rewrite = require('koa-rewrite');
const Router = require('koa-router');

const app = new Koa()
const router = new Router()

router.get('/api/new/getUserInfo', async ( ctx ) => {
  ctx.body = '这是新接口数据!'
})

app.use(rewrite('/api/getUserInfo', '/api/new/getUserInfo'));

app.use(router.routes())

app.listen(4000, () => {
  console.log('server is running, port is 4000')
})
在浏览器直接访问/api/getUserInfo,看能不能访问到新接口数据。
可以看到,访问旧接口是能够访问到新接口数据的,这就是URL重写的一个应用场景。
URL重写也可以使用正则表达式,比如想重写/i123到/item/123,代码如下:
app.use(rewrite(/^\/i(\w+)/, '/items/$1'));
1.9 优雅的错误处理
在处理接口异常时,一般的做法是给前端返回一个状态码,然后带上错误信息。
假设这样一个场景,客户端访问服务端/api/getUserInfo的接口,判断参数中的用户名是不是预期的,如果是,则正常返回,否则返回400,代码如下:
// app.js
const Koa = require('koa');
const Router = require('koa-router');

const app = new Koa();
const router = new Router();

router.get('/api/getUserInfo', async ( ctx ) => {
  if (ctx.request.query.name !== 'liujianghong') {
    ctx.body = '400: 用户名不是liujianghong'
    return
  }
  ctx.body = '200: liujianghong'
})

// 加载路由中间件
app.use(router.routes())

app.listen(4000, () => {
  console.log('server is running, port is 4000')
})

因为有时候出现异常,我们更关注的是错误栈,想知道是哪里的代码出错了,所以直观地显示出各种信息是关键。
Koa官方提供的中间件koa-error:
const Koa = require('koa');
const error = require('koa-error');
const Router = require('koa-router');

const app = new Koa();
const router = new Router();

app.use(error({
  engine: 'pug',
  template: __dirname + '/error.pug'
}));

router.get('/api/getUserInfo', async ( ctx ) => {
  console.log(ctx.request.query)
  if (ctx.request.query.name !== 'liujianghong') {
    throw Error('出现异常')
  }
  ctx.body = '200: liujianghong'
});

app.use(router.routes())
app.listen(4000, () => {
  console.log('server is running, port is 4000')
});
整体实现思路是如果出现异常,返回一个自定义模板并呈现至前端,这样就可以定制内容了。这里简单实现一个模板,代码如下:
<!-- error.pug -->
doctype html
html
  head
    title= 'Error - ' + status
  body
    #error
      h1 Error
      p Looks like something broke!
      if env == 'development'
        h2 Message:
        pre: code= error
        h2 Stack:
        pre: code= stack


 245
245


 被折叠的 条评论
为什么被折叠?
被折叠的 条评论
为什么被折叠?
 到【灌水乐园】发言


