


版本说明
| 软件名称 | 版本号 |
|---|---|
| CentOS | 7.4 |
| PHP | 7.2.2 |
| Apache | 2.4.6 |
| MySQL | 5.7.21 |
| GLPI | 9.2.2 |
关闭SELinux
[root@localhost ~]# sed -i 's/SELINUX=enforcing/SELINUX=disabled/' /etc/selinux/config
关闭Firewall
[root@glpinode ~]# systemctl stop firewalld.service
[root@glpinode ~]# systemctl disable firewalld.service
配置YUM源
[root@glpinode ~]# rpm -Uvh https://dl.fedoraproject.org/pub/epel/epel-release-latest-7.noarch.rpm
[root@glpinode ~]# rpm -Uvh https://mirror.webtatic.com/yum/el7/webtatic-release.rpm
安装APACHE
[root@glpinode ~]# yum -y install httpd
[root@glpinode ~]# systemctl start httpd
[root@glpinode ~]# systemctl enable httpd
安装PHP及PHP模块
[root@glpinode ~]# yum -y install mod_php72w php72w-imap php72w-ldap php72w-gd php72w-pdo php72w-mysql php72w-opcache php72w-xmlrpc php72w-xml php72w-pecl-apcu php72w-mbstring php72w-soap php72w-common php72w-devel
安装MYSQL
1.卸载mariadb
[root@glpinode ~]# rpm -qa | grep mariadb
mariadb-libs-5.5.56-2.el7.x86_64
[root@glpinode ~]# rpm -e --nodeps mariadb-libs
2.安装mysql
[root@glpinode ~]# rpm -Uvh https://repo.mysql.com//mysql57-community-release-el7-11.noarch.rpm
[root@glpinode ~]# yum -y install mysql-community-server
[root@glpinode ~]# yum -y install mysql-community-devel
[root@glpinode ~]# systemctl start mysqld
[root@glpinode ~]# systemctl enable mysqld[root@glpinode ~]# cat /var/log/mysqld.log
2018-03-14T07:32:11.732267Z 1 [Note] A temporary password is generated for root@localhost: uQgLcuyGv2!A
//查看mysql数据库生成的root账户默认密码[root@glpinode ~]# mysql_secure_installation
//mysql安全设置导向
Enter password for user root:
//使用root账户默认密码登录
New password:
Re-enter new password:
//设置root账户密码
Change the password for root ? ((Press y|Y for Yes, any other key for No) : n
//更改root账户密码?选择【No】
Remove anonymous users? (Press y|Y for Yes, any other key for No) : y
//移除匿名用户?选择【Yes】
Disallow root login remotely? (Press y|Y for Yes, any other key for No) : y
//取消root用户远程登录?选择【Yes】
Remove test database and access to it? (Press y|Y for Yes, any other key for No) : y
//删除test数据库?选择【Yes】
Reload privilege tables now? (Press y|Y for Yes, any other key for No) : y
//重新加载权限?选择【Yes】
安装GLPI
[root@glpinode ~]# cd /var/www/html/
[root@glpinode html]# wget https://github.com/glpi-project/glpi/releases/download/9.2.2/glpi-9.2.2.tgz
[root@glpinode html]# tar -xf glpi-9.2.2.tgz
[root@glpinode html]# chown -R apache.apache /var/www/html/
[root@glpinode html]# vim /etc/httpd/conf/httpd.conf
<Directory "/var/www/html">
AllowOverride all
</Directory>
[root@glpinode html]# systemctl restart httpd
初始化GLPI
http://192.168.10.10/glpi
//输入URL,完成GLPI初始化的相关配置。

图1:选择语言,简体中文。

图2:同意许可条约

图3:选择“安装”,全新安装GLPI。

图4:检查系统环境运行GLPI的兼容性,绿色对勾的表示测试项通过,红色对勾的表示测试项不通过。

图5:填写数据库连接参数,SQL服务器地址是localhost,然后输入root账户的用户名和密码。
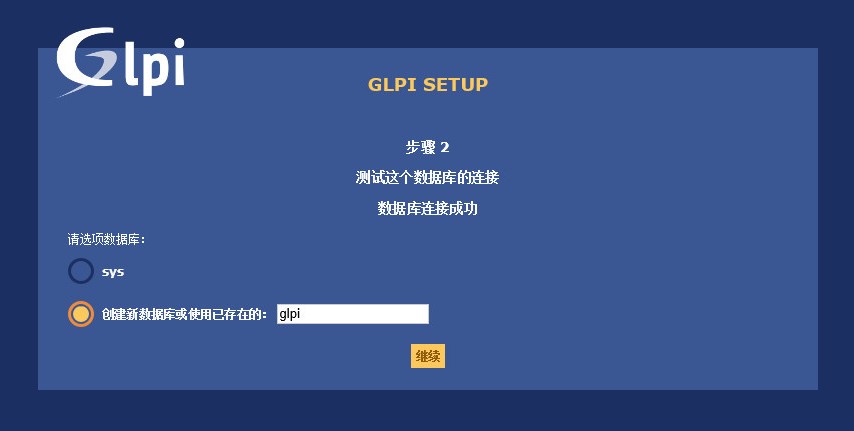
图6:创建新数据库

图7:数据库初始化完成
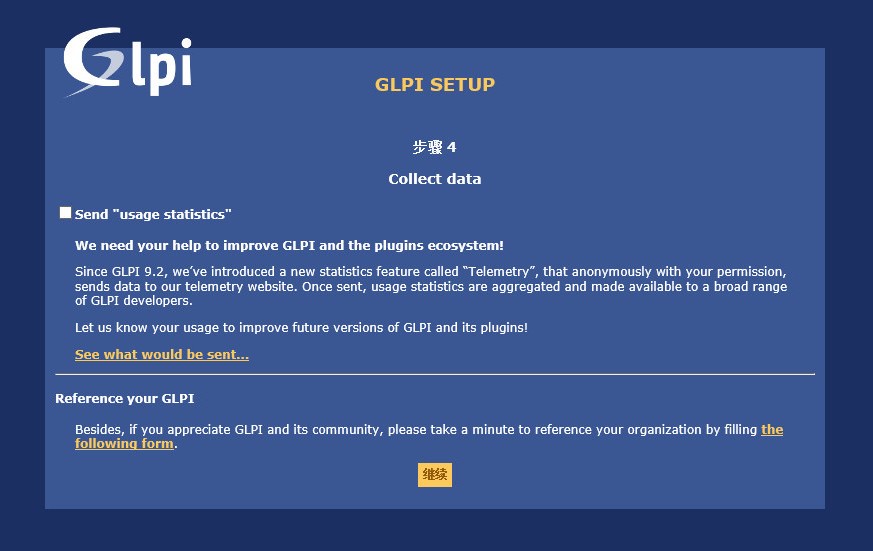
图8:9.2版本后开始监测数据以便统计,收集的数据有GLPI版本信息,插件名称等。

图9:GLPI安装完成并列出默认的账户名和密码

图10:使用管理员账户登录
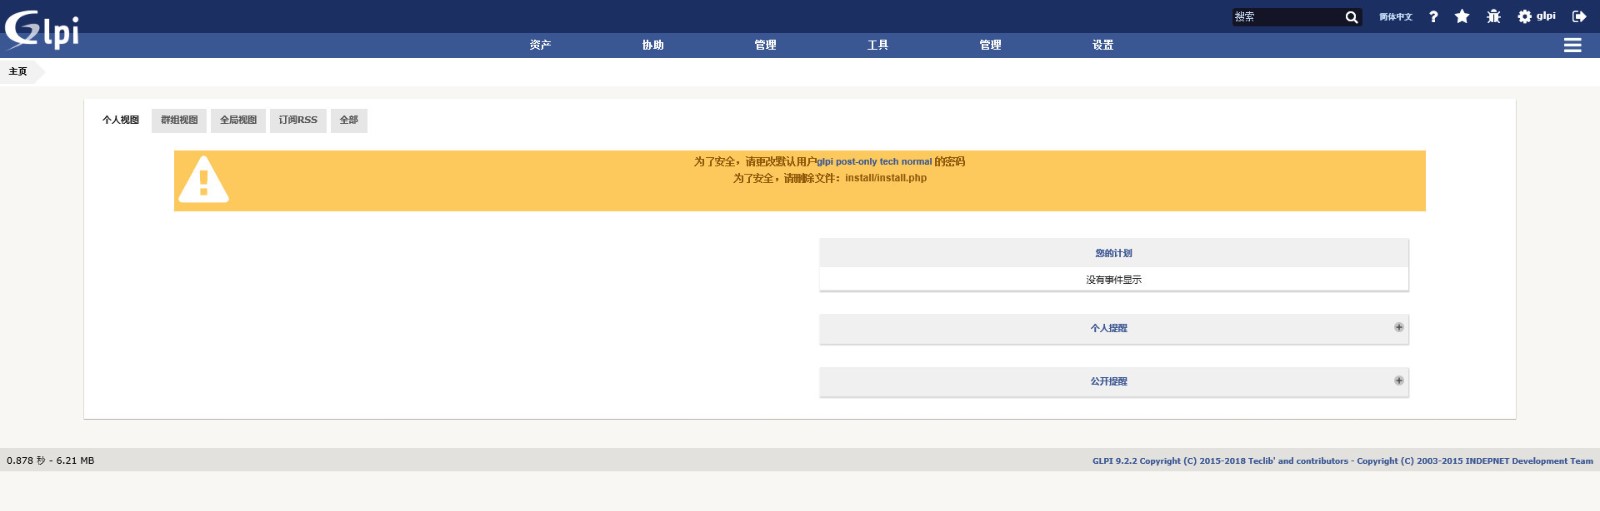
图11:登录成功并完成相关提示预警
[root@glpinode ~]# cd /var/www/html/glpi/install/
[root@glpinode install]# rm -rf install.php
文章持续更新!!!


 4608
4608

 被折叠的 条评论
为什么被折叠?
被折叠的 条评论
为什么被折叠?
 到【灌水乐园】发言


