


Springboot与maven
一、Springboot
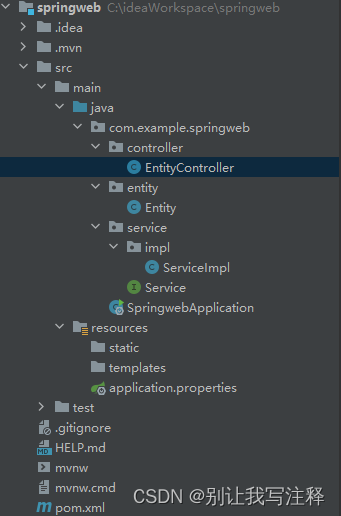
1.整个工程结构
基于Spring的web工程结构
2.pom.xml文件与常用的依赖包
        <!--  JDBC链接MySQL  -->
        <dependency>
            <groupId>org.springframework.boot</groupId>
            <artifactId>spring-boot-starter-data-jdbc</artifactId>
        </dependency>
        <!--  JPA链接数据库(一般用于postgreSQL)  -->
        <dependency>
            <groupId>org.springframework.boot</groupId>
            <artifactId>spring-boot-starter-data-jpa</artifactId>
        </dependency>
        <!--  web启动器 会自动添加Tomcat和Spring MVC依赖,Spring Boot会对Tomcat和Spring MVC进行自动配置。  -->
        <dependency>
            <groupId>org.springframework.boot</groupId>
            <artifactId>spring-boot-starter-web</artifactId>
        </dependency>
        <!--  可以实时更新springboot工程  -->
        <dependency>
            <groupId>org.springframework.boot</groupId>
            <artifactId>spring-boot-devtools</artifactId>
            <scope>runtime</scope>
            <optional>true</optional>
        </dependency>
        <!--  链接MySQL  -->
        <dependency>
            <groupId>com.mysql</groupId>
            <artifactId>mysql-connector-j</artifactId>
            <scope>runtime</scope>
        </dependency>
        <!--  链接postgreSQL  -->
        <dependency>
            <groupId>org.postgresql</groupId>
            <artifactId>postgresql</artifactId>
            <scope>runtime</scope>
        </dependency>

        <!--  单元测试  -->
        <dependency>
            <groupId>org.springframework.boot</groupId>
            <artifactId>spring-boot-starter-test</artifactId>
            <scope>test</scope>
        </dependency>
3.Spring注解(!!!重要)
(1)@SpringBootApplication 启动注解
@SpringBootApplication是一个复合注解,包含了@SpringBootConfiguration,@EnableAutoConfiguration,@ComponentScan这三个注解(可查源码)
@SpringBootConfiguration 注解,继承@Configuration注解,主要用于加载配置文件啊啊啊@SpringBootConfiguration继承自@Configuration,二者功能也一致,标注当前类是配置类, 并会将当前类内声明的一个或多个以@Bean注解标记的方法的实例纳入到spring容器中,并且实例名就是方法名。
@EnableAutoConfiguration 注解,开启自动配置功能@EnableAutoConfiguration可以帮助SpringBoot应用将所有符合条件的@Configuration配置都加载到当前SpringBoot创建并使用的IoC容器。借助于Spring原有的一个工具类:SpringFactoriesLoader,@EnableAutoConfiguration可以智能的自动配置功效才得以大功告成
@ComponentScan注解,主要用于组件扫描和自动装配@ComponentScan的功能其实就是自动扫描并加载符合条件的组件或bean定义,最终将这些bean定义加载到容器中。我们可以通过basePackages等属性指定@ComponentScan自动扫描的范围,如不指定,则默认Spring框架实现从声明@ComponentScan所在类的package进行扫描,默认情况下是不指定的,所以SpringBoot的启动类最好放在root package下。
(2)Controller 相关注解
Ⅰ. @Controller
控制器,处理http请求。return后接页面的文件名,可以直接进行页面跳转。
Ⅱ. @RestController 复合注解
从源码我们知道,@RestController注解相当于@ResponseBody+@Controller合在一起的作用,RestController使用的效果是将方法返回的对象直接在浏览器上展示成json格式.
Ⅲ. @RequestBody
通过HttpMessageConverter读取Request Body并反序列化为Object(泛指)对象
Ⅳ. @RequestMapping
@RequestMapping 是 Spring Web 应用程序中最常被用到的注解之一。这个注解会将 HTTP 请求映射到 MVC 和 REST 控制器的处理方法上
Ⅴ. @GetMapping
用于将HTTP get请求映射到特定处理程序的方法注解
注解简写:@RequestMapping(value = “/say”,method = RequestMethod.GET)等价于:@GetMapping(value = “/say”)
Ⅵ. @PostMapping
用于将HTTP post请求映射到特定处理程序的方法注解
@RequestMapping(method = RequestMethod.POST)的缩写
(3)取请求参数值
Ⅰ. @PathVariable:获取url中的数据
@Controller
@RequestMapping("/User")
public class HelloWorldController {
 	@RequestMapping("/getUser/{uid}")
    // 将url中 uid 的值赋给函数参数中的id
  	// 请求示例:http://localhost:8080/User/getUser/123
   	public String getUser(@PathVariable("uid")Integer id, Model model) {
    	System.out.println("id:"+id);
    	return "user";
   	}
}
Ⅱ. @RequestParam:获取请求参数的值
@Controller
@RequestMapping(“/User”)
public class HelloWorldController {
	@RequestMapping("/getUser")
    // 将函数参数中id的值赋给url中的uid
    // 请求示例:http://localhost:8080/User/getUser?uid=123
	public String getUser(@RequestParam("uid")Integer id, Model model) {
   		System.out.println("id:"+id);
   		return "user";
 	}
}
Ⅲ.@RequestHeader :把Request请求header部分的值绑定到方法的参数上
Ⅳ. @CookieValue: 把Request header中关于cookie的值绑定到方法的参数上
(4)注入bean相关
Ⅰ. @Repository
DAO层注解,DAO层中接口继承JpaRepository<T,ID extends Serializable>,需要在build.gradle中引入相关jpa的一个jar自动加载。
Ⅱ. @Service
@Component注解的一个特例,作用在类上
- @Service注解作用域默认为单例
- 使用注解配置和类路径扫描时,被@Service注解标注的类会被Spring扫描并注册为Bean
- @Service用于标注服务层组件,表示定义一个bean
- @Service使用时没有传参数,Bean名称默认为当前类的类名,首字母小写
- @Service(“serviceBeanId”)或@Service(value=”serviceBeanId”)使用时传参数,使用value作为Bean名字
Ⅲ. @Scope作用域注解
@Scope作用在类上和方法上,用来配置 spring bean 的作用域,它标识 bean 的作用域
属性介绍
value
   singleton  表示该bean是单例的。(默认)
   prototype  表示该bean是多例的,即每次使用该bean时都会新建一个对象。
   request   在一次http请求中,一个bean对应一个实例。
   session   在一个httpSession中,一个bean对应一个实例。

 proxyMode
   DEFAULT     不使用代理。(默认)
   NO        不使用代理,等价于DEFAULT。
   INTERFACES    使用基于接口的代理(jdk dynamic proxy)。
   TARGET_CLASS   使用基于类的代理(cglib)。
Ⅳ. @Entity实体类注解
@Table(name =“数据库表名”),这个注解也注释在实体类上,对应数据库中相应的表。
@Id、@Column注解用于标注实体类中的字段,pk字段标注为@Id,其余@Column。
Ⅴ. @Bean产生一个bean的方法
@Bean明确地指示了一种方法,产生一个bean的方法,并且交给Spring容器管理。支持别名@Bean(“xx-name”)
Ⅵ. @Autowired 自动导入
@Autowired注解作用在构造函数、方法、方法参数、类字段以及注解上
@Autowired注解可以实现Bean的自动注入
Ⅶ. @Component
把普通pojo实例化到spring容器中,相当于配置文件中的
虽然有了@Autowired,但是我们还是要写一堆bean的配置文件,相当麻烦,而@Component就是告诉spring,我是pojo类,把我注册到容器中吧,spring会自动提取相关信息。那么我们就不用写麻烦的xml配置文件了
(5)导入配置文件
@PropertySource注解
引入单个properties文件:@PropertySource(value = {“classpath : xxxx/xxx.properties”})
引入多个properties文件:@PropertySource(value = {“classpath : xxxx/xxx.properties”,“classpath : xxxx.properties”})
@ImportResource导入xml配置文件
可以额外分为两种模式 相对路径classpath,绝对路径(真实路径)file
注意:单文件可以不写value或locations,value和locations都可用
相对路径(classpath)
引入单个xml配置文件:@ImportSource(“classpath : xxx/xxxx.xml”)
引入多个xml配置文件:@ImportSource(locations={“classpath : xxxx.xml” , “classpath : yyyy.xml”})
绝对路径(file)
引入单个xml配置文件:@ImportSource(locations= {“file : d:/hellxz/dubbo.xml”})
引入多个xml配置文件:@ImportSource(locations= {“file : d:/hellxz/application.xml” , “file : d:/hellxz/dubbo.xml”})
@value取值:使用@Value注解取配置文件中的值
@Value(“${properties中的键}”)
	private String xxx;
@Import 导入额外的配置信息
功能类似XML配置的,用来导入配置类,可以导入带有@Configuration注解的配置类或实现了ImportSelector/ImportBeanDefinitionRegistrar。
使用示例
@SpringBootApplication
@Import({SmsConfig.class})
public class DemoApplication {
	public static void main(String[] args) {
		SpringApplication.run(DemoApplication.class, args);
	}
}
(6)事务注解 @Transactional
在Spring中,事务有两种实现方式,分别是编程式事务管理和声明式事务管理两种方式
编程式事务管理: 编程式事务管理使用TransactionTemplate或者直接使用底层的PlatformTransactionManager。对于编程式事务管理,spring推荐使用TransactionTemplate。
声明式事务管理: 建立在AOP之上的。其本质是对方法前后进行拦截,然后在目标方法开始之前创建或者加入一个事务,在执行完目标方法之后根据执行情况提交或者回滚事务,通过@Transactional就可以进行事务操作,更快捷而且简单。推荐使用
(7)全局异常处理
@ControllerAdvice 统一处理异常
@ControllerAdvice 注解定义全局异常处理类
@ControllerAdvice
public class GlobalExceptionHandler {
}
@ExceptionHandler 注解声明异常处理方法
@ControllerAdvice
public class GlobalExceptionHandler {
	@ExceptionHandler(Exception.class)
	@ResponseBody
	public String handleException(){
		return "Exception Deal!";
	}
}
@ExceptionHandler 注解声明异常处理方法
@ControllerAdvice
public class GlobalExceptionHandler {
	@ExceptionHandler(Exception.class)
	@ResponseBody
	public String handleException(){
		return "Exception Deal!";
	}
}


 1万+
1万+


 被折叠的 条评论
为什么被折叠?
被折叠的 条评论
为什么被折叠?
 到【灌水乐园】发言


