


Springboot+Security(一)自定义验证
使用springboot+springsecurity+mybatis 实现数据库动态的管理:用户-角色-权限
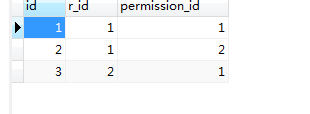
1.数据库表:

2.验证授权
2.1 实体类
User.Java
User这个实体类需要实现接口UserDetails 其他实体类直接创建
public class User implements UserDetails {
    private int id;
    private String username;
    private String password;
    private String nickname;
    private boolean enabled;
    private List<Role> roles;
    private String email;
    private String userface;
    private Date regtime;
    private List<GrantedAuthority> authorities;

    @Override
    public Collection<? extends GrantedAuthority> getAuthorities() {
        return this.authorities;
    }

    public void setAuthorities(List<GrantedAuthority> authorities) {
        this.authorities = authorities;
    }

    @Override
    public String getPassword() {
        return password;
    }

    @Override
    public String getUsername() {
        return username;
    }

    @Override
    public boolean isAccountNonExpired() {
        return true;
    }

    @Override
    public boolean isAccountNonLocked() {
        return true;
    }

    @Override
    public boolean isCredentialsNonExpired() {
        return true;
    }

    @Override
    public boolean isEnabled() {
        return enabled;
    }
    //get和set...
 }
2.2 Dao层
PermissionMapper.java
PermissionMapper实现用户所拥有的权限的查询和获取所有权限列表
@Repository
public interface  PermissionMapper {
	//通过用户的ID查找到用户所拥有的权限
    List<Permission> findByUserid(@Param("userId") int userId);
    //获得所有的权限即权限列表
    List<Permission> findAll();
}
在src/resources/sqlmapper下创建对应的mapper.xml文件
PermissionMapper.xml
<?xml version="1.0" encoding="UTF-8" ?>
<!DOCTYPE mapper PUBLIC "-//mybatis.org//DTD Mapper 3.0//EN" "http://mybatis.org/dtd/mybatis-3-mapper.dtd" >
<mapper namespace="com.example.springsecurity.dao.PermissionMapper" >
  <resultMap id="BaseResultMap" type="com.example.springsecurity.Pojo.Permission" >
    <id column="id" property="id" jdbcType="INTEGER" />
    <result column="name" property="name" jdbcType="VARCHAR" />
    <result column="descritpion" property="descritpion" jdbcType="VARCHAR" />
    <result column="url" property="url" jdbcType="VARCHAR" />
    <result column="pid" property="pid" jdbcType="INTEGER" />
  </resultMap>
  <select id="findByUserid" resultMap="BaseResultMap">
 select p.*
        from user u
        LEFT JOIN user_role sru on u.id= sru.u_id
        LEFT JOIN role r on sru.r_id=r.id
        LEFT JOIN permission_role spr on spr.r_id=r.id
        LEFT JOIN permission p on p.id =spr.permission_id
          where u.id=#{userId}
  </select>
<select id="findAll" resultMap="BaseResultMap">
  select * from permission
</select>
</mapper>
之后在service层完成对dao层的调用,然后实际使用service层中的类和方法。
2.3 创建自定义的Handler
在这里只创建了两个自定的Handler,一个是登录成功,一个是登录失败。而且这里的Handler是返回的JSON数据。
MyAuthenticationFailHandler.java(登录失败)
//登录失败执行的操作  这里 是返回JSON数据给前端
@Component
public class MyAuthenticationFailHandler extends SimpleUrlAuthenticationFailureHandler {
    @Autowired
    private ObjectMapper objectMapper;
    private Logger logger = LoggerFactory.getLogger(getClass());
    @Override
    public void onAuthenticationFailure(HttpServletRequest request, HttpServletResponse response,
                                        AuthenticationException exception) throws IOException, ServletException {
        // TODO Auto-generated method stub
        logger.info("登录失败");
        //以Json格式返回
        Map<String,String> map=new HashMap<>();
        map.put("code", "201");
        map.put("msg", "登录失败");
        response.setStatus(HttpStatus.INTERNAL_SERVER_ERROR.value());
        response.setContentType("application/json");
        response.setCharacterEncoding("UTF-8");
        response.getWriter().write(objectMapper.writeValueAsString(map));

    }
}
MyAuthenticationSuccessHandler.java(登陆成功)
//登录成功执行的操作  这里 是返回JSON数据给前端
@Component
public class MyAuthenticationSuccessHandler extends SavedRequestAwareAuthenticationSuccessHandler {
    @Autowired
    private ObjectMapper objectMapper;
    @Override
    public void onAuthenticationSuccess(HttpServletRequest request, HttpServletResponse response, Authentication authentication)
            throws IOException, ServletException {
        //什么都不做的话,那就直接调用父类的方法
        //super.onAuthenticationSuccess(request, response, authentication);

        //这里可以根据实际情况,来确定是跳转到页面或者json格式。
        //如果是返回json格式,那么这么写
        Map<String,String> map=new HashMap<>();
        map.put("code", "200");
        map.put("msg", "登录成功");
        response.setContentType("application/json;charset=UTF-8");
        response.getWriter().write(objectMapper.writeValueAsString(map));

        //如果是要跳转到某个页面的   "/index" 表示跳转到index页面
        //new DefaultRedirectStrategy().sendRedirect(request, response, "/index");

    }
}
2.4 实现UserDetailsService接口,返回用户数据给自定义AuthenticationProvider来对用户验证授权
实质是AuthenticationManager来验证,AuthenticationManager是一个接口,只有一个authenticate()方法。
这个接口的常见的实现是ProviderManager,而ProviderManger它不自己处理验证,而是委托给所配置的AuthenticationProvider列表来验证。
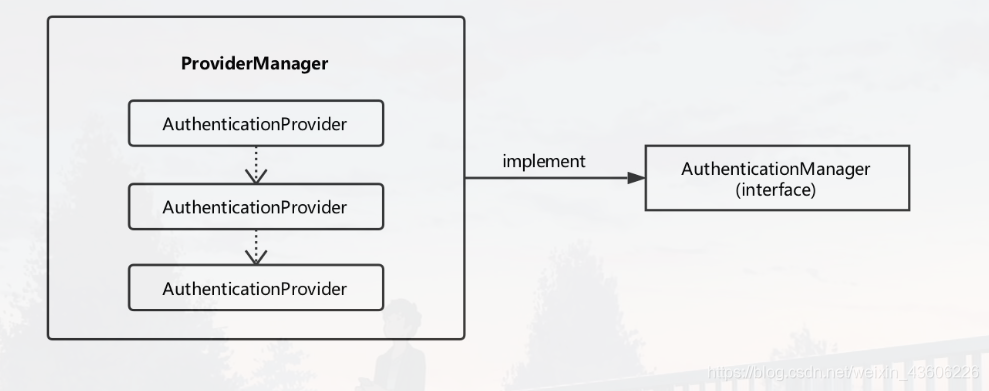
依次调用列表中的AuthenticationProvider验证,只要有一个AuthenticationProvider验证成功,就不再验证,直接以该验证的成果作为ProviderManager的验证结果
MyUserDetailsService.java(实现UserDetailsService接口)
// 返回用户信息给 AuthenticationProvider 去验证
@Component
public class MyUserDetailsService implements UserDetailsService {
    @Autowired
    private UserService userService;
    @Autowired
    private PermissionService permissionService;

    @Override
    public UserDetails loadUserByUsername(String username) throws UsernameNotFoundException {
    	//通过用户名找到用户的信息
        User user=userService.selectbyname(username);
        if(user!=null) {
        	//通过用户的ID获得用户所拥有的权限
           List<Permission> permissions= permissionService.findByUserid(user.getId());
           List<GrantedAuthority> grantedAuthorities=new ArrayList<>();
            for (Permission permission : permissions) {
                if (permission != null && permission.getName()!=null) {
                    GrantedAuthority grantedAuthority = new SimpleGrantedAuthority(permission.getName());
                    //将权限信息添加到 GrantedAuthority 对象中,在后面进行全权限验证时会使用GrantedAuthority 对象。
                    grantedAuthorities.add(grantedAuthority);
                }
            }
            //把用户的权限加入用户的信息中
            user.setAuthorities(grantedAuthorities);
            //把用户信息返回给AuthenticationProvider
            return user;
        }
        return null;
    }
}
MyAuthenticationProvider.java(自定义AuthenticationProvider)
在方法中调用UserDetailsService中的loadUserByUsername 获取用户信息然后验证,验证成功就把用户的详细信息放入spring的全局缓存SecurityContextHolder中,以便在后面访问资源时候方便调用用户信息。
//认证授权
// AuthenticationManager 将验证工作交给ProviderManager   而ProviderManager委托所配置的AuthenticationProvider列表 来验证
//验证用户通过后 授予用户权限  把用户信息保存在spring的全局缓存SecurityContextHolder  好让后面访问资源时 能够调用(比如访问资源时候鉴权)
@Component
public class MyAuthenticationProvider implements AuthenticationProvider {
    @Autowired
    private MyUserDetailsService userDetailService;
    @Autowired
    private PasswordEncoder passwordEncoder;

    @Override
    public Authentication authenticate(Authentication authentication) throws AuthenticationException {
        // TODO Auto-generated method stub
        String userName = authentication.getName();// 这个获取表单输入中返回的用户名;
        String password = (String)authentication.getCredentials();// 这个是表单中输入的密码;
        // 这里构建来判断用户是否存在和密码是否正确
        User userInfo = (User) userDetailService.loadUserByUsername(userName); // 这里调用我们的自己写的获取用户的方法;
        if (userInfo == null) {
            throw new BadCredentialsException("用户名不存在");
        }
        if (!passwordEncoder.matches(password,userInfo.getPassword())) {
            throw new BadCredentialsException("密码不正确");
        }
        Collection<? extends GrantedAuthority> authorities = userInfo.getAuthorities();
        //getAuthorities()是获取权限信息的方法
        // 构建返回的用户登录成功的token
            return new UsernamePasswordAuthenticationToken(userInfo, password, authorities);
    }
    @Override
    public boolean supports(Class<?> aClass) {
        return true;
    }
}
3.完成securityConfig的配置
securityConfig.java
@Configuration
@EnableWebSecurity
public class SecurityConfig extends WebSecurityConfigurerAdapter {
    @Autowired
    private AuthenticationProvider provider;  //注入我们自己的AuthenticationProvider
    @Autowired
    private MyAuthenticationSuccessHandler myAuthenticationSuccessHandler;
    @Autowired
    private MyAuthenticationFailHandler myAuthenticationFailHandler;
    @Autowired
    private MyFilterSecurityInterceptor myFilterSecurityInterceptor;

        @Override
    protected void configure(HttpSecurity http) throws Exception {
        http.
                authorizeRequests()
                    .antMatchers("/").hasAnyRole("USER","ADMIN")
                    .antMatchers("/admin/**").hasRole("ADMIN")
                    .anyRequest().authenticated()
                        .and()
                .formLogin()
                    .and()
                    .csrf().disable()
                    .formLogin().loginPage("/login").permitAll()
                    .loginProcessingUrl("/form")
                    .successHandler(myAuthenticationSuccessHandler)
                    .failureHandler(myAuthenticationFailHandler);
        }

    //配置我们自定义的验证授权  让 spring security使用我们自定义的验证器 而不是默认的验证器  也就是MyAuthenticationProvider
    @Override
    protected void configure(AuthenticationManagerBuilder auth) throws Exception {
        // TODO Auto-generated method stub
        //注册一个自定义的 AuthenticationProvider
        auth.authenticationProvider(provider);
        //再注册一个基于内存的 AuthenticationProvider
//        auth
//        .inMemoryAuthentication()
//            .withUser("admin").password("123456").roles("USER")
//            .and()
//            .withUser("test").password("test123").roles("ADMIN");
    }

//定义了密码的加密方式 这里用了BCrypt加密
    @Bean
   public PasswordEncoder passwordEncoder() {
        return new BCryptPasswordEncoder();
    }
}
4.创建测试用的控制器和页面
4.1控制器创建
TestController.java
@Controller
public class TestController  {
    @RequestMapping("/")
    public String index(Model model){
        return "index";
    }
    @RequestMapping("/admin")
    @ResponseBody
    public String hello(){
        return "hello admin,拥有admin权限";
    }
    @RequestMapping("/whoim")
    @ResponseBody
    public Object whoIm() {
        return SecurityContextHolder.getContext().getAuthentication().getPrincipal();
    }
}
4.2 创建测试页面
index.html
<!DOCTYPE html>
<html lang="en">
<head>
    <meta charset="UTF-8">
    <title>首页</title>
</head>
<body>
   <h5>
       访问到了首页
   </h5>
</body>
</html>
login.html
<!DOCTYPE html>
<html id="ng-app" ng-app="app"  xmlns:th="http://www.thymeleaf.org">
<head>
    <meta charset="UTF-8"/>
    <title>home</title>
</head>
<body>
<form  class="form-signin" action="/form" method="post">
    <h2 class="form-signin-heading">用户登录</h2>
    <table>
        <tr>
            <td>用户名:</td>
            <td><input type="text" name="username"  class="form-control"  placeholder="请输入用户名"/></td>
        </tr>
        <tr>
            <td>密码:</td>
            <td><input type="password" name="password"  class="form-control" placeholder="请输入密码" /></td>
        </tr>
        <tr>

            <td colspan="2">
                <button type="submit"  class="btn btn-lg btn-primary btn-block" >登录</button>
            </td>
        </tr>
    </table>
</form>
</body>
</html>
5.测试
5.1 先创建测试数据
user表(用户表)自己创建两个用户 密码记得要用BCrypt加密 也就是在SecurityConfig中的PasswordEncoder Bean来加密密码。这里插入用户最好用mybatis来创建,能够在方法中调用PasswordEncoder Bean实现密码的加密。

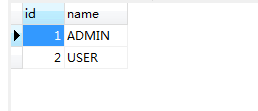
role表(角色表)创建两个角色 一个ADMIN,一个USER
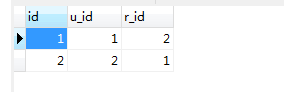
user_role表(用户角色关系表) 用户ID 1 拥有普通用户角色 用户ID 2拥有管理员的角色
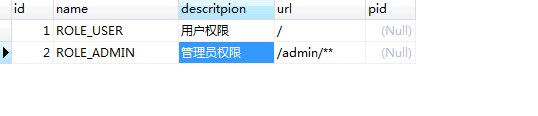
role表(权限表)也设置两个权限 一个用户权限,一个管理员权限 。
permission_role表(权限角色关系表) 管理员角色拥有用户权限和管理员权限,用户角色只拥有管理员权限
5.2 开始测试
直接访问localhost:8080 会跳转到localhost:8080/login 也就是登录页面

然后先用普通用户登录
登录成功的页面

再访问localhost:8080 就能成功访问到首页了 因为是普通用户角色 拥有Role_USER权限

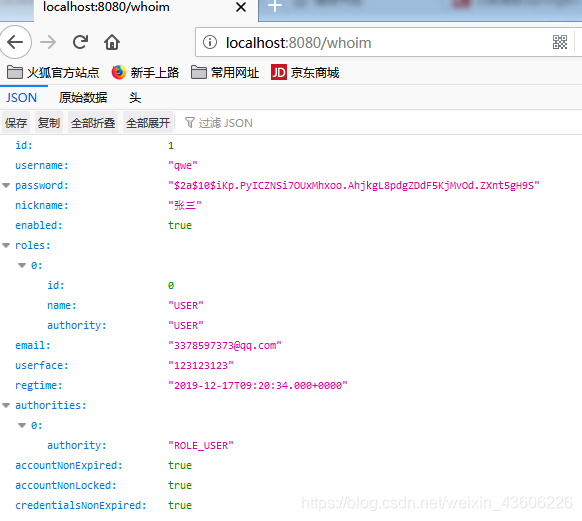
访问localhost:8080/whoim 可以看到自己拥有的权限
接着访问localhost:8080/admin会发现 报403的错误 表示没有访问这个资源的权限

然后登陆用户2 拥有管理员角色的 再访问localhost:8080/admin

访问 localhost:8080/whoim 查看自己拥有的权限


 1689
1689


 被折叠的 条评论
为什么被折叠?
被折叠的 条评论
为什么被折叠?
 到【灌水乐园】发言


