


❤ vue2项目webpack打包的优化策略
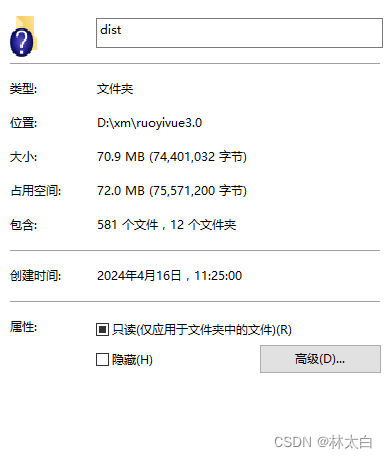
(优化前)
现在我们的打包时间为:
>打包体积大小为:
1、去除开发环境和生产环境提示以及日志
开发环境和生产环境的打印处理
生产环境去除console.log打印的两种方式
通过环境变量控制console.log的打印,具体操作如下:
第一种
1、根目录 .env.xxx文件中写入NODE_ENV参数
2、在main.js里面加上下列语句:
if (process.env.NODE_ENV === 'production') {
  console.log = () => {}
  console.warn = () => {}
}
以上完成了配置
第二种
在babel.config.js 文件中进行修改
1、需下载这个包transform-remove-console
```js
npm install babel-plugin-transform-remove-console --save-dev
2、在babel.config.js可如下写
// babel.config.js
// 生产环境移除console
const remPlugins = []
if (process.env.NODE_ENV === 'production') {
    remPlugins.push('transform-remove-console')
}

module.exports = {
  "plugins":[
  ...remPlugins
  ]
};
根据当前的开发模式或打包模式来使用不同的入口文件
module.exports = {
  chainWebpack: config => {
    // 打包模式
    config.when(process.env.NODE_ENV === 'production', config => {
      config
        .entry('app')
        .clear()
        .add('./src/main-prod.js')
    })
    // 开发模式
    config.when(process.env.NODE_ENV === 'development', config => {
      config
        .entry('app')
        .clear()
        .add('./src/main-dev.js')
    })
  }
}
2、 build后不可查看源码
不设置的情况下,打包上线,可在 f12 -> sources -> webpack:// 下查看到项目源码
在vue.config.js中配置
const isProduction = process.env.NODE_ENV === 'production'
module.exports = {
	productionSourceMap: false,
	configureWebpack: {
		devtool: isProduction ? false : "source-map",
	}
}
3、解决每次发版都要强刷清除浏览器缓存
原理
将打包后的js和css文件,加上打包时的时间戳
1 index.html
在 public 目录下的index.html文件里添加如下代码
<meta http-equiv="pragram" content="no-cache">
<meta http-equiv="cache-control" content="no-cache, no-store, must-revalidate">
<meta http-equiv="expires" content="0">
vue.config.js
let timeStamp = new Date().getTime();
module.exports = {
    publicPath: "./",
    filenameHashing: false,
    // 打包配置
    configureWebpack: {
        output: { // 输出重构 打包编译后的js文件名称,添加时间戳.
            filename: `js/js[name].${timeStamp}.js`,
            chunkFilename: `js/chunk.[id].${timeStamp}.js`,
        }
    },
    css: {
        extract: { // 打包后css文件名称添加时间戳
            filename: `css/[name].${timeStamp}.css`,
            chunkFilename: `css/chunk.[id].${timeStamp}.css`,
        }
    }
};
4、配置Vue2项目打包优化命令行(Tree-shaking)
Tree-shaking 是一种通过静态分析代码来检测未使用部分的技术
(1)添加–report命令:“build”: “vue-cli-service build --report”,打包后 dist 目录会生成 report.html 文件,用来分析各文件的大小
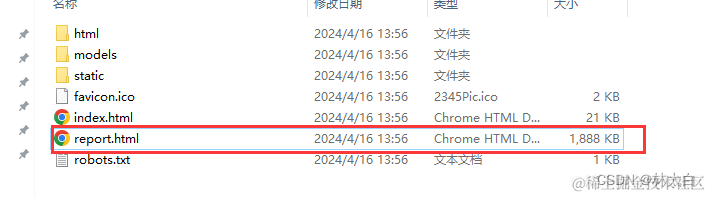
打开以后如图所示
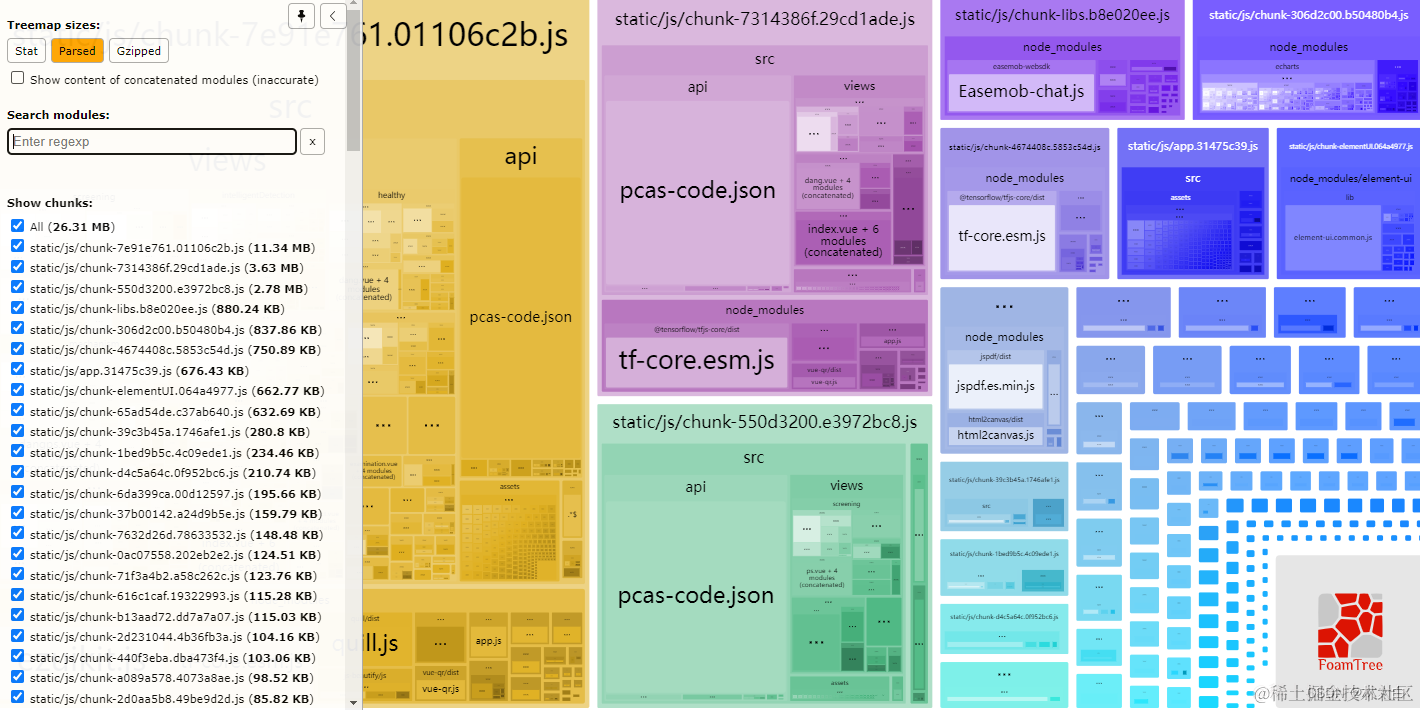
5、配置V2打包优化对比工具webpack-bundle-analyzer ((Tree-shaking))
webpack有一种可视化的打包分析工具:webpack-bundle-analyzer ,在vue.config.js中引入,代码如下:npm run build的时候会出现打包分析图
npm install webpack-bundle-analyzer -D
const BundleAnalyzerPlugin = require('webpack-bundle-analyzer').BundleAnalyzerPlugin;

module.exports = {
configureWebpack: {
        plugins: [
            new BundleAnalyzerPlugin()
        ]
    }
}
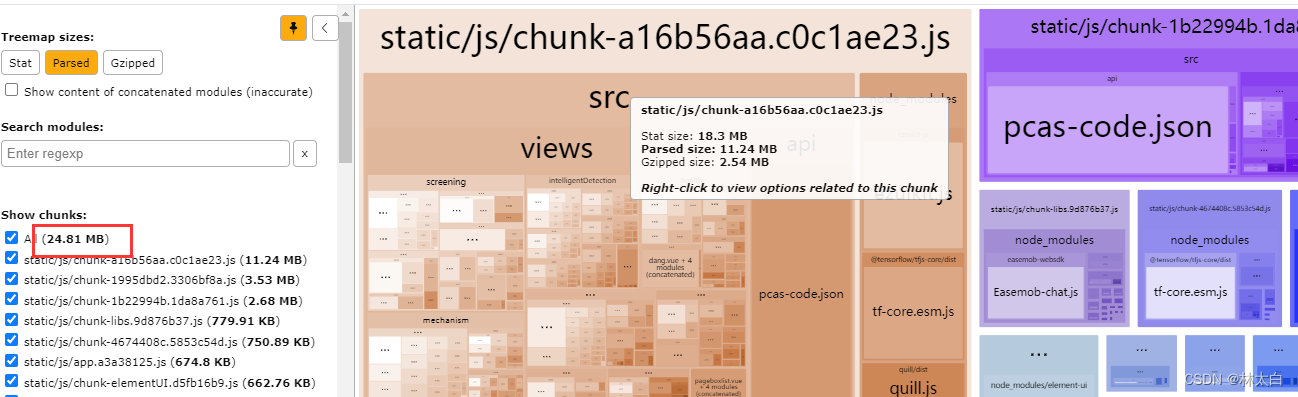
6、externals 提取公共依赖包
在我打包之前项目体积如图

vue.config.js 中配置
configureWebpack: {
    name: name,
    resolve: {
      alias: {
        '@': resolve('src')
      }
    },
    externals: {
      vue: 'Vue',
      'vue-router': 'VueRouter',
      axios: 'axios',
      echarts: 'echarts'
    },
    // 打包插件
    // plugins: [newBundleAnalyzerPlugin],
  },
在 index.html 中使用 CDN 引入依赖
vue
<script type="text/javascript" src="https://lib.baomitu.com/vue/2.6.10/vue.min.js"></script>

vue-router
 <script type="text/javascript" src="https://lib.baomitu.com/vue-router/3.0.2/vue-router.min.js"></script>

axios
 <script type="text/javascript" src="https://lib.baomitu.com/axios/0.18.1/axios.min.js"></script>

echarts
<script type="text/javascript" src="https://lib.baomitu.com/echarts/4.7.0/echarts.min.js"></script>
配置后如图
7、babel-plugin-component(未使用)
通过该插件,最终只引入指定组件和样式,来实现减少组件库体积大小
// 安装
npm install babel-plugin-component -D
babel.config.js中引入
plugins: [
    'component',
    {
      'libraryName': 'element-ui',
      'styleLibraryName': 'theme-chalk',
    }
  ],
8、使用 moment-locales-webpack-plugin插件,剔除掉无用的语言包
安装
npm install moment-locales-webpack-plugin -D
vue.config.js 中引入
constMomentLocalesPlugin = require( 'moment-locales-webpack-plugin');
module.exports = {
configureWebpack: {
	plugins: [
	newMomentLocalesPlugin({ localesToKeep: [ 'zh-cn']})
	]
}
}
9、HappyPack 多线程打包(提升打包速度)
由于运行在 Node.js 之上的 webpack 是单线程模型的,我们需要 webpack 能同一时间处理多个任务,发挥多核 CPU 电脑的威力
HappyPack就能实现多线程打包,它把任务分解给多个子进程去并发的执行,子进程处理完后再把结果发送给主进程,来提升打包速度
vue2
安装
npm install happypack -D

//vue.config.js中进行配置

//顶部引入
const HappyPack = require('happypack');
const happyThreadPool = HappyPack.ThreadPool({ size: os.cpus().length });
const os = require('os');

chainWebpack(config){
		config.plugin('happypack')
			.use(HappyPack)
			.tap(options=>{
				options[0]={
					id:'babel',
					loaders:['babel-loader?cacheDirectory=true'],
					threadPool: happyThreadPool
				}
				return options
			})
		const hRule = config.module.rule('js')
		hRule.test(/\.js$/)
			.include.add(resolve('src'))
			.end()
		hRule.uses.clear()
		hRule.use('happypack/loader?id=babel')
			.loader('happypack/loader?id=babel')
			.end()
}
安装
npm install happypack -D
vue.config.js 中引入
constHappyPack = require( 'happypack');
constos = require( 'os');
consthappyThreadPool = HappyPack.ThreadPool({ size: os.cpus.length });
10、Gzip压缩
安装
npm install compression-webpack-plugin -D
vue.config.js 中引入
// 引入
const CompressionPlugin = require( 'compression-webpack-plugin');


//使用
  configureWebpack: {
    // 打包插件
    plugins:[
      new CompressionPlugin({
      test: /\.(js|css)(\?.*)?$/i, //需要压缩的文件正则
      threshold: 1024, //文件大小大于这个值时启用压缩
      deleteOriginalAssets: false//压缩后保留原文件
      })
    ],
}


 1757
1757

 被折叠的 条评论
为什么被折叠?
被折叠的 条评论
为什么被折叠?
 到【灌水乐园】发言


