


 本文介绍了如何在Vue项目中利用TypeScript封装一个原生放大镜组件,包括放大镜的工作原理、代码实现及关键属性的使用方法,为开发者提供了一个实用的开发参考。
一图解释放大镜原理 以及 Vue+TypeScrip封装原生放大镜组件
效果图

背景介绍
开发中需要一个放大镜功能,但翻遍内外网没有找到符合需求的放大镜组件,一些知名的组件库也没找到合适的组件,于是自己研究了一番放大镜的原理写了个组件。
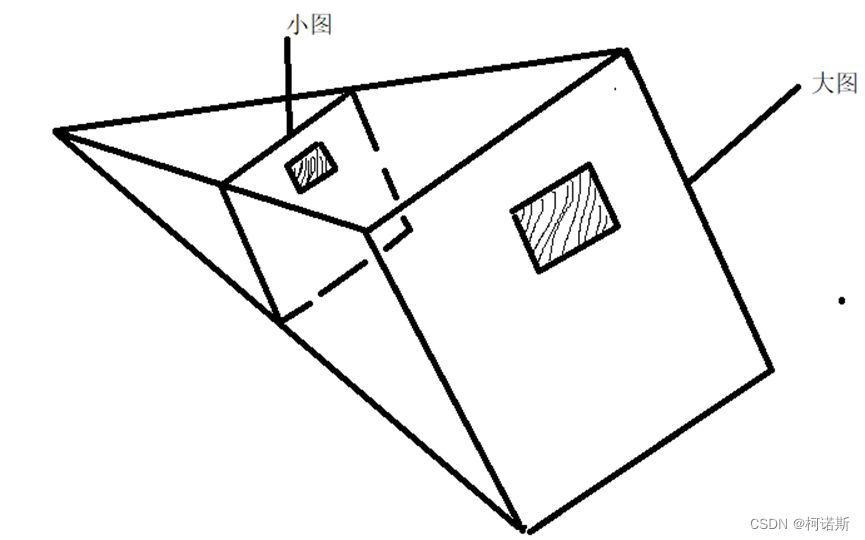
放大镜的原理
假设放大比例为X,那么一张100 × 110的图片(称为小图),放大之后的图片(称为大图)就是x100 × x110, 那么,所谓的放大镜功能只是将,用户在小图范围内选中的阴影范围,在大图里面将按照x比例放大的大图框移动到成x比例移动的距离位置处即可,这个大图框部分展示的大图的内容就是小图里面用户选定的范围放大的部分。
代码以及注释
- 使用组件的方法
import MagnifyLens from './components/MagnifyLens.vue'
…
<MagnifyLens :imgs :imgWidth="300" :imgHeight="300" :borderStyle="'1px solid red'" :scale="3"/>
//	这几个属性依次是 放大镜里面存放的图片数组(元素有src以及name属性), 小图的宽度(px)、小图的高度(px)、小图边框的样式、放大的比例
- 放大镜组件(MagnifyLens.vue)
<style scoped lang="scss">
.page-preview{
display: flex;
flex-direction: column;
gap: 5px;
.top-preview {
border: 1px solid;
position: relative;
height: calc(100% - 30px);
width: 100%;
& > .event {
position: absolute;
width: 100%;
height: 100%;
top: 0;
left: 0;
z-index: 998;
}
> img {
width: 100%;
height: 100%;
}
> .mask {
position: absolute;
background-color: rgba(148, 152, 148, 0.3);
left: 0;
top: 0;
display: none;
}
> .big {
position: absolute;
width: 100%;
height: 100%;
top: -1px;
left: 102%;
overflow: hidden;
z-index: 998;
display: none;
> img {
position: absolute;
left: 0;
top: 0;
display: block;
}
}
&:hover > .mask, &:hover > .big {
display: block;
}
}
.bottom-preview {
height: 30px;
display: flex;
align-items: stretch;
.a{
width: 15px;
border: solid 1px rgba(211, 211, 211, 0.41);
display: flex;
align-items: center;
justify-content: center;
}
.ul {
width: calc(100% - 30px);
display: flex;
gap: 5%;
flex-wrap: nowrap;
overflow-x: hidden;
border-top: 1px solid gray;
border-bottom: 1px solid gray;
.li{
flex: 0 0 100%;
display: flex;
justify-content: center;
align-items: center;
}
}
}
}
</style>
<template>
<div class="page-preview" :style="{width: props.imgWidth+'px', height: props.imgHeight+'px'}">
<div class="top-preview" :style="{border: props.borderStyle}">
<!-- 底图层 -->
<img :src="props.imgs[selectImgIdx].src"/>
<!-- 事件层监听层,透明,用于监听鼠标移动事件,其内不设置子元素,因为如果有子元素,子元素也有自己的mousemove事件,其事件会冒泡到父元素中 -->
<div class="event" @mousemove="magnify" ref="eventMask"></div>
<!-- 遮罩层,灰色,用来模拟鼠标悬浮时的选定范围效果 -->
<div class="mask" :style="{width: 100 / props.scale + '%', height: 100 / props.scale + '%'}" ref="mask"></div>
<!-- 显示放大的图片 -->
<div class="big">
<img :style="{width: props.scale * 100 + '%', height: props.scale * 100 + '%'}" :src="props.imgs[selectImgIdx].src" ref="big"/>
</div>
</div>
<div class="bottom-preview">
<button class="a" @click="moveImg(true)">
<span><</span>
</button>
<div class="ul" ref="ul">
<span class="li">{{props?.imgs[selectImgIdx]?.name || '商品名称'}}</span>
</div>
<button class="a" @click="moveImg(false)">
<span>></span>
</button>
</div>
</div>
</template>
<script setup lang="ts">
import {defineProps, ref} from 'vue';
const props = defineProps({
imgs: {
type: Array,
required: true
},
imgWidth: {
required: false,
type: Number,
default: 200
},
imgHeight: {
required: false,
type: Number,
default: 400
},
borderStyle: {
required: false,
type: String,
default: 'none'
},
scale: {
required: false,
type: Number,
default: 2
}
});
const selectImgIdx = ref(0);
const mask = ref(null);
const big = ref(null);
const eventMask = ref(null);
// 1. 缩略图的逻辑(小图里面小图框的位置(x和y)对应大图框在完整大图框的位置(x1和y1))
const magnify = function (event) {
//计算遮罩的左值以及顶部的值
let left = event.offsetX - mask.value.offsetWidth / 2
let top = event.offsetY - mask.value.offsetHeight / 2
if (left < 0) {
//判断按照当前left绘制的小阴影框超出小图左边的情况, 小图遮罩对于小图的x偏移量<0,则说明: 现在计算出来的小图遮罩位置小图遮罩已经移出小图左侧外了,把小图遮罩设置成贴着左边
left = 0
} else if (left > (eventMask.value.offsetWidth - mask.value.offsetWidth)) {
//判断按照当前left绘制的小阴影框超出小图右边的情况, 小图遮罩对于小图的x偏移量>(遮罩宽度 - 遮罩宽度),则说明: 现在计算出来的小图遮罩位置已经移出小图右侧外了,把小图遮罩设置成贴着右边
left = eventMask.value.offsetWidth - mask.value.offsetWidth;
}
if (top < 0) {
top = 0
} else if (top > (eventMask.value.offsetHeight - mask.value.offsetHeight)) {
top = eventMask.value.offsetHeight - mask.value.offsetHeight;
}
//将遮罩以及big图赋值定位 (此外big图为普通图的两倍大小 且方位为负值)
mask.value.style.left = left + 'px';
mask.value.style.top = top + 'px';
big.value.style.left = -props.scale * left + 'px';
big.value.style.top = -props.scale * top + 'px';
}
// 2. 左右无限切换图片的逻辑
function moveImg(isPre:boolean){
if (isPre) {
// 向左点击
selectImgIdx.value = (selectImgIdx.value + props.imgs?.length - 1) % props.imgs?.length;
} else {
// 向右点击
selectImgIdx.value = (selectImgIdx.value + props.imgs?.length + 1) % props.imgs?.length;
}
}
</script>
tip: 推荐一个gif录制工具 screenToGif, 关注微信公众号【编程同行人】,回复【rj0-01】获取。
声明:文章内容均为原创,转载请注明出处,如有错误或晦涩的地方欢迎在下方评论区指正和讨论。欢迎移步我的微信公众号【编程同行人】,我也会在公众号上分享其他的一些提升编程效率的工具以及实际生产开发中的心得总结。


 746
746


 被折叠的 条评论
为什么被折叠?
被折叠的 条评论
为什么被折叠?
 到【灌水乐园】发言


