


微信公众号开发记录
微信公众号开发记录
前言
最近开发了微信公众号项目,记录一下一些关键点
一、注册公众号/注册测试号(略)
以下以测试号为例
二、接入微信公众平台开发
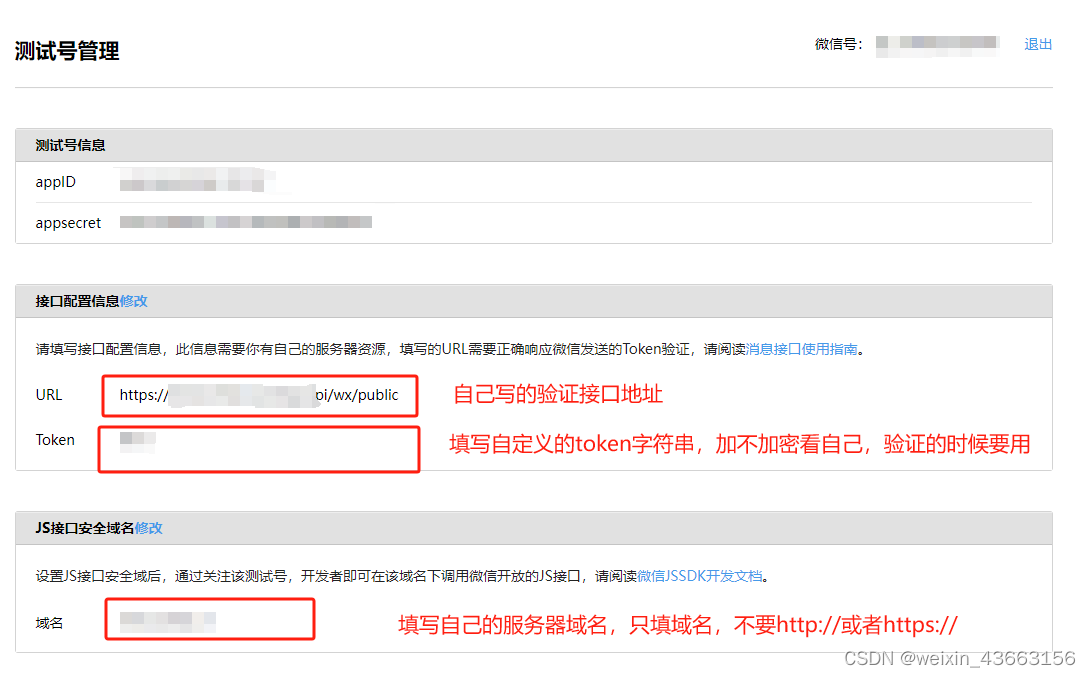
1、接口和域名配置
在自己申请的公众号配置验证接口和域名
2、验证接口
(1)引入依赖。
// 引入MAVEN依赖
<dependency>
  <groupId>com.github.binarywang</groupId>
    <artifactId>weixin-java-mp</artifactId>
    <version>4.5.0</version>
</dependency>
(2)配置application.yml
wx:
  mp:
    #callback:如果本地填写穿透地址,如果是服务器填写服务器地址
    callback: https://域名/
    configs:
      - appId: appid#第一个公众号的appid
        secret: appsecret#公众号的appsecret
        token: Token #对应接口配置里的Token值
        #aesKey: sha1 # 接口配置里的EncodingAESKey值,如果是测试号可以不用填写
(3)写WxMpProperties配置类
package com.cdrsd.lzdx.common.configuration;

import cn.hutool.json.JSONUtil;
import lombok.Data;
import org.springframework.boot.context.properties.ConfigurationProperties;
import org.springframework.stereotype.Component;

import java.util.List;

/**
* @Description: wechat mp properties
* @Author: SWG
* @Date: 2024/3/23
*/
@Data
@Component
@ConfigurationProperties(prefix = "wx.mp")
public class WxMpProperties {
    /**
     * 是否使用redis存储access token
     */
    private boolean useRedis;

    /**
     * redis 配置
     */
    private RedisConfig redisConfig;

    @Data
    public static class RedisConfig {
        /**
         * redis服务器 主机地址
         */
        private String host;

        /**
         * redis服务器 端口号
         */
        private Integer port;

        /**
         * redis服务器 密码
         */
        private String password;

        /**
         * redis 服务连接超时时间
         */
        private Integer timeout;
    }

    /**
     * 多个公众号配置信息
     */
    private List<MpConfig> configs;

    @Data
    public static class MpConfig {
        /**
         * 设置微信公众号的appid
         */
        private String appId;

        /**
         * 设置微信公众号的app secret
         */
        private String secret;

        /**
         * 设置微信公众号的token
         */
        private String token;

        /**
         * 设置微信公众号的EncodingAESKey
         */
        private String aesKey;
    }

    @Override
    public String toString() {
        return JSONUtil.toJsonStr(this);
    }
}
(4)写WxMpConfig配置类
package com.cdrsd.lzdx.common.configuration;

import me.chanjar.weixin.mp.api.WxMpService;
import me.chanjar.weixin.mp.api.impl.WxMpServiceImpl;
import me.chanjar.weixin.mp.config.impl.WxMpDefaultConfigImpl;
import org.springframework.beans.factory.annotation.Autowired;
import org.springframework.context.annotation.Bean;
import org.springframework.context.annotation.Configuration;

import java.util.List;
import java.util.stream.Collectors;

/**
 * @author: SWG
 * @description data: 2024/3/21
 */
@Configuration
public class WxMpConfig {
    @Autowired
    WxMpProperties wxMpProperties;

    /**
     * 创建并配置一个用于微信公众号操作的 WxMpService 实例。
     * 该方法读取配置属性并为每个公众号配置创建一个 WxMpDefaultConfigImpl 实例,
     * 将这些实例放入 MultiConfigStorages 中,并返回最终的 WxMpService 实例。
     *
     * @return WxMpService 实例,用于微信公众号操作
     * @throws RuntimeException 如果 wxService 配置异常或 Application 相关配置对象缺失
     */
    @Bean
    public WxMpService wxService() {
        final List<WxMpProperties.MpConfig> configs = wxMpProperties.getConfigs();
        // 检查配置是否存在
        if (configs == null) {
            throw new RuntimeException("wxService配置异常,请检查Application相关配置对象");
        }
        // 创建 WxMpService 实例
        WxMpService service = new WxMpServiceImpl();
        // 配置 MultiConfigStorages
        service.setMultiConfigStorages(
                configs.stream().map(item -> {
                    WxMpDefaultConfigImpl wxMpDefaultConfig = new WxMpDefaultConfigImpl();
                    // 设置公众号的 AppId
                    wxMpDefaultConfig.setAppId(item.getAppId());
                    // 设置公众号的 Secret
                    wxMpDefaultConfig.setSecret(item.getSecret());
                    // 设置公众号的 Token
                    wxMpDefaultConfig.setToken(item.getToken());
                    // 设置公众号的 AesKey
                    wxMpDefaultConfig.setAesKey(item.getAesKey());
                    return wxMpDefaultConfig;
                }).collect(Collectors.toMap(WxMpDefaultConfigImpl::getAppId, a -> a, (o, n) -> o))
        );

        return service;
    }

}
(5)controller代码`:
// An highlighted block
@RequestMapping("/public")
    public String checkWxServer(@RequestParam Map<String,String> map) {
        System.out.println("开始验证消息是否来自微信服务器,传来的参数{}"+map.toString());
        String signature = map.get("signature");//微信发来的加密字符串
        String echostr = map.get("echostr");//随机字符串
        String timestamp = map.get("timestamp");
        String nonce = map.get("nonce");
        if (StringUtils.isAnyBlank(timestamp, nonce, signature)) {
            throw new IllegalArgumentException("请求参数非法,请核实!");
        }
        //开发者通过检验signature对请求进行校验(下面有校验方式)。
        //若确认此次GET请求来自微信服务器,请原样返回echostr参数内容,则接入生效,成为开发者成功,否则接入失败。
        if (wxService.checkSignature(timestamp, nonce, signature)) {
            System.out.println("消息来自微信服务器,验证成功,signature;{}"+signature);
            return echostr;
        }
        System.out.println("消息来自其他服务器,非法请求!!!");
        return "微信非法请求";
    }
3、创建定时任务定时刷新Access token
(1)配置需要的参数
package com.XXX.XXX.common;

public class Constants {
    public static final String tokentype="1";
    //测试公众号APPID
    public static final String appid = "appid";
    //测试公众号appsecret
    public static String secret = "secret";
    //通过code换取网页授权access_token  URL
    public static final String oauth2url = "https://api.weixin.qq.com/sns/oauth2/access_token?appid=APPID&secret=SECRET&code=CODE&grant_type=authorization_code";
    //获得JSAPIticket URL
    public static String get_jsapiticket_url="https://api.weixin.qq.com/cgi-bin/ticket/getticket?access_token=ACCESS_TOKE&type=jsapi";
    //获取accesstoken URL
    public static final String get_accesstoken_url="https://api.weixin.qq.com/cgi-bin/token?grant_type=client_credential&appid=APPID&secret=SECRECT";

}
(2)WeixinUtil createAccessToken方法和getJsTicket方法
	/**
	* @Description: 根据凭证appid和密钥appsecret生成access_token
	* @return: net.sf.json.JSONObject
	* @Author: SWG
	* @Date: 2024/3/19
	*/
	public static JSONObject createAccessToken() {
		String requestUrl = Constants.get_accesstoken_url.replace("APPID", Constants.appid).replace("SECRECT", Constants.secret);
		String resultstr= HttpRequest.sendGet(requestUrl);
		JSONObject jsonObject = JSONObject.fromObject(resultstr);
		return jsonObject;
	}
	/**
	* 根据access_token生成JsApiTicket
	* @Author: SWG
	* @Date: 2024/3/19
	*/
	public static JSONObject getJsTicket(String accessToken){
		String jsapi_ticketUrl = Constants.get_jsapiticket_url.replace("ACCESS_TOKE", accessToken);
		String jsapi_ticket = HttpRequest.sendGet(jsapi_ticketUrl);
		JSONObject json = JSONObject.fromObject(jsapi_ticket);
		return json;
	}
(2)定时任务
/**
    * @Description: 定时任务定时刷新Access token存到数据库
    * @Author: SWG
    * @Date: 2024/3/23
    */
    @Scheduled(cron = "0 0 0/2 * * ?")
    @PostConstruct
    protected void executeInternal() {
        JSONObject accessTokenTemp = WeixinUtil.createAccessToken();
        try {
            String accessToken = accessTokenTemp.getString("access_token");
            // 取jsapiticket
            JSONObject json = WeixinUtil.getJsTicket(accessToken);
            if (json != null) {
                if(json.getString("ticket")!=null){
                    System.out.println("获取token成功:"+accessToken);
                    // 写入数据库
                    userService.updateToken(Constants.appid, Constants.tokentype, accessToken, json.getString("ticket"));
                }else{
                    System.out.println("wx =====task获取ticket失败");
                }
            } else {
                System.out.println("wx =====task获取ticket失败");
            }
        }catch (JSONException e){
            System.out.println("task没有获取到token"+e.getMessage()+"errcode:"+accessTokenTemp.getString("errcode")+";errmsg:"+accessTokenTemp.getString("errmsg"));
        }
    }
4、创建公众号自定义菜单
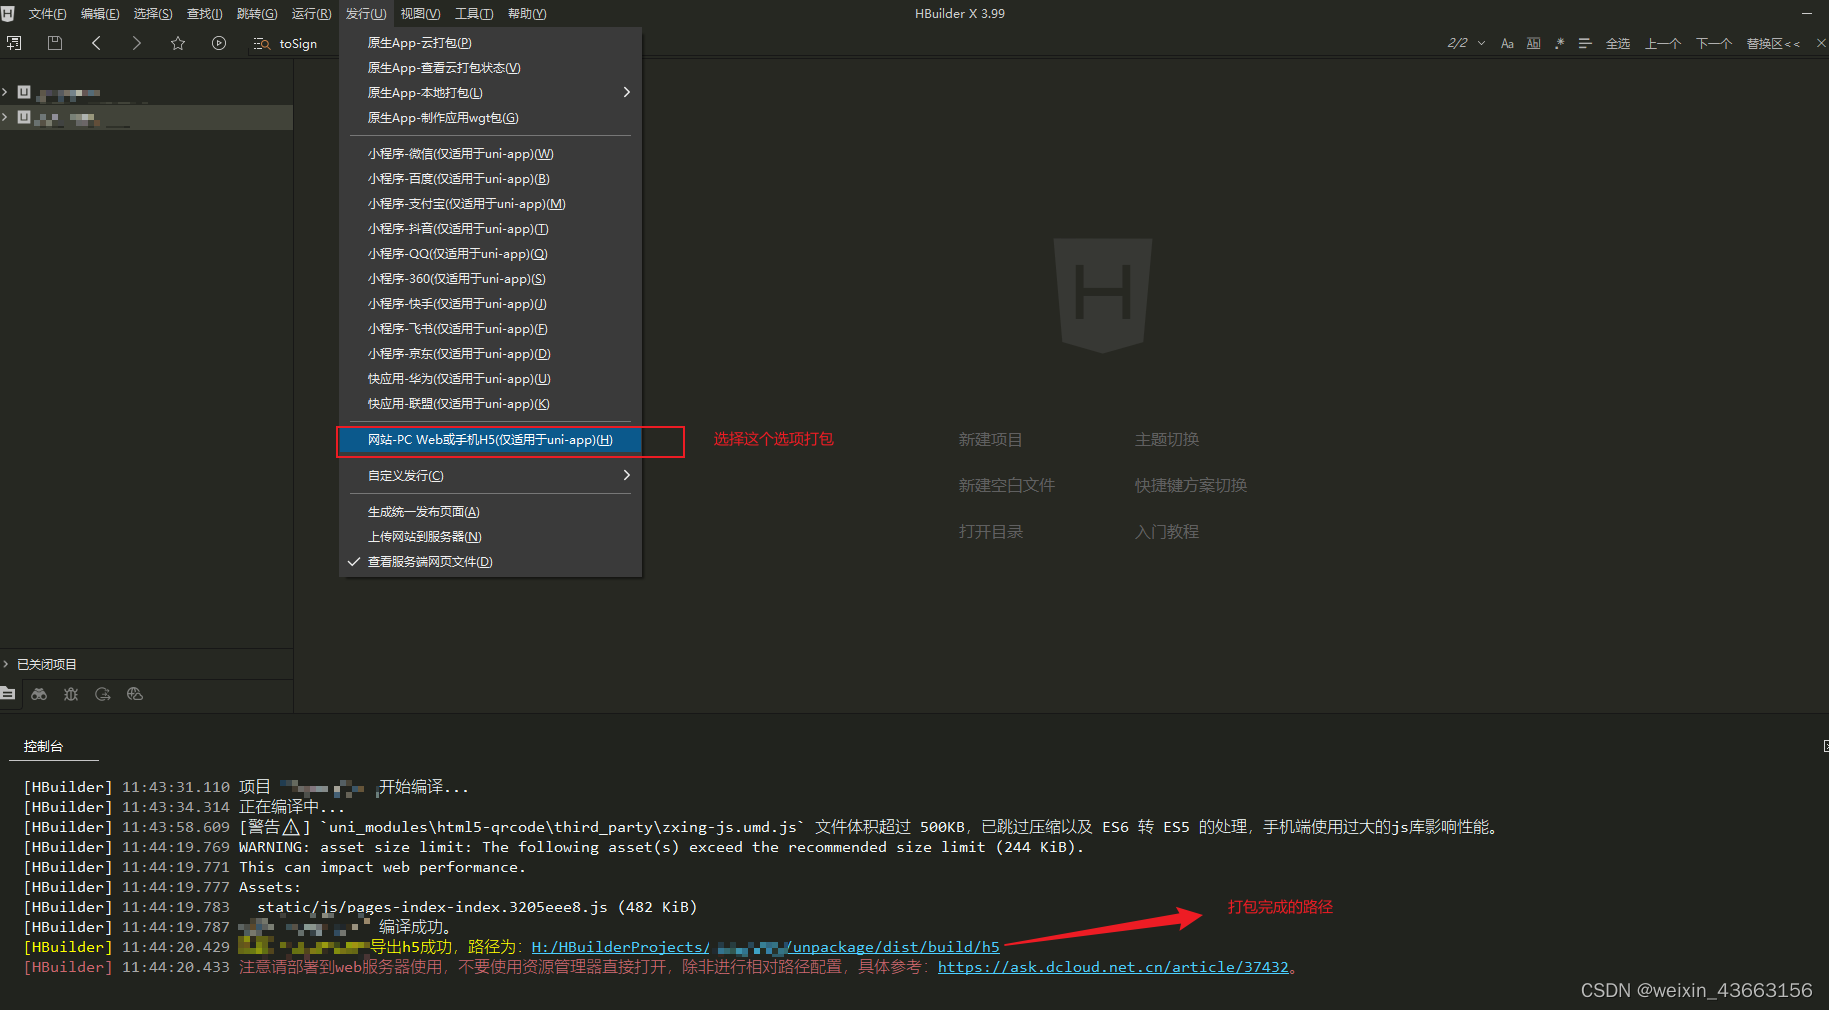
先将uniapp前端打包,部署到服务器,得到访问页面的连接,用postMan请求微信服务器,生成自定义菜单,请求需要access_token
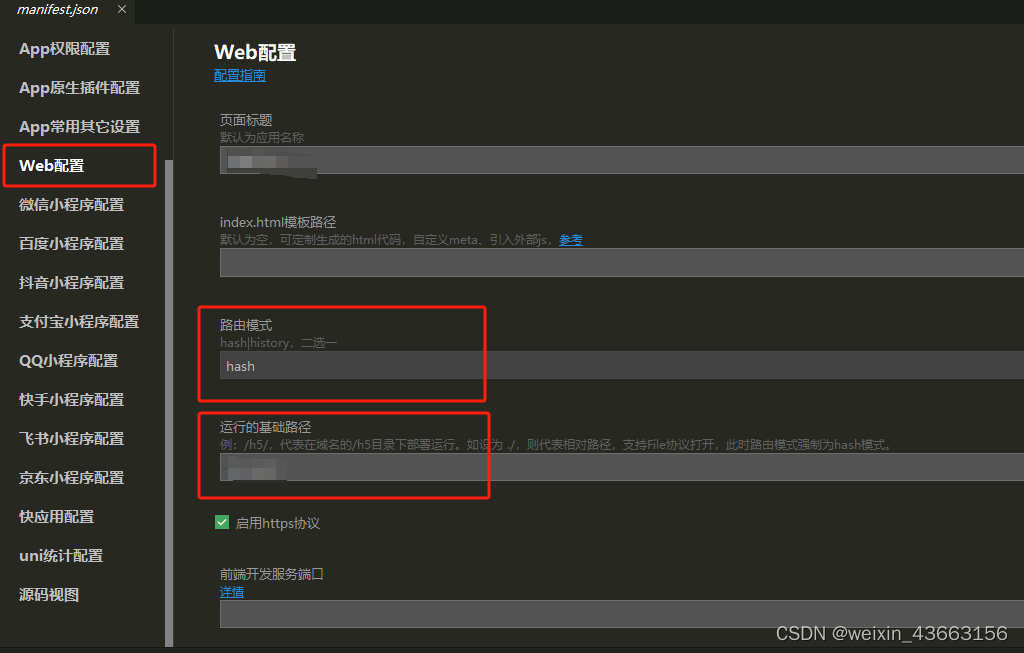
(1)uniapp前端打包
正确填写路由模式和基础路径
打包
(2)生成自定义菜单

总结
关键点:
一、接入服务器
二、定时刷新Access token。
三、获取openid进行登录(此项目是有账号密码验证,openid与账号绑定)
四、可以快乐的敲业务代码了


 1万+
1万+

 被折叠的 条评论
为什么被折叠?
被折叠的 条评论
为什么被折叠?
 到【灌水乐园】发言


