


学前了解:
在PHP中可以通过GD库处理图像
创建一个图像应该完成如下所示的四个基本步骤:
1.创建图像
2.绘制图像
3.输出图像
header函数注意点
在该函数之前,不能输出任何内容
在我们的PHP代码 的函数里面,我们使用的/开头的路径 这个/不是指 web根目录,而是操作系统的 文件的根目录!
4.释放资源
一、创建图像
1.创建新的
imagecreatetruecolor()//新建一个真彩色图像
2.打开服务器或网络文件中已经存在的GIF,JPEG,PNG,WBMP格式图像
imagecreatefromjpeg()
imagecreatefrompng()
imagecreatefromgif()
imagecreatefromwbmp()
创建或者打开失败的时候会返回空字符串,并且输出一条错误信息。
imagesx()//输出画布宽度
imagesy()//输出画布高度
getimagesize()//取得图像大小
二、绘制图像
图像创建完成以后,就可以通过这个图像资源,使用各种画像函数设置图像的颜
色、填充图像、画点、线段、以及向图像的添加文本等
1.imagecolorallocate()//分配颜色
2.imagefill()//区域填充
3.imagesetpixel()//画一个单一像素
4.imageline()//画一条线段
5.imagerectangle()//画一个矩形
6.imagestring()//水平地画一行字符串
7.imagettftext()//用 TrueType 字体向图像写入文本
8.imagettfbbox()//计算 TrueType 文字所占区域
9.imagecopy()//拷贝图像的一部分
10.imagecopymerge()//拷贝并合并图像的一部分
11.imagecopyresampled()//重采样拷贝部分图像并调整大小
三、生成图像
header()
imagegif()
imagejpeg()
imagepng()
imagewbmp()
四、释放资源
imagedestroy()
五、设计验证码
六、水印
七、缩放与裁剪
<?php
	header("Content-Type:text/html;charset=utf-8");//图片编码设置                header("content-type:text/html;charset=utf-8");         //设置编码
	$img=imagecreatetruecolor(200,200);//用var_dump将会返回一个资源类型  新建一个长和高都为200像素的真彩色图像
	$color1=imagecolorallocate($img,50,50,50);//分配颜色   第一个值放存放资源的那个变量
	$color2=imagecolorallocate($img,229,36,36);

	imagefill($img,0,0,$color2);//区域填充

	//以JPEG格式将图像输出到浏览器或文件
	imagejpeg($img);

		//释放相应的资源
	imgedestroy($img);
<?php
	header("Content-Type:text/html;charset=utf-8");//图片编码设置                header("content-type:text/html;charset=utf-8");         //设置编码
	$img=imagecreatetruecolor(200,200);//用var_dump将会返回一个资源类型  新建一个长和高都为200像素的真彩色图像
	$color1=imagecolorallocate($img,50,50,50);//分配颜色   第一个值放存放资源的那个变量
	$color2=imagecolorallocate($img,229,36,36);

	imagefill($img,0,0,$color2);//区域填充


	if(imagejpeg($img,'songchongqiang.jpeg'))//保存图像   输出的时候返回bool类型           也可以保存到文件夹里
	{
		echo '保存成功';
	}
	//释放相应的资源
	imgedestroy($img);

?>
设计验证码的步骤:
<?php
		//告诉浏览器传进去的是图片
		header('content-type:image/jpeg');
		//新建一个真彩色图像
		$width=120;
		$height=40;
	$img=imagecreatetruecolor($width,$height);
	//分配颜色   第一个值放存放资源的那个变量     rand()产生随机颜色
	$color_Bg=imagecolorallocate($img,rand(200,255),rand(200,255),rand(200,255));


	//分配颜色   第一个值放存放资源的那个变量     rand()产生随机颜色
	$colorBorder=imagecolorallocate($img,rand(200,255),rand(200,255),rand(200,255));

	imagefill($img,0,0,$color_Bg);//填充颜色
	//化一个矩形   0,0  左上角的0,0
	imagerectangle($img,0,0,$width-1,$height-1,$colorBorder);


	for($i=0;$i<100;$i++){
	//化圆点                         //圆点坐标  x轴的宽      y轴的高                        圆点颜色
	imagesetpixel($img,rand(0,$width-1),rand(0,$height-1),imagecolorallocate($img,rand(100,200),rand(100,200),rand(100,200)));
	}
	//化一条线

	//起点 在左半边 width将x轴控制在一半      高度在0到40        //终点在右半边
	for($i=0;$i<5;$i++){       //x轴的宽          x轴的高           y轴的宽                            y轴的高
	imageline($img,rand(0,$width/2),rand(0,$height),rand($width/2,$width),rand(0,$height),imagecolorallocate($img,rand(100,200),rand(100,200),rand(100,200)));
	}
	imagejpeg($img);//输出颜色

		//释放相应的资源
	imgedestroy($img);
?>
创建一个简单的验证码
<?php
header('Content-type:image/jpeg');
$width=120;
$height=40;
$element=array('a','b','c','d','e','f','g','h','i','j','k','m','n','o','p','q','r','s','t','u','v','w','x','y','z');
$string='';
for ($i=0;$i<5;$i++){
	$string.=$element[rand(0,count($element)-1)];//单个值的坐标
}
$img=imagecreatetruecolor($width, $height);
$colorBg=imagecolorallocate($img,rand(200,255),rand(200,255),rand(200,255));
$colorBorder=imagecolorallocate($img,rand(200,255),rand(200,255),rand(200,255));
$colorString=imagecolorallocate($img,rand(10,100),rand(10,100),rand(10,100));
imagefill($img,0,0,$colorBg);
imagerectangle($img,0,0,$width-1,$height-1,$colorBorder);
for($i=0;$i<100;$i++){
      //化圆点                         //圆点坐标  x轴的宽      y轴的高                        圆点颜色
	imagesetpixel($img,rand(0,$width-1),rand(0,$height-1),imagecolorallocate($img,rand(100,200),rand(100,200),rand(100,200)));
}
for($i=0;$i<3;$i++){
		//化一条线
		//起点 在左半边 width将x轴控制在一半      高度在0到40        //终点在右半边
		//x轴的宽          x轴的高           y轴的宽                            y轴的高
	imageline($img,rand(0,$width/2),rand(0,$height),rand($width/2,$width),rand(0,$height),imagecolorallocate($img,rand(100,200),rand(100,200),rand(100,200)));
}
//imagestring($img,5,0,0,'abcd',$colorString);
//14是字的大小   rand(-5,5)是字的偏移   第一个字符串左下角的坐标 rand(5,15),rand(30,35)是x轴y轴   $colorString是颜色    'font/SketchyComic.ttf'是下载的字体    $string是路径匹配的字母,也可以直接在里面写字,如$string 直接换个字符串即可:ajjajajj    如果这里是中文就会出错,因为前面是英文字体
imagettftext($img,14,rand(-5,5),rand(5,15),rand(30,35),$colorString,'font/SketchyComic.ttf',$string);
imagejpeg($img);
imagedestroy($img);
设计验证码的步骤:
水印
imagecopy
<?php
//加的是文字水印
header('Content-type:image/jpeg');
//打开一个jpeg图片
$img=imagecreatefromjpeg('images/zcx.jpg');
$color=imagecolorallocate($img,255,255,255);
//获取图片长度
$width=imagesx($img);
//获取图片高度
$height=imagesy($img);
//获取图片大小
//里面写的是图片的路径
//var_dump(getimagesize('images/zcx.jpg'));
//用TrueType 文字所占区域
//字体的大小,角度是多大,字体路径,输入的字体
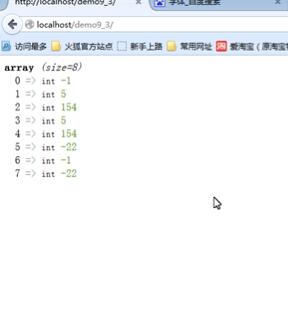
$position=imagettfbbox(20,0,'font/china1.TTF','小刚/周传雄');//返回一个数组 //8个值
$stringWidth=$position[2]-$position[0];//右下角x 减去左下角x
//减去整个图像的30分之一
imagettftext($img,20,0,$width-1-$stringWidth-($width/30),$height-1-($height/30), $color,'font/china1.TTF','小刚/周传雄');
imagejpeg($img);
imagedestroy($img);
imagettfbbox

<?php
header('Content-type:image/jpeg');
$img=imagecreatefromjpeg('images/zcx.jpg');
//打开要拷贝的gif 图像
$waterMark=imagecreatefromgif('images/watermark.gif');
$color=imagecolorallocate($img,255,255,255);

//文字图像的长和高
$width=imagesx($img);
$height=imagesy($img);

//获取水印图像的长和高
$waterMarkWidth=imagesx($waterMark);
$waterMarkHeight=imagesy($waterMark);

$position=imagettfbbox(20,0,'font/china1.TTF','小刚/周传雄');
$stringWidth=$position[2]-$position[0];
//文字水印
//imagettftext($img,20,0,$width-1-$stringWidth-($width/30),$height-1-($height/30), $color,'font/china1.TTF','小刚/周传雄');


 * //imagecopy把这个水印图像$waterMark从0,0位置(也就是左上角),多长多高$waterMarkWidth,$waterMarkHeight现在也就是整个图像 拷贝到$img这个图像的100,100的位置上
 */
/*
imagecopy($img,$waterMark,100,100,0,0,$waterMarkWidth,$waterMarkHeight);
参数说明:
$img:目标图像资源
$waterMark:水印的图像资源
100:所要拷贝到目标图像资源上面的坐标(x轴位置)
100:所要拷贝到目标图像资源上面的坐标(y轴位置)
0:从水印的图像资源的x坐标为0的位置开始拷贝
0:从水印的图像资源的y坐标为0的位置开始拷贝
$waterMarkWidth:所要拷贝的水印图像的长度
$waterMarkHeight:所要拷贝的水印图像的高度
*/
                          //$width-1-$waterMarkWidth水印左上角坐标,水印高度
imagecopy($img,$waterMark,$width-1-$waterMarkWidth,$height-1-$waterMarkHeight,0,0,$waterMarkWidth,$waterMarkHeight);

imagejpeg($img);
imagedestroy($img);
?>
另一个函数
imagecopymerge,只有最后一个参数不一样 可以调整图像的透明度
<?php
header('Content-type:image/jpeg');
$img=imagecreatefromjpeg('images/zcx.jpg');
$waterMark=imagecreatefromgif('images/watermark1.gif');
$color=imagecolorallocate($img,255,255,255);

$width=imagesx($img);
$height=imagesy($img);

$waterMarkWidth=imagesx($waterMark);
$waterMarkHeight=imagesy($waterMark);

$position=imagettfbbox(20,0,'font/china1.TTF','小刚/周传雄');
$stringWidth=$position[2]-$position[0];
//文字水印
//imagettftext($img,20,0,$width-1-$stringWidth-($width/30),$height-1-($height/30), $color,'font/china1.TTF','小刚/周传雄');

/*
imagecopymerge($img,$waterMark,100,100,0,0,$waterMarkWidth,$waterMarkHeight,0);
参数说明:
$img:目标图像资源
$waterMark:水印的图像资源
100:所要拷贝到目标图像资源上面的坐标(x轴位置)
100:所要拷贝到目标图像资源上面的坐标(y轴位置)
0:从水印的图像资源的x坐标为0的位置开始拷贝
0:从水印的图像资源的y坐标为0的位置开始拷贝
$waterMarkWidth:所要拷贝的水印图像的长度
$waterMarkHeight:所要拷贝的水印图像的高度
0:表示透明度,数值越小就越透明,最大值100相当于和imagecopy这个函数一样

*/

imagecopymerge($img,$waterMark,$width-1-$waterMarkWidth,$height-1-$waterMarkHeight,0,0,$waterMarkWidth,$waterMarkHeight,30);//最后一个参数是透明度 0-100

imagejpeg($img);
imagedestroy($img);
?>
缩放与剪裁
剪裁


缩放
/*
imagecopyresampled($dst_image, $src_image, $dst_x, $dst_y, $src_x, $src_y, $dst_w, $dst_h, $src_w, $src_h)
参数说明:
$dst_image:目标图像资源 想要拷贝的资源上去
$src_image:源图像资源(你要采样的那个图像资源)
$dst_x:
d
s
t
y
:
与
上
面
的
dst_y:与上面的
dsty:与上面的dst_x确定了一个坐标,把采样到的部分 放到目标图像资源的什么位置
$src_x:
s
r
c
y
:
与
上
面
的
src_y:与上面的
srcy:与上面的src_y确定了一个坐标,你要采样的原图像资源的 某个部分的起始坐标
$dst_w: 目标的长度
d
s
t
h
:
与
上
面
的
dst_h:与上面的
dsth:与上面的dst_w确定了 放到目标图像资源上面的尺寸
$src_w:要拷贝人家多长多高
s
r
c
h
:
与
上
面
的
src_h:与上面的
srch:与上面的src_w确定了 采样原图像资源的 某个部分
*/
<?php
/*
等比例缩放
*/
header('Content-type:image/jpeg');
//这个是要缩放的宽度
$width=300;

$img=imagecreatefromjpeg('images/zcx.jpg');


$imgWidth=imagesx($img);
$imgHeight=imagesy($img);

//采用原图像的高度
//$imgWidth/$imgHeight=$width/$height 想让他们相等,然后就得到下面的原图像高度
$height=$width/($imgWidth/$imgHeight);
$img1=imagecreatetruecolor($width,$height);
/*
imagecopyresampled($dst_image, $src_image, $dst_x, $dst_y, $src_x, $src_y, $dst_w, $dst_h, $src_w, $src_h)
参数说明:
$dst_image:目标图像资源  想要拷贝的资源上去
$src_image:源图像资源(你要采样的那个图像资源)
$dst_x:
$dst_y:与上面的$dst_x确定了一个坐标,把采样到的部分 放到目标图像资源的什么位置
$src_x:
$src_y:与上面的$src_y确定了一个坐标,你要采样的原图像资源的 某个部分的起始坐标
$dst_w: 目标的长度
$dst_h:与上面的$dst_w确定了 放到目标图像资源上面的尺寸
$src_w:要拷贝人家多长多高
$src_h:与上面的$src_w确定了 采样原图像资源的 某个部分

*/
imagecopyresampled($img1,$img,0,0,0,0,$width,$height,$imgWidth,$imgHeight);
//裁剪
//imagecopyresampled($img1,$img,0,0,0,0,100,100,100,100);
if(imagejpeg($img1)){
	imagejpeg($img1,'images/zoom_zcx.jpg');
}
imagedestroy($img);
imagedestroy($img1);
虽然在html代码里也能缩放 但是它的储存会比原来的大 用php代码去缩放给用户带来的体验比较好
<!DOCTYPE html>
<html lang="zh-CN">
<head>
<meta charset="utf-8" />
</head>
<body>
<img style="margin:100px;width:300px;" src="http://localhost/demo9_4/index.php" />   //这个图像就是上面那个php文件
//如果在html放大图片会使它原来的图片内存变大,用php代码缩放效果比较好
</body>
</html>


 756
756


 被折叠的 条评论
为什么被折叠?
被折叠的 条评论
为什么被折叠?
 到【灌水乐园】发言


