c# 保存软件配置

一、Settings.setting 文件

  • 方便保存和读取参数

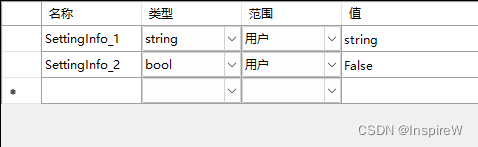
1.1 配置Settings.settings文件

在这里插入图片描述
自由配置参数名称和值,
注:范围的选择(用户运行时可更改,应用程序则运行时不可更改)
在这里插入图片描述

1.2 加载配置信息

在窗体加载时,直接载入

private void Form1_Load(object sender, EventArgs e)
{
	this.label1.Text = Properties.Settings.Default.SettingInfo_1;
	this.checkBox1.Checked = Properties.Settings.Default.SettingInfo_2;
}

1.3 保存配置信息

private void Form1_FormClosing(object sender, FormClosingEventArgs e)
{
	Properties.Settings.Default.SettingInfo_1 = "NewSettingInfo_1";
	Properties.Settings.Default.SettingInfo_2 = true;
	Properties.Settings.Default.Save();			//使用Save方法保存更改,必要
}

二、使用文本保存

  • 通过类【iniHelper】对数据进行直接保存,文件名:Config.ini 保存结果如下
[PLC参数]
IP=192.168.2.4
Port=19622

2.1 引入命名空间

using System.IO;

2.2 新增IniConfigHelper 类

using System;
using System.Text;
using System.IO;
using System.Runtime.InteropServices;
using System.Collections.Generic;

namespace Helper
{
    public class IniConfigHelper
    {
        public static string filePath = "";

        #region API函数声明

        [DllImport("kernel32")]
        private static extern long WritePrivateProfileString(string section, string key,
            string val, string filePath);

        //需要调用GetPrivateProfileString的重载
        [DllImport("kernel32", EntryPoint = "GetPrivateProfileString")]
        private static extern long GetPrivateProfileString(string section, string key,
            string def, StringBuilder retVal, int size, string filePath);

        [DllImport("kernel32", EntryPoint = "GetPrivateProfileString")]
        private static extern uint GetPrivateProfileStringA(string section, string key,
            string def, Byte[] retVal, int size, string filePath);

        #endregion

        #region 获取所有的Sections
        /// <summary>
        /// 获取所有的Sections
        /// </summary>
        /// <param name="iniFilename">文件路径</param>
        /// <returns>Sections集合</returns>
        public static List<string> ReadSections(string iniFilename)
        {
            List<string> result = new List<string>();
            Byte[] buf = new Byte[65536];
            uint len = GetPrivateProfileStringA(null, null, null, buf, buf.Length, iniFilename);
            int j = 0;
            for (int i = 0; i < len; i++)
                if (buf[i] == 0)
                {
                    result.Add(Encoding.Default.GetString(buf, j, i - j));
                    j = i + 1;
                }
            return result;
        }

        #endregion

        #region 获取指定Section下的所有Keys
        /// <summary>
        /// 获取指定Section下的所有Keys
        /// </summary>
        /// <param name="SectionName">SectionName</param>
        /// <param name="iniFilename">文件路径</param>
        /// <returns>Keys集合</returns>
        public static List<string> ReadKeys(string SectionName, string iniFilename)
        {
            List<string> result = new List<string>();
            Byte[] buf = new Byte[65536];
            uint len = GetPrivateProfileStringA(SectionName, null, null, buf, buf.Length, iniFilename);
            int j = 0;
            for (int i = 0; i < len; i++)
                if (buf[i] == 0)
                {
                    result.Add(Encoding.Default.GetString(buf, j, i - j));
                    j = i + 1;
                }
            return result;
        }

        #endregion

        #region 读Ini文件

        public static string ReadIniData(string Section, string Key, string NoText)
        {
            return ReadIniData(Section, Key, NoText, filePath);
        }
        public static string ReadIniData(string Section, string Key, string NoText, string iniFilePath)
        {
            if (File.Exists(iniFilePath))
            {
                StringBuilder temp = new StringBuilder(1024);
                GetPrivateProfileString(Section, Key, NoText, temp, 1024, iniFilePath);
                return temp.ToString();
            }
            else return string.Empty;
        }

        #endregion

        #region 写Ini文件

        public static bool WriteIniData(string Section, string Key, string Value)
        {
            return WriteIniData(Section, Key, Value, filePath);
        }

        public static bool WriteIniData(string Section, string Key, string Value, string iniFilePath)
        {
            long OpStation = WritePrivateProfileString(Section, Key, Value, iniFilePath);
            if (OpStation == 0)
                return false;
            else return true;
        }
        #endregion
    }
}

2.3 测试新建数据

private void button1_Click(object sender, EventArgs e)
{
    Helper.IniConfigHelper.WriteIniData("PLC参数", "IP", "192.168.2.4", Application.StartupPath + "\\Settings.ini");
}

2.4 关闭窗口时保存数据

private void Form1_FormClosing(object sender, FormClosingEventArgs e)
{
	// 如果文件不存在则创建文件后再保存
    if (!File.Exists(configPath))
    {
         FileStream fileStream = new FileStream(configPath, FileMode.Create);
         fileStream.Close();
    }
    IniConfigHelper.WriteIniData("PLC参数", "IP", this.textBoxIPAddress.Text.Trim(), configPath);
    IniConfigHelper.WriteIniData("PLC参数", "Port", this.textBoxPort.Text.Trim(), configPath);
}

2.5 窗口加载时读取数据

private void Form1_Load(object sender, EventArgs e)
{
	 // 如果文件存在,则读取相应的参数信息
     if (File.Exists(configPath))
     {
          this.textBoxIPAddress.Text = IniConfigHelper.ReadIniData("PLC参数", "IP", "", configPath);
          this.textBoxPort.Text = IniConfigHelper.ReadIniData("PLC参数", "Port", "", configPath);
     }
}

三、序列化与反序列化

  • 更方便读取和写入大量配置信息
  • 数据更安全

3.1 引入命名空间

using System.IO;
using System.Runtime.Serialization.Formatters.Binary;

3.2 新增Student 类

using System;
using System.Collections.Generic;
using System.Text;

namespace #此处修改为项目名称
{
    [Serializable]	// 对象可序列化标记,必须
    class Student
    {
        public string Name { get; set; }
        public string Gender { get; set; }
        public int Age { get; set; }
        public DateTime Birthday { get; set; }
    }
}

3.3 保存配置

private void btnSerialize_Click(object sender, EventArgs e)
{
     //封装对象信息
     Student objStu = new Student()
     {
          Name = this.txtName.Text.Trim(),
          Age = Convert.ToInt16(this.txtAge.Text.Trim()),
          Gender = this.txtGender.Text.Trim(),
          Birthday = Convert.ToDateTime(this.txtBirthday.Text.Trim())
     };
     //【1】创建文件流
     FileStream fs = new FileStream("C:\\objStu.obj", FileMode.Create);
     //【2】创建二进制格式化器
     BinaryFormatter formatter = new BinaryFormatter();
     //【3】调用序列化方法
     formatter.Serialize(fs, objStu);
     //【4】关闭文件流
     fs.Close();
}

3.4 打开配置

private void btnDeserialize_Click(object sender, EventArgs e)
{
     //【1】创建文件流
     FileStream fs = new FileStream("C:\\objStu.obj", FileMode.Open);
     //【2】创建二进制格式化器
     BinaryFormatter formatter = new BinaryFormatter();
     //【3】调用序列化方法
     Student objStu = (Student)formatter.Deserialize(fs);
     //【4】关闭文件流
     fs.Close();
     //显示对象属性
     this.txtName.Text = objStu.Name;
     this.txtAge.Text = objStu.Age.ToString();
     this.txtGender.Text = objStu.Gender;
     this.txtBirthday.Text = objStu.Birthday.ToShortDateString();
}

四、XML

(更新:本文不是LinQ 进行操作,推荐使用C#中的Linq to Xml详解

4.1 引入命名空间

using System.Xml;

4.2 XML示范文件

<Students>
	<Student>
		<StuName>王永利</StuName>
		<StuAge>19</StuAge>
		<Gender></Gender>
		<ClassName>计算机1</ClassName>
	</Student>
	<Student>
		<StuName>王大拿</StuName>
		<StuAge>22</StuAge>
		<Gender></Gender>
		<ClassName>计算机2</ClassName>
	</Student>
	<DataInfo>
		<Version vNo="1.2" pTime="2012-12-12">数据版本信息</Version>
	</DataInfo>
</Students>

4.3 写入XML文件(待补充)

4.4 读取XML文件

private void btnLoadXML_Click(object sender, EventArgs e)
{
     XmlDocument objDoc = new XmlDocument();  //【1】创建XML文档操作对象
     objDoc.Load("StuScore.xml");  //【2】加载XML文件到文档对象中
     XmlNode rootNode = objDoc.DocumentElement;  //【3】获取XML文档根目录
     List<Student> list = new List<Student>();//创建对象集合         
     foreach (XmlNode stuNode in rootNode.ChildNodes)  //【4】遍历根节点(根节点包含所有节点)
     {
          if (stuNode.Name == "Student")
          {
               Student objStu = new Student();
               foreach (XmlNode subNode in stuNode)  //【5】遍历子节点
          {
               switch (subNode.Name)//根据子节点的名称封装到对象的属性
               {
                     case "StuName":
                          objStu.StuName = subNode.InnerText;//获取《节点名称》对应的《节点值》
                          break;
                     case "StuAge":
                          objStu.StuAge = Convert.ToInt16(subNode.InnerText);
                          break;
                     case "Gender":
                          objStu.Gender = subNode.InnerText;
                          break;
                     case "ClassName":
                          objStu.ClassName = subNode.InnerText;
                          break;
                     }
               }
               list.Add(objStu);
          }
     }
     this.dgvStuList.DataSource = list;
}

4.5 查找方法

private void btnShowVersion_Click(object sender, EventArgs e)
{
      //创建XML读取器
      XmlTextReader tReader = new XmlTextReader("StuScore.xml");
      string info = string.Empty;
      //循环查询
      while (tReader.Read())
      {
           if (tReader.Name == "Version")
           {
                info = "版本:" + tReader.GetAttribute("vNo") + " 发布时间:" + tReader.GetAttribute("pTime");
                break;
            }
      }
      MessageBox.Show(info,"数据版本");
}

写在最后

本博文只是我在学习c#的过程中所做的笔记,方便以后查阅实现过程。资料均来自网上,如果有侵权请联系我删除,谢谢。

  • 15
    点赞
  • 65
    收藏
    觉得还不错? 一键收藏
  • 0
    评论
    前段时间有点空闲就自学了一下c#,以前也没有学过任何编程,只是对电脑操作还是很熟,会一些应用类软件,计算机相关的英文能看懂点。     看了10多节的视频教程,因为基础太差,前面学的东西老会忘,光这样学也没有多大的意义,于是就找个程序一边练一遍学。网上一搜,不知道怎么的就找了一个进程守护的软件,别人提供的源码,好像是在pudn下的,一测试可以运行,就是觉得不太适合自己的操作习惯。于是就开始改造了。牺牲了一周的业余时间,终于完成,在这分享一下,如果有需要的可以自行再改造,版权归原作者,至于我修改的地方,可以任意改,任意传播,没有版权。附上源码,包含源程序的和我改造的部分。只是希望能给像我这样的不会编程的一类朋友一点启示,只要努力,就能达到自己想要的效果。现成的东西,不一定是适合自己的,要想拿来适合自己,也许就需要付出努力。附上修改的说明及截图。没有多大的技术含量,对于会编程的人,也许2下就搞定了,对于不会编程的人,如果刚好需要这样的软件,那就可以偷懒了。测试了win7(x86x64),win8(x86),win10(x64),其他系统没有测试,如果不能运行请自行解决,vs2010编译的,dedug和Release都有编译好的版本。     修改及使用说明 1、配置文件precesses.xml,里面的进程名不要有扩展名,一定要注意。 2、配置文件中的mutl为是否多开,linecount为多开时的限制数,jgtime为守护的周期。 3、配置文件中新增linecount为相同程序限制数(如果程序本身不允许多开那就没办法),可以给每个程序配置不同限制数,但是界面上修改时,只能修改成一样。读取配置后显示最大的那个值在界面上. 4、配置文件中新增jgtime为循环时间,所有程序使用相同的循环时间,配置时可以配置成不一样的,实际没有意义,因只调用了一个定时器,但默认显示并使用最大的那个时间。 5、增加托盘图标提示及菜单 6、取消任务栏图标显示 7、默认启动最小化,如果没有任务栏,只能通过进程结束,固定了窗口不能改变大小 8、主界面增加了退出按钮、清空日志按钮 9、主界面点击关闭按钮后,自动最小化 10、增加进程调用的部分日志显示框,主要是调试方便,日志超过30行自动清屏,未保存,可修改代码关掉或不显示,evertlog目录下多余的日志关掉了,仍然有小部分日志,,如有必要自行在代码中关掉即可。 11、底部增加多开线程输入框及保存按钮,多开进程数大于1小于100,100为无限制模式。增加间隔时间输入框及保存按钮,间隔时间大于等于500,小于等于1000000000之间的整数(毫秒),没有限制再配置中添加应用程序的个数。 12、开始监控及停止监控互锁显示。 13、默认优先读取配置中的最大的间隔时间,如果配置错误会自动初始化为23秒。 14、其他界面布局微调 15、代码自己随意修改太拖沓,会编程的可以进行大量优化。 16、没有做自守护,可以考虑用任务计划写个批处理,再守护它。win764位以上系统,防任务管理栏结束有难度哦。 17、我用的是系统自带的自定义shell启动它,还是很稳定,23秒是我测试的需要,自己可在代码中修改,我修改的地方还是加了不少注释的。 18、调用有些程序可能无法启动的情况,和本软件无关,可能是路径问题,有些程序不允许改变路径运行等,可自己在命令行下测试调用的软件是否运行,我遇到过类似的软件,加入环境变量也不行,只能在同一个目录下。 19、加入配置文件错误的一些纠缠机制(linecount没有会自动创建并赋值3,值为"",也会自动修复),当然错误的情况不够完善,只考虑了没有整项或者值为""的情况,其他情况没有处理,如果遇到其他情况只会导致程序停止,不能对配置的自修复而已,只针对linecout和jgtime做了处理,jgtime整项如果没有,会自动修复为23000毫秒。程序自修复配置文件后,会自动运行,如遇不能修复的问题根据catch出的问题,自行修改源码,加入到出错情况的处理。 20、只测试了win7x86x64,win8x86,win10x64,精简系统可能无法运行,自己测试了一个5年前的极度精简的win7系统,无法运行没有任何提示,也没有去验证到底是什么问题,但大多数精简系统都行。 21、增加鼠标悬停帮助提示,提示框可能有拖影的情况,自行修改源码中的时间参数,也可改用另一种呈现方式不会拖影,源码中有,就是没有那么好看,鼠标悬停提示有点耗cpu资源。 22、双击进程框列出的需要守护监控的进程,可以查看该进程更多详细信息。 23、配置文件中路径,一定要注意用\\表示,比如 d:\\bitboy\\bitboy.exe  还要有扩展名,name中的进程名不能有扩展名,否则找不到程序,不区分大小写。 24、本软件运行后,会自动启动配置程序路径下的软件,如果该软件不存在,则自动停止监控。所有多余的配置要自行删除,xml文件中不要有注释,没对注释做处理。 25、加入开机自启动选择项,保存到注册表中,加入了默认以管理员身份运行,解决配置文件不在system32下,开机启动找不到配置文件的问题。 26、没有对本程序做单一启动的限制,如果需要只运行一个实例,重新编译主程序中注释掉的一部分代码。对多线程运行的程序,建议设置linecount为100,否则会杀死多余的线程,一个循环周期杀一个,线程数量固定不变的可在配置中设置相同的linecount数,这样能达到守护的目的。 27、加了开机启动参数的支持,在配置文件中路径后用英文的逗号作分隔,前面的是路径,后面的是启动参数。 28、支持对多线程运行程序的退出守护,配置文件中,将linecount设置为100,并且要启用多开。当linecount配置为100后,不允许在界面上修改,只能手动打开配置文件修改。启动后检查进程如果没有运行,就运行一次,如果已经存在了则不处理,因为有些程序,要开启很多个线程运行,只有等所有进程都退出之后,才会启动一次守护的进程,之后又会交给程序自适应。 29、增加循环启动时间次数的累计显示,和所有程序累计启动次数不一样,这个指的是定时器执行的次数,不管是否启动了守护的程序,这个周期都是累加,可能没多大意义,另外那个是程序启动一次才加一次。 30、防止任务管理栏结束,甚至采用服务方式启动等,对于我来说太难了,服务启动又带ui交互,好像涉及到session0穿透的问题,能力有限,没有精力搞了。
配置文件概述: 应用程序配置文件是标准的XML 文件 XML 标记和属性是区分大小写的 它是可以 按需要更改的 开发人员可以使用配置文件来更改设置 而不必重编译应用程序 配置 文件的根节点是configuration 我们经常访问的是appSettings 它是由 Net 预定义配置 节 我们经常使用的配置文件的架构是象下面的形式 先大概有个印象 通过后面的实 例会有一个比较清楚的认识 下面的“配置节”可以理解为进行配置一个XML 的节点 常见配置文件模式: <configuration> <configSections> 配置节声明区域 包含配置节和命名空间声明 <section> 配置节声明 <sectionGroup> 定义配置节组 <section> 配置节组中的配置节声明 <appSettings> 预定义配置节 <Custom element for configuration section> 配置节设置区域 2 只有appSettings 节的配置文件及访问方法 下面是一个最常见的应用程序配置文件的例子 只有appSettings 节 < xml version "1 0" encoding "utf 8" > <configuration> <appSettings> <add key "connectionstring" value "User ID sa;Data Source ;Password ;Initial C atalog test;Provider SQLOLEDB 1;" > <add key "TemplatePATH" value "Template" > < appSettings> < configuration> 下面来看看这样的配置文件如何方法 string connectionString ConfigurationSettings AppSettings["connectionstring"]; 使用ConfigurationSettings 类的静态属性AppSettings 就可以直接方法配置文件中的配置 信息 这个属性的类型是NameValueCollection 3 自定义配置文件 3 1 自定义配置节 一个用户自定义的配置节 在配置文件中分为两部分:一是在<configSections>< confi gSections>配置节中声明配置节(上面配置文件模式中的“<section>”) 另外是在<confi gSections>< configSections >之后设置配置节(上面配置文件模式中的“<Custom eleme nt for configuration section>”) 有点类似一个变量先声明 后使用一样 声明一个配 置文件的语句如下: <section name " " type " " > <section>:声明新配置节 即可创建新配置节 P> name:自定义配置节的名称 type:自定义配置节的类型 主要包括System Configuration SingleTagSectionHandler S ystem Configuration DictionarySectionHandler System Configuration NameValueSectionHa ndler 不同的type 不但设置配置节的方式不一样 最后访问配置文件的操作上也有差异 下面 我们就举一个配置文件的例子 让它包含这三个不同的type < xml version "1 0" encoding "utf 8" > <configuration> <configSections> <section name "Test1" type "System Configuration SingleTagSectionHandler" > <section name "Test2" type "System
C# 中,你可以通过以下代码设置软件的管理员权限: ```csharp using System.Diagnostics; using System.Security.Principal; // 检查当前用户是否为管理员 bool isAdmin = new WindowsPrincipal(WindowsIdentity.GetCurrent()).IsInRole(WindowsBuiltInRole.Administrator); if (!isAdmin) { // 创建一个启动信息对象 ProcessStartInfo startInfo = new ProcessStartInfo(); // 指定要启动的程序的路径和文件名 startInfo.FileName = Application.ExecutablePath; // 指定启动时要使用的用户名和密码 startInfo.UserName = "Administrator"; startInfo.Password = new SecureString(); string password = "123456"; // 这里需要替换为实际的管理员密码 foreach (char c in password) { startInfo.Password.AppendChar(c); } // 指定启动时使用的域名,默认为本地机器名 startInfo.Domain = Environment.MachineName; // 指定启动时的参数 startInfo.Arguments = "/restart"; // 指定启动时的工作目录 startInfo.WorkingDirectory = Application.StartupPath; // 指定启动时的窗口模式 startInfo.WindowStyle = ProcessWindowStyle.Normal; // 指定启动时的标准输入输出流 startInfo.UseShellExecute = false; startInfo.RedirectStandardInput = true; startInfo.RedirectStandardOutput = true; // 启动程序,并等待程序退出 Process process = new Process(); process.StartInfo = startInfo; process.Start(); process.WaitForExit(); } ``` 这段代码首先检查当前用户是否为管理员,如果不是,则使用 `ProcessStartInfo` 对象来启动程序,并使用管理员权限运行程序。在 `ProcessStartInfo` 对象中,我们可以指定启动时使用的用户名、密码、域名、参数、工作目录、窗口模式以及标准输入输出流等信息。最后,我们使用 `Process` 对象启动程序,并等待程序退出。 需要注意的是,使用管理员权限运行程序需要输入管理员账户的密码,这里我们将密码以明文的方式写在代码中,这并不是一个安全的做法。为了保证安全性,我们应该将密码以加密的方式保存配置文件中,或者使用其他安全的方式来获取管理员密码。

“相关推荐”对你有帮助么?

  • 非常没帮助
  • 没帮助
  • 一般
  • 有帮助
  • 非常有帮助
提交
评论
添加红包

请填写红包祝福语或标题

红包个数最小为10个

红包金额最低5元

当前余额3.43前往充值 >
需支付:10.00
成就一亿技术人!
领取后你会自动成为博主和红包主的粉丝 规则
hope_wisdom
发出的红包
实付
使用余额支付
点击重新获取
扫码支付
钱包余额 0

抵扣说明:

1.余额是钱包充值的虚拟货币,按照1:1的比例进行支付金额的抵扣。
2.余额无法直接购买下载,可以购买VIP、付费专栏及课程。

余额充值