


(自己学习过程笔记,可能有错误,仅备忘)
一、Spring框架的术语:
1.组件/框架设计:
侵入式:对现有的类的结构有影响
非侵入式:对现有的类的结构没有影响
2.控制反转(IOC):
对象的创建交给外部容器(IOC容器)。
3.依赖注入(DI):
处理对象的依赖关系
区别:控制反转:解决对象的创建问题
依赖注入:在创建完成之后,对象的关系方的处理(set方法注入)
4.AOP:面向切面编程
二、Spring框架的概述
解决对象创建以及对象之间的依赖关系的一种框架,可与其他框架一起使用。
作用:整合
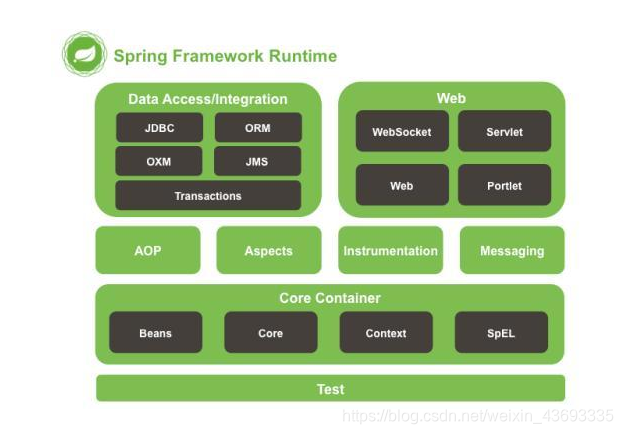
三、Spring提供了一站式解决方案:
(六大模块)
1.Spring Core:Spring核心功能,IOC容器
2.Spring web:对WEB模块的支持
3.Spring DAO:对于JDBC支持
4.SpringORM:对ORM的支持
5.SPring AOP:切面编程
6.Spring EE:对Java EE其他模块的支持
四、IOC编写(xml开发方式)
1.搭建IOC环境
导包:core、beans、context、expression
日志依赖包:(属于apache)
commons-logging.jar(必导),apache-log4j.jar(可选)
2.创建一个类(因为IOC就是针对类的)
3.在src下创建applicationContext.xml(相当于IOC容器)
4.通过IOC容器创建类的实例对象
```java
  ApplicationContext context  = new ClassPathXmlApplicationContext("applicationContext.xml");//获取容器/获取工厂

  Classname clsname = (Classname)context.getBean("idname");//通过id获取相应对象
 注:
 1.bean标签指定要实例化的对象<bean id = "abc"  class="LIN.zd.User" scope="prototype"></bean>
   <bean>还有一个属性 scope="singleton/prototype",默认为singleton。
    1)  singleton(单实例): 当获取容器(配置文件一加载 new ClassPathXmlApplicationContext("applicationContext.xml"))
         时创建对象放入IOC容器中,此后通过getBean()方法获取的都是同一个对象。
          应用于:service/dao
     2)  prototype(多实例):每通过getBean()方法获取对象时,就创建一个实例。
           应用于action
     3)还有属性init-method和destroy-method="方法名"指定相应的方法为初始化方法和销毁方法。
          IOC容器的关闭(ClassPathXmlApplicationContext  context.close())。
2.<import resourse="xxx.xml">
       可以将其他xml文件导入
3.工厂模式就是把对象的new交给工厂类。
   工厂类读取配置文件,进行解析然后创建(如读取类名的字符串来进行创建,也就是说xml文件是一个具有特殊格式的文件供读取)。
而spring框架已经帮我们实现了工厂,不需要我们写。通过工厂+配置文件+反射的形式(工厂读取配置文件,采用反射的形式创建对象)
4.工程类有旧和新


```java
旧:BeanFactory
Resource resource = new FileSystemResource("beans.xml");
BeanFactory factory = new XmlBeanFactory(resource);

ClassPathResource resource = new ClassPathResource("beans.xml");
BeanFactory factory = new XmlBeanFactory(resource);
新:ApplicationContext--->实现了BeanFactory接口
   他有两个实现类:
       ClassPathXmlApplicationContext:类路径(src)下读取文件
      FileSystemXmlApplicationContext:文件系统下加载(如磁盘)
还有一个注解形式的AnnotatiaonApplicationContext(“扫描的包(类中有注解)”);
五、依赖注入(DI)
1.DI是在IOC的基础上进行对象属性的赋值。
2.DI的属性注入方式:
1)构造器注入方式:类中要有有参构造器(必须显示声明无参构造器)
    <bean id = "abc"  class="LIN.zd.User" scope="prototype">
       <constructor-arg name="属性名" value="属性值" / ref="属性值">   </constructor-arg>
    </bean>

     注:value针对的是基本类型和String类型,ref针对的是对象(填的是spring中有的对象的id)。
2)set方法注入:必须有set方法(重点)
3)p名称空间注入
4)复杂属性(map,list[],…)注入(这里使用set的方式)
对于数组、list用标签
<bean id = "abc"  class="LIN.zd.User" scope="prototype">
           <property name="属性名" >
               <list>
                     <value>111</value>
                     <value></value>
                      <ref></ref>
                      <ref></ref>
                </list>
            </property>
 </bean>
对于set用标签
对于map用
<property name="arr">
   <array>122<array>
</propetty>
<bean id = "abc"  class="LIN.zd.User" scope="prototype">
           <property name="属性名" >
               <map>
                   <entry key=""  value=""></entry>
                    <entry key=""  value-ref=""></entry>
                </map>
            </property>
</bean>
对于.properties文件
<bean id = "abc"  class="LIN.zd.User" scope="prototype">
           <property name="属性名" >
               <props>
                   <prop key="">value</prop>
                    <prop key="">value</prop>
                </props>
            </property>
 </bean>
五、IOC的注解方式
1.首先导包,除了导xml方式的所有包之外,还应该导入AOP包;
2.编写类
2.配置xml文件,约束头是Context的(xml是Bean)。
引入组件扫描的标签配置<context:component-scan base-package=“类的包名”/>
4.在类上添加注解@component(value=“等于写入id”)
注:三个衍生类,便于分层开发,目前一样
@Conntroller
@Service
@Repository
5.属性注入:
1)普通属性@Value("")
若无set方法,则在属性上@Value("")
若有set方法,则在set上@Value("")
2) 对象属性@Autowired//但是按类型完成注入,不是按id
@Autowired与@Qualifier(“id名”)联用即按id
@Resourse(name="")按id
注:1.xml优先的原则:注解如@Autowird来输入时,其实是优先在xml配置文档找bing(即使开了组件扫描,不必配合其他注解使用,比如使用
@Autowird,注入Da对象,可以在文档中配置相应的bean,也可一在dao类上注解@Repository。也正是因为这样,在使用
@Autowired注入时,如果在xml配置有相对应的bean,这时若果其配置了property而类中却没有setter方法,就会报错)
2.@Autowird因为是按类型来输入的,但是如果这时候有一个父接口有多个实现类,那么这时候可以与@Qualifier(“id名”)
联用来选择哪一个实现类。
3.@Resource(name = “userDao”)与@Repository(value=“userdao”),
@Resourse(name="")按id(xml中)
	3)bean的其他注解:
	  @PostConstruct初始化方法:修饰实例方法,在构造方法之后,init()之前
	  @preDestroy销毁方法,destroy()之后
	  @Scope作用域:@scope("prototype")
==============================================================================================================
AOP:切面编程
一、AOP的底层实现是动态代理
JDK代理
cglib代理
注:目前个人理解是,将对象交给一个代理,该代理类似对象的增强版,对方法的增强(如添加一些权限校验等)
二、AOP的相关术语
   Joinpoint:连接点,类中可以进行增强的方法就是连接点(比如数据库的dao中增删改查都是切入点)
   Pointcut:切入点,真正进行增强的点(连接点并不一定全部进行增强)
   Advice:通知,增强(方法层面的增强),对某方法进行增强的代码(切面类)(暂且这样理解)
   Introduction:类层面的增强
   Target:被增强的对象
   Waving:织入,将Advice应用到Target的过程----------》形成
   Proxy(代理对象)
   Aspect:切面,多个通知和多个切入点的组合
三、AOP的XML形式开发
1.首先导入jar包:编写IOC的jar包+ aspectj.weaver(依赖包中) + spring-aspects
aspectjrt.jar
aspectjweaver.jar
aspectj.jar
aopalliance.jar
2.添加配置文件applicationContext.xml—>aop约束
3.编写目标类(需要被增强的类)
4.编写测试类
5.编写切面类,类中编写各种方法(如权限校验等等)
6. 在配置文件中用标签配置目标类和切面类(交给spring)
7.对目标生成代理:(切入点+通知)
<aop:config>
//需要增强的方法(切入点)
 <aop:pointcut expression="execution(* 包名.类名.方法名(..))" id="">//注*表示任意返回值,..任意参数;
 //配置切面
 <aop:aspect ref="切面类id">
    //前置通知
   <aop:before method="(通知,即增强的方法)切面类中的方法名" pointcut-ref="(需要增强的方法)切入点id">
 </aop:aspect>
</aop:config>
8.运行
Spring AOP实现方式有两种,一种使用JDK动态代理,另一种通过CGLIB来为目标对象创建代理。如果被代理的目标实现了至少一个接口,则会使用JDK动态代理,所有该目标类型实现的接口都将被代理。若该目标对象没有实现任何接口,则创建一个CGLIB代理,创建的代理类是目标类的子类。
(目标类实现了接口,则通过工程获取对象时,类型为接口类型)
ApplicationContext ac = new ClassPathXmlApplicationContext("applicationContext.xml");
Users user = (Users) ac.getBean("user");
user.save();
注:其实spring的声明式事务也是通过aop实现的,切入点就比如dao中的各种增删改查方法,当然配置事务管理
不需要我们编写切面类,因为spring中就有一个事务管理器。
当然配置略有不同,如下:缓存了<aop:advisor / >,其他保持一致。
<!-- 会重复读,不会脏读事务 -->
<tx:advice id="txAdvice" transaction-manager="transactionManager">
<tx:attributes>
<tx:method name="*" timeout="120" propagation="REQUIRED" rollback-for="Exception" />
</tx:attributes>
</tx:advice>

<aop:config proxy-target-class="true">
<aop:pointcut id="txPointCut" expression="..."/>
<aop:advisor advice-ref="txAdvice" pointcut-ref="txPointCut" />
</aop:config>
四、通知的类型
前置通知:在目标方法之前进行操作
获得切入点信息 切面类中对应方法传入(JoinPoint类型参数)
后置通知:在目标方法之后进行通知
获得切入点信息和获得方法的返回值
<aop:after-returning method="" pointcut-ref="" returning=“Rname”>
切面类中对应方法传入Object Rname
环绕通知:在目标方法之前和之后进行操作
阻止目标方法的执行
 <aop:around method="" pointcut-ref="">
 public Object fname(ProceedingJoinPoint joinPoint)throw Throwable{
	   前代码
	   Object obj = JoinPoint.proceed();//相当于执行方法代码
	   后代码
	   return obj;

   }
例:public Object aopMethod1(ProceedingJoinPoint joinPoint) throws Throwable {
System.out.println(“切面类方法1执行。。。”);
Object obj = joinPoint.proceed();
System.out.println(“切面类方法2执行。。。”);
return obj;
}
异常抛出通知:在程序出现异常时进行操作
获取异常信息:切面类中对应方法传入 Throwable Tname---->getMseeage();
最终通知: 无论代码是否异常均执行
引介通知:略
五、表达式
表达式的写法灵活且强调
基于execution();
语法:[访问控制符] 方法返回值 包名.方法名(参数)
举例:public void lin.zd.save(…)//…代表任意参数
* ... Dao.save(…)//*代表任意
*.lin.zd.Dao+.save(…)//+代表类和子类
* com.test.spring .(…)
…
六、个人对于切面编程的理解
在不改原有代码的情况下,对代码进行修改,在代码前后进行增加操作的编程。
因为有可能很多修改的是一样的,所以切面编程只需修改一份。
就好比对代码横向切一刀,然后补入代码。
七、AOP的注解形式开发
1.导jar包,与上面相同
2.xml配置文件,aop约束头
在配置文件中开启注解的开发方式aop:aspectj-autoproxy/
切面类、目标类的注册()
3.在切面类进行注解:
在类名上:@Aspect表示该类为切面类
在切面类方法上(前置增强为例):@Before(value=“execution(”")")
@Aspect
public class myAspect {
@Before(value=“execution(* Lin.zd.targetCls.target.show(…))”)
public void aspectf1() {
System.out.println(“增强方法执行。。。”);
}
}
<?xml version="1.0" encoding="UTF-8"?>

<beans xmlns="http://www.springframework.org/schema/beans"
    xmlns:xsi="http://www.w3.org/2001/XMLSchema-instance"
    xmlns:aop="http://www.springframework.org/schema/aop"
	xsi:schemaLocation="
     http://www.springframework.org/schema/beans https://www.springframework.org/schema/beans/spring-beans.xsd
     http://www.springframework.org/schema/aop https://www.springframework.org/schema/aop/spring-aop.xsd">

<aop:aspectj-autoproxy/>

<bean id="target" class="Lin.zd.targetCls.target"></bean>//目标类
<bean id="aspect" class="Lin.zd.aspect.myAspect"></bean>//切面类
</beans>
使用:
1.xml方式:
ApplicationContext ac = new ClassPathXmlApplicationContext(“applicationContext.xml”);
target tg = (target)ac.getBean(“target”);
tg.show();
2.当然,如果采用组件扫描的方式,可以在切面类上加上@Component来作为扫描的类。
注:1)通知的类型
@Before()
@AfterReturning
@Around
@AfterThrowing("",throwing=“e”)
方法传入参数throwable e
@After
2)@Pointcut(value="execution()")
   空方法如private void p(){}

   然后@Before(value="切面类名.p()")

   这样便于修改
八、jdcd模板
(一)(这里使用了数据库连接池)
1.导包,(这里使用mysql,这里使用spring自带的连接池所以不用导)
基本的6个包+mysql驱动包+springjdbc的包+spring tx的包
2.获取数据库连接池,再用JdbcTemplate继续操作。
    DriverManagerDataSource ds = new DriverManagerDataSource();
	ds.setDriverClassName("com.mysql.jdbc.Driver");
	ds.setUrl("jdbc:mysql:///hellospring?serverTimezone=UTC");
	ds.setUsername("root");
	ds.setPassword("1234");
	JdbcTemplate jTemplate  = new JdbcTemplate(ds);
	jTemplate.update("insert into account values(null,?,?) ", "李华",1000d);
(二)可以使用配置文件的形式对进行优化
1.数据库连接池的创建交给spring
2.jdbc模板也交给配置文件
https://www.w3cschool.cn/wkspring/iuck1mma.html4
具体使用可以查看:https://www.w3cschool.cn/wkspring/iuck1mma.html
配置如下:
<?xml version="1.0" encoding="UTF-8"?>
<beans xmlns="http://www.springframework.org/schema/beans"
    xmlns:xsi="http://www.w3.org/2001/XMLSchema-instance"
    xsi:schemaLocation="http://www.springframework.org/schema/beans
    http://www.springframework.org/schema/beans/spring-beans-3.0.xsd ">

   <!-- Initialization for data source -->
   <bean id="dataSource"
      class="org.springframework.jdbc.datasource.DriverManagerDataSource">
      <property name="driverClassName" value="com.mysql.jdbc.Driver"/>
      <property name="url" value="jdbc:mysql://localhost:3306/TEST"/>
      <property name="username" value="root"/>
      <property name="password" value="password"/>
   </bean>

   <!-- Definition for studentJDBCTemplate bean -->
   <bean id="studentJDBCTemplate"
      class="com.tutorialspoint.StudentJDBCTemplate">
      <property name="dataSource"  ref="dataSource" />
   </bean>

  </beans>
补充1:
spring bean 三种配置方式:
一、spring所需的一些基本依赖
<dependency>
      <groupId>org.springframework</groupId>
      <artifactId>spring-core</artifactId>
      <!--这个jar文件包含Spring框架基本的核心工具类,Spring其它组件要都要使用到这个包里的类,是其它组件的基本核心 -->
      <version>4.1.0.RELEASE</version>
    </dependency>
    <dependency>
      <groupId>org.springframework</groupId>
      <artifactId>spring-context</artifactId>
      <!--这个jar文件为Spring核心提供了大量扩展 -->
      <version>4.1.0.RELEASE</version>
    </dependency>
    <dependency>
      <groupId>org.springframework</groupId>
      <artifactId>spring-test</artifactId>
      <!--对JUNIT等测试框架的简单封装 -->
      <version>4.1.0.RELEASE</version>
    </dependency>
    <dependency>
      <groupId>org.springframework</groupId>
      <artifactId>spring-tx</artifactId>
      <!--为JDBC、Hibernate、JDO、JPA等提供的一致的声明式和编程式事务管理。-->
      <version>4.1.0.RELEASE</version>
    </dependency>
    <dependency>
      <groupId>org.springframework</groupId>
      <artifactId>spring-beans</artifactId>
      <!--这个jar文件是所有应用都要用到的,它包含访问配置文件、创建和管理bean以及进行(IoC/DI)操作相关的所有类 -->
      <version>4.1.0.RELEASE</version>
    </dependency>
    <dependency>
      <groupId>org.springframework</groupId>
      <artifactId>spring-jdbc</artifactId>
      <!--这个jar文件包含对Spring对JDBC数据访问进行封装的所有类。 -->
      <version>4.1.0.RELEASE</version>
    </dependency>
    <dependency>
      <groupId>junit</groupId>
      <artifactId>junit</artifactId>
      <version>4.12</version>
    </dependency>
二、配置方式
1.基于XML的配置方式
1)编写Java Bean的 ".java"类,如beanDemo.java.
2)在applicationContext.xml的文件中声明,如下:
<?xml version="1.0" encoding="UTF-8"?>
<beans
        xmlns="http://www.springframework.org/schema/beans"
        xmlns:xsi="http://www.w3.org/2001/XMLSchema-instance"
        xmlns:context="http://www.springframework.org/schema/context"
        xsi:schemaLocation="http://www.springframework.org/schema/beans
    http://www.springframework.org/schema/beans/spring-beans-3.0.xsd
    http://www.springframework.org/schema/context
    http://www.springframework.org/schema/context/spring-context-3.0.xsd
    ">

    <bean id="idName" class="全类名" />

</beans>
3)使用,如:
        ApplicationContext ctx= new ClassPathXmlApplicationContext("applicationContext.xml");
        BeanFactory bean=(BeanFactory) ctx.getBean("idName");
        bean.method(); //使用bean,method()为具体方法
2.基于java注解的配置
1)类使用了@Service,@Component、@Repository、@Controller
,说明该类为bean
2)在xml配置表扫描器,就可以扫描相应包下的类,有注解的类就是bean
<context:component-scan base-package=“包名”/>
3)使用,对于这种方式的使用,可以和基于Xml的使用方式一样,但是注解上需要写bean的名字,如@service(“beanName”)
使用getBean(“beanName”)获取;
还有一种方式是注解方式的自动装配。
3.基于类的java config(这种方式可以消除xml文件的配置)
1)比如有:接口Bean.java与其实现类 beanImpl.java
2)写一个类作为配置类,如BeanConFig.java,在类上注解@Configuration,该类就相当于xml文件了,在该类中的方法上
  注解@Bean,则说明该方法返回bean,如下:
@Configuration
public class BeanConfig {
    @Bean
    public Bean beanFactory(){
        return new BeanImpl();
    }
}
3)使用
   ApplicationContext applicationContext=new AnnotationConfigApplicationContext(BeanConfig.class);
   Bean bean=applicationContext.getBean(BeanImpl.class);
   bean.method();
spring事务管理分为编程式事务管理和声明式事务管理,具体用法详见W3Cschool网址
https://www.w3cschool.cn/wkspring/jcny1mmg.html
=============================================================================================
补充2:
spring与springMVC:
子容器的几个特点:
子容器能访问到父容器的bean
父容器无法访问子容器的bean
所以经常是在spring的xml配置全局扫描包(不包括@Controller),而在springMVC的xml中配置@Controller扫描
  <context:component-scan base-package="com.example">
  <context:exclude-filter type="annotation" expression="com.example.annotation.ExcludedFromITests"/>
  </context:component-scan>


 606
606


 被折叠的 条评论
为什么被折叠?
被折叠的 条评论
为什么被折叠?
 到【灌水乐园】发言


