


一、概念
1.什么是Nginx
Nginx是一款用C语言开发的自由的、开源的、高性能的HTTP服务器和反向代理服务器;同时也是一个IMAP、POP3、SMTP(电子邮件)代理服务器,nginx能够支撑5万并发链接,并且cpu、内存等资源消耗却非常低,运行非常稳定,中国大陆使用nginx网站用户有:百度、京东、新浪、网易、腾讯、淘宝等。
Nginx同Apache一样都是一种WEB服务器。基于REST架构风格,以统一资源描述符(Uniform Resources Identifier)URI或者统一资源定位符(Uniform Resources Locator)URL作为沟通依据,通过HTTP协议提供各种网络服务。
apache被设计为一个重量级的。它不支持高并发的服务器。在Apache上运行数以万计的并发访问,会导致服务器消耗大量内存。操作系统对其进行进程或线程间的切换也消耗了大量的CPU资源,导致HTTP请求的平均响应速度降低。
这些都决定了Apache不可能成为高性能WEB服务器,轻量级高并发服务器Nginx就应运而生了。
2.为什么使用Nginx
负载均衡是Nginx常用的一个功能,当一台服务器的单位时间内的访问量越大时,服务器压力就越大,大到超过自身承受能力时,服务器就会崩溃。为了避免服务器崩溃,让用户有更好的体验,我们通过负载均衡的方式来分担服务器压力。
我们可以建立很多很多服务器,组成一个服务器集群,当用户访问网站时,先访问一个中间服务器,在让这个中间服务器在服务器集群中选择一个压力较小的服务器,然后将该访问请求引入该服务器。
如此以来,用户的每次访问,都会保证服务器集群中的每个服务器压力趋于平衡,分担了服务器压力,避免了服务器崩溃的情况。负载均衡配置一般都需要同时配置反向代理,通过反向代理跳转到负载均衡。
二、Nginx源码编译安装
本实验基于redhat6.5版本,在三台主机上
主机名			server1 			server2 			server3
服务				ngnix				apache				apache
ip				172.25.47.1			172.25.47.2			172.25.47.3
1、编译
1)下载源码包,在官网可下载,此处已经下载
	[root@server1 nginx]# ls
	gd-devel-2.0.35-26.el7.x86_64.rpm  nginx-1.14.2.tar.gz
	nginx-1.10.3.tar.gz                nginx-1.15.9.tar.gz
2)解压
	[root@server1 nginx]# tar zxf nginx-1.14.2.tar.gz
	生成nginx-1.14.2目录
3)编译安装
1>设置成快速编译
		[root@server1 cc]# pwd
		/root/nginx/nginx-1.14.2/auto/cc
		[root@server1 cc]# vim gcc
		171 # debug							##不开启debug,编译出来会很小
		172 #CFLAGS="$CFLAGS -g"			##日志级别

2>安装编译依赖包
	yum install gcc pcre-devel openssl-devel -y				##源码是c语言写的,所以安装gcc
	#openssl-devel	##加密算法
3>编译,要在 nginx-1.14.2目录下编译
[root@server1 nginx-1.14.2]# pwd
/root/nginx/nginx-1.14.2
[root@server1 nginx-1.14.2]# ./configure --prefix=/usr/local/nginx --with-http_ssl_module --with-http_stub_status_module
#--prefix=/usr/local/nginx  ##指定安装路径
4>安装、查看安装目录
[root@server1 nginx-1.14.2]# make && make install
[root@server1 nginx-1.14.2]# cd /usr/local/nginx/
[root@server1 nginx]# ls
conf  html  logs  sbin
5>设置链接
ln -s /usr/local/nginx/sbin/nginx /usr/local/sbin/
三、Nginx的配置
1、nginx的基本配置
		[root@server1 nginx]# pwd
		/usr/local/nginx
		[root@server1 nginx]# cd conf/
1)设置用户名,用户组
		[root@server1 conf]# vim nginx.conf	##配置文件
		 2 user  nginx nginx;				##用户名 用户组,使用户为nginx用户和nginx用户组进行管理
		 3 worker_processes  1;		##nginx开启的worker的进程数,一般设置为cpu核数  ,auto为自动识别cpu核数,但是一般不推荐使用
2)查看内核cpu数
	[root@server1 conf]# cat  /proc/cpuinfo |grep "processor"|wc -l
	1
3)创建nginx用户
源码编译的nginx没有nginx用户,需要手动创建
		[root@server1 conf]# id nginx
		id: nginx: No such user
		[root@server1 conf]# useradd nginx
4)开启nginx
 [root@server1 conf]# nginx
 [root@server1 conf]# nginx -t			##检测配置文件修改是否正确
开启nginx后,会有四个work进程和一个master进程

5)修改worker进程数
	[root@server1 conf]# kill -9 3669 3670 3671 3672 3673			##修改前需要先停掉进程
	[root@server1 conf]# vim nginx.conf
	  2 user  nginx nginx;
	  3 worker_processes  4;
	  4 worker_cpu_affinity 0001 0010 0100 1000;	##若worker数为2,则为01 10
	 12 events {
	 13     worker_connections  1024;			##worker可以开启的线程数
	 14 }

	ps aux
			root      3679  0.0  0.1  47276  1200 ?        Ss   02:22   0:00 nginx: master process nginx
			nginx     3680  0.0  0.1  47728  1816 ?        S    02:22   0:00 nginx: worker process
			nginx     3681  0.0  0.1  47728  1836 ?        S    02:22   0:00 nginx: worker process
			nginx     3682  0.0  0.1  47728  1836 ?        S    02:22   0:00 nginx: worker process
			nginx     3683  0.0  0.1  47728  1820 ?        S    02:22   0:00 nginx: worker process
2、配置负载均衡
1)反向代理
server1
		[root@server1 conf]# pwd
		/usr/local/nginx/conf
		[root@server1 conf]# vim nginx.conf
				 21         upstream westos {
				 22         server 172.25.47.2:80;		##后端服务器
				 23         server 172.25.47.3:80;
				 24         }

				120 server {
				121         listen 80;			##nginx监听80端口
				122         server_name www.westos.org;		##上边的虚拟主机
				123         location / {				##访问虚拟主机
				124                 proxy_pass http://westos;
				125 }
				126 }
		[root@server1 conf]# nginx -t
		nginx: the configuration file /usr/local/nginx/conf/nginx.conf syntax is ok
		nginx: configuration file /usr/local/nginx/conf/nginx.conf test is successful
		[root@server1 conf]# nginx -s reload		##
server2
	[root@server2 ~]# yum install httpd -y
	[root@server2 ~]# cd /var/www/html/
	[root@server2 html]# vim index.html
		server2
	[root@server2 html]# /etc/init.d/httpd start
server3
	[root@server3 ~]# yum install httpd -y
	[root@server3 ~]# cd /var/www/html/
	[root@server3 html]# vim index.html
		server3
	[root@server3 html]# /etc/init.d/httpd start
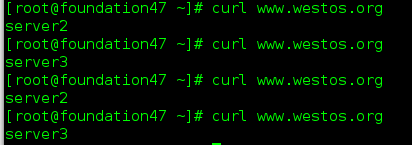
测试
物理真机访问
www.westos.org
能看到轮循的效果
2)粘性
	[root@server1 conf]# vim nginx.conf
		 21         upstream westos {
		 22         ip_hash;
		 23         server 172.25.47.2:80;
		 24         server 172.25.47.3:80;
		 25         }
	[root@server1 conf]# nginx -t
	[root@server1 conf]# nginx -s reload
测试
物理真机
curl www.westos.org
当第一次访问到server3时,就会一直访问server3,
当server3下线时[root@server3 html]# /etc/init.d/httpd stop
访问server2
当server3上线时,[root@server3 html]# /etc/init.d/httpd start
又回到server3上

3)nginx做备用服务器
		[root@server1 conf]# vim nginx.conf
			 21         upstream westos {
			 22         #ip_hash;
			 23         server 172.25.47.2:80;
			 24         server 172.25.47.3:80;
			 25         server 127.0.0.1:80 backup;
			 26         }
		[root@server1 conf]# nginx -t
		[root@server1 conf]# nginx -s reload
测试
server2 server3下线
[root@server2 html]# /etc/init.d/httpd stop
[root@server3 html]# /etc/init.d/httpd stop
物理真机浏览器访问www.westos.org,
nginx充当备用服务器


 499
499


 被折叠的 条评论
为什么被折叠?
被折叠的 条评论
为什么被折叠?
 到【灌水乐园】发言


