


一 概述
上篇文章客户端是如何通过Binder与服务端通信的,后记中遗留客户端是如何通过bindservice获取服务端的BinderProxy对象的?
本篇文章将从进程的角度出发来分析 bindService 流程,在 bindService 的流程中将要涉及到三个主要的进程,分别是
- 客户端进程(bindService 发起端进程)
- system_server 进程(AMS在system_server 进程中)
- 服务端 Service 进程
我们将会以这三个进程角度出来阐述 bindService 是怎么在这三个进程之间辗转腾挪达到远程绑定服务或者说是 Binder 传递功能的,最终客户端拿到服务端proxy对象,调用服务端代码进行通信。调用代码及日志参考上篇文章。
涉及代码如下:
frameworks/base/services/core/java/com/android/server/am/ActivityManagerService.java
frameworks/base/services/core/java/com/android/server/am/ActiveServices.java
frameworks/base/services/core/java/com/android/server/am/ProcessRecord.java
frameworks/base/services/core/java/com/android/server/am/ServiceRecord.java

frameworks/base/core/java/android/app/LoadedApk.java
frameworks/base/core/java/android/app/ContextImpl.java
frameworks/base/core/java/android/app/ActivityThread.java
frameworks/base/core/java/android/app/Service.java
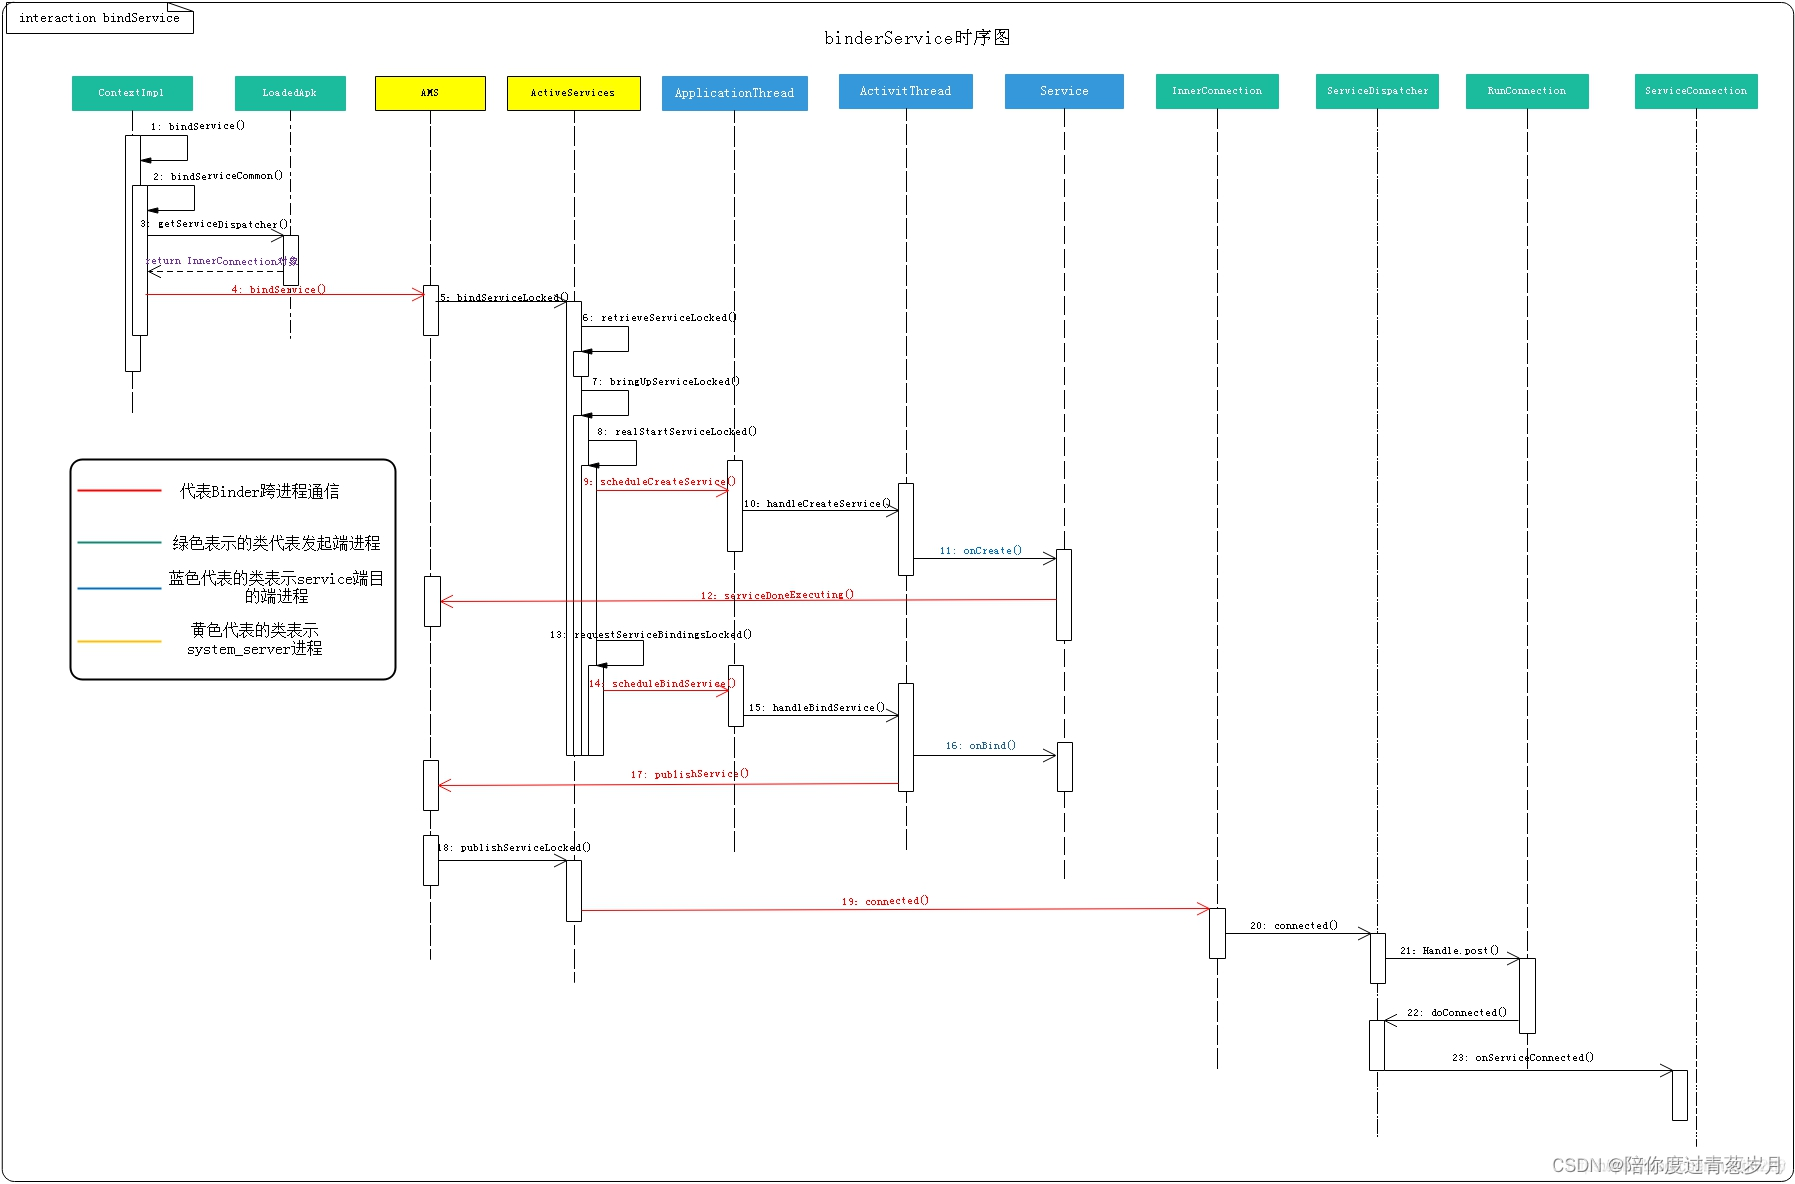
时序图:
二 客户端进程发送 bindService请求
2.1 ContextImpl.bindService
// frameworks/base/core/java/android/app/ContextImpl.java
@Override
public boolean bindService(Intent service, ServiceConnection conn,
        int flags) {
    // 和 startService 流程一样,检查是否是系统应用调用的,打印 log
    warnIfCallingFromSystemProcess();
    return bindServiceCommon(service, conn, flags, null,
            mMainThread.getHandler(), null, getUser());
}
注意第5个参数,传入了主线程的 handler,对应着 client 端的主线程 handler,后面会用到它。
2.2 ContextImpl.bindServiceCommon
private boolean bindServiceCommon(Intent service, ServiceConnection conn,
        ......) {
    // 获取 ServiceDispatcher 对象,用来实现进程间通信的核心
    // 本质上是一个 ServiceDispatcher.InnerConnection 对象,这个类是
    // 实现了 IServiceConnection 接口的 Binder 实体,是服务端
    IServiceConnection sd;
    if (conn == null) {
            throw new IllegalArgumentException("connection is null");
        }
        if (handler != null && executor != null) {
            throw new IllegalArgumentException("Handler and Executor both supplied");
        }
    if (mPackageInfo != null) {
        if (executor != null) {
            sd = mPackageInfo.getServiceDispatcher(conn,
                getOuterContext(), executor, flags);
        } else {
        // conn 封装到了 ServiceDispatcher 中
            sd = mPackageInfo.getServiceDispatcher(conn,
                getOuterContext(), handler, flags);
        }
    }
    // 获取 Activity token
    IBinder token = getActivityToken();
    ......
    // 绑定 isolated 服务.
    int res = ActivityManager.getService().bindIsolatedService(
        mMainThread.getApplicationThread(), getActivityToken(), service,
                service.resolveTypeIfNeeded(getContentResolver()),
                sd, flags, instanceName, getOpPackageName(), user.getIdentifier());
    if (res < 0) {
          throw new SecurityException(
                 "Not allowed to bind to service " + service);
    }
    return res != 0;
}
将这个方法分为两部分来看,一部分是创建 sd 对象,第二部是调用 AMS 的 bindIsolatedService() 方法与系统进程交互。
先来看 sd 是如何被赋值的。这里 mPackageInfo 不为 null,并且 executor 传入的为 null,所以执行 else 分支调用 mPackageInfo 的 getServiceDispatcher() 方法得到一个 sd 对象,其中第一个参数 conn 为我们在客户端创建的 ServiceConnection,第三个参数 handler 为前文提到的客户端 app 主线程的 handler。mPackageInfo 是 LoadedApk 类型对象。
2.2.1 LoadedApk.getServiceDispatcher
// LoadedApk.java
public final IServiceConnection getServiceDispatcher(ServiceConnection c,
        Context context, Handler handler, int flags) {
    return getServiceDispatcherCommon(c, context, handler, null, flags);
}
继续调用 getServiceDispatcherCommon
// LoadedApk.java

public final IServiceConnection getServiceDispatcher(ServiceConnection c,
        Context context, Handler handler, int flags) {
    return getServiceDispatcherCommon(c, context, handler, null, flags);
}
executor 为空,执行注释2所在的 else 分支,创建一个 ServiceDispatcher 实例。
2.2.2 ServiceDispatcher
// LoadedApk.java
static final class ServiceDispatcher {
    private final ServiceDispatcher.InnerConnection mIServiceConnection;
    // 一个 Binder 实体,是 binder 通信的核心
    @UnsupportedAppUsage
    private final ServiceConnection mConnection;  // 一个连接被封装到此
    @UnsupportedAppUsage(maxTargetSdk = Build.VERSION_CODES.P,
        trackingBug = 115609023)
    private final Context mContext;
    private final Handler mActivityThread;
    private final Executor mActivityExecutor;
    private final ServiceConnectionLeaked mLocation;
    private final int mFlags;

    ......
    // 关键内部类 InnerConnection 实现了 IServiceConnection.Stub 接口
    // 是为 Binder 服务端
    private static class InnerConnection extends IServiceConnection.Stub {
        @UnsupportedAppUsage
        final WeakReference<LoadedApk.ServiceDispatcher> mDispatcher;

        InnerConnection(LoadedApk.ServiceDispatcher sd) {
        // 构造方法中,包含了 ServiceDispatcher
            mDispatcher = new WeakReference<LoadedApk.ServiceDispatcher>(sd);
        }
        // 跨进程调用的 connected 方法,这里的 service 即为从远程服务端所在进程传递过来的
        // Binder 对象,接下来我们重点关注这个对象是怎么传递过来的
        public void connected(ComponentName name, IBinder service, boolean dead)
                throws RemoteException {
            LoadedApk.ServiceDispatcher sd = mDispatcher.get();
            if (sd != null) {
            // 进而调用 ServiceDispatcher 的 connected 方法
             // 进而最终调用到 ServiceDispatcher 中的 ServiceConnection 的
             // onServiceConnected 方法
                sd.connected(name, service, dead);
            }
        }
    }

    ......

    // ServiceDispatcher 构造方法
    @UnsupportedAppUsage
    ServiceDispatcher(ServiceConnection conn,
            Context context, Handler activityThread, int flags) {
        // 创建一个 InnerConnection 对象,是一个 IBinder
        mIServiceConnection = new InnerConnection(this);
        // ServiceConnection 对象
        mConnection = conn;
        mContext = context;
        mActivityThread = activityThread;
        mActivityExecutor = null;
        mLocation = new ServiceConnectionLeaked(null);
        mLocation.fillInStackTrace();
        mFlags = flags;
    }
    ......
}
在 ServiceDispatcher 的构造方法中,将客户端 conn 赋值给 mConnection,主线程 handler 赋值给 mActivityThread,并实例化了内部类 InnerConnection 赋值给 mIServiceConnection,内部类 InnerConnection 继承了 IServiceConnection.Stub,并实现了 IServiceConnection 中的 connected() 接口。
接着看 getServiceDispatcherCommon() 方法,最后调用了 sd.getIServiceConnection() 方法。
IServiceConnection getIServiceConnection() {
    return mIServiceConnection;
}
返回了创建的 InnerConnection 对象。有了这个 InnerConnection 对象就可以执行跨进程通信了。
回到 bindServiceCommon() 方法,接着会调用 bindIsolatedService() 方法,这个最终会调用到 ActivityManagerService 的 bindIsolatedService 方法。
三 system_server 进程处理 binderService
3.1 AMS.bindIsolatedService
// frameworks/base/services/core/java/com/android/server/am/ActivityManagerService.java

public int bindIsolatedService(IApplicationThread caller, IBinder token,
    Intent service, String resolvedType, IServiceConnection connection,
    int flags, String instanceName, String callingPackage, int userId)
    throws TransactionTooLargeException {
    // isolated 进程不能调用
    enforceNotIsolatedCaller("bindService");
    // instanceName 非空的话,进行字符校验. 此处 instanceName 为空,走不到这里
    if (instanceName != null) {
        ........
    }
    synchronized(this) {
        // 调用 ActiveServices 绑定服务.
        return mServices.bindServiceLocked(caller, token, service,
               ......);
    }
}
可以看到 AMS 中涉及到的 Service 操作,全部都放到 ActiveServices 中了。
3.2 ActiveServices.bindServiceLocked
// frameworks/base/services/core/java/com/android/server/am/ActiveServices.java
int bindServiceLocked(IApplicationThread caller, IBinder token, Intent service,
            String resolvedType, final IServiceConnection connection, int flags,
            String instanceName, String callingPackage, final int userId)
            throws TransactionTooLargeException {
  ......
  // 从 mProcessList 列表中获取调用端进程
  final ProcessRecord callerApp = mAm.getRecordForAppLOSP(caller);
  ActivityServiceConnectionsHolder<ConnectionRecord> activity = null;
  // token 不为空,代表着发起方具有 activiy 上下文
    if (token != null) {
        // 获取指定 Activity 的服务连接持有者 ActivityServiceConnectionHolder
      activity = mAm.mAtmInternal.getServiceConnectionsHolder(token);
        // 如果 holder 为空, 直接返回
        if (activity == null) {
            return 0;
        }
    }
    ......

    // 如果是系统进程调用, 则需要对 intent 进行标记
    if (isCallerSystem) {
         ......
    }

    // flags检查
    ......
    // 一系列权限检查.
    ......

    // 开始构建 ServiceRecord
    // 先权限检查,并从 ServiceMap 中根据 ComponentName 查找 ServiceRecord
    // 没有找到则创建一个新的 ServiceRecord,最后封装到 ServiceLookupResult 中
    ServiceLookupResult res =
        retrieveServiceLocked(service, instanceName, resolvedType,
                ......);
    ServiceRecord s = res.record;

    ......
    try {

       ......

        // 构建 IntentBindRecord, AppBindRecord, ConnectionRecord
        // 从 bindings 映射表中查找或新建 AppBindRecord
        AppBindRecord b = s.retrieveAppBindingLocked(service, callerApp);
        // 创建 ConnectionRecord, 此处 connection 来自发起方
        ConnectionRecord c = new ConnectionRecord(b, activity,
                connection, ......);

        // 建立 binder 和 ConnectionRecord 列表的映射关系
        IBinder binder = connection.asBinder();
        s.addConnection(binder, c);
        b.connections.add(c);
        if (activity != null) {
            activity.addConnection(c);
        }

        ......
         ArrayList<ConnectionRecord> clist = mServiceConnections.get(binder);
            if (clist == null) {
                clist = new ArrayList<>();
                mServiceConnections.put(binder, clist);
            }
            clist.add(c);
        // 如果 flags 为 BIND_AUTO_CREATE, 真正执行绑定服务并返回
        // 如果 flag 为0,则不会启动服务
        if ((flags&Context.BIND_AUTO_CREATE) != 0) {
            s.lastActivity = SystemClock.uptimeMillis();
            if (bringUpServiceLocked(s, service.getFlags(), ......) {
                return 0;
            }
        }

        // 若为其他 flags, 且 Service 所在的进程非空,
        // 则更新 lru 进程列表和 oomAdj. 这个可能会提高所在进程优先级
        if (s.app != null) {
            if ((flags&Context.BIND_TREAT_LIKE_ACTIVITY) != 0) {
                s.app.treatLikeActivity = true;
            }
            if (s.whitelistManager) {
                s.app.whitelistManager = true;
            }
            // This could have made the service more important.
            mAm.updateLruProcessLocked(s.app,......);
            mAm.updateOomAdjLocked(
                OomAdjuster.OOM_ADJ_REASON_BIND_SERVICE);
        }

        if (s.app != null && b.intent.received) {
            // 如果服务正在运行, 则先建立连接
            c.conn.connected(s.name, b.intent.binder, false);
            // rebind 服务
            if (b.intent.apps.size() == 1 && b.intent.doRebind) {
                requestServiceBindingLocked(s, b.intent, callerFg, true);
            }
        } else if (!b.intent.requested) {
            // bind 服务
            requestServiceBindingLocked(s, b.intent, callerFg, false);
        }

        // 从 mStartingBackground 后台服务列表中移除当前 Service, 取消后台启动
        getServiceMapLocked(s.userId).ensureNotStartingBackgroundLocked(s);
    } finally {
        Binder.restoreCallingIdentity(origId);
    }
    return 1;
}
代码的主要功能有:
通常第三方进程调用 system_server 进程中的 Java 层 Binder 服务时候会做一些安全和功能的检测,这里也不例外,会判断发起端进程是否存在,是否存在 activity 上下文等信息
调用 retrieveServiceLocked 查找根据第三方进程传递进来的 Intent 所对应的服务,即系统中是否存在符合 intent 携带消息的 Service,不存在的话会创建一个新的 ServiceRecord 并封装起来
通过 retrieveAppBindingLocked() 方法创建 AppBindRecord 对象,该对象记录着当前 ServiceRecord,intent 以及发起方的进程 ProcessRecord 信息
一切准备就绪之后,调用 bringUpServiceLocked 拉起目标服务
另外可以看到在 AMS 服务中会将发起端传递过来的 connection 存储起来,即将发起端进程传递过来的 LoadedApk.ServiceDispatcher.InnerConnection 的代理对象 connection,保存到新创建的 ConnectionRecord 对象的成员变量。再通过 clist.add( c ),将该 ConnectionRecord 对象添加到 clist 队列。后面便可以通过 clist 来查询发起方的信息。
3.2.1 创建 ConnectionRecord
// ConnectionRecord.java

final class ConnectionRecord {
   ConnectionRecord(AppBindRecord _binding,
        ActivityServiceConnectionsHolder<ConnectionRecord> _activity,
        IServiceConnection _conn, int _flags,
        int _clientLabel, PendingIntent _clientIntent,
        int _clientUid, String _clientProcessName, String _clientPackageName) {
      binding = _binding;
      activity = _activity;
      conn = _conn;
      flags = _flags;
      clientLabel = _clientLabel;
      clientIntent = _clientIntent;
      clientUid = _clientUid;
      clientProcessName = _clientProcessName;
      clientPackageName = _clientPackageName;
   }
}
创建 ConnectionRecord 对象,将前面的 IServiceConnection 也就是 InnerConnection 赋值给 conn。
接着通过 asBinder 得到 IBinder 对象,然后调用 ServiceRecord 的 addConnection() 方法。
3.2.2 ServiceRecord.addConnection
// ServiceRecord.java
private final ArrayMap<IBinder, ArrayList<ConnectionRecord>> connections
            = new ArrayMap<IBinder, ArrayList<ConnectionRecord>>();

void addConnection(IBinder binder, ConnectionRecord c) {
    ArrayList<ConnectionRecord> clist = connections.get(binder);
    if (clist == null) {
        clist = new ArrayList<>();
        connections.put(binder, clist);
    }
    clist.add(c);

    // if we have a process attached, add bound client uid of this connection to it
    if (app != null) {
        app.addBoundClientUid(c.clientUid);
    }
}
-
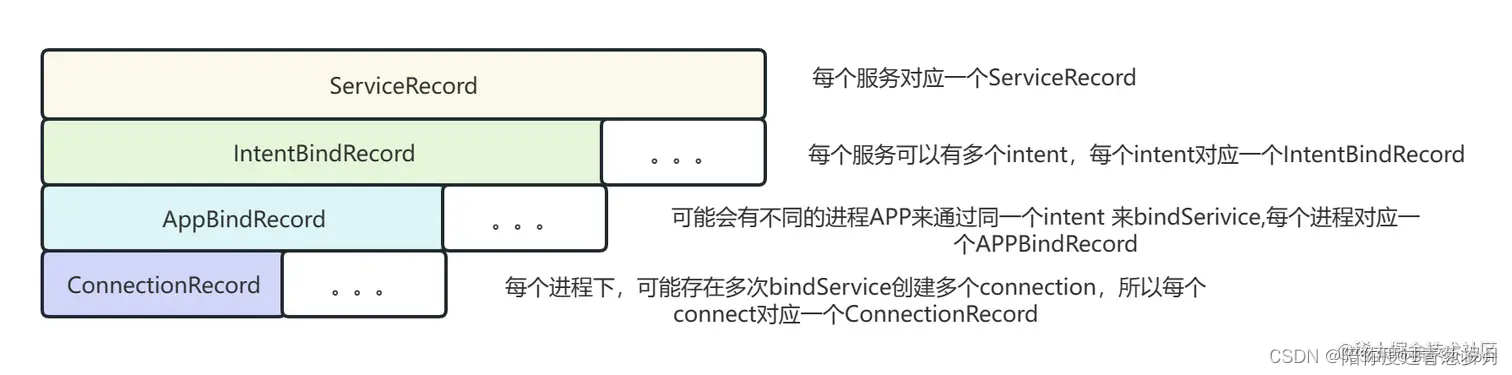
connections 是一个 ArrayMap,其 key 保存了 IBinder,value 保存了一个由 ConnectionRecord 对象组成的 ArrayList,也就是 clist
-
每一个 ServiceConnection,都会有一个对应的 InnerConnection(IBinder)
-
每一次 bindService 都会创建一个 ConnectionRecord,里面保存了 InnerConnection
-
对同一个 ServiceConnection 调用多次 bindService,会得到多个 ConnectionRecord,并且这些 ConnectionRecord 会保存在 clist 中,但是只有一个 InnerConnection(IBinder)
3.3 ActiveServices.retrieveServiceLocked
参考 Android四大组件系列4 Service启动流程 的 # 3.2.1
3.4 ServiceRecord.retrieveAppBindingLocked
// ServiceRecord.java
final ArrayMap<Intent.FilterComparison, IntentBindRecord> bindings
            = new ArrayMap<Intent.FilterComparison, IntentBindRecord>();

// 创建 AppBindRecord 对象记录着当前 ServiceRecord, intent 以及发起方的进程信息
public AppBindRecord retrieveAppBindingLocked(Intent intent,
            ProcessRecord app) {
        Intent.FilterComparison filter = new Intent.FilterComparison(intent);
        IntentBindRecord i = bindings.get(filter);
        if (i == null) {
        // 创建连接 ServiceRecord 和 fliter 的记录
            i = new IntentBindRecord(this, filter);
            bindings.put(filter, i);
        }
        // 此处 app 是指调用方所在进程
        AppBindRecord a = i.apps.get(app);
        if (a != null) {
            return a;
        }
        // 创建 ServiceRecord 跟进程绑定的记录信息
        a = new AppBindRecord(this, i, app);
        i.apps.put(app, a);
        return a;
    }
这里我们需要知道 AppBindRecord 对象记录着当前 ServiceRecord,intent 以及发起方的进程信息,并且该记录会在 ArrayMap 对象 bindings 中存起来,供后续查询。
回到 bindServiceLocked() 方法,在 try 中,会调用 bringUpServiceLocked() 方法。
3.5 ActiveServices.bringUpServiceLocked
参考 Android四大组件系列4 Service启动流程 # 3.4
bringUpServiceLocked 方法在 Service 启动流程中已经讲过。简单总结如下:
如果目标 Service 已经创建,则可以直接通过 sendServiceArgsLocked() 回调目标 Service 的 onStartCommand()
如果目标 Service 尚未创建但所属的进程已经存在,则需要通过 realStartServiceLocked() 执行 Service 的 create 流程
如果目标 Service 所属的进程尚未创建,则需要通过 AMS 的 startProcessLocked() 创建对应的进程
因为在 Android四大组件系列4 Service启动流程 中我们已经了解了第三种情况即:进程尚未创建的情况,我们还知道进程创建后会调到 realStartServiceLocked 方法。
对于 startService 调用链为: realStartServiceLocked -> ApplicationThread.scheduleCreateService -> sendServiceArgsLocked
对于 bindService 调用链为: realStartServiceLocked -> ApplicationThread.scheduleCreateService -> requestServiceBindingsLocked
四 创建 Service 所属的新进程
4.1 AMS.startProcessLocked
final ProcessRecord startProcessLocked(String processName,
            ApplicationInfo info, boolean knownToBeDead, int intentFlags,
            HostingRecord hostingRecord, boolean allowWhileBooting,
            boolean isolated, boolean keepIfLarge) {
        return mProcessList.startProcessLocked(processName, info,
        knownToBeDead, intentFlags, hostingRecord, allowWhileBooting,
        isolated, 0 /* isolatedUid */, keepIfLarge, null /* ABI override */,
        null /* entryPoint */, null /* entryPointArgs */,
        null /* crashHandler */);
}
这个函数的分析,我们可以参考 Android四大组件系列2 Activity启动流程(上) 的 ##3.17 节内容。就是创建了一个新的进程。
五 应用进程启动 Service
我们知道当创建一个新的进程的时候,会在进程中执行 ActivityThread 的 main 函数。并且我们知道会在这个 main 函数中执行 ActivityThread 的 attach 方法,在这个 attach 方法中,调用到 AMS 的 attachApplicationLocked。我们来看这个方法:
public final void attachApplication(IApplicationThread thread, long startSeq) {
    if (thread == null) {
            throw new SecurityException("Invalid application interface");
        }
        synchronized (this) {
            int callingPid = Binder.getCallingPid();
            final int callingUid = Binder.getCallingUid();
            final long origId = Binder.clearCallingIdentity();
            attachApplicationLocked(thread, callingPid, callingUid, startSeq);
            Binder.restoreCallingIdentity(origId);
        }
}


private final boolean attachApplicationLocked(IApplicationThread thread,
        int pid, int callingUid, long startSeq) {
    ProcessRecord app;
    // 从 mPidsSelfLocked 列表根据 pid 查找进程
    if (pid != MY_PID && pid >= 0) {
        synchronized (mPidsSelfLocked) {
            app = mPidsSelfLocked.get(pid);
        }
        ........
    } else {
        app = null;
    }
	........
    // 如果当前的 Application 记录仍然依附到之前的进程中,则清理掉
    if (app.thread != null) {
        handleAppDiedLocked(app, true, true);
    }

    // mProcessesReady 这个变量在 AMS 的 systemReady 中被赋值为 true,
    //  所以这里的 normalMode 也为 true
    boolean normalMode = mProcessesReady || isAllowedWhileBooting(app.info);
	........
	if (app.isolatedEntryPoint != null) { // isolated进程
        // This is an isolated process which should just call an entry point instead of
        // being bound to an application.
        thread.runIsolatedEntryPoint(app.isolatedEntryPoint, app.isolatedEntryPointArgs);
    } else if (instr2 != null) {
	    // 绑定 App 进程
        thread.bindApplication(processName, appInfo, providers,
                instr2.mClass,
                profilerInfo, instr2.mArguments,
                instr2.mWatcher,
                instr2.mUiAutomationConnection, testMode,
                mBinderTransactionTrackingEnabled, enableTrackAllocation,
                isRestrictedBackupMode || !normalMode, app.isPersistent(),
                new Configuration(app.getWindowProcessController().getConfiguration()),
                app.compat, getCommonServicesLocked(app.isolated),
                mCoreSettingsObserver.getCoreSettingsLocked(),
                buildSerial, autofillOptions, contentCaptureOptions);
    } else {
        thread.bindApplication(processName, appInfo, providers, null, profilerInfo,
                null, null, null, testMode,
                mBinderTransactionTrackingEnabled, enableTrackAllocation,
                isRestrictedBackupMode || !normalMode, app.isPersistent(),
                new Configuration(app.getWindowProcessController().getConfiguration()),
                app.compat, getCommonServicesLocked(app.isolated),
                mCoreSettingsObserver.getCoreSettingsLocked(),
                buildSerial, autofillOptions, contentCaptureOptions);
    }
    ........
    // 绑定应用程序后, 设置 app active, 并更新 lru 进程信息
    // Make app active after binding application or client may be
    //  running requests (e.g starting activities) before it is ready.
    synchronized (mProcLock) {
                app.makeActive(thread, mProcessStats); // 设置 app active
                checkTime(startTime, "attachApplicationLocked: immediately
                after bindApplication");
    }
    updateLruProcessLocked(app, false, null); // 并更新 lru 进程信息
    ......

    boolean didSomething = false;
    if (normalMode) {
		//调用 ATMS 的 attachApplication()
        didSomething = mAtmInternal.attachApplication(app.getWindowProcessController());
		........
    }
    // Find any services that should be running in this process...
    // #####################关键调用:启动进程中的服务.
    if (!badApp) {
            try {
                didSomething |= mServices.attachApplicationLocked(app, processName);
                checkTime(startTime,
                "attachApplicationLocked: after mServices.attachApplicationLocked");
            } catch (Exception e) {
                Slog.wtf(TAG, "Exception thrown starting services in " + app, e);
                badApp = true;
            }
     }
    // Check if a next-broadcast receiver is in this process...
    // 发送 pending 中的广播. (发送广播过程本文暂不讲解)
    if (!badApp && isPendingBroadcastProcessLocked(pid)) {
            try {
                didSomething |= sendPendingBroadcastsLocked(app);
                checkTime(startTime,
                "attachApplicationLocked: after sendPendingBroadcastsLocked");
            } catch (Exception e) {
                // If the app died trying to launch the receiver we declare it 'bad'
                Slog.wtf(TAG, "Exception thrown dispatching broadcasts in " + app, e);
                badApp = true;
            }
        }
    if (!didSomething) {
	    // 进程启动,更新 Adj
        updateOomAdjLocked(OomAdjuster.OOM_ADJ_REASON_PROCESS_BEGIN);
    }
	........
    return true;
}
当 Service 所属的进程不存在时,会将对应的 ServiceRecord 保存在 mPendingServices 中,以等待进程创建完毕。此处的 attachApplicationLocked() 会遍历这个列表,并恢复执行属于当前进程的 Service 的后续启动流程。
5.2 ActiveServices.attachApplicationLocked
boolean attachApplicationLocked(ProcessRecord proc, String processName)
        throws RemoteException {
    ......
    if (mPendingServices.size() > 0) {
        ServiceRecord sr = null;
        ......
        for (int i = 0; i < mPendingServices.size(); i++) {
            sr = mPendingServices.get(i);
            // 和当前进程信息不符合的 ServiceRecord 直接跳过
            if (proc != sr.isolatedProc && (proc.uid != sr.appInfo.uid
                    || !processName.equals(sr.processName))) {
                continue;
             }
            ......
            realStartServiceLocked(sr, proc, sr.createdFromFg); // 关键调用
            ......
        }
    }
    ......
}
attachApplicationLocked() 遍历 mPendingServices 中的每一项 ServiceRecord,当对应的进程恰好是目标 Service 所属的进程时,则调用 realStartServiceLocked() 执行 Service 的 create 流程。
5.3 ActiveServices.realStartServiceLocked
private final void realStartServiceLocked(ServiceRecord r,
      ProcessRecord app, boolean execInFg) throws RemoteException {
    ......
    r.setProcess(app, thread, pid, uidRecord);
    // 可知在服务启动的时候,才设置ServiceRecord 的所属进程
    r.restartTime = r.lastActivity = SystemClock.uptimeMillis();
    ......
    // 服务创建
    app.thread.scheduleCreateService(r, r.serviceInfo,
           mAm.compatibilityInfoForPackage(r.serviceInfo.applicationInfo),
           app.getReportedProcState());
    r.postNotification();
    created = true;
    if (r.whitelistManager) {
        app.whitelistManager = true;
    }
    ......
    // 请求绑定服务
    requestServiceBindingsLocked(r, execInFg);
    ......
    sendServiceArgsLocked(r, execInFg, true); // 发送参数
    ......
}
关于 app.thread.scheduleCreateService 的调用,我们在 startService 的流程中已经做过分析,在此不再赘述,重点看与 bindService 有关的 requestServiceBindingsLocked 方法。
5.4 ActiveServices.requestServiceBindingsLocked
private final void requestServiceBindingsLocked(ServiceRecord r,
      boolean execInFg)
        throws TransactionTooLargeException {
    for (int i=r.bindings.size()-1; i>=0; i--) {
        IntentBindRecord ibr = r.bindings.valueAt(i);
        if (!requestServiceBindingLocked(r, ibr, execInFg, false)) {
            break;
        }
    }
}
遍历 bindings 列表每一项,执行 bind 操作。通过 bindService 方式启动的服务,那么该 serviceRecord 的 bindings 则一定不会空,不然后续的工作怎么开展呢!接着继续调用重载的 requestServiceBindingLocked 方法继续处理。
private final boolean requestServiceBindingLocked(ServiceRecord r,
        IntentBindRecord i,......) throws TransactionTooLargeException {
    if (r.app == null || r.app.thread == null) {
        // If service is not currently running, can't yet bind.
        return false;
    }
    if ((!i.requested || rebind) && i.apps.size() > 0) {
        try {
            // 更新 ServiceRecord bind 阶段各属性,ANR 埋雷操作
            bumpServiceExecutingLocked(r, execInFg, "bind",
                        OomAdjuster.OOM_ADJ_REASON_BIND_SERVICE);
            // 调用 ApplicationThread.scheduleBindService
            r.app.thread.scheduleBindService(r, i.intent.getIntent(),
                  rebind, r.app.getReportedProcState());
            if (!rebind) {
                i.requested = true;
            }
            i.hasBound = true;
            i.doRebind = false;
        } catch (TransactionTooLargeException e) {
            ......
        } catch (RemoteException e) {
            ......
        }
    }
    return true;
}
5.5 ApplicationThread.scheduleBindService
private class ApplicationThread extends IApplicationThread.Stub {
    ......
    public final void scheduleBindService(IBinder token,
          Intent intent, boolean rebind, int processState) {
        updateProcessState(processState, false);
        BindServiceData s = new BindServiceData();
        s.token = token;
        s.intent = intent;
        s.rebind = rebind;
        sendMessage(H.BIND_SERVICE, s);
    }
}

class H extends Handler {
    ...
    public void handleMessage(Message msg) {
        switch (msg.what) {
            case BIND_SERVICE:
                handleBindService((BindServiceData)msg.obj);
                break;
            ...
        }
    }
}
5.6 ActivityThread.handleBindService
private void handleBindService(BindServiceData data) {
    CreateServiceData createData = mServicesData.get(data.token);
    Service s = mServices.get(data.token);
    if (s != null) {
        data.intent.setExtrasClassLoader(s.getClassLoader());
        data.intent.prepareToEnterProcess();

        if (!data.rebind) {
         // 调用 Service.onBind,这个返回值就是服务端的 Service binder 对象
         // 我们通过这个 binder 实现 aidl 接口的远程调用
            IBinder binder = s.onBind(data.intent);
	        // 发布服务,把这个 binder 对象通过 AMS 传递到客户端进程
            ActivityManager.getService().publishService(data.token,
                    data.intent, binder);
        } else {
            // 调用 Service.onRebind
            s.onRebind(data.intent);
            // 做一些列表移除工作
            ActivityManager.getService().serviceDoneExecuting(
            data.token, SERVICE_DONE_EXECUTING_ANON, 0, 0);
        }
    }
}
5.7 AMS.publishService
// frameworks/base/services/core/java/com/android/server/am/ActivityManagerService.java
public void publishService(IBinder token, Intent intent,
        IBinder service) {
    synchronized(this) {
        mServices.publishServiceLocked((ServiceRecord)token,
                intent, service);
    }
}
5.8 ActiveServices.publishServiceLocked
// frameworks/base/services/core/java/com/android/server/am/ActiveServices.java

// 这段代码的含义是: 根据 intent 封装 filter 对象并以此作为匹配条件,从 bindings 列表
// 中的所有 ConnectionRecord 中查找 filter 匹配的 ConnectionRecord, 然后建立连接
void publishServiceLocked(ServiceRecord r, Intent intent,
        IBinder service) {
    final long origId = Binder.clearCallingIdentity();
    try {
        if (r != null) {
            Intent.FilterComparison filter =
                    new Intent.FilterComparison(intent);
            IntentBindRecord b = r.bindings.get(filter);
            if (b != null && !b.received) {
                b.binder = service;
                b.requested = true;
                b.received = true;
         ArrayMap<IBinder, ArrayList<ConnectionRecord>> connections =
                 r.getConnections();
         for (int conni = connections.size() - 1; conni >= 0; conni--) {
              ArrayList<ConnectionRecord> clist =
                     connections.valueAt(conni);
                    for (int i=0; i<clist.size(); i++) {
                        ConnectionRecord c = clist.get(i);
                if (!filter.equals(c.binding.intent.intent)) {
                            continue;
                }
		// 建立连接.会回调 ServiceConnect 的 onServiceConnected 方法
                        c.conn.connected(r.name, service, false);
                    }
                }
            }
			// 发布服务后的收尾工作
            serviceDoneExecutingLocked(r, ......);
        }
    } finally {
        Binder.restoreCallingIdentity(origId);
    }
}
根据之前分析,我们知道 c.conn.connected 实际上调用的是 ServiceDispatcher.InnerConnection 的 connected 方法。
5.9 ServiceDispatcher.InnerConnection.connected
private static class InnerConnection extends IServiceConnection.Stub {
    final WeakReference<LoadedApk.ServiceDispatcher> mDispatcher;

    InnerConnection(LoadedApk.ServiceDispatcher sd) {
      mDispatcher = new WeakReference<LoadedApk.ServiceDispatcher>(sd);
    }

    public void connected(ComponentName name,
            IBinder service, boolean dead) throws RemoteException {
        LoadedApk.ServiceDispatcher sd = mDispatcher.get();
        if (sd != null) {
            // 建立连接.
            sd.connected(name, service, dead);
        }
    }
}
5.10 ServiceDispatcher.connected
// 如果有线程池在 Runnable 中执行, 否则直接在当前线程执行, 最终都调到 doConnected
public void connected(ComponentName name, IBinder service,
      boolean dead) {
    if (mActivityExecutor != null) {
        mActivityExecutor.execute(
                new RunConnection(name, service, 0, dead));
    } else if (mActivityThread != null) {// 走此分支,切換到主線程
        mActivityThread.post(
               new RunConnection(name, service, 0, dead));
    } else {
        doConnected(name, service, dead);
    }
}
5.11 ServiceDispatcher.RunConnection
private final class RunConnection implements Runnable {
    RunConnection(ComponentName name, IBinder service, int command, boolean dead) {
        mName = name;
        mService = service;
        mCommand = command;
        mDead = dead;
    }
    public void run() {
        if (mCommand == 0) {
            // 建立连接.
            doConnected(mName, mService, mDead);
        } else if (mCommand == 1) {
            doDeath(mName, mService);
        }
    }
    final ComponentName mName;
    final IBinder mService;
    final int mCommand;
    final boolean mDead;
}
5.12 ServiceDispatcher.doConnected
// name 为要 bind 的服务对应的 ComponentName, service 为 onBind 返回的 Binder 对象
// dead 为 false 表示绑定操作
public void doConnected(ComponentName name, IBinder service,
        boolean dead) {
    ServiceDispatcher.ConnectionInfo old;
    ServiceDispatcher.ConnectionInfo info;

    synchronized (this) {
        if (mForgotten) {
            // We unbound before receiving the connection
            // ignore any connection received.
            return;
        }
        // 如果当前连接中已经含义目标 Service 的 ComponentName,且 binder 和
        // onBind 方法返回的 binder 相同,则说明已经完成建立连接了, 直接返回
        old = mActiveConnections.get(name);
        if (old != null && old.binder == service) {
            // Huh, already have this one.  Oh well!
            return;
        }

        if (service != null) {
            // 新建ConnectionInfo对象并设置binder, 将ConnectionInfo
            // 对象添加到mActiveConnections列表
            // A new service is being connected... set it all up.
            info = new ConnectionInfo();
            info.binder = service;
            info.deathMonitor = new DeathMonitor(name, service);

            service.linkToDeath(info.deathMonitor, 0);
            mActiveConnections.put(name, info);
        } else {
            // The named service is being disconnected... clean up.
            mActiveConnections.remove(name);
        }

        if (old != null) {
            old.binder.unlinkToDeath(old.deathMonitor, 0);
        }
    }

    // If there was an old service, it is now disconnected.
    if (old != null) {
        mConnection.onServiceDisconnected(name);
    }
    if (dead) {
        mConnection.onBindingDied(name);
    }
    // If there is a new viable service, it is now connected.
    if (service != null) {
        // 关键调用:回调 ServiceConnection.onServiceConnected
        mConnection.onServiceConnected(name, service);
    } else {
        //The binding machinery worked, but the remote
        // returned null from onBind().
        mConnection.onNullBinding(name);
    }
}
5.13 ServiceConnection.onServiceConnected
frameworks/base/core/java/android/content/ServiceConnection.java
一般是开发者调用 bindService 时,手动传入 ServiceConnection 的实现类。如上篇文章中ClientActiviy拿到服务端的proxy对象
   ServiceConnection serviceConnection = new ServiceConnection() {
        @Override
        public void onServiceConnected(ComponentName name, IBinder service) {
            Log.w("BinderChric", "【CLIENT】== onServiceConnected");
            // proxy
            pmsProxy = IPersonManager.Stub.asInterface(service);
        }

        @Override
        public void onServiceDisconnected(ComponentName name) {
            pmsProxy = null;
        }
    };
六 总结
参考:Android四大组件系列6 bindService流程_android bindservice-CSDN博客
大家可以关注下这个博主。


 873
873

 被折叠的 条评论
为什么被折叠?
被折叠的 条评论
为什么被折叠?
 到【灌水乐园】发言


