


本文介绍tkinter的Text控件。Text控件是一种非常灵活和强大的工具。Text控件通常用作编辑框,可以接收文字的输入。但是它还可以用做样式化代码编辑器、web浏览器等。
Text的属性&方法
单纯的描述每个属性&方法的作用其实"感觉不太明显",看完后还是不知道怎么用,我还是觉得有个例子作为参考,可能会更好一些。
width&height
width 表示TEXT的宽度,以字符为单位,具体显示宽度依赖字体大小(font size)
height 表示TEXT的高度,以字符为单位,具体显示高度依赖字体大小(font size)
main_win = Tk()
main_win.title('渔道的Text控件')
width = 300
height = 300

main_win.geometry(f'{width}x{height}')
text1 = Text(main_win, width=40, height=10)
text1.pack()
main_win.mainloop()
insert()
从上面的例子可看出,创建一个Text控件对象,默认是没有任何内容的。如果想让它显示默认的提示性文字,要怎么做呢?
text = Text(main_win, width=40, height=10)
text.pack()
text.insert('1.0', '这是文本框,你可以输入任何内容')
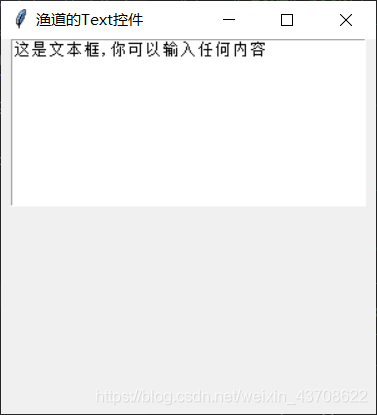
Text的insert函数要怎么使用呢?
insert(index, chars, *args)
Insert CHARS before the characters at INDEX. An additional tag can be given in ARGS. Additional CHARS and tags can follow in ARGS.
index 表示插入文本的位置
chars 表示文本的内容
insert是在index处的字符前插入字符。
本例中,index=‘1.0’,表示插入的位置在第1行第0个字符处,也就是行首。说明,由于历史惯例,行号从1开始计数,字符编号从0开始计数。
这里我们引出了一个TK中索引(index)的概念,索引的内容也非常的丰富,这里只是简单的举例说明一下,后面会单独的写一篇文章来详细讲解,如果有需要的话。
| line.char | 表示第几行的第几个字符,也就是我们前面例子使用的形式 |
|---|---|
| line.end | 表示在行尾位置(该行的换行符前)插入 |
| END | 在文本的最后插入 |
因为Text控件支持显示多行文本,文本内容中有换行符’\n’,就会换行显示。
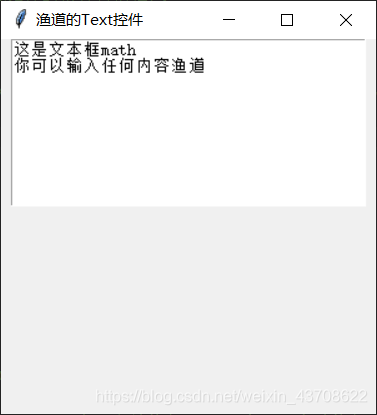
text.insert('1.0','这是文本框\n你可以输入任何内容')
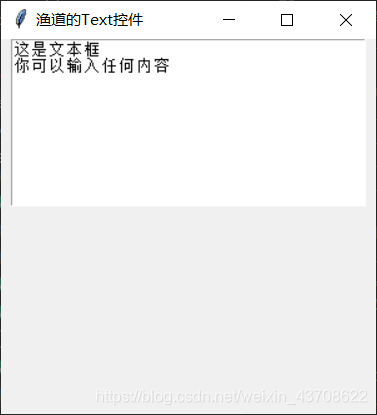
text.insert('1.0','这是文本框\n你可以输入任何内容')
text.insert('1.end', 'math')
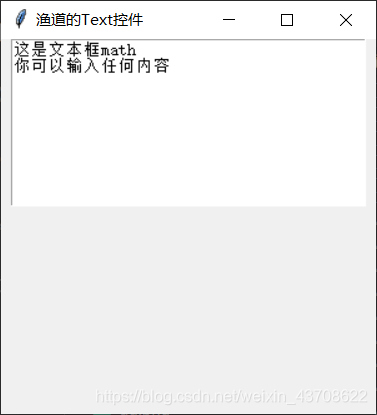
text.insert('1.0','这是文本框\n你可以输入任何内容')
text.insert('1.end', 'math')
from tkinter.constants import END
text.insert(END, '渔道') # END实际就是字符串'end'
delete()
前面一小节介绍了Text的文本"增",本小节介绍Text文本的"删"。
delete(index1, index2=None)
Delete the characters between INDEX1 and INDEX2 (not included)
删除[index1,index2)之间的字符。
text.delete('1.0', '1.7')

从结果可以看到,delete将第一行的第0到第6个字符删除了,只显示了’th’这两个字符。
get()
前面一小节介绍了Text的文本"删",本小节介绍Text文本的"查"。
get(index1, index2=None)
Return the text from INDEX1 to INDEX2 (not included).
s = text.get('1.0', '1.10')
print(s)
print(s)最终打印的内容是’这是文本框ma’。
给Text加上滚动条
有时候文本的内容超出文本框的可显示区时,就需要滚动条来提升体验。下面就介绍怎样将Text和滚动条绑定在一起使用。
我先介绍一个实际的例子,然后结合例子来介绍Text相关的属性或方法。
from tkinter import (Tk, Text, Scrollbar)
from tkinter.constants import (HORIZONTAL, VERTICAL, RIGHT, LEFT, X, Y, BOTH, BOTTOM, YES, NONE, END, CURRENT)
main_win = Tk()
main_win.title('渔道的Text控件')
main_win.geometry(f'{800}x{800}')
# create Scrollbar
scrollbar_v = Scrollbar(main_win)
scrollbar_v.pack(side=RIGHT, fill=Y)
scrollbar_h = Scrollbar(main_win, orient=HORIZONTAL)
scrollbar_h.pack(side=BOTTOM, fill=X)
# wrap属性是指 自动换行。WORD表示单词换行;CHAR(default)表示字符换行;NONE 表示不自动换行
text = Text(main_win, width=40, height=40, yscrollcommand=scrollbar_v.set, xscrollcommand=scrollbar_h.set, wrap=NONE)
# text.pack()
text.pack(expand=YES,fill=BOTH)
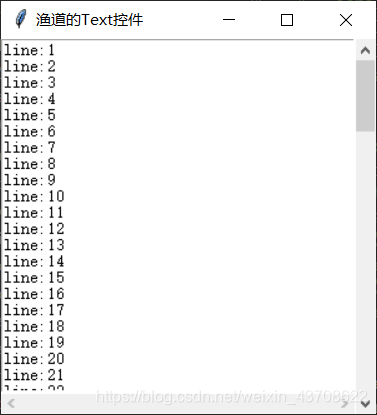
for i in range(1, 100):
text.insert(f'{i}.0', f'line:{str(i)}\n')
main_win.mainloop()

第9-12行,分别创建了水平和垂直滚动条。
yscrollcommand
使Text控件可以垂直滚动。yscrollcommand=scrollbar_v.set,将Scrollbar与 Text绑定。
xscrollcommand
使Text控件可以水平滚动。xscrollcommand=scrollbar_h.set,将Scrollbar与 Text绑定。
wrap
wrap属性,用来控制当一行的内容太多,超出Text的width时,文本的内容怎样显示。简单讲就是控制自动换行。WORD表示单词换行;CHAR(default)表示字符换行;NONE 表示不自动换行。
config()
上面的例子中,Scrollbar与Text的绑定是在Text对象创建时,"静态"绑定的。能否"动态"绑定呢?答案是肯定的。就是使用config函数。
通过查看源码发现,Text类中并没有config函数,其实config函数是从Misc继承过来的。下面给出Text和Misc的类间关系图
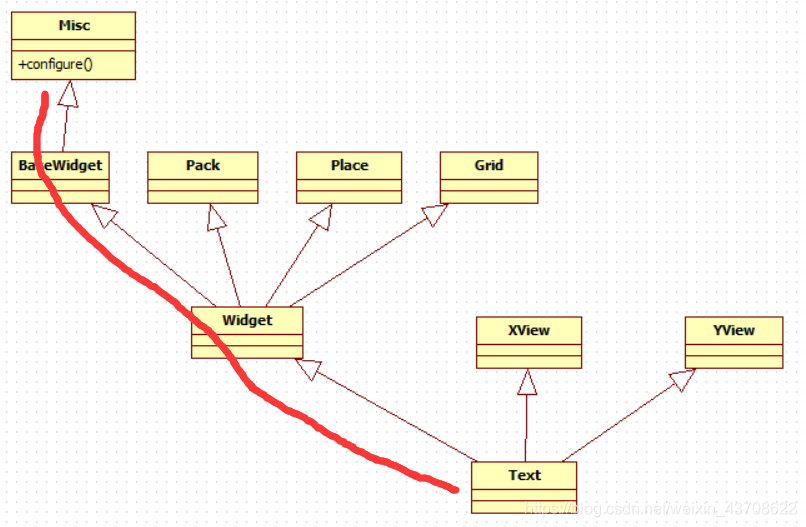
Misc类中configure()函数的定义如下:
    def configure(self, cnf=None, **kw):
        """Configure resources of a widget.

        The values for resources are specified as keyword
        arguments. To get an overview about
        the allowed keyword arguments call the method keys.
        """
        return self._configure('configure', cnf, kw)
    config = configure
config=configure这条语句相当于给configure函数取了一个别名,既可以使用obj.configure()也可以使用obj.config()。
好,介绍了config函数的来源,接下来,再看看怎样使用它,来"动态"绑定Text和Scrollbar。
text = Text(main_win, width=40, height=20, wrap=NONE)
scrollbar_v = Scrollbar(main_win)
scrollbar_v.pack(side=RIGHT, fill=Y)
scrollbar_h = Scrollbar(main_win, orient=HORIZONTAL)
scrollbar_h.pack(side=BOTTOM, fill=X)
# yscrollcommand属性使Text可以垂直滚动
text.config(yscrollcommand=scrollbar_v.set) # 使scroll跟着鼠标滚轮一起动
# xscrollcommand属性使Text可以垂直滚动
text.config(xscrollcommand=scrollbar_h.set) # 使scroll跟着鼠标滚轮一起动
text.pack(expand=YES,fill=BOTH)
for i in range(1, 100):
    text.insert(f'{i}.0', f'line:{str(i)}\n')
通过本节config的介绍,可以进一步延伸一下,所有控件对象都可以使用config函数来动态设置各自的属性。
既然这里提到了各个控件对象和Misc的类间关系,顺便介绍另外几个常用函数。
怎样知道一个控件类到底有多少个属性(也可以称为resources name, options)?可以通过keys()函数来获取。
text = Text(main_win, width=40, height=20, wrap=NONE)
text.pack()

print(text.keys()) # Text 有44种属性
main_win.mainloop()
下面即是Text控件的44个属性
['autoseparators', 'background', 'bd', 'bg', 'blockcursor', 'borderwidth', 'cursor', 'endline', 'exportselection', 'fg', 'font', 'foreground', 'height', 'highlightbackground', 'highlightcolor', 'highlightthickness', 'inactiveselectbackground', 'insertbackground', 'insertborderwidth', 'insertofftime', 'insertontime', 'insertunfocussed', 'insertwidth', 'maxundo', 'padx', 'pady', 'relief', 'selectbackground', 'selectborderwidth', 'selectforeground', 'setgrid', 'spacing1', 'spacing2', 'spacing3', 'startline', 'state', 'tabs', 'tabstyle', 'takefocus', 'undo', 'width', 'wrap', 'xscrollcommand', 'yscrollcommand']
在前面介绍布局的文章(tkinter-pack布局详解、tkinter-grid布局详解、tkinter-place布局详解)中,我提到了info函数,info()可以获取控件的布局信息。

可以看到Text是Pack,Place,Grid类的子孙类,同样继承Pack,Place,Grid类的方法。于是我们可以通过info()函数来获取控件的布局信息。
 class Pack:
    def pack_info(self):
        """Return information about the packing options
        for this widget."""
        d = _splitdict(self.tk, self.tk.call('pack', 'info', self._w))
        if 'in' in d:
            d['in'] = self.nametowidget(d['in'])
        return d
    info = pack_info # 设置别名为info

class Place:
    def place_info(self):
        """Return information about the placing options
        for this widget."""
        d = _splitdict(self.tk, self.tk.call('place', 'info', self._w))
        if 'in' in d:
            d['in'] = self.nametowidget(d['in'])
        return d
    info = place_info # 设置别名为info

class Grid:
    def grid_info(self):
        """Return information about the options
        for positioning this widget in a grid."""
        d = _splitdict(self.tk, self.tk.call('grid', 'info', self._w))
        if 'in' in d:
            d['in'] = self.nametowidget(d['in'])
        return d
    info = grid_info # 设置别名为info
设置info别名的好处时,不管控件使用哪种布局方式,只需要调用info函数就可获取布局信息,而不用关系控件使用的哪种布局方式。
text = Text(main_win, width=40, height=20, wrap=NONE)
text.pack()
print(text.info())
text的布局信息如下:
{‘in’: <tkinter.Tk object .>, ‘anchor’: ‘center’, ‘expand’: 0, ‘fill’: ‘none’, ‘ipadx’: 0, ‘ipady’: 0, ‘padx’: 0, ‘pady’: 0, ‘side’: ‘top’}
count()
我们在写博客时,网站上会统计出文章的字数。那么可不可以统计出Text中的字符个数呢?唉,可以的。
text = Text(main_win, width=40, height=20, wrap=NONE)
text.insert(INSERT, '渔道的Text控件')
text.pack()
print(text.count('1.0', END))
打印(10,),即字符个数为10,但实际的字符个数是9个,我猜想可能是把\n也统计进去了吧。


 1万+
1万+

 被折叠的 条评论
为什么被折叠?
被折叠的 条评论
为什么被折叠?
 到【灌水乐园】发言


