


一、IOC概述
Inverse Of Controll即为控制反转,简称IOC。简单来说,控制反转就是,就是把原先我们代码里面需要实现的对象创建、依赖的代码,交给容器来帮我们实现。
二、DI:依赖注入
依赖注入是指对象是被动接受依赖类而不是自己主动去找。就是说对象不是在从容器中去查找它所需要要的依赖,而是在实例化对象的时候就把它所需要的的类注入给它。
三、什么是Bean
1.Spring Bean是被实例的,组装的及被Spring 容器管理的Java对象。
2.Spring 容器会自动完成@bean对象的实例化。
3.创建应用对象之间的协作关系的行为称为:装配(wiring),这就是依赖注入的本质。
四、IOC作用
比如此时有两个类,A类和B类,在A类中用到了B的对象b,一般情况下,我们需要在A类中new一个B类的对象b。但是如果使用IOC容器,那么我们可以通过相关的容器控制程序来将B对象在外部new出来并注入到A类里的引用中。由配置文件来指定创建对象关系,大大降低了各个组件之间的强耦合,有利于维护,是项目变得更加稳健灵活。
五、IOC容器
1.BeanFactory
以Factory结尾,表示它是一个工厂类(接口),用于管理Bean的一个工厂。在Spring中,BeanFactory是IOC容器的核心接口,它的职责包括:实例化、定位、配置应用程序中的对象及建立这些对象间的依赖。
2.ApplicationContext
继承了BeanFactory,添加了更多的企业特定的功能,例如从一个属性文件中解析文本信息的能力,发布应用程序事件给感兴趣的事件监听器的能力。该容器是由 org.springframework.context.ApplicationContext 接口定义。通常推荐使用 ApplicationContext。
ApplicationContext 接口的主要实现:
- FileSystemXmlApplicationContext
基于文件系统中XML文件配置的应用程序上下文- ClassPathXmlApplicationContext
基于ClassPath路径中XML文件配置的应用程序上下文- AnnotationConfigApplicationConext
基于注解配置的应用程序上下文
3.BeanFactory与ApplicationContext区别
BeanFactory的实现是按需创建,即第一次获取Bean时才创建这个Bean,而ApplicationContext会一次性创建所有的Bean。
五,案例实现
1.创建maven项目或者导入spring包
2.导入依赖
<dependency>
	<groupId>org.springframework</groupId>
	<artifactId>spring-context</artifactId>
	<version>5.2.8.RELEASE</version>
</dependency>
3.编码
//cpu接口
public interface CPU {
    void run();
}
public class AMDCpu implements Cpu {
    public void run() {
        System.out.println("AMD的CPU在运行。。。");
    }
}

public class IntelCpu implements Cpu {
    public void run() {
        System.out.println("英特尔CPU在运行。。。");
    }
}
/**
 * 内存
 */
public interface Memory {

    void read();
    void write();
}
public class KingstonMemory implements Memory {
    public void read() {
        System.out.println("金士顿内存读取数据");
    }

    public void write() {
        System.out.println("金士顿内存写入数据");
    }
}

public class SumsungMemory implements Memory {
    public void read() {
        System.out.println("三星内存读取数据");
    }

    public void write() {
        System.out.println("三星内存写入数据");
    }
}
/**
* 电脑
*/
public class Computer {
private String brand;
private Cpu cpu;
private Memory memory;
public Cpu getCpu() {
return cpu;
}
public void setCpu(Cpu cpu) {
this.cpu = cpu;
}
public Memory getMemory() {
return memory;
}
public void setMemory(Memory memory) {
this.memory = memory;
}
public String getBrand() {
return brand;
}
public void setBrand(String brand) {
this.brand = brand;
}
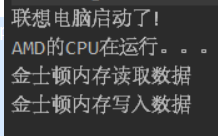
public void start(){
System.out.println(brand + "电脑启动了!");
cpu.run();
memory.read();
memory.write();
}
}
4.添加Spring配置文件
在resources目录下,添加Spring配置文件
<?xml version="1.0" encoding="UTF-8"?>
<beans xmlns="http://www.springframework.org/schema/beans"
       xmlns:xsi="http://www.w3.org/2001/XMLSchema-instance"
       xsi:schemaLocation="http://www.springframework.org/schema/beans http://www.springframework.org/schema/beans/spring-beans.xsd">

    <bean id="cpu" class="com.blb.ioc_demo.AMDCpu"></bean>
    <bean id="memory" class="com.blb.ioc_demo.KingstonMemory"></bean>
    <!--Java对象配置-->
    <bean id="computer" class="com.blb.ioc_demo.Computer">
        <property name="brand" value="联想"></property>
        <property name="cpu" ref="cpu"></property>
        <property name="memory" ref="memory"></property>
    </bean>
</beans>
5.测试代码
`public class TestComputerSpring {
public static void main(String[] args) {
    //创建应用程序上下文
    ClassPathXmlApplicationContext context = new ClassPathXmlApplicationContext("spring.xml");
    //获得对象
    Computer computer = (Computer) context.getBean("computer");
    computer.start();
}
}


 1226
1226


 被折叠的 条评论
为什么被折叠?
被折叠的 条评论
为什么被折叠?
 到【灌水乐园】发言


