


Spring之AOP初体验
Spring的AOP源码分析(一)@EnableAspectJAutoProxy
Spring的AOP源码分析(二)AnnotationAwareAspectJAutoProxyCreator工作原理
Spring的AOP源码分析(三)代理对象的创建
Spring的AOP源码分析(四)目标方法执行
上一篇博客中aop代理对象。介绍了容器会针对需要被加强的对象,从而创通过jdk代理或cjlib代理,创建出代理对象。本篇文章接着上一篇继续介绍,目标方法是如何执行的。

代理对象中包含一个增强器数组,里面包含着我们定义的4个增强通知方法方法(如下图)。 还包含其他的详细信息,如目标对象

使用debug模式,进入代理对象执行machine.div(1, 1)中,代码如下:进入cjlib代理的 intercept方法,执行代码如下图
	@Override
		public Object intercept(Object proxy, Method method, Object[] args, MethodProxy methodProxy) throws Throwable {
			// --------------------部分代码省略-------------------
				target = getTarget();
				if (target != null) {
				//获取目标对象 #1
					targetClass = target.getClass();
				}
				//尝试返回一个拦截器链 #2
				List<Object> chain = this.advised.getInterceptorsAndDynamicInterceptionAdvice(method, targetClass);
				Object retVal;
				// 如果没有返回拦截器链 那么直接执行目标方法 #3
				if (chain.isEmpty() && Modifier.isPublic(method.getModifiers())) {
				.adaptArgumentsIfNecessary(method, args);
					retVal = methodProxy.invoke(target, argsToUse);
				}
				else {
					// 如果有拦截器链那么获取一个CglibMethodInvocation对象 #4 推动拦截器 // Object retVal =  mi.proceed(); #5
					retVal = new CglibMethodInvocation(proxy, target, method, args, targetClass, chain, methodProxy).proceed();
				}

				retVal = processReturnType(proxy, target, method, retVal);
				return retVal;
			}
			finally {
				if (target != null) {
					releaseTarget(target);
				}
				if (setProxyContext) {
					// Restore old proxy.
					AopContext.setCurrentProxy(oldProxy);
				}
			}
		}
- 获取目标对象
#1 - 尝试返回一个拦截器链
#2 - 如果没有返回拦截器链 那么直接执行目标方法
#3 - 如果有拦截器链那么获取一个CglibMethodInvocation对象
#4 - Object retVal = mi.proceed(); 推动拦截器
#5
下面就介绍上面的过程 其中#1就不做介绍…
#2处的getInterceptorsAndDynamicInterceptionAdvice方法如下:
探究一下是如何获取拦截器链的
	public List<Object> getInterceptorsAndDynamicInterceptionAdvice(Method method, Class<?> targetClass) {
		// 尝试从缓存中获取
		MethodCacheKey cacheKey = new MethodCacheKey(method);
		List<Object> cached = this.methodCache.get(cacheKey);
		if (cached == null) {
		// 从工厂拿到拦截器链  具体在下面
			cached = this.advisorChainFactory.getInterceptorsAndDynamicInterceptionAdvice(
					this, method, targetClass);
			this.methodCache.put(cacheKey, cached);
		}
		return cached;
	}
//######################################getInterceptorsAndDynamicInterceptionAdvice方法#########################################
	@Override
	public List<Object> getInterceptorsAndDynamicInterceptionAdvice(
			Advised config, Method method, Class<?> targetClass) {
		//创建一个增强器链条的list集合 在后面会不断向里面增加拦截器
		List<Object> interceptorList = new ArrayList<Object>(config.getAdvisors().length);
		Class<?> actualClass = (targetClass != null ? targetClass : method.getDeclaringClass());
		boolean hasIntroductions = hasMatchingIntroductions(config, actualClass);
		AdvisorAdapterRegistry registry = GlobalAdvisorAdapterRegistry.getInstance();

		for (Advisor advisor : config.getAdvisors()) {
			if (advisor instanceof PointcutAdvisor) {
				// 判断增强器的类型 遍历 将增强器包装成MethodInterceptor
				PointcutAdvisor pointcutAdvisor = (PointcutAdvisor) advisor;
				if (config.isPreFiltered() || pointcutAdvisor.getPointcut().getClassFilter().matches(actualClass)) {
					MethodInterceptor[] interceptors = registry.getInterceptors(advisor);
					MethodMatcher mm = pointcutAdvisor.getPointcut().getMethodMatcher();
					if (MethodMatchers.matches(mm, method, actualClass, hasIntroductions)) {
						if (mm.isRuntime()) {
							// Creating a new object instance in the getInterceptors() method
							// isn't a problem as we normally cache created chains.
							for (MethodInterceptor interceptor : interceptors) {
								interceptorList.add(new InterceptorAndDynamicMethodMatcher(interceptor, mm));
							}
						}
						else {
							interceptorList.addAll(Arrays.asList(interceptors));
						}
					}
				}
			}
				// 判断增强器的类型 遍历 将增强器包装成MethodInterceptor
			else if (advisor instanceof IntroductionAdvisor) {
				IntroductionAdvisor ia = (IntroductionAdvisor) advisor;
				if (config.isPreFiltered() || ia.getClassFilter().matches(actualClass)) {
					Interceptor[] interceptors = registry.getInterceptors(advisor);
					interceptorList.addAll(Arrays.asList(interceptors));
				}
			}
				// 判断增强器的类型 遍历 将增强器包装成MethodInterceptor
			else {
				Interceptor[] interceptors = registry.getInterceptors(advisor);
				interceptorList.addAll(Arrays.asList(interceptors));
			}
		}

		return interceptorList;
	}
返回的拦截器链条如下:

小结一下:
这个方法的主要作用就是 将所有增强器方法中需转换的 转换成为MethodInterceptor类型,也就是拦截器链。然后如果有拦截器链,就会执行#4方法,下面接着记录。
#4 new CglibMethodInvocation().process()方法执行器的调用
下面将介绍,拦截器链该是如何进行调用的。我们说的拦截器链条,就是我们定义的那些通知方法比如:前置通知,后置通知,返回通知 异常通知…。spring的AOP是如何控制他的调用顺序,下面将详细介绍。
else {
		// 如果有拦截器链那么获取一个CglibMethodInvocation对象 #4 推动拦截器
		retVal = new CglibMethodInvocation(proxy, target, method, args, targetClass, chain, methodProxy).proceed();
				}
在文章刚刚开始介绍到,如何返回了一个拦截器链 就会执行#4操作,那么来看一下CglibMethodInvocation这个对象的proceed()方法的执行过程。
	@Override
	public Object proceed() throws Throwable {
		//	currentInterceptorIndex 的默认初始值为-1
		//这个条件会有两种情况成立:
		//1、拦截器链条的长度为0
		//2、或者执行到最后一个拦截器器(也就是最后一个通知方法)
		if (this.currentInterceptorIndex == this.interceptorsAndDynamicMethodMatchers.size() - 1) {
			//类似于我们手动推进执行目标方法
			return invokeJoinpoint();
		}

		// 当执行一个拦截器之前会currentInterceptorIndex 加一
		Object interceptorOrInterceptionAdvice =
				this.interceptorsAndDynamicMethodMatchers.get(++this.currentInterceptorIndex);
		if (interceptorOrInterceptionAdvice instanceof InterceptorAndDynamicMethodMatcher) {
			InterceptorAndDynamicMethodMatcher dm =
					(InterceptorAndDynamicMethodMatcher) interceptorOrInterceptionAdvice;
			if (dm.methodMatcher.matches(this.method, this.targetClass, this.arguments)) {
				return dm.interceptor.invoke(this);
			}
			else {
				return proceed();
			}
		}
		else {
			// 调用拦截器的invoke方法########################################重要
			return ((MethodInterceptor) interceptorOrInterceptionAdvice).invoke(this);
		}
	}

	// 目标方法
	protected Object invokeJoinpoint() throws Throwable {
		return AopUtils.invokeJoinpointUsingReflection(this.target, this.method, this.arguments);
	}
第一个拦截器是ExposeInvocationInterceptor,进入他的invoke方法(这是它内部自带的一个通知方法),下面代码有一个重要的一句话mi.proceed(),他也执行了mi.proceed方法
	@Override
	public Object invoke(MethodInvocation mi) throws Throwable {
		MethodInvocation oldInvocation = invocation.get();
		invocation.set(mi);
		try {
			return mi.proceed();
		}
		finally {
			invocation.set(oldInvocation);
		}
	}
mi.proceed()方法,也就回到我们一开始调用的proceed()方法体中,重复又执行一遍逻辑,只不过获取到的是另外一个拦截器
	@Override
	public Object proceed() throws Throwable {
		// 部分代码省略..................
		//判断 是否到达最后一个
		if (this.currentInterceptorIndex == this.interceptorsAndDynamicMethodMatchers.size() - 1) {
			return invokeJoinpoint();
		}
		// 部分代码省略...................
		//获得 角标为1的拦截器
		Object interceptorOrInterceptionAdvice =
				this.interceptorsAndDynamicMethodMatchers.get(++this.currentInterceptorIndex);
		// 部分代码省略...................
		// 调用拦截器的invoke(this);方法
			return ((MethodInterceptor) interceptorOrInterceptionAdvice).invoke(this);
		}
	}
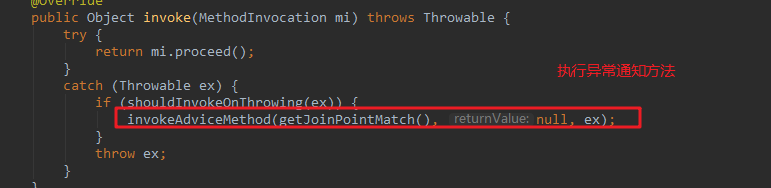
这个角标为1的拦截器是 AspectJAfterThrowingAdvice,同样进入他的invoke方法,代码如下:
	@Override
	public Object invoke(MethodInvocation mi) throws Throwable {
		try {
			return mi.proceed();
		}
		catch (Throwable ex) {
			if (shouldInvokeOnThrowing(ex)) {
				invokeAdviceMethod(getJoinPointMatch(), null, ex);
			}
			throw ex;
		}
	}
如出一辙它也是调用MethodInvocation 的proceed()方法,也就有由进入下面这段代码
@Override
	public Object proceed() throws Throwable {
		// 部分代码省略..................
		//判断 是否到达最后一个
		if (this.currentInterceptorIndex == this.interceptorsAndDynamicMethodMatchers.size() - 1) {
			return invokeJoinpoint();
		}
		// 部分代码省略...................
		//获得 角标为2的拦截器
		Object interceptorOrInterceptionAdvice =
				this.interceptorsAndDynamicMethodMatchers.get(++this.currentInterceptorIndex);
		// 部分代码省略...................
		// 调用拦截器的invoke(this);方法
			return ((MethodInterceptor) interceptorOrInterceptionAdvice).invoke(this);
		}
	}
与之前不同的是,此时又取到了下一个拦截器。AspectJAfterReturningAdvice返回通知,同样它由调用返回通知的invoke(this)方法…
就这样形成了一个链条,直到最后一个拦截器执行完毕之后,执行上一个拦截器。这里就不一一往下记录,直接看当执行到最后一个拦截器MethodBeforeAdviceInterceptor的方法代码。
	@Override
	public Object invoke(MethodInvocation mi) throws Throwable {
		//调用前置通知方法
		this.advice.before(mi.getMethod(), mi.getArguments(), mi.getThis() );###1
		//同样也是调用MethodInvocation 对象的mi.proceed()
		return mi.proceed();###2
	}
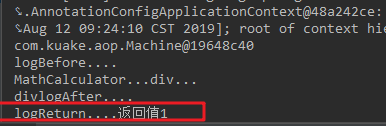
执行完#1代码后,前置通知的方法就被调用了,可以看一下控制台。

#2代码的执行 同样进入这段代码
@Override
	public Object proceed() throws Throwable {
		// 部分代码省略..................
		//此时 当调用到最后一个拦截器的时候   4 =  5-1  条件成立
		if (this.currentInterceptorIndex == this.interceptorsAndDynamicMethodMatchers.size() - 1) {
		//条件成立  执行invokeJoinpoint方法
			return invokeJoinpoint();
		}
		// 部分代码省略...................
		//获得 角标为2的拦截器
		Object interceptorOrInterceptionAdvice =
				this.interceptorsAndDynamicMethodMatchers.get(++this.currentInterceptorIndex);
		// 部分代码省略...................
		// 调用拦截器的invoke(this);方法 详情见下面
			return ((MethodInterceptor) interceptorOrInterceptionAdvice).invoke(this);
		}
	}

//##############################################     invokeJoinpoint()方法    #################################################

	protected Object invokeJoinpoint() throws Throwable {
			if (this.publicMethod) {
				// 这就是调用目标方法的过程
				return this.methodProxy.invoke(this.target, this.arguments);
			}
			else {
				return super.invokeJoinpoint();
			}
		}
	}
执行完 #2代码

目标方法也就被执行了。他就返回到AspectJAfterAdvice 方法了
	@Override
	public Object invoke(MethodInvocation mi) throws Throwable {
		try {
			return mi.proceed();
		}
		finally {
			// 执行后置通知
			invokeAdviceMethod(getJoinPointMatch(), null, null);
		}
	}
后置通知执行完。控制台打印

执行完成之后返回到AfterReturningAdviceInterceptor结果返回拦截器,执行
this.advice.afterReturning(retVal, mi.getMethod(), mi.getArguments(), mi.getThis());//有异常通知的时候,不会执行
当有异常发生时候,返回通知的时候抛出异常,往上抛出,被AspectJAfterThrowingAdvice捕获然后执行,异常通知方法。
到这通知方法的执行过程已经分析完成啦。画一张图总结一下:
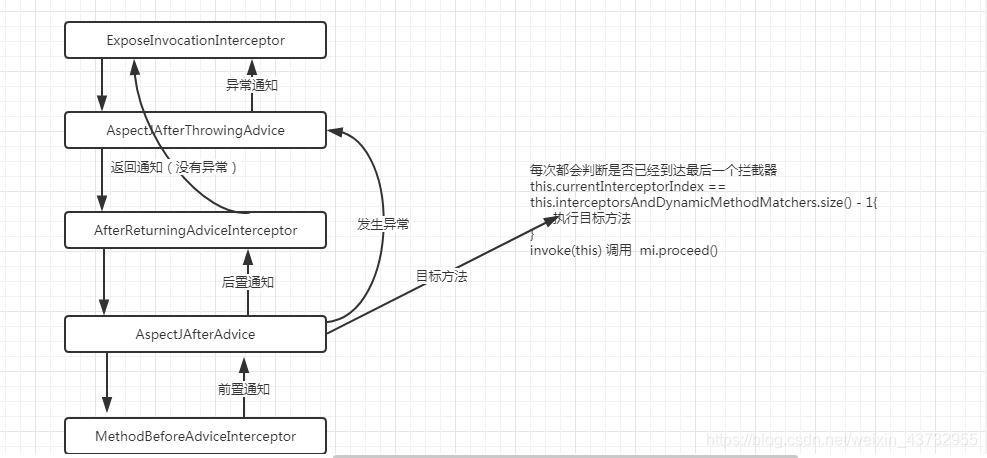
执行过程是:
如果没有发生异常:
①前置通知 ②目标方法 ③后置通知 ④返回通知
发生异常:
①前置通知 ②目标方法 ③后置通知 ④异常通知
上面的执行过程是没有环绕通知的。下面给目标方法,也增加一个环绕通知,看一下是如何执行的。添加环绕通知如下。
	@Around(value="pointcut()")
	public Object logAround(ProceedingJoinPoint joinPoint) throws Throwable{
		System.out.println("logAround....");
		Object proceed = joinPoint.proceed();
        System.out.println("logAround....");
		return proceed;
	}
执行过程如下:(画图不容易啊)
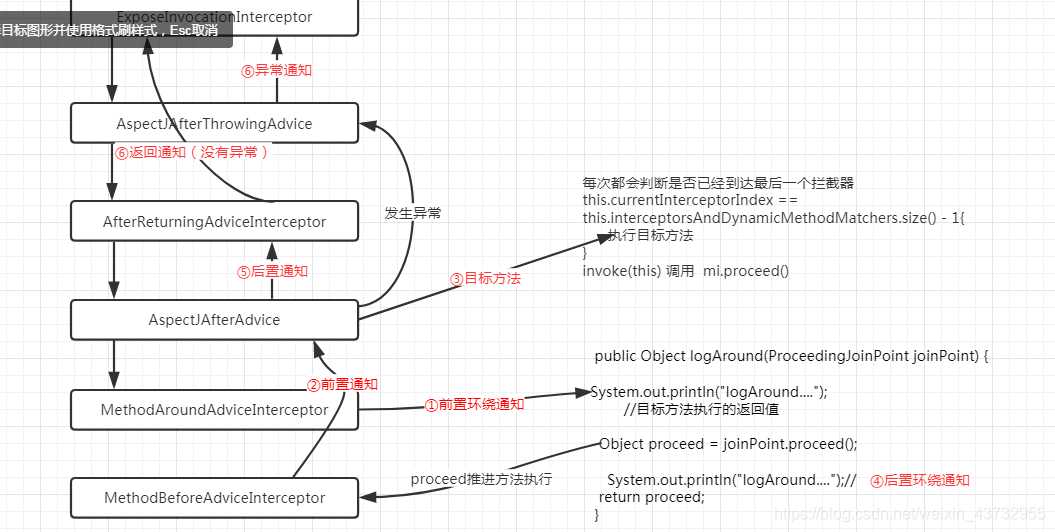
执行结果与上面流程图分析的一样:
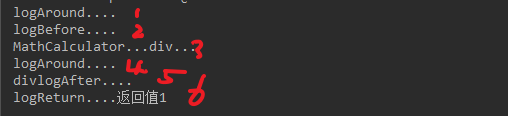
包含环绕通知的执行顺序如下:
没有异常的时候:
①前置环绕通知 ②前置通知 ③ 目标方法 ④后置环绕通知 ⑤后置通知 ⑥后置返回通知
发生异常的时候:
①前置环绕通知 ②前置通知 ③ 目标方法 ④后置环绕通知 ⑤后置通知 ⑥异常通知
总结:这种巧妙的拦截器链式设计,保证了通知方法的执行顺序


 700
700


 被折叠的 条评论
为什么被折叠?
被折叠的 条评论
为什么被折叠?
 到【灌水乐园】发言


