


在ssm项目中,我们需要的xml配置文件有web.xml(用于整个项目的配置),还有spring的配置文件applicationContext.xml(用于配置spring的配置),springMvc.xml(用来配置springMvc的配置),mybatis的全局配置文件可以不用,直接配置在spring的配置文件就可以。在基于Servlet3.0之后,这三个文件可以不用,改成用配置类替代,实现项目不需要配置繁杂的xml文件。这里的原理用到上一篇Servlet3.0动态注册组件讲的内容
servlet3.0的 Sharedlibraries(共享库) / runtimes pluggability(运行时插件能力)
 	1.Servlet容器启动时(这里是tomcat)会扫描当前应用里面的每一个jar包的ServletContainerInitializer实现类
  	2.ServletContainerInitializer的实现类放的位置有要求:
  		必须绑定在,META-INF/services/javax.servlet.ServletContainerInitializer
		文件的内容就是ServletContainerInitializer实现类的全类名;
我们来创建项目并查看这个东西到底在哪里
1.创建maven项目并导包
  <dependencies>
		<dependency>
		    <groupId>org.springframework</groupId>
		    <artifactId>spring-webmvc</artifactId>
		    <version>5.2.6.RELEASE</version>
		</dependency>

		<dependency>
	  		<groupId>javax.servlet</groupId>
	  		<artifactId>servlet-api</artifactId>
	  		<version>3.0-alpha-1</version>
	  		<scope>provided</scope>
	  	</dependency>

  </dependencies>
查看maven依赖,在spring-web包下的META-INF/services/javax.servlet.ServletContainerInitializer文件果然绑定这一个类,通过查看类的内容,跟我们之前Servlet3.0动态注册组件的一样都是事先ServletContainerInitializer 接口,将META-INF/services/javax.servlet.ServletContainerInitializer文件里面所配置的类传进入,当容器启动时(这里是tomcat)就会为我们创建传进去的这个类的所以子类创建对象,查看传进去的个类的继承结构,容器会为我们创建这几个类,最后一个是spring5新增的。所以我们只要继承这几个类中的一个,并实现抽象方法就可以配置我们自己所需要的的东西了。AbstractAnnotationConfigDispatcherServletInitializer包含了前面的内容,功能更强大,我们一般继承这个类
 文件的内容
文件的内容
 查看类的内容
@HandlesTypes(WebApplicationInitializer.class)
public class SpringServletContainerInitializer implements ServletContainerInitializer {


	@Override
	public void onStartup(@Nullable Set<Class<?>> webAppInitializerClasses, ServletContext servletContext)
			throws ServletException {

		List<WebApplicationInitializer> initializers = new LinkedList<>();

		if (webAppInitializerClasses != null) {
			for (Class<?> waiClass : webAppInitializerClasses) {
				// Be defensive: Some servlet containers provide us with invalid classes,
				// no matter what @HandlesTypes says...
				if (!waiClass.isInterface() && !Modifier.isAbstract(waiClass.getModifiers()) &&
						WebApplicationInitializer.class.isAssignableFrom(waiClass)) {
					try {
						initializers.add((WebApplicationInitializer)
								ReflectionUtils.accessibleConstructor(waiClass).newInstance());
					}
					catch (Throwable ex) {
						throw new ServletException("Failed to instantiate WebApplicationInitializer class", ex);
					}
				}
			}
		}

		if (initializers.isEmpty()) {
			servletContext.log("No Spring WebApplicationInitializer types detected on classpath");
			return;
		}

		servletContext.log(initializers.size() + " Spring WebApplicationInitializers detected on classpath");
		AnnotationAwareOrderComparator.sort(initializers);
		for (WebApplicationInitializer initializer : initializers) {
			initializer.onStartup(servletContext);
		}
	}

}
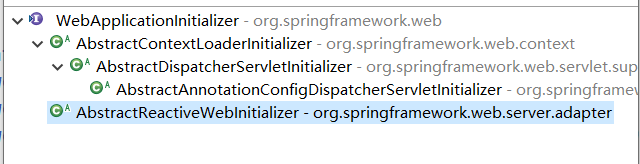
WebApplicationInitializer类的继承结构
以上的总结
1、web容器在启动的时候,会扫描每个jar包下的META-INF/services/javax.servlet.ServletContainerInitializer
2、加载这个文件指定的类SpringServletContainerInitializer
3、spring的应用一启动会加载感兴趣的WebApplicationInitializer接口的下的所有组件;
4、并且为WebApplicationInitializer组件创建对象(组件不是接口,不是抽象类)
	1)、AbstractContextLoaderInitializer:创建根容器;createRootApplicationContext();
	2)、AbstractDispatcherServletInitializer:
			创建一个web的ioc容器;createServletApplicationContext();
			创建了DispatcherServlet;createDispatcherServlet();
			将创建的DispatcherServlet添加到ServletContext中;
				getServletMappings();
	3)、AbstractAnnotationConfigDispatcherServletInitializer:注解方式配置的DispatcherServlet初始化器
			创建根容器:createRootApplicationContext()
					getRootConfigClasses();传入一个配置类
			创建web的ioc容器: createServletApplicationContext();
					获取配置类;getServletConfigClasses();

总结:
	以注解方式来启动SpringMVC;继承AbstractAnnotationConfigDispatcherServletInitializer;
实现抽象方法指定DispatcherServlet的配置信息;
2.继承AbstractAnnotationConfigDispatcherServletInitializer
自定义继承了这个类,就相当于是web.xml文件的注解版,所有在之前web.xml中配置的东西都可以在这个类中重写方法实现。一般主要我们就配置springMVC的文件,spring的文件,还有springMVC的前端控制器,编码过滤器。
package cn.hzu;

import java.util.EnumSet;

import javax.servlet.DispatcherType;
import javax.servlet.FilterRegistration.Dynamic;
import javax.servlet.ServletContext;

import org.springframework.web.filter.CharacterEncodingFilter;
import org.springframework.web.servlet.support.AbstractAnnotationConfigDispatcherServletInitializer;

import cn.hzu.config.RootConfig;
import cn.hzu.config.WebConfig;

public class MyWebAppInitializer extends AbstractAnnotationConfigDispatcherServletInitializer{

	//获取根容器的配置类;(Spring的配置文件)   父容器;
	@Override
	protected Class<?>[] getRootConfigClasses() {
		return new Class[] { RootConfig.class };
	}

	//获取web容器的配置类(SpringMVC配置文件)  子容器;
	@Override
	protected Class<?>[] getServletConfigClasses() {
		return new Class[] { WebConfig.class };
	}

	//配置前端控制器的映射信息
	//  /:拦截所有请求(包括静态资源(xx.js,xx.png)),但是不包括*.jsp;
	//  /*:拦截所有请求;连*.jsp页面都拦截;jsp页面是tomcat的jsp引擎解析的;
	@Override
	protected String[] getServletMappings() {
		// TODO Auto-generated method stub
		return new String[]{"/"};
	}

	//这个是父类的父类的父类的方法
	protected void registerContextLoaderListener(ServletContext servletContext) {
		super.registerContextLoaderListener(servletContext);
		//编码过滤器
		Dynamic filter = servletContext.addFilter("CharacterEncodingFilter", CharacterEncodingFilter.class);
		filter.setInitParameter("encoding", "UTF-8");
		filter.addMappingForUrlPatterns(EnumSet.of(DispatcherType.REQUEST), true, "/*");
	}
}
可以看到这就是需要实现的三个抽象方法(其他根据需要自己重写父类的方法)
第一个是getRootConfigClasses,这个相当于创建spring的配置文件,也就是根容器,我们需要创建一个作为类spring的配置类,之前在applicationContext.xml中配置的东西全都可以在这个类配置,这个类不需要继承或实现任何类,就是一个简单的配置类。
第二个getServletConfigClasses,这个相当于创建springMVC的配置文件,所有在springMVC.xml中配置的东西全子啊这个类配置,这个类需要继承或实现某个类,下面讲。
第三个是getServletMappings,就是配置前端控制器的映射信息,直接return new String[]{"/"};就可以
下面开始创建spring的配置类和springMVC的配置类
3.创建根容器(spring的配置类)
package cn.hzu.config;

import javax.sql.DataSource;

import org.springframework.beans.factory.annotation.Value;
import org.springframework.context.annotation.Bean;
import org.springframework.context.annotation.ComponentScan;
import org.springframework.context.annotation.FilterType;
import org.springframework.context.annotation.PropertySource;
import org.springframework.context.annotation.ComponentScan.Filter;
import org.springframework.jdbc.datasource.DataSourceTransactionManager;
import org.springframework.context.annotation.Configuration;
import org.springframework.stereotype.Controller;

import com.alibaba.druid.pool.DruidDataSource;

//Spring的容器不扫描controller;根容器
//不扫描controller
@ComponentScan(value="cn.hzu",excludeFilters={
		@Filter(type=FilterType.ANNOTATION,classes={Controller.class})
})
@Configuration
//@EnableTransactionManagement
//@PropertySource("classpath:db.properties")用于配置数据源
//相当于之前在配置文件的<context:property-placeholder location="classpath:db.properties" system-properties-mode="FALLBACK"/>
public class RootConfig {

	/*
	 * @Value("${jdbc.driverClassName}") private String driverClassName;
	 *
	 * @Value("${jdbc.url}") private String url;
	 *
	 * @Value("${jdbc.username}") private String username;
	 *
	 * @Value("${jdbc.password}") private String password;
	 *
	 * @Value("${jdbc.initialSize}") private int initialSize;
	 *
	 * //连接池对象
	 *
	 * @Bean public DataSource dataSource() { DruidDataSource ds = new
	 * DruidDataSource(); ds.setDriverClassName(driverClassName); ds.setUrl(url);
	 * ds.setUsername(username); ds.setPassword(password);
	 * ds.setInitialSize(initialSize); return ds; }
	 *
	 * //事务管理器对象
	 *
	 * @Bean public DataSourceTransactionManager txManager(DataSource ds) { return
	 * new DataSourceTransactionManager(ds); }
	 */
		//配置其他所需要的bean对象,比如sqlSessionFactoryBean


}
注解说明(这一部分跟spring的注解版一样)
@Configuration指明这是一个配置类,相当与配置文件
@PropertySource(“classpath:db.properties”)用于配置数据源
相当于之前在配置文件的<context:property-placeholder location=“classpath:db.properties” system-properties-mode=“FALLBACK”/>
@EnableTransactionManagement事务管理器
4.创建子容器(springMVC的配置类)
这里有两个选择一个是继承WebMvcConfigurerAdapter,另一个是实现WebMvcConfigurer
首先WebMvcConfigurerAdapter是WebMvcConfigurer的实现类,但是里面的方法是空实现。
在spring5之前,我们是继承WebMvcConfigurerAdapter这个类的,重写里面的方法就好了。因为实现接口需要实现里面的所有抽象方法,即使我们不使用,也要留空方法,看起来不好。
Spring 5.0后使用Java8,而在Java8中接口是可以有default方法的,所以这个类就没必要了。所以我们只需要在自定义配置类中直接实现 WebMvcConfigurer 接口就好了。然后实现自己想要重写的方法
注意:在springboot中也是直接实现 WebMvcConfigurer 接口就好,注意springboot中不要加@EnableWebMvc注解,否则访问不到静态资源,需要自己配置。
package cn.hzu.config;

import org.springframework.context.annotation.Bean;
import org.springframework.context.annotation.ComponentScan;
import org.springframework.context.annotation.Configuration;
import org.springframework.context.annotation.FilterType;
import org.springframework.context.annotation.ComponentScan.Filter;
import org.springframework.stereotype.Controller;
import org.springframework.web.servlet.ViewResolver;
import org.springframework.web.servlet.config.annotation.DefaultServletHandlerConfigurer;
import org.springframework.web.servlet.config.annotation.EnableWebMvc;
import org.springframework.web.servlet.config.annotation.InterceptorRegistry;
import org.springframework.web.servlet.config.annotation.ViewResolverRegistry;
import org.springframework.web.servlet.config.annotation.WebMvcConfigurer;
import org.springframework.web.servlet.view.InternalResourceViewResolver;


import cn.hzu.interceptor.MyInterceptor;

@Configuration
@EnableWebMvc

//SpringMVC只扫描Controller;子容器
//useDefaultFilters=false 禁用默认的过滤规则;
@ComponentScan(value = "cn.hzu", includeFilters = {
		@Filter(type = FilterType.ANNOTATION, classes = { Controller.class }) }, useDefaultFilters = false)
public class WebConfig implements WebMvcConfigurer {


	  @Bean
	  public MyInterceptor myInterceptor() {
		  return new MyInterceptor();
		  }

	  //配置拦截器

	  public void addInterceptors(InterceptorRegistry registry) { //设置放行的路径
//	  registry.addInterceptor(myInterceptor()).excludePathPatterns("/login");
	  //设置拦截的路径
	  registry.addInterceptor(myInterceptor()).addPathPatterns("/**"); }


	// 配置JSP视图
	@Bean
	public ViewResolver viewResolver() {
		InternalResourceViewResolver viewResolver = new InternalResourceViewResolver();
		viewResolver.setPrefix("/WEB-INF/views/");
		viewResolver.setSuffix(".jsp");
		return viewResolver;
	}

	// 配置静态资源处理
	public void configureDefaultServletHandling(DefaultServletHandlerConfigurer configurer) {
		configurer.enable();
	}
}
5.编写controller和service测试
package cn.hzu.controller;

import org.springframework.beans.factory.annotation.Autowired;
import org.springframework.stereotype.Controller;
import org.springframework.web.bind.annotation.RequestMapping;
import org.springframework.web.bind.annotation.ResponseBody;

import cn.hzu.service.HelloService;

@Controller
public class HelloController {

	@Autowired
	HelloService helloService;


	@ResponseBody
	@RequestMapping("/hello")
	public String hello(){
		String hello = helloService.sayHello("tomcat..");
		return hello;
	}

	//  /WEB-INF/views/success.jsp
	@RequestMapping("/suc")
	public String success(){
		return "success";
	}


}
package cn.hzu.service;

import org.springframework.stereotype.Service;

@Service
public class HelloService {

	public String sayHello(String name){

		return "Hello "+name;
	}

}
6.编写拦截器
在WebConfig里面注册了一个自己写的拦截器,代码如下
package cn.hzu.interceptor;

import javax.servlet.http.HttpServletRequest;
import javax.servlet.http.HttpServletResponse;

import org.springframework.web.servlet.HandlerInterceptor;
import org.springframework.web.servlet.ModelAndView;

public class MyInterceptor implements HandlerInterceptor {

	//目标方法运行之前执行
	@Override
	public boolean preHandle(HttpServletRequest request, HttpServletResponse response, Object handler)
			throws Exception {
		// TODO Auto-generated method stub
		System.out.println("preHandle..."+request.getRequestURI());
		return true;
	}

	//目标方法执行正确以后执行
	@Override
	public void postHandle(HttpServletRequest request, HttpServletResponse response, Object handler,
			ModelAndView modelAndView) throws Exception {
		// TODO Auto-generated method stub
		System.out.println("postHandle...");

	}

	//页面响应以后执行
	@Override
	public void afterCompletion(HttpServletRequest request, HttpServletResponse response, Object handler, Exception ex)
			throws Exception {
		// TODO Auto-generated method stub
		System.out.println("afterCompletion...");
	}
}
7.controller中返回的页面的代码
在controller中返回了一个success页面
<%@ page language="java" contentType="text/html; charset=UTF-8"
    pageEncoding="UTF-8"%>
<!DOCTYPE html PUBLIC "-//W3C//DTD HTML 4.01 Transitional//EN" "http://www.w3.org/TR/html4/loose.dtd">
<html>
<head>
<meta http-equiv="Content-Type" content="text/html; charset=UTF-8">
<title>Insert title here</title>
</head>
<body>
	<h1>success!</h1>
</body>
</html>
8.运行项目测试
运行项目访问可以发现所有的配置都生效了。这样我们就可以不使用xml的方式进行web开发了,少了许多繁杂的xml配置。


 最后,如果在pom.xml包缺少web.xml的错误的话,加上以下的代码就不会了
<build>
  	<plugins>
  		<plugin>
  			<groupId>org.apache.maven.plugins</groupId>
  			<artifactId>maven-war-plugin</artifactId>
  			<version>2.4</version>
  			<configuration>
  				<failOnMissingWebXml>false</failOnMissingWebXml>
  			</configuration>
  		</plugin>
  	</plugins>
  </build>
9.最后的项目结构


 2125
2125


 被折叠的 条评论
为什么被折叠?
被折叠的 条评论
为什么被折叠?
 到【灌水乐园】发言


