


 超级会员免费看
Ceph集群部署方式
本文为ceph专题技术专栏,定价99元,总计更新10篇以上,涵盖ceph的企业级高可用环境部署方案规划和实施,ceph集群维护,认证授权多用户管理,ceph的多领域应用: RBD块存储简单挂载到K8S生产应用,cephfs生产级应用,作为RGW生产级存储网关应用,生产级HDD,SDD磁盘应用,crush基于HDD和SSD磁盘实现数据冷热数据分类存储高级应用,对接kubernetes的各类配置,以及完整的监控方案,完整学习完成后,相信能让您对ceph有着更加深厚的理解和应用,如您有所疑问,请尽情在评论区写出,看到必回!
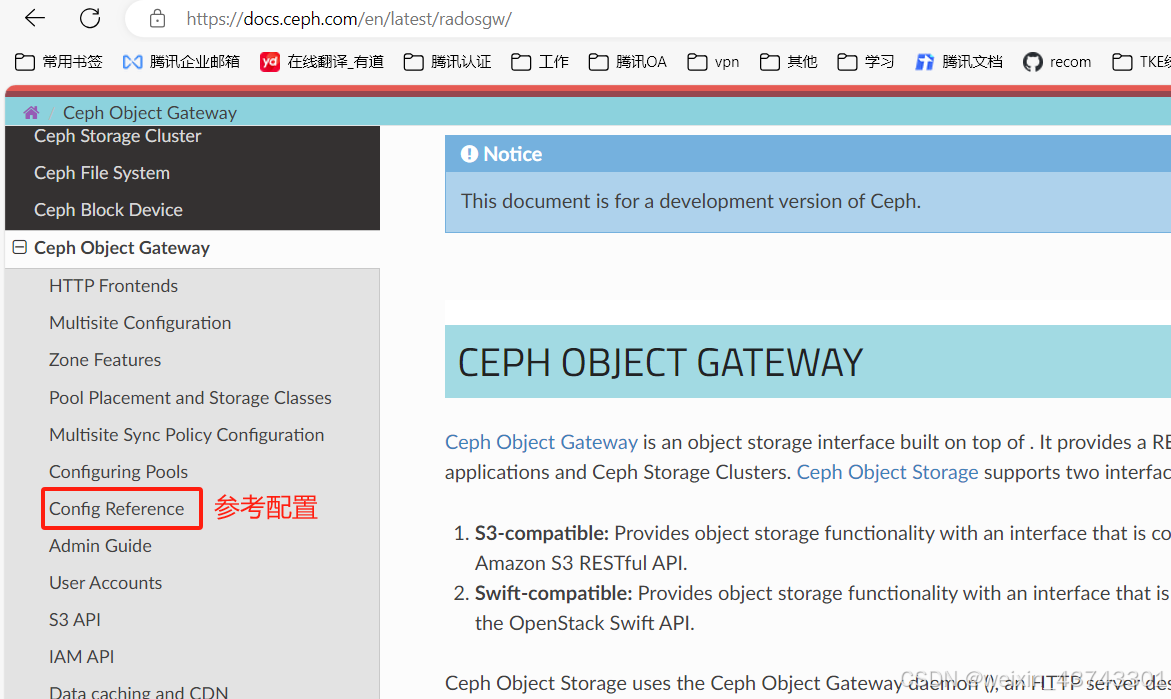
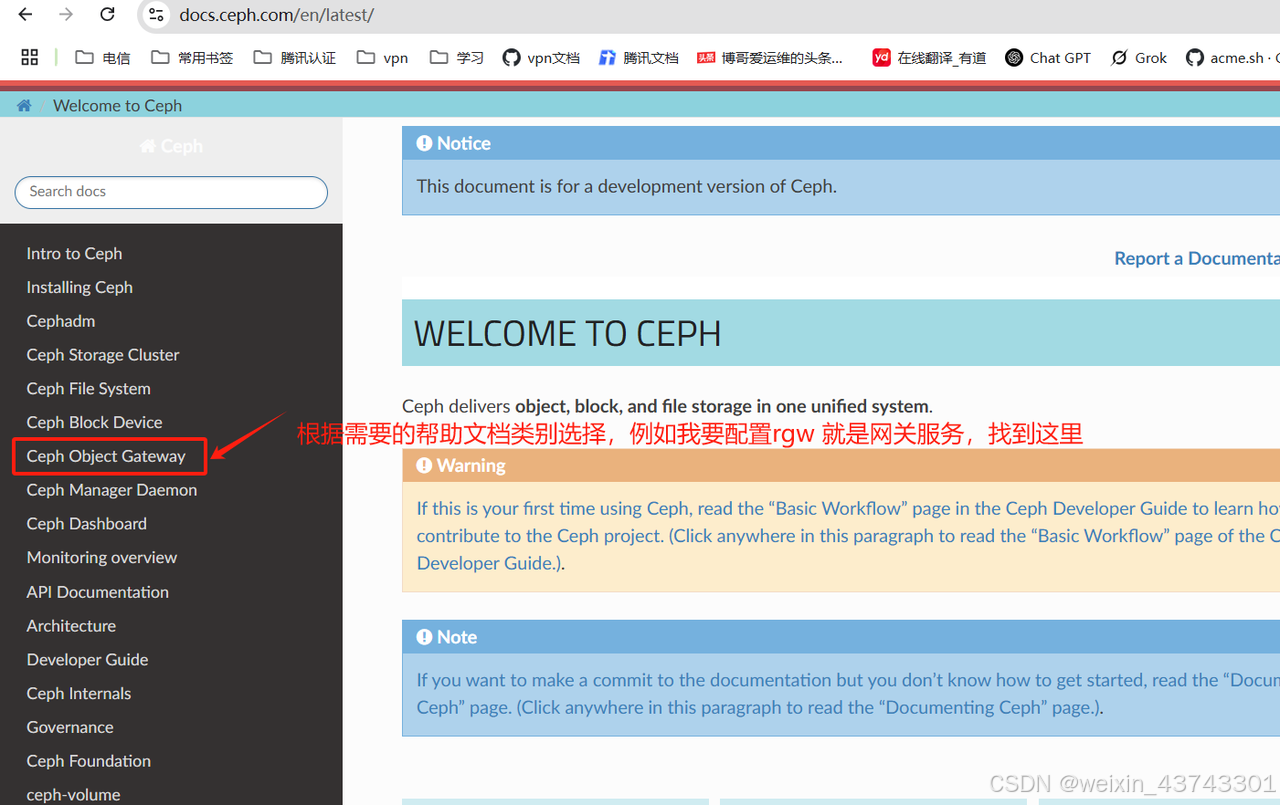
如何查看官方文档?不知道参数怎么配置,多看文档
官方文档地址: https://docs.ceph.com/en/latest/
关于部署的方式:
本文采用目前主流的部署方式,且经过官方认证支持的工具 ceph-deploy(基于Python3)完成本次部署
官方github地址: https://github.com/ceph/ceph-deploy
Ceph版本选择
到2017年底,Ceph项目都采取每年发布两个稳定版本的做法,从Jewel版到Nautilus之前, Ceph经历过一段时间的每间隔9个月发布一个新版本,Nautilus版本开始改为每年春季3月 份发布一个稳定版本,并提供长达26个月左右的后期版本更新. 目前截止到(2024年6月新版本为 ceph18.2.2),所以大家不必为版本支持而担心
ceph服务器选型与版本规划原则
对于企业而言,构建可靠,成本低,扩展性强且与业务紧密结合的高性能分布式存储系统是实施的目标
- 较低的 TCO (Total Cost of Ownership, 总拥有成本):
使用廉价的 X86 服务器。 - 较高的 IOPS (Input/Output Operations Per Second, 每秒可完成的读写次数):
使用 SSD/PCI-E SSD/NVMe 硬盘提高高存储集群数据以提高读写性能。 - 较大的存储容量:
使用单块 2T/4T 或更大容量的磁盘,提高单台服务器的总空间,节省服务器总数,降低机柜使用量。 - 较快的网络吞吐:
使用 10G、40G、100G 或更快的光纤网络。 - 更好的数据冗余:
数据可以以三副本制分别保存到不同的主机,宕机 2 台也不会丢失数据。
服务器选型建议
Monitor、mgr、radosgw服务器:
这些组件对集群的性能和稳定性至关重要。以下是建议的配置:
- 小型配置 (4C 8G~16G):
适用场景:小型测试集群或负载较低的生产环境。
建议:专用虚拟机可以满足需求,但应确保网络和存储的性能不会成为瓶颈。 - 中型配置 (8C 16G~32G):
适用场景:中等规模的生产集群。
建议:专用虚拟机是合适的选择,确保虚拟机所在的宿主机性能稳定,网络带宽充足。 - 大型配置 (16C32C 32G64G):
适用场景:大规模生产集群或需要高可靠性的环境。
建议:专用物理机更为合适,能够提供更高的性能和稳定性,同时确保有足够的网络和存储资源。
MDS(元数据服务器,相对配置更高一个等级)服务器:
MDS 负责 Ceph 文件系统(CephFS)的元数据管理,配置要求较高。
小型配置 (8C 8G~16G):
适用场景:小型 CephFS 部署或测试环境。
建议:专用虚拟机可以满足需求,但应确保虚拟机的存储 I/O 性能足够。

中型配置 (16C 16G~32G):
适用场景:中等规模的 CephFS 部署。
建议:专用虚拟机是合适的选择,确保虚拟机有足够的 CPU 和内存资源,以应对元数据操作。

大型配置 (32C64C 64G96G):
适用场景:大规模 CephFS 部署,需要高性能元数据处理。
建议:专用物理机是最佳选择,提供更高的性能和可靠性,同时确保网络和存储资源充足。
磁盘选型
OSD 节点: 配置:每个 OSD 节点使用多个 SSD/NVMe 硬盘,或者混合使用 SSD/NVMe 和 HDD。推荐至少使用 2T/4T 或更大容量的硬盘。
数量:确保每个 OSD 节点有足够的磁盘来分担负载,建议至少 4-8 个硬盘。

MON 和 MGR 节点:
配置:使用企业级 SSD 硬盘,确保稳定性和高性能。
数量:每个节点至少 1 个高性能 SSD 硬盘。

MDS 节点:
配置:使用 NVMe 硬盘,提供最佳性能。
数量:每个节点至少 1-2 个 NVMe 硬盘。
Ceph OSD 要以下条件:
目标磁盘不能有任何磁盘分区(例如不能有 sdb1/sdc2)。
目标磁盘不能有基于 PV/LV 创建的 LVM。
目标磁盘不能被挂载到当前文件系统的任何目录。
目标磁盘不能包含文件系统(例如不能包含 ext4/xfs)。
目标磁盘不能包含 Ceph BlueStore OSD,会对磁盘进行全部擦除。
目标磁盘大小必须大于 5GB,Ceph 会自动为小于 5GB 的磁盘指定权重 0。
网络带宽选型:
-
10Gbps 网卡:
- 适用场景:中小型 Ceph 集群。
- 优点:性价比高,能够满足大多数中小型集群的需求。
- 建议:对于大多数企业环境,10Gbps 网卡已经足够处理 Ceph 的数据传输需求。 -
25Gbps 网卡:
- 适用场景:需要更高网络性能的中大型 Ceph 集群。
- 优点:相较于 10Gbps,提供更高的带宽,适用于需要处理大量 IOPS 和数据传输的环境。
- 建议:如果预算允许,25Gbps 网卡是一个很好的选择,能够显著提升数据传输性能。 -
40Gbps 或 100Gbps 网卡:
用场景:超大型 Ceph 集群或对性能要求极高的环境。
优点:提供极高的带宽和吞吐量,适用于需要处理海量数据和高频率 IOPS 的场景。
建议:适用于大规模数据中心和云服务提供商,如果 Ceph 集群规模很大,建议选择 40Gbps 或 100Gbps 网卡。
处理器选型:
Ceph 集群的性能不仅依赖于存储和网络,还高度依赖于处理器的性能。根据不同角色和负载情况,选择合适的处理器配置对于保证 Ceph 集群的高效运行至关重要。以下是针对不同角色和负载的处理器选型建议
处理器选型原则
- 多核高频:
Ceph 受益于多核高频处理器,因为它能更好地并行处理 I/O 操作和后台任务。
建议选择具有较高主频和较多核心数的处理器,以满足并发处理需求。 - 内存带宽:
Ceph 在处理数据时对内存带宽有较高要求。选择支持高带宽内存的处理器可以提升整体性能。
建议选择支持 DDR4 或 DDR5 内存的处理器。 - 扩展性和升级:
确保处理器平台具有良好的扩展性和升级潜力,以便在未来可以增加更多处理器或升级至更高性能的处理器。
具体角色的处理器选型:
- Monitor(监控节点)和 Manager(管理节点):
推荐处理器:Intel Xeon E5/E7 系列、AMD EPYC 7002/7003 系列。
配置建议:至少 8 核心 16 线程,主频 2.5GHz 以上,支持高带宽内存。
如:Intel Xeon E5-2640 v4(10 核心,2.4GHz),AMD EPYC 7402P(24 核心,2.8GHz)。 - OSD(对象存储守护进程)节点:
推荐处理器:Intel Xeon Scalable 系列、AMD EPYC 7002/7003 系列。
配置建议:至少 16 核心 32 线程,主频 2.5GHz 以上,支持高带宽内存。
示例:Intel Xeon Gold 6130(16 核心,2.1GHz),AMD EPYC 7351P(16 核心,2.4GHz)。 - MDS(元数据服务器)节点:
推荐处理器:Intel Xeon Gold/Platinum 系列、AMD EPYC 7002/7003 系列。
配置建议:至少 24 核心 48 线程,主频 2.5GHz 以上,支持高带宽内存。
示例:Intel Xeon Gold 6230(20 核心,2.1GHz),AMD EPYC 7702P(64 核心,2.0GHz)。
OSD选型:
OSD(对象存储守护进程)节点是 Ceph 存储集群的核心,负责存储数据并进行复制和恢复操作
配置建议:
- 核心数:至少 16 核心,建议 24 核心或更多。
- 主频:至少 2.5GHz。
- 示例型号:
Intel Xeon Gold 6230(20 核心,2.1GHz)
AMD EPYC 7402P(24 核心,2.8GHz)
推荐配置:
处理器:2 x AMD EPYC 7402P(24 核心,2.8GHz)
内存:256GB DDR4 3200MHz
存储:
数据盘:10 x Samsung PM983 NVMe SSD(3.84TB)
日志盘:2 x Intel DC P4510 NVMe SSD(1TB)
网络:2 x Mellanox ConnectX-5(25Gbps)
电源:冗余 750W 电源模块
散热:高效风扇和散热片
机架:标准 19 英寸 2U 机架
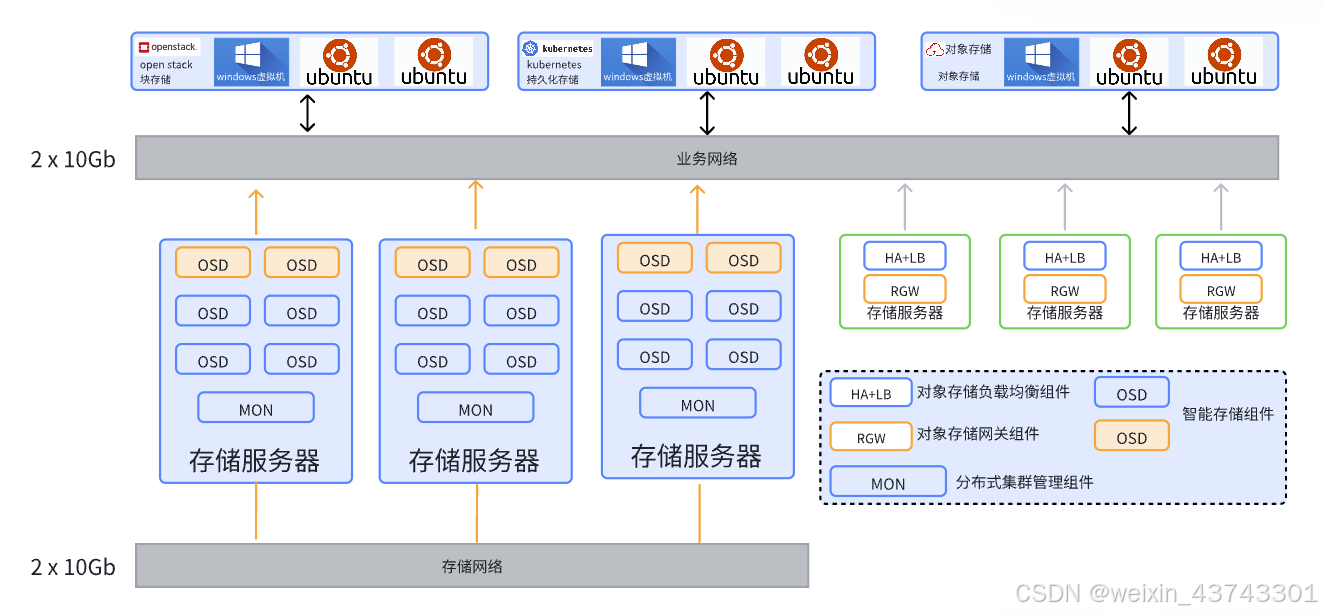
Ceph集群规划图
Ceph集群规划表/服务器准备
| 主机名 | 角色 | 集群网络 (cluster) | 公共网络 (public) | ceph版本 | OS版本 | 磁盘挂载 |
|---|---|---|---|---|---|---|
| ceph-deploy.example.local | ceph-deploy | 172.31.3.100 | 192.168.3.100 | ceph18.2.4 | Ubuntu22.04 | |
| ceph-mon01.example.local | ceph-mon01 | 172.31.3.101 | 192.168.3.101 | ceph18.2.4 | Ubuntu22.04 | |
| ceph-mon02.example.local | ceph-mon02 | 172.31.3.102 | 192.168.3.102 | ceph18.2.4 | Ubuntu22.04 | |
| ceph-mon03.example.local | ceph-mon03 | 172.31.3.103 | 192.168.3.103 | ceph18.2.4 | Ubuntu22.04 | |
| ceph-mgr01.example.local | ceph-mgr01 | 172.31.3.104 | 192.168.3.104 | ceph18.2.4 | Ubuntu22.04 | |
| ceph-mgr02.example.local | ceph-mgr02 | 172.31.3.105 | 192.168.3.105 | ceph18.2.4 | Ubuntu22.04 | |
| ceph-node01.example.local | ceph-node01 | 172.31.3.106 | 192.168.3.106 | ceph18.2.4 | Ubuntu22.04 | /dev/sdb 200G, /dev/sdc 200G, /dev/nvme0n1 300G, /dev/nvme0n2 300G |
| ceph-node02.example.local | ceph-node02 | 172.31.3.107 | 192.168.3.107 | ceph18.2.4 | Ubuntu22.04 | /dev/sdb 200G, /dev/sdc 200G, /dev/nvme0n1 300G, /dev/nvme0n2 300G |
| ceph-node03.example.local | ceph-node03 | 172.31.3.108 | 192.168.3.108 | ceph18.2.4 | Ubuntu22.04 | /dev/sdb 200G, /dev/sdc 200G, /dev/nvme0n1 300G, /dev/nvme0n2 300G |
| ceph-node04.example.local | ceph-node04 | 172.31.3.109 | 192.168.3.109 | ceph18.2.4 | Ubuntu22.04 | /dev/sdb 200G, /dev/sdc 200G, /dev/nvme0n1 300G, /dev/nvme0n2 300G |
如果你是虚拟机,尽可能也添加上每个节点的磁盘用于后面ceph案例演示
ceph-deploy 作为ceph的部署服务器
ceph-mon01~ ceph-mon03 作为监视节点服务器
ceph-mgr01 ~ ceph-mgr02 作为管理节点服务器
ceph-node01~ceph-node03 作为存储节点服务器
添加磁盘可以是ssd磁盘,也可以是机械磁盘,为了后续实验目的,可以添加ssd与hdd两种磁盘
用于ssd存储池和hdd存储池的创建,确保符合企业需求
Public Network(公共网络): 用于 业务请求数据使用的,处理客户端的 I/O 请求,包括读写操作。确保业务数据传输的高效和低延迟,并提供给客户端访问使用的。
Cluster Network(集群网络): 用于Ceph集群内部的通信,包括OSD之间的数据复制、恢复操作和心跳检测,处理Ceph集群内部的数据同步和健康监控,确保数据的一致性和高可用性
服务器初始化
#1. 时间同步:
echo '*/5 * * * * /usr/sbin/ntpdate time2.aliyun.com &>/dev/null && hwclock -w'|crontab -
systemctl restart cron.service


#2. 修改时区
timedatectl set-timezone Asia/Shanghai
ln -sf /usr/share/zoneinfo/Asia/Shanghai /etc/localtime
echo 'Asia/Shanghai' >/etc/timezone


#3.配置hosts文件(所有服务器配置):
cat /etc/hosts
172.31.3.100 192.168.3.100 ceph-deploy.example.local
172.31.3.101 192.168.3.101 ceph-mon01.example.local
172.31.3.102 192.168.3.102 ceph-mon02.example.local
172.31.3.103 192.168.3.103 ceph-mon03.example.local
172.31.3.104 192.168.3.104 ceph-mgr01.example.local
172.31.3.105 192.168.3.105 ceph-mgr02.example.local
172.31.3.106 192.168.3.106 ceph-node01.example.local
172.31.3.107 192.168.3.107 ceph-node02.example.local
172.31.3.108 192.168.3.108 ceph-node03.example.local
172.31.3.109 192.168.3.109 ceph-node04.example.local


# 4. 配置基础源(Ubuntu2204)
vim /etc/apt/sources.list
# 默认注释了源码镜像以提高 apt update 速度,如有需要可自行取消注释
deb https://mirrors.tuna.tsinghua.edu.cn/ubuntu/ jammy main restricted universe multiverse
deb https://mirrors.tuna.tsinghua.edu.cn/ubuntu/ jammy-updates main restricted universe multiverse
deb https://mirrors.tuna.tsinghua.edu.cn/ubuntu/ jammy-backports main restricted universe multiverse


# 5. 基础包安装(用于支持https)
apt update
apt install -y apt-transport-https ca-certificates curl software-properties-common


# 6. 配置Ceph系统源(清华源)
# 6.1 导入清华源的Ceph GPG密钥(不使用 tee)
wget --user-agent="Mozilla" -q -O- https://mirrors.tuna.tsinghua.edu.cn/ceph/keys/release.asc | gpg --dearmor > /usr/share/keyrings/ceph-release.gpg

# 6.2 配置Ceph清华源
echo "deb [signed-by=/usr/share/keyrings/ceph-release.gpg] http://mirrors.tuna.tsinghua.edu.cn/ceph/debian-reef jammy main" > /etc/apt/sources.list.d/ceph.list

apt update


# 6.2 配置ceph系统源(推荐阿里云源)
# 6.2 导入阿里云的Ceph GPG密钥:
wget -q -O /etc/apt/trusted.gpg.d/ceph-release.asc 'https://mirrors.aliyun.com/ceph/keys/release.asc'

# 6.2 创建并Ceph源列表文件:
echo "deb https://mirrors.aliyun.com/ceph/debian-reef jammy main" > /etc/apt/sources.list.d/ceph.list
apt update


我的系统是22.04版本的Ubuntu,所以是 jammy
这里需要注意,要根据系统版本来配置源
1804 Ubuntu系统是: bionic
2004 Ubuntu系统是: focal
2204 Ubuntu系统是: jammy


最简单的就是通过系统命令来确认:
root@ceph-deploy:~# lsb_release -a
No LSB modules are available.
Distributor ID:  Ubuntu
Description:     Ubuntu 22.04.4 LTS
Release:         22.04
Codename:        jammy

注意: 如果你想装高版本 如2204中支持的18.2.2版本,那么你需要装对应版本的key,这也可以在2004版本中使用


# 7. 检查ceph源中的版本
apt-cache madison ceph-common ceph

#每个节点安装Python2(deploy节点除外):
sudo apt install python2.7 -y
sudo ln -sv /usr/bin/python2.7 /usr/bin/python2
检测源中的ceph版本,等于高于该版本均可
Ceph-common 是 Ceph 存储系统的一个核心组件,包含了 Ceph 集群中共享的基本工具、库和配置文件。它为其他 Ceph 组件(如 Ceph OSD、Mon、MDS 等)提供了必要的功能支持。Ceph-common 包含了以下几个关键内容:
公共库:这些库用于 Ceph 集群内各个组件之间的通信和数据处理。
客户端工具:Ceph-common 提供了一些用于管理和配置 Ceph 存储集群的命令行工具。例如,ceph 命令用于与 Ceph 集群进行交互,检查集群状态,查看日志,监控性能等。
配置文件:Ceph-common 包含了 Ceph 集群的配置文件模板,如 ceph.conf,这些配置文件允许管理员设置集群的工作参数,如节点、网络和存储设备等。
集群认证和密钥管理:Ceph-common 包含了管理和分发 Ceph 集群密钥的工具,保证集群中各个节点之间的安全通信。
日志和监控支持:Ceph-common 提供了一些日志功能,用于记录集群的运行状态,方便管理员排查问题。
注意: 如果是虚拟机做实验,一定记得配置LAN区段,配置结束还要选择这个LAN区段,否则配置网络后也无法ping通访问
创建LAN区段:
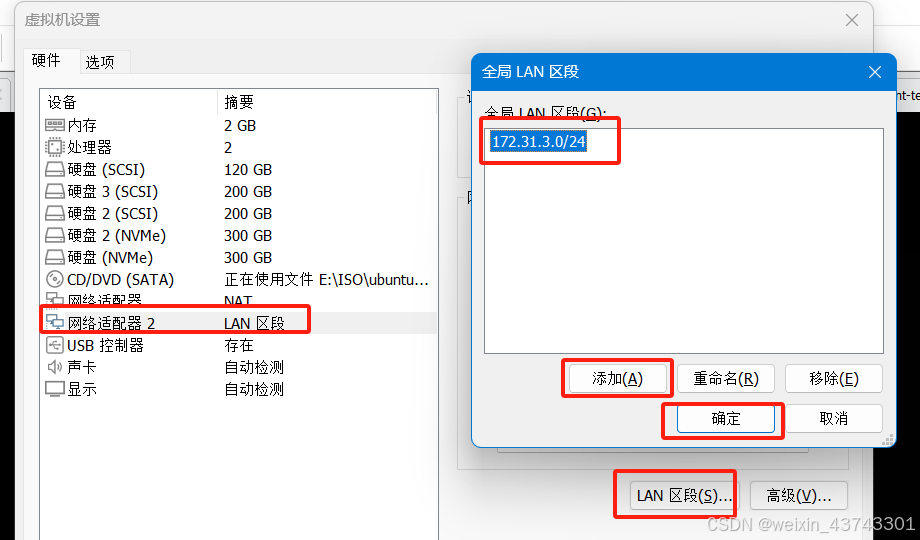
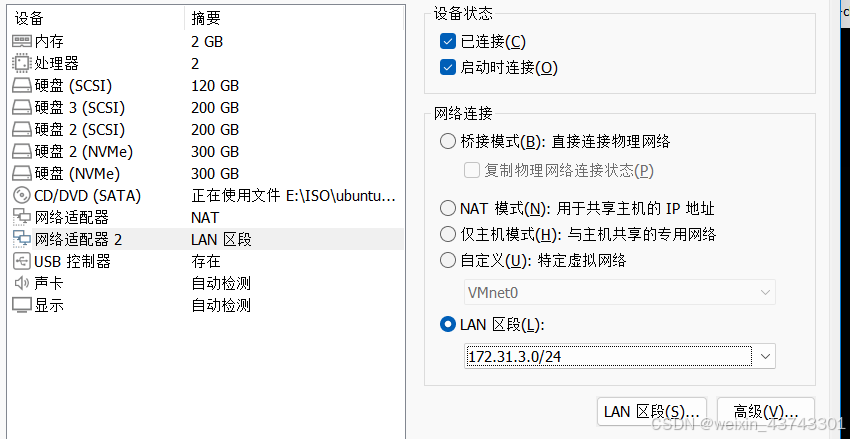
选择后,在后续ceph初始化过程中使用LAN区段的时候才不会报错,否则会出现无法访问,ping都无法ping通的而情况,真实服务器不会有这样的问题
部署ceph 18.2 版本
推荐使用指定的普通用户部署和运行Ceph集群,普通用户只要能以非交互方式执行sudo命令执行一些特权命令即可。新版的ceph-deploy可以指定包含root的用户只要可以执行sudo命令的用户,不过仍然推荐使用普通用户。
Ceph集群安装完成后会自动创建ceph用户(ceph集群默认会使用ceph用户运行各种服务进程如ceph-osd等),因此推荐使用除ceph用户之外的例如cephuser、cephadmin这样的普通用户去部署和管理Ceph集群。
cephadmin仅用于通过ceph-deploy部署和管理Ceph集群的时候使用,比如首次初始化集群和部署集群、添加节点、删除节点等。Ceph集群在node节点、mgr等节点会使用ceph用户启动服务进程。
get-pip.py 文件放在deploy节点 /usr/local/src 目录
下载地址在本文文章顶部自行下载
#1. 每个节点添加用户
groupadd -r -g 2088 cephadmin
useradd -r -m -s /bin/bash -u 2088 -g 2088 cephadmin && echo cephadmin:123456 | chpasswd
#配置权限允许 cephadmin 用户以 sudo 执行特权命令:
echo "cephadmin ALL=(ALL) NOPASSWD: ALL" >> /etc/sudoers
#2.配置各节点的免密登录
1. 首先在部署节点cephadmin下生成一个密钥
su - cephadmin
ssh-keygen -t rsa -b 4096 -N '' -f ~/.ssh/id_rsa -q
2. 通过免密脚本配置所有节点的免密
免密脚本:
cat ssh-copy.sh
--------------------------------------------------
#!/bin/bash
# 目标主机,每个节点IP都填上去
IP="
172.31.3.100
172.31.3.101
172.31.3.102
172.31.3.103
172.31.3.104
172.31.3.105
172.31.3.106
172.31.3.107
172.31.3.108
172.31.3.109
"
REMOTE_PORT="22"
REMOTE_USER="cephadmin"
REMOTE_PASS="123456"
# 生成SSH密钥对(如果还没有生成)
if [ ! -f ~/.ssh/id_rsa ]; then
ssh-keygen -t rsa -b 4096 -N '' -f ~/.ssh/id_rsa -q
fi
for REMOTE_HOST in ${IP}; do
ssh-keyscan -p "${REMOTE_PORT}" "${REMOTE_HOST}" >> ~/.ssh/known_hosts 2>/dev/null
if sshpass -p "${REMOTE_PASS}" ssh-copy-id -o StrictHostKeyChecking=no "${REMOTE_USER}@${REMOTE_HOST}" > /dev/null 2>&1; then
echo -e "\e[32m在 ${REMOTE_HOST} 上配置免密钥成功...\e[0m"
else
echo -e "\e[31m在 ${REMOTE_HOST} 上配置免密钥失败...\e[0m"
fi
# 安装 Python 2.7 并创建软链接
if sshpass -p "${REMOTE_PASS}" ssh -o StrictHostKeyChecking=no "${REMOTE_USER}@${REMOTE_HOST}" "sudo apt update > /dev/null 2>&1 && sudo apt install -y python2.7 > /dev/null 2>&1"; then
echo -e "\e[32m在 ${REMOTE_HOST} 上安装Python成功...\e[0m"
if sshpass -p "${REMOTE_PASS}" ssh -o StrictHostKeyChecking=no "${REMOTE_USER}@${REMOTE_HOST}" "[ -L /usr/bin/python2 ] && echo '软链接已存在' || (sudo ln -sv /usr/bin/python2.7 /usr/bin/python2 && echo -e '\e[32m在 ${REMOTE_HOST} 上创建软链接成功...\e[0m')" > /dev/null 2>&1; then
echo -e "\e[32m在 ${REMOTE_HOST} 上创建软链接成功或已存在...\e[0m"
else
echo -e "\e[31m在 ${REMOTE_HOST} 上创建软链接失败...\e[0m"
fi
else
echo -e "\e[31m在 ${REMOTE_HOST} 上安装Python失败...\e[0m"
fi
done
--------------------------------------------------
root@ceph-deploy:~# apt install sshpass
root@ceph-deploy:~# su - cephadmin
cephadmin@ceph-deploy:~$ ssh-keygen
cephadmin@ceph-deploy:~$ bash ssh-copy.sh
提示:
cephadmin@ceph-deploy:~$ bash ssh-copy.sh
在 172.31.3.100 上配置免密钥成功...
在 172.31.3.100 上安装Python成功...
在 172.31.3.100 上创建软链接成功或已存在...
在 172.31.3.101 上配置免密钥成功...
在 172.31.3.101 上安装Python成功...
在 172.31.3.101 上创建软链接成功或已存在...
在 172.31.3.102 上配置免密钥成功...
在 172.31.3.102 上安装Python成功...
在 172.31.3.102 上创建软链接成功或已存在...
在 172.31.3.103 上配置免密钥成功...
在 172.31.3.103 上安装Python成功...
在 172.31.3.103 上创建软链接成功或已存在...
在 172.31.3.104 上配置免密钥成功...
在 172.31.3.104 上安装Python成功...
在 172.31.3.104 上创建软链接成功或已存在...
在 172.31.3.105 上配置免密钥成功...
在 172.31.3.105 上安装Python成功...
在 172.31.3.105 上创建软链接成功或已存在...
在 172.31.3.106 上配置免密钥成功...
在 172.31.3.106 上安装Python成功...
在 172.31.3.106 上创建软链接成功或已存在...
在 172.31.3.107 上配置免密钥成功...
在 172.31.3.107 上安装Python成功...
在 172.31.3.107 上创建软链接成功或已存在...
在 172.31.3.108 上配置免密钥成功...
在 172.31.3.108 上安装Python成功...
在 172.31.3.108 上创建软链接成功或已存在...
在 172.31.3.109 上配置免密钥成功...
在 172.31.3.109 上安装Python成功...
在 172.31.3.109 上创建软链接成功或已存在...
ceph-deploy节点安装Python包管理工具 (仅在部署机安装ceph-deploy-2.0.1)
cephadmin@ceph-deploy:~$ cd /usr/local/src
cephadmin@ceph-deploy:~$ sudo python2 get-pip.py
如果速度慢,使用国内的清华源也可以
cephadmin@ceph-deploy:~$ python2 get-pip.py -i https://pypi.tuna.tsinghua.edu.cn/simple
提示信息:
Collecting pip<21.0
Downloading pip-20.3.4-py2.py3-none-any.whl (1.5 MB)
|████████████████████████████████| 1.5 MB 25 kB/s
Collecting setuptools<45
Downloading setuptools-44.1.1-py2.py3-none-any.whl (583 kB)
|████████████████████████████████| 583 kB 20 kB/s
Collecting wheel
Downloading wheel-0.37.1-py2.py3-none-any.whl (35 kB)
Installing collected packages: pip, setuptools, wheel
Successfully installed pip-20.3.4 setuptools-44.1.1 wheel-0.37.1
#2025年以后清华源执行get-pip.py 会报错,建议用阿里云源
cephadmin@ceph-deploy:~$ python2 get-pip.py -i https://mirrors.aliyun.com/pypi/simple
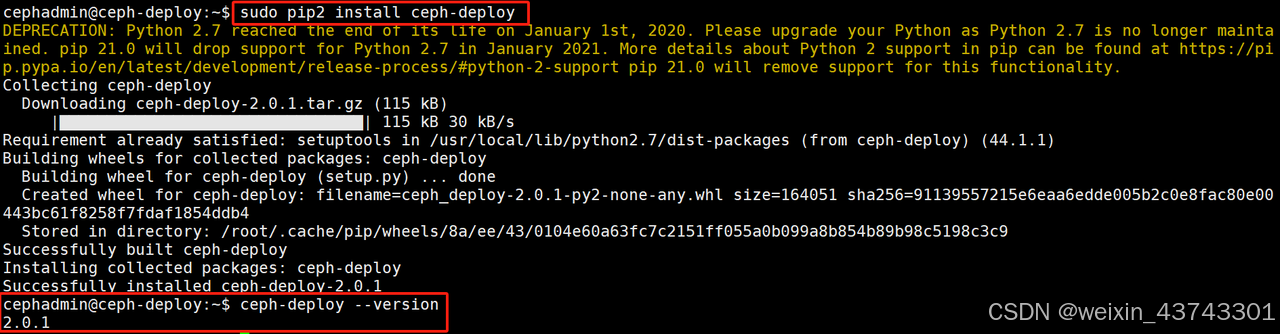
安装ceph部署工具ceph-deploy:
cephadmin@ceph-deploy:/usr/local/src$ sudo pip2 install ceph-deploy
Collecting ceph-deploy
Downloading ceph-deploy-2.0.1.tar.gz (115 kB)
|████████████████████████████████| 115 kB 113 kB/s
Requirement already satisfied: setuptools in /usr/local/lib/python2.7/dist-packages (from ceph-deploy) (44.1.1)
Building wheels for collected packages: ceph-deploy
Building wheel for ceph-deploy (setup.py) ... done
Created wheel for ceph-deploy: filename=ceph_deploy-2.0.1-py2-none-any.whl size=164051 sha256=4aaf5ce022f6ba8e15daa4e6d04c480d02c8412ec4c31bb855b2846e8096d382
Stored in directory: /root/.cache/pip/wheels/8a/ee/43/0104e60a63fc7c2151ff055a0b099a8b854b89b98c5198c3c9
Successfully built ceph-deploy
Installing collected packages: ceph-deploy
Successfully installed ceph-deploy-2.0.1 #看到这个说明安装好了部署工具
检查:
cephadmin@ceph-deploy:/usr/local/src$ ceph-deploy --version
2.0.1
可以看到已经有了部署工具 ceph-deploy-2.0.1
cephadmin@ceph-deploy:/usr/local/src$ ceph-deploy --help
执行截图: python2 get-pip.py -i https://mirrors.aliyun.com/pypi/simple

安装 ceph-deploy-2.0.1
deploy工具帮助:
deploy工具帮助:
cephadmin@ceph-deploy:~$ ceph-deploy --help
new: 开始部署一个新的 ceph 存储集群,并生成 CLUSTER.conf 集群配置文件和 keyring 认证文件。
uninstall: 从远程主机删除安装包
install: 在远程主机上安装 ceph 相关的软件包,可以通过 --release 指定安装的版本。
rgw: 管理 RGW 守护程序(RADOSGW,对象存储网关)。
mgr: 管理 MGR 守护程序(ceph-mgr, Ceph Manager Daemon,Ceph 管理守护程序)。
mds: 管理 MDS 守护程序(Ceph Metadata Server,ceph 源数据服务器)。
mon: 管理 MON 守护程序(ceph-mon, ceph 监视器)。
gatherkeys: 从指定主机提取集群的验证 keys,这些 keys 会在添加新的 MON/OSD/MD 使用。(很少用)
disk: 管理远程主机磁盘。添加主机的时候会用,管理的时候也会用,用的不太多
disk zap: 在远程主机准备和清除磁盘,即将指定远程主机的指定磁盘添加到 ceph 集群作为 osd 使用。
osd:  在远程主机准备数据磁盘,将指定的远程主机指定磁盘添加到ceph集群作为osd使用
repo: 配置远程主机仓库(很少用)。
admin: 推送 ceph 集群配置文件和 client.admin 认证文件到远程主机。
config: 将 ceph 配置文件推送到远程主机或从远程主机拷贝。
rgw: 管理对象存储守护程序。
purgedata: 从 /var/lib/ceph 删除ceph数据,会删除/etc/ceph下的内容。
purge: 删除指定主机的安装包和所有数据。
forgetkeys:从本地主机删除所有的验证 keyring,包括 client.admin、monitor、bootstrap 等认证文件。
pkg:管理远端主机的安装包。
calamari:安装并配置一个 calamari web 节点,calamari 是一个 web 监控平台。(被替代了,基本不用)
部署一个新的ceph集群
初始化mon节点
初始化之前,请检查各个节点是否配置了免密,能否正常登录,确保每个预期加入集群的磁盘没有被使用
#创建初始化目录

cephadmin@ceph-deploy:~$ cd ~
cephadmin@ceph-deploy:~$ mkdir ceph-cluster
cephadmin@ceph-deploy:~$ cd ceph-cluster/

解释:
公共网络(Public Network)  用于Ceph集群与客户端之间的通信。
集群网络(Cluster Network) 用于Ceph集群内部的通信,主要是数据复制和心跳检测。

如果服务器只有一个网络,那么可以将同一个网络用于这两个选项。这样,Ceph集群的内部通信和外部通信都通过同一个网络进行

初始化:
cephadmin@ceph-deploy:~$ ceph-deploy new --cluster-network 172.31.3.0/24 --public-network 192.168.3.0/24 ceph-mon01.example.local

输出信息:
cephadmin@ceph-deploy:~/ceph-cluster$ ceph-deploy new --cluster-network 172.31.3.0/24 --public-network 192.168.3.0/24 ceph-mon01.example.local
[ceph_deploy.conf][DEBUG ] found configuration file at: /home/cephadmin/.cephdeploy.conf
[ceph_deploy.cli][INFO  ] Invoked (2.0.1): /usr/local/bin/ceph-deploy new --cluster-network 172.31.3.0/24 --public-network 192.168.3.0/24 ceph-mon01.example.local
[ceph_deploy.cli][INFO  ] ceph-deploy options:
[ceph_deploy.cli][INFO  ]  username                      : None
[ceph_deploy.cli][INFO  ]  verbose                       : False
[ceph_deploy.cli][INFO  ]  overwrite_conf                : False
[ceph_deploy.cli][INFO  ]  quiet                         : False
[ceph_deploy.cli][INFO  ]  cd_conf                       : <ceph_deploy.conf.cephdeploy.Conf instance at 0x7faaf227ab40>
[ceph_deploy.cli][INFO  ]  cluster                       : ceph
[ceph_deploy.cli][INFO  ]  ssh_copykey                   : True
[ceph_deploy.cli][INFO  ]  mon                           : ['ceph-mon01.example.local']
[ceph_deploy.cli][INFO  ]  func                          : <function new at 0x7faaf21915d0>
[ceph_deploy.cli][INFO  ]  public_network                : 192.168.3.0/24
[ceph_deploy.cli][INFO  ]  ceph_conf                     : None
[ceph_deploy.cli][INFO  ]  cluster_network               : 172.31.3.0/24
[ceph_deploy.cli][INFO  ]  default_release               : False
[ceph_deploy.cli][INFO  ]  fsid                          : None
[ceph_deploy.new][DEBUG ] Creating new cluster named ceph
[ceph_deploy.new][INFO  ] making sure passwordless SSH succeeds
[ceph-mon01.example.local][DEBUG ] connected to host: ceph-deploy.example.local
[ceph-mon01.example.local][INFO  ] Running command: ssh -CT -o BatchMode=yes ceph-mon01.example.local
[ceph_deploy.new][WARNIN] could not connect via SSH
[ceph_deploy.new][INFO  ] will connect again with password prompt
The authenticity of host 'ceph-mon01.example.local (172.31.3.101)' can't be established.
ED25519 key fingerprint is SHA256:imiVtAMxnk6ViiXOed4zJoEDwR7VgjZNUzQxL+yxprA.
This host key is known by the following other names/addresses:
    ~/.ssh/known_hosts:6: 172.31.3.101
Are you sure you want to continue connecting (yes/no/[fingerprint])? yes #第一次连接会有询问
Warning: Permanently added 'ceph-mon01.example.local' (ED25519) to the list of known hosts.
[ceph-mon01.example.local][DEBUG ] connected to host: ceph-mon01.example.local
[ceph-mon01.example.local][DEBUG ] detect platform information from remote host
[ceph-mon01.example.local][DEBUG ] detect machine type
[ceph_deploy.new][INFO  ] adding public keys to authorized_keys
[ceph-mon01.example.local][DEBUG ] append contents to file
[ceph-mon01.example.local][DEBUG ] connection detected need for sudo
[ceph-mon01.example.local][DEBUG ] connected to host: ceph-mon01.example.local
[ceph-mon01.example.local][DEBUG ] detect platform information from remote host
[ceph-mon01.example.local][DEBUG ] detect machine type
[ceph-mon01.example.local][DEBUG ] find the location of an executable
[ceph-mon01.example.local][INFO  ] Running command: sudo /bin/ip link show
[ceph-mon01.example.local][INFO  ] Running command: sudo /bin/ip addr show
[ceph-mon01.example.local][DEBUG ] IP addresses found: [u'192.168.3.101', u'172.31.3.101']
[ceph_deploy.new][DEBUG ] Resolving host ceph-mon01.example.local
[ceph_deploy.new][DEBUG ] Monitor ceph-mon01 at 192.168.3.101
[ceph_deploy.new][DEBUG ] Monitor initial members are ['ceph-mon01']
[ceph_deploy.new][DEBUG ] Monitor addrs are [u'192.168.3.101']
[ceph_deploy.new][DEBUG ] Creating a random mon key...
[ceph_deploy.new][DEBUG ] Writing monitor keyring to ceph.mon.keyring...
[ceph_deploy.new][DEBUG ] Writing initial config to ceph.conf...


只会生成相关配置文件:
cephadmin@ceph-deploy:~/ceph-cluster$ ll
total 24
drwxrwxr-x 2 cephadmin cephadmin 4096 May 27 15:27 ./
drwxr-x--- 6 cephadmin cephadmin 4096 May 27 15:21 ../
-rw-rw-r-- 1 cephadmin cephadmin 4212 May 27 15:27 ceph-deploy-ceph.log # ceph日志文件
-rw-rw-r-- 1 cephadmin cephadmin  265 May 27 15:27 ceph.conf            # ceph认证文件
-rw------- 1 cephadmin cephadmin   73 May 27 15:27 ceph.mon.keyring     # ceph配置文件

配置文件:
cephadmin@ceph-deploy:~/ceph-cluster$ cat ceph.conf
[global]
fsid = 90acbdcb-aa79-4fc1-ad96-10e388c4e9be
public_network = 192.168.3.0/24
cluster_network = 172.31.3.0/24
mon_initial_members = ceph-mon01
mon_host = 192.168.3.101
auth_cluster_required = cephx
auth_service_required = cephx
auth_client_required = cephx

mon认证文件:
cephadmin@ceph-deploy:~/ceph-cluster$ cat ceph.mon.keyring
[mon.]
key = AQD+NVRmAAAAABAA2eEDT0ob6akN+fs7HfzLbQ==
caps mon = allow *


此时,仅仅生成了mon节点的配置文件,并没有启动mon进程服务
在节点上安装环境包和mon服务
#添加认证
wget -q -O- 'https://mirrors.tuna.tsinghua.edu.cn/ceph/keys/release.asc' | sudo apt-key add -

确保每个node节点源配置如下:
root@ceph-node01:~# cat /etc/apt/sources.list
deb https://mirrors.tuna.tsinghua.edu.cn/ubuntu/ jammy main restricted universe multiverse
deb https://mirrors.tuna.tsinghua.edu.cn/ubuntu/ jammy-updates main restricted universe multiverse
deb https://mirrors.tuna.tsinghua.edu.cn/ubuntu/ jammy-backports main restricted universe multiverse
deb https://mirrors.tuna.tsinghua.edu.cn/ubuntu/ jammy-security main restricted universe multiverse

root@ceph-node01:~# cat /etc/apt/sources.list.d/ceph.list
deb https://mirrors.tuna.tsinghua.edu.cn/ceph/debian-reef jammy main

为node节点安装Ceph软件包:
cephadmin@ceph-deploy:~$ su - cephadmin
cephadmin@ceph-deploy:~$ cd ceph-cluster
cephadmin@ceph-deploy:~/ceph-cluster$ ceph-deploy install --no-adjust-repos --nogpgcheck ceph-mon01 ceph-mon02  ceph-mgr01  ceph-node01 ceph-node02 ceph-node03

ceph-mon03  (后续用于mon节点扩容)
ceph-mgr02 (后续用于mgr节点扩容)
ceph-node04 (后续用于node节点扩容)  #如果需要一次完整安装 不学习扩容,这里可以全部写进去


安装mon服务
mon服务在配置文件中可以看到,
cephadmin@ceph-deploy:~/ceph-cluster$ cat ceph.conf
[global]
fsid = fbcd7dfd-c0b1-420e-a1c3-5eb5002c0cd3
public_network = 192.168.3.0/24
cluster_network = 172.31.3.0/24
mon_initial_members = ceph-mon01
#可以看到3.101被作为mon服务如果需要多个可以后面加其他的地址和服务器名称,逗号隔开,后续扩容笔记做这个
mon_host = 192.168.3.101
auth_cluster_required = cephx
auth_service_required = cephx
auth_client_required = cephx

执行初始化mon服务:
cephadmin@ceph-deploy:~/ceph-cluster$ ceph-deploy mon create-initial

注意,ceph.conf配置中因为只填写了一个mon服务器地址,所以他只会对 192.168.3.101 进行初始化
如果指定多个 就会初始化多个mon服务器
如:
cephadmin@ceph-deploy:~/ceph-cluster$ cat ceph.conf
[global]
fsid = fbcd7dfd-c0b1-420e-a1c3-5eb5002c0cd3
public_network = 192.168.3.0/24
cluster_network = 172.31.3.0/24
mon_initial_members = ceph-mon01,ceph-mon02
mon_host = 192.168.3.101,192.168.3.102
auth_cluster_required = cephx
auth_service_required = cephx
auth_client_required = cephx
标红是 添加第二个mon服务器,然后再执行 ceph-deploy mon create-initial 就会初始化ceph-mon02节点
初始化部署mgr节点
初始化mgr节点时,需要保证安装了python3依赖
apt-get install -y python3-bcrypt

cephadmin@ceph-deploy:~/ceph-cluster$ ceph-deploy mgr create ceph-mgr01
[ceph_deploy.conf][DEBUG ] found configuration file at: /home/cephadmin/.cephdeploy.conf
[ceph_deploy.cli][INFO  ] Invoked (2.0.1): /usr/local/bin/ceph-deploy mgr create ceph-mgr01
[ceph_deploy.cli][INFO  ] ceph-deploy options:
[ceph_deploy.cli][INFO  ]  username                      : None
[ceph_deploy.cli][INFO  ]  verbose                       : False
[ceph_deploy.cli][INFO  ]  mgr                           : [('ceph-mgr01', 'ceph-mgr01')]
[ceph_deploy.cli][INFO  ]  overwrite_conf                : False
[ceph_deploy.cli][INFO  ]  subcommand                    : create
[ceph_deploy.cli][INFO  ]  quiet                         : False
[ceph_deploy.cli][INFO  ]  cd_conf                       : <ceph_deploy.conf.cephdeploy.Conf instance at 0x7f2872da53c0>
[ceph_deploy.cli][INFO  ]  cluster                       : ceph
[ceph_deploy.cli][INFO  ]  func                          : <function mgr at 0x7f2872df4950>
[ceph_deploy.cli][INFO  ]  ceph_conf                     : None
[ceph_deploy.cli][INFO  ]  default_release               : False
[ceph_deploy.mgr][DEBUG ] Deploying mgr, cluster ceph hosts ceph-mgr01:ceph-mgr01
[ceph-mgr01][DEBUG ] connection detected need for sudo
[ceph-mgr01][DEBUG ] connected to host: ceph-mgr01
[ceph-mgr01][DEBUG ] detect platform information from remote host
[ceph-mgr01][DEBUG ] detect machine type
[ceph_deploy.mgr][INFO  ] Distro info: Ubuntu 22.04 jammy
[ceph_deploy.mgr][DEBUG ] remote host will use systemd
[ceph_deploy.mgr][DEBUG ] deploying mgr bootstrap to ceph-mgr01
[ceph-mgr01][DEBUG ] write cluster configuration to /etc/ceph/{cluster}.conf
[ceph-mgr01][WARNIN] mgr keyring does not exist yet, creating one
[ceph-mgr01][DEBUG ] create a keyring file
[ceph-mgr01][DEBUG ] create path recursively if it doesn't exist
[ceph-mgr01][INFO  ] Running command: sudo ceph --cluster ceph --name client.bootstrap-mgr --keyring /var/lib/ceph/bootstrap-mgr/ceph.keyring auth get-or-create mgr.ceph-mgr01 mon allow profile mgr osd allow * mds allow * -o /var/lib/ceph/mgr/ceph-ceph-mgr01/keyring
[ceph-mgr01][INFO  ] Running command: sudo systemctl enable ceph-mgr@ceph-mgr01
[ceph-mgr01][WARNIN] Created symlink /etc/systemd/system/ceph-mgr.target.wants/ceph-mgr@ceph-mgr01.service → /lib/systemd/system/ceph-mgr@.service.
[ceph-mgr01][INFO  ] Running command: sudo systemctl start ceph-mgr@ceph-mgr01
[ceph-mgr01][INFO  ] Running command: sudo systemctl enable ceph.target


cephadmin@ceph-deploy:~/ceph-cluster$ ceph -s
  cluster:
    id:     fbcd7dfd-c0b1-420e-a1c3-5eb5002c0cd3
    health: HEALTH_WARN
            mons are allowing insecure global_id reclaim
            13 mgr modules have failed dependencies
            OSD count 0 < osd_pool_default_size 3

  services:
    mon: 2 daemons, quorum ceph-mon01,ceph-mon02 (age 15h)
    mgr: ceph-mgr01(active, since 30s)
    osd: 0 osds: 0 up, 0 in

  data:
    pools:   0 pools, 0 pgs
    objects: 0 objects, 0 B
    usage:   0 B used, 0 B / 0 B avail
    pgs:

mgr安装完成,如果安装有问题,可以直接去mgr服务器安装mgr服务:
apt install ceph-mgr -y
装完以后,再去deploy节点部署mgr
ceph-deploy mgr create ceph-mgr01

通常来说,直接执行  ceph-deploy mgr create ceph-mgr01  的时候就可以正常安装mgr服务,某些情况下需要自己手动装就去mgr节点手动安装ceph-mgr服务,装好了就可以通过ceph -s命令看到对应服务的安装状态
mgr: ceph-mgr01(active, since 30s)  这就表示,mgr节点有一台服务器叫 ceph-mgr01


现在也可以把第二台mgr服务也部署上
ceph-deploy mgr create ceph-mgr02
初始化node节点
在需要初始化的节点上安装对应包,我有4个node节点:
root@ceph-node01:~# sudo apt install -y ceph-volume python3-packaging
root@ceph-node02:~# sudo apt install -y ceph-volume python3-packaging
root@ceph-node03:~# sudo apt install -y ceph-volume python3-packaging
root@ceph-node04:~# sudo apt install -y ceph-volume python3-packaging
这个包主要用于管理擦除磁盘的

上面的命令和这个命令基本一样,下面这条命令会检查环境中是否部署包齐全,并且安装其他必要的 Ceph 组件
在node节点上安装所续包,reef 是指定版本
cephadmin@ceph-deploy:~/ceph-cluster$ ceph-deploy install --release reef ceph-node01 ceph-node02 ceph-node03 ceph-node04
部分提示:
[ceph-node04][DEBUG ] Reading package lists...
[ceph-node04][INFO  ] Running command: sudo env DEBIAN_FRONTEND=noninteractive DEBIAN_PRIORITY=critical apt-get --assume-yes -q --no-install-recommends install -o Dpkg::Options::=--force-confnew ceph ceph-osd ceph-mds ceph-mon radosgw
[ceph-node04][DEBUG ] Reading package lists...
[ceph-node04][DEBUG ] Building dependency tree...
[ceph-node04][DEBUG ] Reading state information...
[ceph-node04][DEBUG ] ceph is already the newest version (18.2.2-1jammy).
[ceph-node04][DEBUG ] ceph-mds is already the newest version (18.2.2-1jammy).
[ceph-node04][DEBUG ] ceph-mon is already the newest version (18.2.2-1jammy).
[ceph-node04][DEBUG ] ceph-osd is already the newest version (18.2.2-1jammy).
[ceph-node04][DEBUG ] radosgw is already the newest version (18.2.2-1jammy).
[ceph-node04][DEBUG ] 0 upgraded, 0 newly installed, 0 to remove and 9 not upgraded.
[ceph-node04][INFO  ] Running command: sudo ceph --version
[ceph-node04][DEBUG ] ceph version 18.2.2 (531c0d11a1c5d39fbfe6aa8a521f023abf3bf3e2) reef (stable)

看到这些说明已经安装好了
命令说明:
ceph-deploy: Ceph 官方提供的一个用于简化 Ceph 集群部署和管理的工具。
install: ceph-deploy 的子命令,用于安装 Ceph。
--release reef: 指定安装 Ceph 的版本为 reef。reef 是 Ceph 的一个特定版本。
ceph-node01 ceph-node02 ceph-node03 ceph-node04: 要在其上安装 Ceph 的节点列表
列出集群node节点中的磁盘,并擦除磁盘
如果需要列出多个主机磁盘,可以后面跟每个节点,如 ceph-deploy disk list ceph-node01 ceph-node02
cephadmin@ceph-deploy:~/ceph-cluster$ ceph-deploy disk list ceph-node01
[ceph_deploy.conf][DEBUG ] found configuration file at: /home/cephadmin/.cephdeploy.conf
[ceph_deploy.cli][INFO ] Invoked (2.0.1): /usr/local/bin/ceph-deploy disk list ceph-node01
[ceph_deploy.cli][INFO ] ceph-deploy options:
[ceph_deploy.cli][INFO ] username : None
[ceph_deploy.cli][INFO ] verbose : False
[ceph_deploy.cli][INFO ] debug : False
[ceph_deploy.cli][INFO ] overwrite_conf : False
[ceph_deploy.cli][INFO ] subcommand : list
[ceph_deploy.cli][INFO ] quiet : False
[ceph_deploy.cli][INFO ] cd_conf : <ceph_deploy.conf.cephdeploy.Conf instance at 0x7fb8232ba870>
[ceph_deploy.cli][INFO ] cluster : ceph
[ceph_deploy.cli][INFO ] host : ['ceph-node01']
[ceph_deploy.cli][INFO ] func : <function disk at 0x7fb82331ead0>
[ceph_deploy.cli][INFO ] ceph_conf : None
[ceph_deploy.cli][INFO ] default_release : False
[ceph-node01][DEBUG ] connection detected need for sudo
[ceph-node01][DEBUG ] connected to host: ceph-node01
[ceph-node01][DEBUG ] detect platform information from remote host
[ceph-node01][DEBUG ] detect machine type
[ceph-node01][DEBUG ] find the location of an executable
[ceph-node01][INFO ] Running command: sudo fdisk -l
[ceph-node01][INFO ] Disk /dev/nvme0n1: 300 GiB, 322122547200 bytes, 629145600 sectors
[ceph-node01][INFO ] Disk /dev/nvme0n2: 300 GiB, 322122547200 bytes, 629145600 sectors
[ceph-node01][INFO ] Disk /dev/sda: 120 GiB, 128849018880 bytes, 251658240 sectors
[ceph-node01][INFO ] Disk /dev/sdb: 200 GiB, 214748364800 bytes, 419430400 sectors
[ceph-node01][INFO ] Disk /dev/sdc: 200 GiB, 214748364800 bytes, 419430400 sectors
通过命令整理出当前已添加的节点磁盘信息:
cephadmin@ceph-deploy:~/ceph-cluster$ ceph-deploy disk list ceph-node01 ceph-node02 ceph-node03 ceph-node04
[ceph-node01][DEBUG ] connected to host: ceph-node01
[ceph-node01][INFO ] Disk /dev/nvme0n1: 300 GiB, 322122547200 bytes, 629145600 sectors
[ceph-node01][INFO ] Disk /dev/nvme0n2: 300 GiB, 322122547200 bytes, 629145600 sectors
[ceph-node01][INFO ] Disk /dev/sda: 120 GiB, 128849018880 bytes, 251658240 sectors
[ceph-node01][INFO ] Disk /dev/sdb: 200 GiB, 214748364800 bytes, 419430400 sectors
[ceph-node01][INFO ] Disk /dev/sdc: 200 GiB, 214748364800 bytes, 419430400 sectors
[ceph-node02][DEBUG ] connected to host: ceph-node02
[ceph-node02][INFO ] Disk /dev/nvme0n1: 300 GiB, 322122547200 bytes, 629145600 sectors
[ceph-node02][INFO ] Disk /dev/nvme0n2: 300 GiB, 322122547200 bytes, 629145600 sectors
[ceph-node02][INFO ] Disk /dev/sda: 120 GiB, 128849018880 bytes, 251658240 sectors
[ceph-node02][INFO ] Disk /dev/sdb: 200 GiB, 214748364800 bytes, 419430400 sectors
[ceph-node02][INFO ] Disk /dev/sdc: 200 GiB, 214748364800 bytes, 419430400 sectors
[ceph-node03][DEBUG ] connected to host: ceph-node03
[ceph-node03][INFO ] Disk /dev/nvme0n1: 300 GiB, 322122547200 bytes, 629145600 sectors
[ceph-node03][INFO ] Disk /dev/nvme0n2: 300 GiB, 322122547200 bytes, 629145600 sectors
[ceph-node03][INFO ] Disk /dev/sda: 120 GiB, 128849018880 bytes, 251658240 sectors
[ceph-node03][INFO ] Disk /dev/sdb: 200 GiB, 214748364800 bytes, 419430400 sectors
[ceph-node03][INFO ] Disk /dev/sdc: 200 GiB, 214748364800 bytes, 419430400 sectors
[ceph-node04][DEBUG ] connected to host: ceph-node04
[ceph-node04][INFO ] Disk /dev/nvme0n1: 300 GiB, 322122547200 bytes, 629145600 sectors
[ceph-node04][INFO ] Disk /dev/nvme0n2: 300 GiB, 322122547200 bytes, 629145600 sectors
[ceph-node04][INFO ] Disk /dev/sda: 120 GiB, 128849018880 bytes, 251658240 sectors
[ceph-node04][INFO ] Disk /dev/sdb: 200 GiB, 214748364800 bytes, 419430400 sectors
[ceph-node04][INFO ] Disk /dev/sdc: 200 GiB, 214748364800 bytes, 419430400 sectors
这是我当前4个节点的信息
每个节点有两个300G的固态硬盘,2个200G的机械硬盘,一个120G的系统盘
擦除磁盘
列出磁盘信息后,可以擦除指定的磁盘,可以一次擦除指定的所有盘,也可以一次擦除一块盘
cephadmin@ceph-deploy:~/ceph-cluster$ ceph-deploy disk zap ceph-node01 /dev/nvme0n1 /dev/nvme0n2 /dev/sdb
以上命令一次擦除了3块磁盘
现在只是擦除了 ceph-node01 的磁盘,现在把其他服务器对应磁盘的也擦除,命令如下:
ceph-deploy disk zap ceph-node02 /dev/nvme0n1 /dev/nvme0n2 /dev/sdb
ceph-deploy disk zap ceph-node03 /dev/nvme0n1 /dev/nvme0n2 /dev/sdb
ceph-deploy disk zap ceph-node04 /dev/nvme0n1 /dev/nvme0n2 /dev/sdb
如果不知道要创建osd的目标主机有几块盘,可以通过上面的命令获取,或者直接去对应服务器查询
ceph-deploy disk list ceph-node01
创建添加OSD[固态盘]
ceph-deploy osd create ceph-node01 --data /dev/nvme0n1
ceph-deploy osd create ceph-node01 --data /dev/nvme0n2
ceph-deploy osd create ceph-node02 --data /dev/nvme0n1
ceph-deploy osd create ceph-node02 --data /dev/nvme0n2
ceph-deploy osd create ceph-node03 --data /dev/nvme0n1
ceph-deploy osd create ceph-node03 --data /dev/nvme0n2
ceph-deploy osd create ceph-node04 --data /dev/nvme0n1
ceph-deploy osd create ceph-node04 --data /dev/nvme0n2
创建添加OSD[hdd盘]
ceph-deploy osd create ceph-node01 --data /dev/sdb
ceph-deploy osd create ceph-node02 --data /dev/sdb
ceph-deploy osd create ceph-node03 --data /dev/sdb
ceph-deploy osd create ceph-node04 --data /dev/sdb
这些命令执行后,会自动设置开机启动osd,不用人为设置
在每个node节点执行命令可以看到对应的osd编号: ceph-volume lvm list
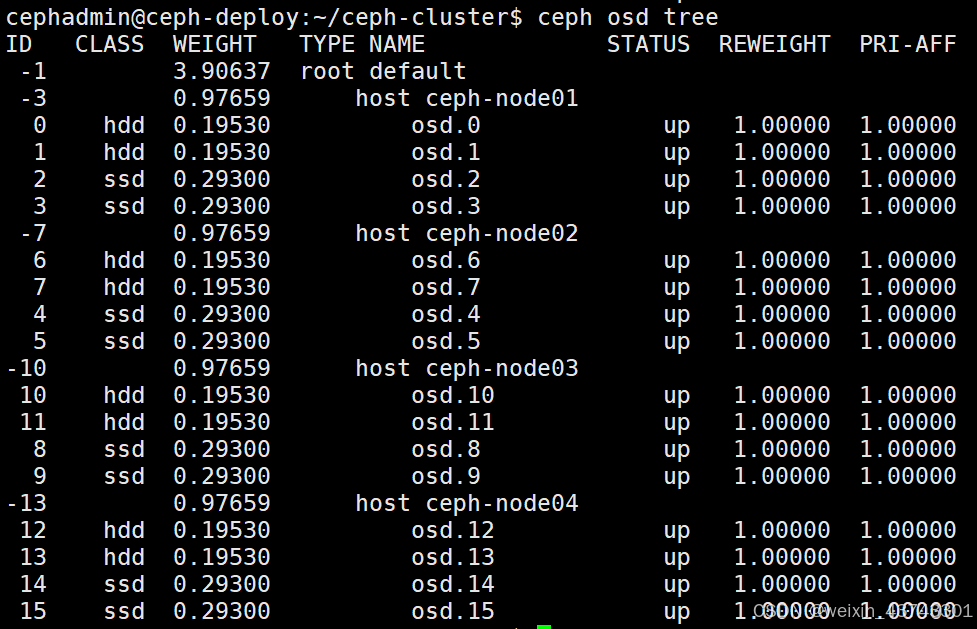
也可以直接通过: ceph osd tree 可以看到
root@ceph-node01:~# ceph osd tree
ID CLASS WEIGHT TYPE NAME STATUS REWEIGHT PRI-AFF
-1 2.34399 root default
-3 0.58600 host ceph-node01
0 ssd 0.29300 osd.0 up 1.00000 1.00000
1 ssd 0.29300 osd.1 up 1.00000 1.00000
-5 0.58600 host ceph-node02
2 ssd 0.29300 osd.2 up 1.00000 1.00000
3 ssd 0.29300 osd.3 up 1.00000 1.00000
-7 0.58600 host ceph-node03
4 ssd 0.29300 osd.4 up 1.00000 1.00000
5 ssd 0.29300 osd.5 up 1.00000 1.00000
-9 0.58600 host ceph-node04
6 ssd 0.29300 osd.6 up 1.00000 1.00000
7 ssd 0.29300 osd.7 up 1.00000 1.00000
工作中,最好把磁盘做个表格,这样能知道哪个节点有几块盘,哪几块盘是在ceph里被使用的,表格如下:

这里只写了固态盘的osd编号只是给大家演示的,工作中尽可能都写进去,方便以后查找
初始化mds节点
cephadmin@ceph-deploy:~/ceph-cluster$ cat /etc/hosts
192.168.3.121 ceph-deploy.example.local ceph-deploy
192.168.3.131 ceph-mon01.example.local  ceph-mon01
192.168.3.132 ceph-mon02.example.local  ceph-mon02
192.168.3.133 ceph-mon03.example.local  ceph-mon03
192.168.3.141 ceph-mgr01.example.local  ceph-mgr01
192.168.3.142 ceph-mgr02.example.local  ceph-mgr02
192.168.3.151 ceph-node01.example.local ceph-node01
192.168.3.152 ceph-node02.example.local ceph-node02
192.168.3.153 ceph-node03.example.local ceph-node03
192.168.3.154 ceph-node04.example.local ceph-node04


#将这两台机器安装mds基础组件
root@ceph-mgr01:~# apt install -y ceph-mds
另一台也装上
root@ceph-mgr02:~# apt install -y ceph-mds


在deploy服务器创建mds服务
cephadmin@ceph-deploy:~/ceph-cluster$ ceph-deploy mds create ceph-mgr01
输出信息:
[ceph_deploy.conf][DEBUG ] found configuration file at: /home/cephadmin/.cephdeploy.conf
[ceph_deploy.cli][INFO  ] Invoked (2.0.1): /usr/local/bin/ceph-deploy mds create ceph-mgr01
[ceph_deploy.cli][INFO  ] ceph-deploy options:
[ceph_deploy.cli][INFO  ]  username                      : None
[ceph_deploy.cli][INFO  ]  verbose                       : False
[ceph_deploy.cli][INFO  ]  overwrite_conf                : False
[ceph_deploy.cli][INFO  ]  subcommand                    : create
[ceph_deploy.cli][INFO  ]  quiet                         : False
[ceph_deploy.cli][INFO  ]  cd_conf                       : <ceph_deploy.conf.cephdeploy.Conf instance at 0x7ff16d3effa0>
[ceph_deploy.cli][INFO  ]  cluster                       : ceph
[ceph_deploy.cli][INFO  ]  func                          : <function mds at 0x7ff16d454dd0>
[ceph_deploy.cli][INFO  ]  ceph_conf                     : None
[ceph_deploy.cli][INFO  ]  mds                           : [('ceph-mgr01', 'ceph-mgr01')]
[ceph_deploy.cli][INFO  ]  default_release               : False
[ceph_deploy.mds][DEBUG ] Deploying mds, cluster ceph hosts ceph-mgr01:ceph-mgr01
[ceph-mgr01][DEBUG ] connection detected need for sudo
[ceph-mgr01][DEBUG ] connected to host: ceph-mgr01
[ceph-mgr01][DEBUG ] detect platform information from remote host
[ceph-mgr01][DEBUG ] detect machine type
[ceph_deploy.mds][INFO  ] Distro info: Ubuntu 22.04 jammy
[ceph_deploy.mds][DEBUG ] remote host will use systemd
[ceph_deploy.mds][DEBUG ] deploying mds bootstrap to ceph-mgr01
[ceph-mgr01][DEBUG ] write cluster configuration to /etc/ceph/{cluster}.conf
[ceph-mgr01][WARNIN] mds keyring does not exist yet, creating one
[ceph-mgr01][DEBUG ] create a keyring file
[ceph-mgr01][DEBUG ] create path if it doesn't exist
[ceph-mgr01][INFO  ] Running command: sudo ceph --cluster ceph --name client.bootstrap-mds --keyring /var/lib/ceph/bootstrap-mds/ceph.keyring auth get-or-create mds.ceph-mgr01 osd allow rwx mds allow mon allow profile mds -o /var/lib/ceph/mds/ceph-ceph-mgr01/keyring
[ceph-mgr01][INFO  ] Running command: sudo systemctl enable ceph-mds@ceph-mgr01
[ceph-mgr01][WARNIN] Created symlink /etc/systemd/system/ceph-mds.target.wants/ceph-mds@ceph-mgr01.service → /lib/systemd/system/ceph-mds@.service.
[ceph-mgr01][INFO  ] Running command: sudo systemctl start ceph-mds@ceph-mgr01
[ceph-mgr01][INFO  ] Running command: sudo systemctl enable ceph.target
cephadmin@ceph-deploy:~/ceph-cluster$ ceph -s
  cluster:
    id:     8c6beb8a-3fbb-4ae5-aaf2-6cbf92ffd8a8
    health: HEALTH_WARN
            1 pool(s) do not have an application enabled

  services:
    mon: 3 daemons, quorum ceph-mon01,ceph-mon02,ceph-mon03 (age 27h)
    mgr: ceph-mgr01(active, since 28h), standbys: ceph-mgr02
    mds: 1/1 daemons up
    osd: 9 osds: 9 up (since 27h), 9 in (since 27h)

  data:
    volumes: 1/1 healthy
    pools:   5 pools, 225 pgs
    objects: 30 objects, 579 KiB
    usage:   389 MiB used, 2.3 TiB / 2.3 TiB avail
    pgs:     225 active+clean

  io:
    client:   1.2 KiB/s wr, 0 op/s rd, 3 op/s wr


这样一个mds节点就已经成功部署了
扩容篇
扩容mon节点(可选)
1. 查看当前已经存在的mon节点(可选):
cephadmin@ceph-deploy:~/ceph-cluster$ ceph node ls mon
{
    "ceph-mon01.example.local": [
        "ceph-mon01"
    ]
}


cat /etc/hosts
#ceph server
172.31.3.100 192.168.3.100 ceph-deploy.example.local
172.31.3.101 192.168.3.101 ceph-mon01.example.local
172.31.3.102 192.168.3.102 ceph-mon02.example.local   #需要做扩容
172.31.3.103 192.168.3.103 ceph-mon03.example.local   #需要做扩容
172.31.3.104 192.168.3.104 ceph-mgr01.example.local
172.31.3.105 192.168.3.105 ceph-mgr02.example.local
172.31.3.106 192.168.3.106 ceph-node01.example.local
172.31.3.107 192.168.3.107 ceph-node02.example.local
172.31.3.108 192.168.3.108 ceph-node03.example.local
172.31.3.109 192.168.3.109 ceph-node04.example.local

在172.31.3.102,172.31.3.103节点安装 ceph-mon服务 所需软件
root@ceph-mon03:~# apt install -y ceph-mon


扩容第二台 mon 节点:

在第二台mon节点安装mon服务
cephadmin@ceph-mon02:~$ apt install -y ceph-mon

在ceph-deploy节点创建mon服务
root@ceph-deploy:~# su - cephadmin
cephadmin@ceph-deploy:~$ cd ceph-cluster
cephadmin@ceph-deploy:~/ceph-cluster$ ceph-deploy mon add ceph-mon02
输出信息:
cephadmin@ceph-deploy:~/ceph-cluster$ ceph-deploy mon add ceph-mon02
[ceph_deploy.conf][DEBUG ] found configuration file at: /home/cephadmin/.cephdeploy.conf
[ceph_deploy.cli][INFO  ] Invoked (2.0.1): /usr/local/bin/ceph-deploy mon add ceph-mon02
[ceph_deploy.cli][INFO  ] ceph-deploy options:
[ceph_deploy.cli][INFO  ]  username                      : None
[ceph_deploy.cli][INFO  ]  verbose                       : False
[ceph_deploy.cli][INFO  ]  overwrite_conf                : False
[ceph_deploy.cli][INFO  ]  subcommand                    : add
[ceph_deploy.cli][INFO  ]  quiet                         : False
[ceph_deploy.cli][INFO  ]  cd_conf                       : <ceph_deploy.conf.cephdeploy.Conf instance at 0x7f5e4e7a3410>
[ceph_deploy.cli][INFO  ]  cluster                       : ceph
[ceph_deploy.cli][INFO  ]  mon                           : ['ceph-mon02']
[ceph_deploy.cli][INFO  ]  func                          : <function mon at 0x7f5e4e80f550>
[ceph_deploy.cli][INFO  ]  address                       : None
[ceph_deploy.cli][INFO  ]  ceph_conf                     : None
[ceph_deploy.cli][INFO  ]  default_release               : False
[ceph_deploy.mon][INFO  ] ensuring configuration of new mon host: ceph-mon02
[ceph_deploy.admin][DEBUG ] Pushing admin keys and conf to ceph-mon02
[ceph-mon02][DEBUG ] connection detected need for sudo
[ceph-mon02][DEBUG ] connected to host: ceph-mon02
[ceph-mon02][DEBUG ] detect platform information from remote host
[ceph-mon02][DEBUG ] detect machine type
[ceph-mon02][DEBUG ] write cluster configuration to /etc/ceph/{cluster}.conf
[ceph_deploy.mon][DEBUG ] Adding mon to cluster ceph, host ceph-mon02
[ceph_deploy.mon][DEBUG ] using mon address by resolving host: 192.168.3.132
[ceph_deploy.mon][DEBUG ] detecting platform for host ceph-mon02 ...
[ceph-mon02][DEBUG ] connection detected need for sudo
[ceph-mon02][DEBUG ] connected to host: ceph-mon02
[ceph-mon02][DEBUG ] detect platform information from remote host
[ceph-mon02][DEBUG ] detect machine type
[ceph-mon02][DEBUG ] find the location of an executable
[ceph_deploy.mon][INFO  ] distro info: Ubuntu 22.04 jammy
[ceph-mon02][DEBUG ] determining if provided host has same hostname in remote
[ceph-mon02][DEBUG ] get remote short hostname
[ceph-mon02][DEBUG ] adding mon to ceph-mon02
[ceph-mon02][DEBUG ] get remote short hostname
[ceph-mon02][DEBUG ] write cluster configuration to /etc/ceph/{cluster}.conf
[ceph-mon02][DEBUG ] create the mon path if it does not exist
[ceph-mon02][DEBUG ] checking for done path: /var/lib/ceph/mon/ceph-ceph-mon02/done
[ceph-mon02][DEBUG ] done path does not exist: /var/lib/ceph/mon/ceph-ceph-mon02/done
[ceph-mon02][INFO  ] creating keyring file: /var/lib/ceph/tmp/ceph-ceph-mon02.mon.keyring
[ceph-mon02][DEBUG ] create the monitor keyring file
[ceph-mon02][INFO  ] Running command: sudo ceph --cluster ceph mon getmap -o /var/lib/ceph/tmp/ceph.ceph-mon02.monmap
[ceph-mon02][WARNIN] got monmap epoch 1
[ceph-mon02][INFO  ] Running command: sudo ceph-mon --cluster ceph --mkfs -i ceph-mon02 --monmap /var/lib/ceph/tmp/ceph.ceph-mon02.monmap --keyring /var/lib/ceph/tmp/ceph-ceph-mon02.mon.keyring --setuser 64045 --setgroup 64045
[ceph-mon02][INFO  ] unlinking keyring file /var/lib/ceph/tmp/ceph-ceph-mon02.mon.keyring
[ceph-mon02][DEBUG ] create a done file to avoid re-doing the mon deployment
[ceph-mon02][DEBUG ] create the init path if it does not exist
[ceph-mon02][INFO  ] Running command: sudo systemctl enable ceph.target
[ceph-mon02][INFO  ] Running command: sudo systemctl enable ceph-mon@ceph-mon02
[ceph-mon02][WARNIN] Created symlink /etc/systemd/system/ceph-mon.target.wants/ceph-mon@ceph-mon02.service → /lib/systemd/system/ceph-mon@.service.
[ceph-mon02][INFO  ] Running command: sudo systemctl start ceph-mon@ceph-mon02
[ceph-mon02][INFO  ] Running command: sudo ceph --cluster=ceph --admin-daemon /var/run/ceph/ceph-mon.ceph-mon02.asok mon_status
[ceph-mon02][WARNIN] ceph-mon02 is not defined in `mon initial members`
[ceph-mon02][WARNIN] monitor ceph-mon02 does not exist in monmap
[ceph-mon02][INFO  ] Running command: sudo ceph --cluster=ceph --admin-daemon /var/run/ceph/ceph-mon.ceph-mon02.asok mon_status
[ceph-mon02][DEBUG ] ********************************************************************************
[ceph-mon02][DEBUG ] status for monitor: mon.ceph-mon02
[ceph-mon02][DEBUG ] {
[ceph-mon02][DEBUG ]   "election_epoch": 1,
[ceph-mon02][DEBUG ]   "extra_probe_peers": [],
[ceph-mon02][DEBUG ]   "feature_map": {
[ceph-mon02][DEBUG ]     "mon": [
[ceph-mon02][DEBUG ]       {
[ceph-mon02][DEBUG ]         "features": "0x3f01cfbffffdffff",
[ceph-mon02][DEBUG ]         "num": 1,
[ceph-mon02][DEBUG ]         "release": "reef"
[ceph-mon02][DEBUG ]       }
[ceph-mon02][DEBUG ]     ]
[ceph-mon02][DEBUG ]   },
[ceph-mon02][DEBUG ]   "features": {
[ceph-mon02][DEBUG ]     "quorum_con": "0",
[ceph-mon02][DEBUG ]     "quorum_mon": [],
[ceph-mon02][DEBUG ]     "required_con": "2449958197560098820",
[ceph-mon02][DEBUG ]     "required_mon": [
[ceph-mon02][DEBUG ]       "kraken",
[ceph-mon02][DEBUG ]       "luminous",
[ceph-mon02][DEBUG ]       "mimic",
[ceph-mon02][DEBUG ]       "osdmap-prune",
[ceph-mon02][DEBUG ]       "nautilus",
[ceph-mon02][DEBUG ]       "octopus",
[ceph-mon02][DEBUG ]       "pacific",
[ceph-mon02][DEBUG ]       "elector-pinging",
[ceph-mon02][DEBUG ]       "quincy",
[ceph-mon02][DEBUG ]       "reef"
[ceph-mon02][DEBUG ]     ]
[ceph-mon02][DEBUG ]   },
[ceph-mon02][DEBUG ]   "monmap": {
[ceph-mon02][DEBUG ]     "created": "2025-03-13T10:42:55.560862Z",
[ceph-mon02][DEBUG ]     "disallowed_leaders: ": "",
[ceph-mon02][DEBUG ]     "election_strategy": 1,
[ceph-mon02][DEBUG ]     "epoch": 2,
[ceph-mon02][DEBUG ]     "features": {
[ceph-mon02][DEBUG ]       "optional": [],
[ceph-mon02][DEBUG ]       "persistent": [
[ceph-mon02][DEBUG ]         "kraken",
[ceph-mon02][DEBUG ]         "luminous",
[ceph-mon02][DEBUG ]         "mimic",
[ceph-mon02][DEBUG ]         "osdmap-prune",
[ceph-mon02][DEBUG ]         "nautilus",
[ceph-mon02][DEBUG ]         "octopus",
[ceph-mon02][DEBUG ]         "pacific",
[ceph-mon02][DEBUG ]         "elector-pinging",
[ceph-mon02][DEBUG ]         "quincy",
[ceph-mon02][DEBUG ]         "reef"
[ceph-mon02][DEBUG ]       ]
[ceph-mon02][DEBUG ]     },
[ceph-mon02][DEBUG ]     "fsid": "8c6beb8a-3fbb-4ae5-aaf2-6cbf92ffd8a8",
[ceph-mon02][DEBUG ]     "min_mon_release": 18,
[ceph-mon02][DEBUG ]     "min_mon_release_name": "reef",
[ceph-mon02][DEBUG ]     "modified": "2025-03-13T11:23:36.949693Z",
[ceph-mon02][DEBUG ]     "mons": [
[ceph-mon02][DEBUG ]       {
[ceph-mon02][DEBUG ]         "addr": "192.168.3.131:6789/0",
[ceph-mon02][DEBUG ]         "crush_location": "{}",
[ceph-mon02][DEBUG ]         "name": "ceph-mon01",
[ceph-mon02][DEBUG ]         "priority": 0,
[ceph-mon02][DEBUG ]         "public_addr": "192.168.3.131:6789/0",
[ceph-mon02][DEBUG ]         "public_addrs": {
[ceph-mon02][DEBUG ]           "addrvec": [
[ceph-mon02][DEBUG ]             {
[ceph-mon02][DEBUG ]               "addr": "192.168.3.131:3300",
[ceph-mon02][DEBUG ]               "nonce": 0,
[ceph-mon02][DEBUG ]               "type": "v2"
[ceph-mon02][DEBUG ]             },
[ceph-mon02][DEBUG ]             {
[ceph-mon02][DEBUG ]               "addr": "192.168.3.131:6789",
[ceph-mon02][DEBUG ]               "nonce": 0,
[ceph-mon02][DEBUG ]               "type": "v1"
[ceph-mon02][DEBUG ]             }
[ceph-mon02][DEBUG ]           ]
[ceph-mon02][DEBUG ]         },
[ceph-mon02][DEBUG ]         "rank": 0,
[ceph-mon02][DEBUG ]         "weight": 0
[ceph-mon02][DEBUG ]       },
[ceph-mon02][DEBUG ]       {
[ceph-mon02][DEBUG ]         "addr": "192.168.3.132:6789/0",
[ceph-mon02][DEBUG ]         "crush_location": "{}",
[ceph-mon02][DEBUG ]         "name": "ceph-mon02",
[ceph-mon02][DEBUG ]         "priority": 0,
[ceph-mon02][DEBUG ]         "public_addr": "192.168.3.132:6789/0",
[ceph-mon02][DEBUG ]         "public_addrs": {
[ceph-mon02][DEBUG ]           "addrvec": [
[ceph-mon02][DEBUG ]             {
[ceph-mon02][DEBUG ]               "addr": "192.168.3.132:3300",
[ceph-mon02][DEBUG ]               "nonce": 0,
[ceph-mon02][DEBUG ]               "type": "v2"
[ceph-mon02][DEBUG ]             },
[ceph-mon02][DEBUG ]             {
[ceph-mon02][DEBUG ]               "addr": "192.168.3.132:6789",
[ceph-mon02][DEBUG ]               "nonce": 0,
[ceph-mon02][DEBUG ]               "type": "v1"
[ceph-mon02][DEBUG ]             }
[ceph-mon02][DEBUG ]           ]
[ceph-mon02][DEBUG ]         },
[ceph-mon02][DEBUG ]         "rank": 1,
[ceph-mon02][DEBUG ]         "weight": 0
[ceph-mon02][DEBUG ]       }
[ceph-mon02][DEBUG ]     ],
[ceph-mon02][DEBUG ]     "removed_ranks: ": "",
[ceph-mon02][DEBUG ]     "stretch_mode": false,
[ceph-mon02][DEBUG ]     "tiebreaker_mon": ""
[ceph-mon02][DEBUG ]   },
[ceph-mon02][DEBUG ]   "name": "ceph-mon02",
[ceph-mon02][DEBUG ]   "outside_quorum": [],
[ceph-mon02][DEBUG ]   "quorum": [],
[ceph-mon02][DEBUG ]   "rank": 1,
[ceph-mon02][DEBUG ]   "state": "electing",
[ceph-mon02][DEBUG ]   "stretch_mode": false,
[ceph-mon02][DEBUG ]   "sync_provider": []
[ceph-mon02][DEBUG ] }
[ceph-mon02][DEBUG ] ********************************************************************************
[ceph-mon02][INFO  ] monitor: mon.ceph-mon02 is running

#检查
cephadmin@ceph-deploy:~/ceph-cluster$ ceph -s
  cluster:
    id:     8c6beb8a-3fbb-4ae5-aaf2-6cbf92ffd8a8
    health: HEALTH_OK

  services:
    mon: 2 daemons, quorum ceph-mon01,ceph-mon02 (age 2m)
    mgr: ceph-mgr01(active, since 28m)
    osd: 9 osds: 9 up (since 16m), 9 in (since 17m)

  data:
    pools:   1 pools, 1 pgs
    objects: 2 objects, 577 KiB
    usage:   243 MiB used, 2.3 TiB / 2.3 TiB avail
    pgs:     1 active+clean


扩容第三台mon节点:
在第三台mon节点安装mon服务
cephadmin@ceph-mon02:~$ apt install -y ceph-mon

在ceph-deploy节点创建mon服务
root@ceph-deploy:~# su - cephadmin
cephadmin@ceph-deploy:~$ cd ceph-cluster
cephadmin@ceph-deploy:~/ceph-cluster$ ceph-deploy mon add ceph-mon03
输出信息:
[ceph_deploy.conf][DEBUG ] found configuration file at: /home/cephadmin/.cephdeploy.conf
[ceph_deploy.cli][INFO  ] Invoked (2.0.1): /usr/local/bin/ceph-deploy mon add ceph-mon03
[ceph_deploy.cli][INFO  ] ceph-deploy options:
[ceph_deploy.cli][INFO  ]  username                      : None
[ceph_deploy.cli][INFO  ]  verbose                       : False
[ceph_deploy.cli][INFO  ]  overwrite_conf                : False
[ceph_deploy.cli][INFO  ]  subcommand                    : add
[ceph_deploy.cli][INFO  ]  quiet                         : False
[ceph_deploy.cli][INFO  ]  cd_conf                       : <ceph_deploy.conf.cephdeploy.Conf instance at 0x7fb215f82410>
[ceph_deploy.cli][INFO  ]  cluster                       : ceph
[ceph_deploy.cli][INFO  ]  mon                           : ['ceph-mon03']
[ceph_deploy.cli][INFO  ]  func                          : <function mon at 0x7fb215fee550>
[ceph_deploy.cli][INFO  ]  address                       : None
[ceph_deploy.cli][INFO  ]  ceph_conf                     : None
[ceph_deploy.cli][INFO  ]  default_release               : False
[ceph_deploy.mon][INFO  ] ensuring configuration of new mon host: ceph-mon03
[ceph_deploy.admin][DEBUG ] Pushing admin keys and conf to ceph-mon03
[ceph-mon03][DEBUG ] connection detected need for sudo
[ceph-mon03][DEBUG ] connected to host: ceph-mon03
[ceph-mon03][DEBUG ] detect platform information from remote host
[ceph-mon03][DEBUG ] detect machine type
[ceph-mon03][DEBUG ] write cluster configuration to /etc/ceph/{cluster}.conf
[ceph_deploy.mon][DEBUG ] Adding mon to cluster ceph, host ceph-mon03
[ceph_deploy.mon][DEBUG ] using mon address by resolving host: 192.168.3.133
[ceph_deploy.mon][DEBUG ] detecting platform for host ceph-mon03 ...
[ceph-mon03][DEBUG ] connection detected need for sudo
[ceph-mon03][DEBUG ] connected to host: ceph-mon03
[ceph-mon03][DEBUG ] detect platform information from remote host
[ceph-mon03][DEBUG ] detect machine type
[ceph-mon03][DEBUG ] find the location of an executable
[ceph_deploy.mon][INFO  ] distro info: Ubuntu 22.04 jammy
[ceph-mon03][DEBUG ] determining if provided host has same hostname in remote
[ceph-mon03][DEBUG ] get remote short hostname
[ceph-mon03][DEBUG ] adding mon to ceph-mon03
[ceph-mon03][DEBUG ] get remote short hostname
[ceph-mon03][DEBUG ] write cluster configuration to /etc/ceph/{cluster}.conf
[ceph-mon03][DEBUG ] create the mon path if it does not exist
[ceph-mon03][DEBUG ] checking for done path: /var/lib/ceph/mon/ceph-ceph-mon03/done
[ceph-mon03][DEBUG ] done path does not exist: /var/lib/ceph/mon/ceph-ceph-mon03/done
[ceph-mon03][INFO  ] creating keyring file: /var/lib/ceph/tmp/ceph-ceph-mon03.mon.keyring
[ceph-mon03][DEBUG ] create the monitor keyring file
[ceph-mon03][INFO  ] Running command: sudo ceph --cluster ceph mon getmap -o /var/lib/ceph/tmp/ceph.ceph-mon03.monmap
[ceph-mon03][WARNIN] got monmap epoch 2
[ceph-mon03][INFO  ] Running command: sudo ceph-mon --cluster ceph --mkfs -i ceph-mon03 --monmap /var/lib/ceph/tmp/ceph.ceph-mon03.monmap --keyring /var/lib/ceph/tmp/ceph-ceph-mon03.mon.keyring --setuser 64045 --setgroup 64045
[ceph-mon03][INFO  ] unlinking keyring file /var/lib/ceph/tmp/ceph-ceph-mon03.mon.keyring
[ceph-mon03][DEBUG ] create a done file to avoid re-doing the mon deployment
[ceph-mon03][DEBUG ] create the init path if it does not exist
[ceph-mon03][INFO  ] Running command: sudo systemctl enable ceph.target
[ceph-mon03][INFO  ] Running command: sudo systemctl enable ceph-mon@ceph-mon03
[ceph-mon03][WARNIN] Created symlink /etc/systemd/system/ceph-mon.target.wants/ceph-mon@ceph-mon03.service → /lib/systemd/system/ceph-mon@.service.
[ceph-mon03][INFO  ] Running command: sudo systemctl start ceph-mon@ceph-mon03
[ceph-mon03][INFO  ] Running command: sudo ceph --cluster=ceph --admin-daemon /var/run/ceph/ceph-mon.ceph-mon03.asok mon_status
[ceph-mon03][WARNIN] ceph-mon03 is not defined in `mon initial members`
[ceph-mon03][INFO  ] Running command: sudo ceph --cluster=ceph --admin-daemon /var/run/ceph/ceph-mon.ceph-mon03.asok mon_status
[ceph-mon03][DEBUG ] ********************************************************************************
[ceph-mon03][DEBUG ] status for monitor: mon.ceph-mon03
[ceph-mon03][DEBUG ] {
[ceph-mon03][DEBUG ]   "election_epoch": 1,
[ceph-mon03][DEBUG ]   "extra_probe_peers": [
[ceph-mon03][DEBUG ]     {
[ceph-mon03][DEBUG ]       "addrvec": [
[ceph-mon03][DEBUG ]         {
[ceph-mon03][DEBUG ]           "addr": "192.168.3.132:3300",
[ceph-mon03][DEBUG ]           "nonce": 0,
[ceph-mon03][DEBUG ]           "type": "v2"
[ceph-mon03][DEBUG ]         },
[ceph-mon03][DEBUG ]         {
[ceph-mon03][DEBUG ]           "addr": "192.168.3.132:6789",
[ceph-mon03][DEBUG ]           "nonce": 0,
[ceph-mon03][DEBUG ]           "type": "v1"
[ceph-mon03][DEBUG ]         }
[ceph-mon03][DEBUG ]       ]
[ceph-mon03][DEBUG ]     }
[ceph-mon03][DEBUG ]   ],
[ceph-mon03][DEBUG ]   "feature_map": {
[ceph-mon03][DEBUG ]     "mon": [
[ceph-mon03][DEBUG ]       {
[ceph-mon03][DEBUG ]         "features": "0x3f01cfbffffdffff",
[ceph-mon03][DEBUG ]         "num": 1,
[ceph-mon03][DEBUG ]         "release": "reef"
[ceph-mon03][DEBUG ]       }
[ceph-mon03][DEBUG ]     ]
[ceph-mon03][DEBUG ]   },
[ceph-mon03][DEBUG ]   "features": {
[ceph-mon03][DEBUG ]     "quorum_con": "0",
[ceph-mon03][DEBUG ]     "quorum_mon": [],
[ceph-mon03][DEBUG ]     "required_con": "2449958197560098820",
[ceph-mon03][DEBUG ]     "required_mon": [
[ceph-mon03][DEBUG ]       "kraken",
[ceph-mon03][DEBUG ]       "luminous",
[ceph-mon03][DEBUG ]       "mimic",
[ceph-mon03][DEBUG ]       "osdmap-prune",
[ceph-mon03][DEBUG ]       "nautilus",
[ceph-mon03][DEBUG ]       "octopus",
[ceph-mon03][DEBUG ]       "pacific",
[ceph-mon03][DEBUG ]       "elector-pinging",
[ceph-mon03][DEBUG ]       "quincy",
[ceph-mon03][DEBUG ]       "reef"
[ceph-mon03][DEBUG ]     ]
[ceph-mon03][DEBUG ]   },
[ceph-mon03][DEBUG ]   "monmap": {
[ceph-mon03][DEBUG ]     "created": "2025-03-13T10:42:55.560862Z",
[ceph-mon03][DEBUG ]     "disallowed_leaders: ": "",
[ceph-mon03][DEBUG ]     "election_strategy": 1,
[ceph-mon03][DEBUG ]     "epoch": 3,
[ceph-mon03][DEBUG ]     "features": {
[ceph-mon03][DEBUG ]       "optional": [],
[ceph-mon03][DEBUG ]       "persistent": [
[ceph-mon03][DEBUG ]         "kraken",
[ceph-mon03][DEBUG ]         "luminous",
[ceph-mon03][DEBUG ]         "mimic",
[ceph-mon03][DEBUG ]         "osdmap-prune",
[ceph-mon03][DEBUG ]         "nautilus",
[ceph-mon03][DEBUG ]         "octopus",
[ceph-mon03][DEBUG ]         "pacific",
[ceph-mon03][DEBUG ]         "elector-pinging",
[ceph-mon03][DEBUG ]         "quincy",
[ceph-mon03][DEBUG ]         "reef"
[ceph-mon03][DEBUG ]       ]
[ceph-mon03][DEBUG ]     },
[ceph-mon03][DEBUG ]     "fsid": "8c6beb8a-3fbb-4ae5-aaf2-6cbf92ffd8a8",
[ceph-mon03][DEBUG ]     "min_mon_release": 18,
[ceph-mon03][DEBUG ]     "min_mon_release_name": "reef",
[ceph-mon03][DEBUG ]     "modified": "2025-03-13T11:29:40.508795Z",
[ceph-mon03][DEBUG ]     "mons": [
[ceph-mon03][DEBUG ]       {
[ceph-mon03][DEBUG ]         "addr": "192.168.3.131:6789/0",
[ceph-mon03][DEBUG ]         "crush_location": "{}",
[ceph-mon03][DEBUG ]         "name": "ceph-mon01",
[ceph-mon03][DEBUG ]         "priority": 0,
[ceph-mon03][DEBUG ]         "public_addr": "192.168.3.131:6789/0",
[ceph-mon03][DEBUG ]         "public_addrs": {
[ceph-mon03][DEBUG ]           "addrvec": [
[ceph-mon03][DEBUG ]             {
[ceph-mon03][DEBUG ]               "addr": "192.168.3.131:3300",
[ceph-mon03][DEBUG ]               "nonce": 0,
[ceph-mon03][DEBUG ]               "type": "v2"
[ceph-mon03][DEBUG ]             },
[ceph-mon03][DEBUG ]             {
[ceph-mon03][DEBUG ]               "addr": "192.168.3.131:6789",
[ceph-mon03][DEBUG ]               "nonce": 0,
[ceph-mon03][DEBUG ]               "type": "v1"
[ceph-mon03][DEBUG ]             }
[ceph-mon03][DEBUG ]           ]
[ceph-mon03][DEBUG ]         },
[ceph-mon03][DEBUG ]         "rank": 0,
[ceph-mon03][DEBUG ]         "weight": 0
[ceph-mon03][DEBUG ]       },
[ceph-mon03][DEBUG ]       {
[ceph-mon03][DEBUG ]         "addr": "192.168.3.132:6789/0",
[ceph-mon03][DEBUG ]         "crush_location": "{}",
[ceph-mon03][DEBUG ]         "name": "ceph-mon02",
[ceph-mon03][DEBUG ]         "priority": 0,
[ceph-mon03][DEBUG ]         "public_addr": "192.168.3.132:6789/0",
[ceph-mon03][DEBUG ]         "public_addrs": {
[ceph-mon03][DEBUG ]           "addrvec": [
[ceph-mon03][DEBUG ]             {
[ceph-mon03][DEBUG ]               "addr": "192.168.3.132:3300",
[ceph-mon03][DEBUG ]               "nonce": 0,
[ceph-mon03][DEBUG ]               "type": "v2"
[ceph-mon03][DEBUG ]             },
[ceph-mon03][DEBUG ]             {
[ceph-mon03][DEBUG ]               "addr": "192.168.3.132:6789",
[ceph-mon03][DEBUG ]               "nonce": 0,
[ceph-mon03][DEBUG ]               "type": "v1"
[ceph-mon03][DEBUG ]             }
[ceph-mon03][DEBUG ]           ]
[ceph-mon03][DEBUG ]         },
[ceph-mon03][DEBUG ]         "rank": 1,
[ceph-mon03][DEBUG ]         "weight": 0
[ceph-mon03][DEBUG ]       },
[ceph-mon03][DEBUG ]       {
[ceph-mon03][DEBUG ]         "addr": "192.168.3.133:6789/0",
[ceph-mon03][DEBUG ]         "crush_location": "{}",
[ceph-mon03][DEBUG ]         "name": "ceph-mon03",
[ceph-mon03][DEBUG ]         "priority": 0,
[ceph-mon03][DEBUG ]         "public_addr": "192.168.3.133:6789/0",
[ceph-mon03][DEBUG ]         "public_addrs": {
[ceph-mon03][DEBUG ]           "addrvec": [
[ceph-mon03][DEBUG ]             {
[ceph-mon03][DEBUG ]               "addr": "192.168.3.133:3300",
[ceph-mon03][DEBUG ]               "nonce": 0,
[ceph-mon03][DEBUG ]               "type": "v2"
[ceph-mon03][DEBUG ]             },
[ceph-mon03][DEBUG ]             {
[ceph-mon03][DEBUG ]               "addr": "192.168.3.133:6789",
[ceph-mon03][DEBUG ]               "nonce": 0,
[ceph-mon03][DEBUG ]               "type": "v1"
[ceph-mon03][DEBUG ]             }
[ceph-mon03][DEBUG ]           ]
[ceph-mon03][DEBUG ]         },
[ceph-mon03][DEBUG ]         "rank": 2,
[ceph-mon03][DEBUG ]         "weight": 0
[ceph-mon03][DEBUG ]       }
[ceph-mon03][DEBUG ]     ],
[ceph-mon03][DEBUG ]     "removed_ranks: ": "",
[ceph-mon03][DEBUG ]     "stretch_mode": false,
[ceph-mon03][DEBUG ]     "tiebreaker_mon": ""
[ceph-mon03][DEBUG ]   },
[ceph-mon03][DEBUG ]   "name": "ceph-mon03",
[ceph-mon03][DEBUG ]   "outside_quorum": [],
[ceph-mon03][DEBUG ]   "quorum": [],
[ceph-mon03][DEBUG ]   "rank": 2,
[ceph-mon03][DEBUG ]   "state": "electing",
[ceph-mon03][DEBUG ]   "stretch_mode": false,
[ceph-mon03][DEBUG ]   "sync_provider": []
[ceph-mon03][DEBUG ] }
[ceph-mon03][DEBUG ] ********************************************************************************
[ceph-mon03][INFO  ] monitor: mon.ceph-mon03 is running


检查ceph状态:
cephadmin@ceph-deploy:~/ceph-cluster$ ceph -s
  cluster:
    id:     fbcd7dfd-c0b1-420e-a1c3-5eb5002c0cd3
    health: HEALTH_OK

  services:
    mon: 3 daemons, quorum ceph-mon01,ceph-mon02,ceph-mon03 (age 52s) #52秒前添加了一台mon节点
    mgr: ceph-mgr01(active, since 7h), standbys: ceph-mgr02
    osd: 8 osds: 8 up (since 27m), 8 in (since 13h)

  data:
    pools:   2 pools, 33 pgs
    objects: 32 objects, 30 MiB
    usage:   280 MiB used, 2.3 TiB / 2.3 TiB avail
    pgs:     33 active+clean


以json格式来查看:
cephadmin@ceph-deploy:~/ceph-cluster$ ceph quorum_status --format json-pretty
"mons": [
    {
        "rank": 0,
        "name": "ceph-mon01",
        "public_addrs": {
            "addrvec": [
                {
                    "type": "v2",
                    "addr": "192.168.3.131:3300",
                    "nonce": 0
                },
                {
                    "type": "v1",
                    "addr": "192.168.3.131:6789",
                    "nonce": 0
                }
            ]
        },
        "addr": "192.168.3.131:6789/0",
        "public_addr": "192.168.3.131:6789/0",
        "priority": 0,
        "weight": 0,
        "crush_location": "{}"
    },
    {
        "rank": 1,
        "name": "ceph-mon02",
        "public_addrs": {
            "addrvec": [
                {
                    "type": "v2",
                    "addr": "192.168.3.132:3300",
                    "nonce": 0
                },
                {
                    "type": "v1",
                    "addr": "192.168.3.132:6789",
                    "nonce": 0
                }
            ]
        },
        "addr": "192.168.3.132:6789/0",
        "public_addr": "192.168.3.132:6789/0",
        "priority": 0,
        "weight": 0,
        "crush_location": "{}"
    },
    {
        "rank": 2,
        "name": "ceph-mon03",
        "public_addrs": {
            "addrvec": [
                {
                    "type": "v2",
                    "addr": "192.168.3.133:3300",
                    "nonce": 0
                },
                {
                    "type": "v1",
                    "addr": "192.168.3.133:6789",
                    "nonce": 0
                }
            ]
        },
        "addr": "192.168.3.133:6789/0",
        "public_addr": "192.168.3.133:6789/0",
        "priority": 0,
        "weight": 0,
        "crush_location": "{}"
    }
]

如果需要知道当前已经有哪些mon节点可以通过下面命令查询
cephadmin@ceph-deploy:~/ceph-cluster$ ceph mon stat
cephadmin@ceph-deploy:~/ceph-cluster$ ceph mon dump


查看ceph状态:
cephadmin@ceph-deploy:~/ceph-cluster$ ceph -s
  cluster:
    id:     8c6beb8a-3fbb-4ae5-aaf2-6cbf92ffd8a8
    health: HEALTH_OK

  services:
    mon: 3 daemons, quorum ceph-mon01,ceph-mon02,ceph-mon03 (age 1m) # mon节点扩容到3台了
    mgr: ceph-mgr01(active, since 36m)
    osd: 9 osds: 9 up (since 24m), 9 in (since 25m)

  data:
    pools:   1 pools, 1 pgs
    objects: 2 objects, 577 KiB
    usage:   243 MiB used, 2.3 TiB / 2.3 TiB avail
    pgs:     1 active+clean
扩容mgr节点(可选)
mgr节点:
root@ceph-mgr02:~# cat /etc/apt/sources.list
deb https://mirrors.tuna.tsinghua.edu.cn/ubuntu/ jammy main restricted universe multiverse
deb https://mirrors.tuna.tsinghua.edu.cn/ubuntu/ jammy-updates main restricted universe multiverse
deb https://mirrors.tuna.tsinghua.edu.cn/ubuntu/ jammy-backports main restricted universe multiverse
deb https://mirrors.tuna.tsinghua.edu.cn/ubuntu/ jammy-security main restricted universe multiverse

root@ceph-mgr02:~# apt-get update
root@ceph-mgr02:~# apt-get install -y python3-bcrypt
root@ceph-mgr02:~# apt-get install -y ceph-mgr

deploy节点:
root@ceph-deploy:~# ceph-deploy mgr create ceph-mgr02   #创建节点服务
root@ceph-deploy:~# ceph-deploy admin ceph-mgr02        #同步配置

修改配置文件:
cephadmin@ceph-deploy:~/ceph-cluster$ vim ceph.conf
找到:
mon_initial_members = ceph-mon01,ceph-mon02
mon_host = 192.168.3.101,192.168.3.102

改为:
mon_initial_members = ceph-mon01,ceph-mon02,ceph-mon03
mon_host = 192.168.3.101,192.168.3.102,192.168.3.103


推送修改的配置文件到各个node节点:
node节点推送:
cephadmin@ceph-deploy:~/ceph-cluster$ ceph-deploy --overwrite-conf admin ceph-node01 ceph-node02 ceph-node03 ceph-node04
[ceph_deploy.conf][DEBUG ] found configuration file at: /home/cephadmin/.cephdeploy.conf
[ceph_deploy.cli][INFO  ] Invoked (2.0.1): /usr/local/bin/ceph-deploy --overwrite-conf admin ceph-node01 ceph-node02 ceph-node03 ceph-node04
[ceph_deploy.cli][INFO  ] ceph-deploy options:
[ceph_deploy.cli][INFO  ]  username                      : None
[ceph_deploy.cli][INFO  ]  verbose                       : False
[ceph_deploy.cli][INFO  ]  overwrite_conf                : True
[ceph_deploy.cli][INFO  ]  quiet                         : False
[ceph_deploy.cli][INFO  ]  cd_conf                       : <ceph_deploy.conf.cephdeploy.Conf instance at 0x7f76e8f54fa0>
[ceph_deploy.cli][INFO  ]  cluster                       : ceph
[ceph_deploy.cli][INFO  ]  client                        : ['ceph-node01', 'ceph-node02', 'ceph-node03', 'ceph-node04']
[ceph_deploy.cli][INFO  ]  func                          : <function admin at 0x7f76e902d2d0>
[ceph_deploy.cli][INFO  ]  ceph_conf                     : None
[ceph_deploy.cli][INFO  ]  default_release               : False
[ceph_deploy.admin][DEBUG ] Pushing admin keys and conf to ceph-node01
[ceph-node01][DEBUG ] connection detected need for sudo
[ceph-node01][DEBUG ] connected to host: ceph-node01
[ceph-node01][DEBUG ] detect platform information from remote host
[ceph-node01][DEBUG ] detect machine type
[ceph-node01][DEBUG ] write cluster configuration to /etc/ceph/{cluster}.conf
[ceph_deploy.admin][DEBUG ] Pushing admin keys and conf to ceph-node02
[ceph-node02][DEBUG ] connection detected need for sudo
[ceph-node02][DEBUG ] connected to host: ceph-node02
[ceph-node02][DEBUG ] detect platform information from remote host
[ceph-node02][DEBUG ] detect machine type
[ceph-node02][DEBUG ] write cluster configuration to /etc/ceph/{cluster}.conf
[ceph_deploy.admin][DEBUG ] Pushing admin keys and conf to ceph-node03
[ceph-node03][DEBUG ] connection detected need for sudo
[ceph-node03][DEBUG ] connected to host: ceph-node03
[ceph-node03][DEBUG ] detect platform information from remote host
[ceph-node03][DEBUG ] detect machine type
[ceph-node03][DEBUG ] write cluster configuration to /etc/ceph/{cluster}.conf
[ceph_deploy.admin][DEBUG ] Pushing admin keys and conf to ceph-node04
[ceph-node04][DEBUG ] connection detected need for sudo
[ceph-node04][DEBUG ] connected to host: ceph-node04
[ceph-node04][DEBUG ] detect platform information from remote host
[ceph-node04][DEBUG ] detect machine type
[ceph-node04][DEBUG ] write cluster configuration to /etc/ceph/{cluster}.conf

mgr节点推送:
cephadmin@ceph-deploy:~/ceph-cluster$ ceph-deploy --overwrite-conf admin ceph-mgr01 ceph-mgr02

mon节点推送:
cephadmin@ceph-deploy:~/ceph-cluster$ ceph-deploy --overwrite-conf admin ceph-mon01 ceph-mon02 ceph-mon03


检查ceph集群信息:
cephadmin@ceph-deploy:~/ceph-cluster$ ceph -s
  cluster:
    id:     fbcd7dfd-c0b1-420e-a1c3-5eb5002c0cd3
    health: HEALTH_OK

  services:
    mon: 3 daemons, quorum ceph-mon01,ceph-mon02,ceph-mon03 (age 24m)
    mgr: ceph-mgr01(active, since 7h), standbys: ceph-mgr02
    osd: 8 osds: 8 up (since 50m), 8 in (since 13h)

  data:
    pools:   2 pools, 33 pgs
    objects: 32 objects, 30 MiB
    usage:   280 MiB used, 2.3 TiB / 2.3 TiB avail
    pgs:     33 active+clean
扩容node节点(可选)
#node04新节点安装包:
root@ceph-node04:~# sudo apt install -y ceph-volume


#ceph-deploy节点安装node节点依赖
cephadmin@ceph-deploy:~$ ceph-deploy install --release reef ceph-node04

#获取磁盘信息:
root@ceph-deploy:~# su - cephadmin
cephadmin@ceph-deploy:~$ cd ceph-cluster/
cephadmin@ceph-deploy:~/ceph-cluster$ ceph-deploy disk list ceph-node04

#擦除磁盘
ceph-deploy disk zap ceph-node04 /dev/sdb /dev/nvme0n1 /dev/nvme0n2

#创建固态盘和hdd盘的osd
ceph-deploy osd create ceph-node01 --data /dev/sdb
ceph-deploy osd create ceph-node04 --data /dev/nvme0n1
ceph-deploy osd create ceph-node04 --data /dev/nvme0n2
添加结果:
扩容mds服务器(可选)
cephadmin@ceph-deploy:~/ceph-cluster$ ceph -s
  cluster:
    id:     8c6beb8a-3fbb-4ae5-aaf2-6cbf92ffd8a8
    health: HEALTH_WARN
            1 pool(s) do not have an application enabled

  services:
    mon: 3 daemons, quorum ceph-mon01,ceph-mon02,ceph-mon03 (age 27h)
    mgr: ceph-mgr01(active, since 28h), standbys: ceph-mgr02
    mds: 1/1 daemons up  #可以看到目前mds是单节点
    osd: 9 osds: 9 up (since 28h), 9 in (since 28h)

  data:
    volumes: 1/1 healthy
    pools:   5 pools, 225 pgs
    objects: 31 objects, 579 KiB
    usage:   389 MiB used, 2.3 TiB / 2.3 TiB avail
    pgs:     225 active+clean


#扩容方法
1. 每个节点hosts文件添加添加的节点信息
192.168.3.121 ceph-deploy.example.local ceph-deploy
192.168.3.131 ceph-mon01.example.local  ceph-mon01
192.168.3.132 ceph-mon02.example.local  ceph-mon02
192.168.3.133 ceph-mon03.example.local  ceph-mon03
192.168.3.141 ceph-mgr01.example.local  ceph-mgr01
192.168.3.142 ceph-mgr02.example.local  ceph-mgr02
192.168.3.151 ceph-node01.example.local ceph-node01
192.168.3.152 ceph-node02.example.local ceph-node02
192.168.3.153 ceph-node03.example.local ceph-node03
192.168.3.154 ceph-node04.example.local ceph-node04

#需要部署mds的节点上安装mds服务
root@ceph-mgr02:~# apt install -y ceph-mds


#在deploy服务器中创建mgr02节点
cephadmin@ceph-deploy:~/ceph-cluster$ ceph-deploy mds create ceph-mgr02
输出信息:
[ceph_deploy.conf][DEBUG ] found configuration file at: /home/cephadmin/.cephdeploy.conf
[ceph_deploy.cli][INFO  ] Invoked (2.0.1): /usr/local/bin/ceph-deploy mds create ceph-mgr02
[ceph_deploy.cli][INFO  ] ceph-deploy options:
[ceph_deploy.cli][INFO  ]  username                      : None
[ceph_deploy.cli][INFO  ]  verbose                       : False
[ceph_deploy.cli][INFO  ]  overwrite_conf                : False
[ceph_deploy.cli][INFO  ]  subcommand                    : create
[ceph_deploy.cli][INFO  ]  quiet                         : False
[ceph_deploy.cli][INFO  ]  cd_conf                       : <ceph_deploy.conf.cephdeploy.Conf instance at 0x7f1ba4837fa0>
[ceph_deploy.cli][INFO  ]  cluster                       : ceph
[ceph_deploy.cli][INFO  ]  func                          : <function mds at 0x7f1ba489cdd0>
[ceph_deploy.cli][INFO  ]  ceph_conf                     : None
[ceph_deploy.cli][INFO  ]  mds                           : [('ceph-mgr02', 'ceph-mgr02')]
[ceph_deploy.cli][INFO  ]  default_release               : False
[ceph_deploy.mds][DEBUG ] Deploying mds, cluster ceph hosts ceph-mgr02:ceph-mgr02
[ceph-mgr02][DEBUG ] connection detected need for sudo
[ceph-mgr02][DEBUG ] connected to host: ceph-mgr02
[ceph-mgr02][DEBUG ] detect platform information from remote host
[ceph-mgr02][DEBUG ] detect machine type
[ceph_deploy.mds][INFO  ] Distro info: Ubuntu 22.04 jammy
[ceph_deploy.mds][DEBUG ] remote host will use systemd
[ceph_deploy.mds][DEBUG ] deploying mds bootstrap to ceph-mgr02
[ceph-mgr02][DEBUG ] write cluster configuration to /etc/ceph/{cluster}.conf
[ceph-mgr02][WARNIN] mds keyring does not exist yet, creating one
[ceph-mgr02][DEBUG ] create a keyring file
[ceph-mgr02][DEBUG ] create path if it doesn't exist
[ceph-mgr02][INFO  ] Running command: sudo ceph --cluster ceph --name client.bootstrap-mds --keyring /var/lib/ceph/bootstrap-mds/ceph.keyring auth get-or-create mds.ceph-mgr02 osd allow rwx mds allow mon allow profile mds -o /var/lib/ceph/mds/ceph-ceph-mgr02/keyring
[ceph-mgr02][INFO  ] Running command: sudo systemctl enable ceph-mds@ceph-mgr02
[ceph-mgr02][WARNIN] Created symlink /etc/systemd/system/ceph-mds.target.wants/ceph-mds@ceph-mgr02.service → /lib/systemd/system/ceph-mds@.service.
[ceph-mgr02][INFO  ] Running command: sudo systemctl start ceph-mds@ceph-mgr02
[ceph-mgr02][INFO  ] Running command: sudo systemctl enable ceph.target

检查节点:
cephadmin@ceph-deploy:~/ceph-cluster$ ceph -s
  cluster:
    id:     8c6beb8a-3fbb-4ae5-aaf2-6cbf92ffd8a8
    health: HEALTH_WARN
            1 pool(s) do not have an application enabled

  services:
    mon: 3 daemons, quorum ceph-mon01,ceph-mon02,ceph-mon03 (age 27h)
    mgr: ceph-mgr01(active, since 28h), standbys: ceph-mgr02
    mds: 1/1 daemons up, 1 standby   #多出备用节点
    osd: 9 osds: 9 up (since 28h), 9 in (since 28h)

  data:
    volumes: 1/1 healthy
    pools:   5 pools, 225 pgs
    objects: 31 objects, 579 KiB
    usage:   389 MiB used, 2.3 TiB / 2.3 TiB avail
    pgs:     225 active+clean
扩容完毕
osd维护
如果某个节点出现磁盘故障,那么那台机器的osd也就宕机了,在ceph osd tree 状态下可以看到down 信息,根据命令信息,到指定服务器查看磁盘状态。
此时可能会涉及到 磁盘 剔除,加入等操作

剔除坏的磁盘(假如是ceph-node04节点上的 osd.7 磁盘)
判断哪个服务器的磁盘坏了
ceph osd tree 查看down的磁盘。找到对应的osd序列号

例如osd.6磁盘坏了
1.将 OSD 标记为 out
ceph osd out 6

2. 停止 OSD 守护进程
sudo systemctl stop ceph-osd@6.service

3. 清除 OSD 的数据并移除 OSD 信息
ceph osd destroy 6 --yes-i-really-mean-it
验证ceph RBD块存储挂载使用
存储池创建流程
1. 列出存储池

2. 创建存储池[创建了一个名为mypool的存储池,并为其分配了32个PG,存储对象时会存入32个PG中其中一个]
第一个 32: 存储池的 PG 数量。
第二个 32: 存储池的 PGP 数量,也是设置了磁盘组合关系

root@ceph-deploy:~# ceph osd pool create mypool 32 32
pool 'mypool' created
查看创建的存储池:
root@ceph-deploy:~# ceph osd pool ls
.mgr
mypool

3. 验证上传数据,并验证数据是否存储成功
root@ceph-node04:~# rados put msg1 /var/log/ntpdate.log --pool=mypool

另一台服务器查看:
root@ceph-deploy:~# rados ls --pool mypool
msg1
这样就代表存储成功了

检查数据存储在哪儿了:
root@ceph-deploy:~# ceph osd map mypool msg1
osdmap e55 pool 'mypool' (2) object 'msg1' -> pg 2.c833d430 (2.10) -> up ([7,4,0], p7) acting ([7,4,0], p7)


root@ceph-deploy:~# ceph pg ls-by-pool mypool|awk '{print $1,$2,$15}'
PG OBJECTS UP
2.0 0 [3,5,0]p3
2.1 0 [7,0,5]p7
2.2 0 [3,1,7]p3
2.3 0 [7,2,5]p7
2.4 0 [1,4,6]p1
2.5 0 [4,0,2]p4
2.6 0 [1,4,6]p1
2.7 0 [3,7,1]p3
2.8 0 [7,5,0]p7
2.9 0 [1,3,6]p1
2.a 0 [5,1,7]p5
2.b 0 [5,3,7]p5
2.c 0 [5,0,2]p5
2.d 0 [5,7,1]p5
2.e 0 [1,4,7]p1
2.f 0 [4,7,3]p4
2.10 1 [7,4,0]p7      #可以看到数据存到这里来了
2.11 0 [6,3,1]p6
2.12 0 [5,1,2]p5
2.13 0 [7,3,1]p7
2.14 0 [2,4,7]p2
2.15 0 [7,1,5]p7
2.16 0 [2,5,6]p2
2.17 0 [3,5,1]p3
2.18 0 [6,2,4]p6
2.19 0 [0,3,4]p0
2.1a 0 [3,4,1]p3
2.1b 0 [5,2,7]p5
2.1c 0 [4,2,1]p4
2.1d 0 [7,5,3]p7
2.1e 0 [1,5,6]p1
2.1f 0 [0,3,4]p0
存储池删除与限制解除和设置
在ceph中存储池不能被轻易删除,如果要删除,需要添加多个参数

1. 创建并查看现有存储池
ceph osd pool create mypool 32 32
ceph osd pool ls

2. 删除存储池
root@ceph-deploy:~# ceph osd pool rm mypool mypool --yes-i-really-really-mean-it
Error EPERM: pool deletion is disabled; you must first set the mon_allow_pool_delete config option to true before you can destroy a pool

root@ceph-deploy:~# ceph tell mon.* injectargs --mon-allow-pool-delete=true
mon.ceph-mon01: {}
mon.ceph-mon01: mon_allow_pool_delete = 'true'
mon.ceph-mon02: {}
mon.ceph-mon02: mon_allow_pool_delete = 'true'
出现这个提示 在执行一次

root@ceph-deploy:~# ceph tell mon.* injectargs --mon-allow-pool-delete=true
mon.ceph-mon01: {}
mon.ceph-mon02: {}
出现这个提示,则开始允许删除

检查是不是变成了true ,状态正确才可以删除
cephadmin@ceph-deploy:~/ceph-cluster$ ceph tell mon.* config get mon_allow_pool_delete
mon.ceph-mon01: {
    "mon_allow_pool_delete": "true"
}
mon.ceph-mon02: {
    "mon_allow_pool_delete": "true"
}
mon.ceph-mon03: {
    "mon_allow_pool_delete": "true"
}

ceph osd pool delete mypool mypool --yes-i-really-really-mean-it
root@ceph-deploy:~# ceph osd pool rm mypool mypool --yes-i-really-really-mean-it
pool 'mypool' removed    ---提示删除成功

再次检查存储池,可以看到已经被删除了
root@ceph-deploy:~# ceph osd pool ls
.mgr

----------------------------------------------------
恢复禁止删除的策略:
1. 创建并查看现有存储池
ceph osd pool create mypool 32 32
ceph osd pool ls

2. 设置禁止删除
存储池删除操作很危险,系统默认会提示多次,除此之外,还可以恢复设置存储池禁止删除功能
禁止删除存储池配置(执行多次出现 {} 符号表示成功):
ceph tell mon.* injectargs --mon-allow-pool-delete=false

验证状态:
root@ceph-deploy:~# ceph config get mon.* mon_allow_pool_delete
false

测试:
root@ceph-deploy:~# ceph osd pool rm mypool mypool --yes-i-really-really-mean-it
Error EPERM: pool deletion is disabled; you must first set the mon_allow_pool_delete config option to true before you can destroy a pool
使用场景配置:
RBD 块存储(RADOS Block Device) 扩容,挂载,新增,删除(上面写了)
RBD是Ceph提供的块存储服务,类似于传统的硬盘分区或LUN。在多台机器上同时挂载同一个RBD映像时,需要特别小心数据一致性问题,因为块设备不具备内置的同步机制。通常情况下,不建议多个客户端同时读写同一个RBD映像,除非使用集群文件系统(如OCFS2或GFS2)来协调访问。
作用:为虚拟机、数据库等提供块存储。
Ceph集群服务器上操作:
0. 创建存储
cephadmin@ceph-deploy:~# ceph osd pool create myrbd1 64 64
pool 'myrbd1' created

1.启用RBD应用程序
root@ceph-deploy:~# ceph osd pool application enable myrbd1 rbd
enabled application 'rbd' on pool 'myrbd'

2.创建RBD镜像
创建一个10GB的RBD镜像
root@ceph-deploy:~# rbd create myrbd1/myimg1 --size 3G
root@ceph-deploy:~# rbd create myrbd1/myimg2 --size 5G

3.扩容RBD镜像(可选)
将 RBD 镜像大小扩展到 10GB:
root@ceph-deploy:~# rbd info myrbd1/myimg2
cephadmin@ceph-deploy:~/ceph-cluster$ rbd info myrbd1/myimg2
rbd image 'myimg2':
        size 5 GiB in 1280 objects
        order 22 (4 MiB objects)
        snapshot_count: 0
        id: b0b3c7c3da5b
        block_name_prefix: rbd_data.b0b3c7c3da5b
        format: 2
        features: layering, exclusive-lock, object-map, fast-diff, deep-flatten
        op_features:
        flags:
        create_timestamp: Sun Jun  2 16:14:34 2024
        access_timestamp: Sun Jun  2 16:14:34 2024
        modify_timestamp: Sun Jun  2 16:14:34 2024

root@ceph-deploy:~# rbd resize myrbd1/myimg2 --size 10G
cephadmin@ceph-deploy:~/ceph-cluster$ rbd info myrbd1/myimg2
rbd image 'myimg2':
        size 10 GiB in 2560 objects
        order 22 (4 MiB objects)
        snapshot_count: 0
        id: b0b3c7c3da5b
        block_name_prefix: rbd_data.b0b3c7c3da5b
        format: 2
        features: layering, exclusive-lock, object-map, fast-diff, deep-flatten
        op_features:
        flags:
        create_timestamp: Sun Jun  2 16:14:34 2024
        access_timestamp: Sun Jun  2 16:14:34 2024
        modify_timestamp: Sun Jun  2 16:14:34 2024


4. 缩容rbd镜像(可选)
注意,缩小的空间不能少于已用空间,如: 总空间10G 已用6G,这时候缩小到5G,就无法执行
但是如果缩小到 7G,就没问题
cephadmin@ceph-deploy:~/ceph-cluster$ rbd info myrbd1/myimg1
rbd image 'myimg1':
        size 3 GiB in 768 objects
        order 22 (4 MiB objects)
        snapshot_count: 0
        id: b0ad50516940
        block_name_prefix: rbd_data.b0ad50516940
        format: 2
        features: layering, exclusive-lock, object-map, fast-diff, deep-flatten
        op_features:
        flags:
        create_timestamp: Sun Jun  2 16:14:29 2024
        access_timestamp: Sun Jun  2 16:14:29 2024
        modify_timestamp: Sun Jun  2 16:14:29 2024
cephadmin@ceph-deploy:~/ceph-cluster$ rbd resize myrbd1/myimg1 --size 2G --allow-shrink
Resizing image: 100% complete...done.
cephadmin@ceph-deploy:~/ceph-cluster$ rbd info myrbd1/myimg1
rbd image 'myimg1':
        size 2 GiB in 512 objects
        order 22 (4 MiB objects)
        snapshot_count: 0
        id: b0ad50516940
        block_name_prefix: rbd_data.b0ad50516940
        format: 2
        features: layering, exclusive-lock, object-map, fast-diff, deep-flatten
        op_features:
        flags:
        create_timestamp: Sun Jun  2 16:14:29 2024
        access_timestamp: Sun Jun  2 16:14:29 2024
        modify_timestamp: Sun Jun  2 16:14:29 2024


4. 查看:
cephadmin@ceph-deploy:$ rbd ls myrbd1
myimg1
myimg2


#4. 删除存储池(可选)
ceph tell mon.* injectargs --mon-allow-pool-delete=true
ceph tell mon.* injectargs --mon-allow-pool-delete=true
ceph osd pool delete myrbd1 myrbd1 --yes-i-really-really-mean-it

删除结束恢复配置
ceph tell mon.* injectargs --mon-allow-pool-delete=flase


在客户端上操作:
1. 安装ceph-common包
apt install -y ceph-common

2. 配置ceph权限
mkdir -p /etc/ceph
scp cephadmin@ceph-deploy:~/ceph-cluster/ceph.conf /etc/ceph/
scp cephadmin@ceph-deploy:~/ceph-cluster/ceph.client.admin.keyring /etc/ceph/
ceph -s


3. 检查 RBD 镜像:
rbd info myrbd/myimg1

cephadmin@ceph-deploy:~/ceph-cluster$ rbd info myrbd1/myimg1
rbd image 'myimg1':
        size 2 GiB in 512 objects
        order 22 (4 MiB objects)
        snapshot_count: 0
        id: b0ad50516940
        block_name_prefix: rbd_data.b0ad50516940
        format: 2
        features: layering, exclusive-lock, object-map, fast-diff, deep-flatten
        op_features:
        flags:
        create_timestamp: Sun Jun  2 16:14:29 2024
        access_timestamp: Sun Jun  2 16:14:29 2024
        modify_timestamp: Sun Jun  2 16:14:29 2024

检查 RBD 镜像列表
cephadmin@ceph-deploy:~# rbd ls myrbd1
myimg1
myimg2


4. 映射服务器的磁盘到到本机
root@ceph-node04:~# rbd map myrbd1/myimg1
rbd: sysfs write failed
RBD image feature set mismatch. You can disable features unsupported by the kernel with "rbd feature disable myrbd1/myimg1 object-map fast-diff deep-flatten".
In some cases useful info is found in syslog - try "dmesg | tail".
rbd: map failed: (6) No such device or address

出现这个问题,去服务器上执行:
cephadmin@ceph-deploy:~/ceph-cluster$ rbd feature disable myrbd1/myimg1 object-map fast-diff deep-flatten

[root@ceph-client-centos ~]# rbd map myrbd1/myimg1
/dev/rbd0

[root@ceph-client-centos ~]# rbd map myrbd1/myimg2
/dev/rbd1


5. 取消映射(可选):
5.1 检查映射
[root@ceph-client-centos ~]# rbd showmapped
id  pool    namespace  image   snap  device
0   myrbd1             myimg1  -     /dev/rbd0
1   myrbd1             myimg2  -     /dev/rbd1

5.2 取消一个映射
root@ceph-node04:~# rbd unmap /dev/rbd0
root@ceph-node04:~# rbd showmapped
id  pool    namespace  image   snap  device
0   myrbd1             myimg1  -     /dev/rbd0


6. 格式化并挂载镜像
[root@ceph-client-centos ~]# mkfs.ext4 /dev/rbd0    #不要多次格式化,第一次格式化就行了
[root@ceph-client-centos ~]# mount /dev/rbd0 /mnt
[root@ceph-client-centos ~]# df -h
Filesystem      Size  Used Avail Use% Mounted on
devtmpfs        980M     0  980M   0% /dev
tmpfs           991M     0  991M   0% /dev/shm
tmpfs           991M  9.6M  981M   1% /run
tmpfs           991M     0  991M   0% /sys/fs/cgroup
/dev/sda2       100G  4.0G   96G   4% /
/dev/sda1       187M  109M   78M  59% /boot
tmpfs           199M     0  199M   0% /run/user/0
/dev/rbd0       2.0G  6.0M  1.8G   1% /mnt


7. 配置为系统服务,开机启动挂载(可选)
获取UUID:
[root@ceph-client-centos ~]#blkid /dev/rbd0
/dev/rbd0: UUID="6d1f87f7-8b04-407e-aea8-5fb26c82354b" TYPE="xfs"

配置镜像映射:
root@ceph-node04:~# vim /etc/ceph/rbdmap
myrbd1/myimg2           id=admin,keyring=/etc/ceph/ceph.client.admin.keyring


启用并启动 rbdmap 服务
root@ceph-node04: sudo systemctl enable rbdmap
root@ceph-node04: sudo systemctl start rbdmap


缩容案例(极少用)
# 将 OSD.3 标记为 out
ceph osd out osd.3

# 检查集群状态,等待数据迁移完成
ceph -s

# 在 OSD 所在节点上停止 OSD 服务
sudo systemctl stop ceph-osd@3

# 从 Ceph 集群中删除 OSD
ceph osd rm osd.3

# 删除 OSD 对应的密钥
ceph auth del osd.3

# 从 CRUSH 图中移除 OSD
ceph osd crush remove osd.3

# 推送配置文件
ceph-deploy --overwrite-conf config push <ceph-node节点>
ceph删除数据(回收未使用的块资源)
删除完成的数据只是标记为已经被删除,但是不会从块存储立即清空,因此在删除完成后使用 ceph df 查看并没有回收空间。

查看现在的数据占用情况
root@ceph-client-ubuntu:/mnt# df -h
Filesystem      Size  Used Avail Use% Mounted on
devtmpfs        980M     0  980M   0% /dev
tmpfs           991M     0  991M   0% /dev/shm
tmpfs           991M  9.6M  981M   1% /run
tmpfs           991M     0  991M   0% /sys/fs/cgroup
/dev/sda2       100G  3.1G   97G   4% /
/dev/sda1       187M  109M   78M  59% /boot
tmpfs           199M     0  199M   0% /run/user/0
/dev/rbd2       4.8G  974M  3.6G  21% /leilei-3
/dev/rbd0       4.8G   20M  4.6G   1% /mysql-1
/dev/rbd1       2.9G  9.1M  2.8G   1% /mysql-2
/dev/rbd4       2.9G   38M  2.7G   2% /leilei-4

[root@ceph-client-centos leilei-3]# ceph df
--- RAW STORAGE ---
CLASS     SIZE    AVAIL     USED  RAW USED  %RAW USED
ssd    2.3 TiB  2.3 TiB  7.9 GiB   7.9 GiB       0.33
TOTAL  2.3 TiB  2.3 TiB  7.9 GiB   7.9 GiB       0.33

--- POOLS ---
POOL              ID  PGS   STORED  OBJECTS     USED  %USED  MAX AVAIL
.mgr               1    1  865 KiB        2  1.7 MiB      0    1.1 TiB
myrbd1            12   64  258 MiB       75  589 MiB   0.03    995 GiB
myrbd2            13   32  3.1 GiB      633  6.7 GiB   0.30    1.0 TiB
cephfs.myfs.meta  14   16  4.8 KiB       41  168 KiB      0   1000 GiB
cephfs.myfs.data  15  256      0 B        0      0 B      0    756 GiB
cephfs_metadata   16   32   17 KiB       23  144 KiB      0    842 GiB
cephfs_data       17   32      0 B        0      0 B      0    756 GiBB


可以看到空间有被占用,通过命令来释放没有使用的空间
root@ceph-client-ubuntu:/mnt# fstrim -v /mysql-1
/leilei-3: 4.8 GiB (5129170944 bytes) trimmed     #释放了4.8G空间 ,但是这个不能直观展现出来


虽然 fstrim 不会直接改变 df -h 显示的已用空间,但它对底层存储设备进行优化,并最终改善存储资源的使用效率。ceph df 命令可以帮助您查看Ceph集群整体的存储使用情况,但同样不一定会直接反映 fstrim 操作的效果。实际效果可能更多地体现在设备的性能和寿命上。
可能出现的问题
1. ceph告警:  1 pool(s) do not have an application enabled

cephadmin@ceph-deploy:~$ ceph -s
  cluster:
    id:     fbcd7dfd-c0b1-420e-a1c3-5eb5002c0cd3
    health: HEALTH_WARN
            1 pool(s) do not have an application enabled

  services:
    mon: 3 daemons, quorum ceph-mon01,ceph-mon02,ceph-mon03 (age 42h)
    mgr: ceph-mgr01(active, since 2d), standbys: ceph-mgr02
    osd: 8 osds: 8 up (since 49s), 8 in (since 49s)

  data:
    pools:   3 pools, 97 pgs
    objects: 152 objects, 426 MiB
    usage:   1.6 GiB used, 2.3 TiB / 2.3 TiB avail
    pgs:     97 active+clean

没有启动存储池的用途或应用,需要手动指定
cephadmin@ceph-deploy:~$ ceph osd pool application enable myrbd2 rados
enabled application 'rados' on pool 'myrbd2'
cephadmin@ceph-deploy:~$ ceph -s
  cluster:
    id:     fbcd7dfd-c0b1-420e-a1c3-5eb5002c0cd3
    health: HEALTH_OK

  services:
    mon: 3 daemons, quorum ceph-mon01,ceph-mon02,ceph-mon03 (age 42h)
    mgr: ceph-mgr01(active, since 2d), standbys: ceph-mgr02
    osd: 8 osds: 8 up (since 108s), 8 in (since 108s)

  data:
    pools:   3 pools, 97 pgs
    objects: 152 objects, 426 MiB
    usage:   1.6 GiB used, 2.3 TiB / 2.3 TiB avail
    pgs:     97 active+clean


2.删除存储池报错
ceph osd pool rm myrbd1 myrbd1 --yes-i-really-really-mean-it
提示:
Error EPERM: pool deletion is disabled; you must first set the mon_allow_pool_delete config option to true before you can destroy a pool
执行两次: ceph tell mon.* injectargs --mon-allow-pool-delete=true 后再次尝试即可
扩容报错:
报错1:
cephadmin@ceph-deploy:~/ceph-cluster$ ceph-deploy disk zap ceph-node02 /dev/nvme0n1 /dev/nvme0n2 /dev/sdb /dev/sdc
[ceph_deploy.conf][DEBUG ] found configuration file at: /home/cephadmin/.cephdeploy.conf
[ceph_deploy.cli][INFO  ] Invoked (2.0.1): /usr/local/bin/ceph-deploy disk zap ceph-node02 /dev/nvme0n1 /dev/nvme0n2 /dev/sdb /dev/sdc
[ceph_deploy.cli][INFO  ] ceph-deploy options:
[ceph_deploy.cli][INFO  ]  username                      : None
[ceph_deploy.cli][INFO  ]  verbose                       : False
[ceph_deploy.cli][INFO  ]  debug                         : False
[ceph_deploy.cli][INFO  ]  overwrite_conf                : False
[ceph_deploy.cli][INFO  ]  subcommand                    : zap
[ceph_deploy.cli][INFO  ]  quiet                         : False
[ceph_deploy.cli][INFO  ]  cd_conf                       : <ceph_deploy.conf.cephdeploy.Conf instance at 0x7fc7ade01c80>
[ceph_deploy.cli][INFO  ]  cluster                       : ceph
[ceph_deploy.cli][INFO  ]  host                          : ceph-node02
[ceph_deploy.cli][INFO  ]  func                          : <function disk at 0x7fc7ade6c2d0>
[ceph_deploy.cli][INFO  ]  ceph_conf                     : None
[ceph_deploy.cli][INFO  ]  default_release               : False
[ceph_deploy.cli][INFO  ]  disk                          : ['/dev/nvme0n1', '/dev/nvme0n2', '/dev/sdb', '/dev/sdc']
[ceph_deploy.osd][DEBUG ] zapping /dev/nvme0n1 on ceph-node02
[ceph-node02][DEBUG ] connection detected need for sudo
[ceph-node02][DEBUG ] connected to host: ceph-node02
[ceph-node02][DEBUG ] detect platform information from remote host
[ceph-node02][DEBUG ] detect machine type
[ceph-node02][DEBUG ] find the location of an executable
[ceph_deploy.osd][INFO  ] Distro info: Ubuntu 22.04 jammy
[ceph-node02][DEBUG ] zeroing last few blocks of device
[ceph-node02][DEBUG ] find the location of an executable
[ceph-node02][INFO  ] Running command: sudo /usr/sbin/ceph-volume lvm zap /dev/nvme0n1
[ceph-node02][WARNIN] Traceback (most recent call last):
[ceph-node02][WARNIN]   File "/usr/sbin/ceph-volume", line 33, in <module>
[ceph-node02][WARNIN]     sys.exit(load_entry_point('ceph-volume==1.0.0', 'console_scripts', 'ceph-volume')())
[ceph-node02][WARNIN]   File "/usr/sbin/ceph-volume", line 25, in importlib_load_entry_point
[ceph-node02][WARNIN]     return next(matches).load()
[ceph-node02][WARNIN]   File "/usr/lib/python3.10/importlib/metadata/__init__.py", line 171, in load
[ceph-node02][WARNIN]     module = import_module(match.group('module'))
[ceph-node02][WARNIN]   File "/usr/lib/python3.10/importlib/__init__.py", line 126, in import_module
[ceph-node02][WARNIN]     return _bootstrap._gcd_import(name[level:], package, level)
[ceph-node02][WARNIN]   File "<frozen importlib._bootstrap>", line 1050, in _gcd_import
[ceph-node02][WARNIN]   File "<frozen importlib._bootstrap>", line 1027, in _find_and_load
[ceph-node02][WARNIN]   File "<frozen importlib._bootstrap>", line 1006, in _find_and_load_unlocked
[ceph-node02][WARNIN]   File "<frozen importlib._bootstrap>", line 688, in _load_unlocked
[ceph-node02][WARNIN]   File "<frozen importlib._bootstrap_external>", line 883, in exec_module
[ceph-node02][WARNIN]   File "<frozen importlib._bootstrap>", line 241, in _call_with_frames_removed
[ceph-node02][WARNIN]   File "/usr/lib/python3/dist-packages/ceph_volume/main.py", line 9, in <module>
[ceph-node02][WARNIN]     from ceph_volume import log, devices, configuration, conf, exceptions, terminal, inventory, drive_group, activate
[ceph-node02][WARNIN]   File "/usr/lib/python3/dist-packages/ceph_volume/devices/__init__.py", line 1, in <module>
[ceph-node02][WARNIN]     from . import lvm, simple, raw # noqa
[ceph-node02][WARNIN]   File "/usr/lib/python3/dist-packages/ceph_volume/devices/lvm/__init__.py", line 1, in <module>
[ceph-node02][WARNIN]     from .main import LVM # noqa
[ceph-node02][WARNIN]   File "/usr/lib/python3/dist-packages/ceph_volume/devices/lvm/main.py", line 4, in <module>
[ceph-node02][WARNIN]     from . import activate
[ceph-node02][WARNIN]   File "/usr/lib/python3/dist-packages/ceph_volume/devices/lvm/activate.py", line 9, in <module>
[ceph-node02][WARNIN]     from ceph_volume.util import encryption as encryption_utils
[ceph-node02][WARNIN]   File "/usr/lib/python3/dist-packages/ceph_volume/util/encryption.py", line 9, in <module>
[ceph-node02][WARNIN]     from packaging import version
[ceph-node02][WARNIN] ModuleNotFoundError: No module named 'packaging'
[ceph-node02][ERROR ] RuntimeError: command returned non-zero exit status: 1
[ceph_deploy][ERROR ] RuntimeError: Failed to execute command: /usr/sbin/ceph-volume lvm zap /dev/nvme0n1


解决方法
sudo apt install python3-packaging
cephadmin@ceph-deploy:~/ceph-cluster$ ceph -s
  cluster:
    id:     76f62a5b-2c67-488d-bb11-46687aec5868
    health: HEALTH_WARN
            mons are allowing insecure global_id reclaim
            1 pool(s) do not have an application enabled

  services:
    mon: 2 daemons, quorum ceph-mon01,ceph-mon02 (age 101m)
    mgr: ceph-mgr01(active, since 42m), standbys: ceph-mgr02
    osd: 16 osds: 16 up (since 6m), 16 in (since 7m)

  data:
    pools:   2 pools, 33 pgs
    objects: 3 objects, 591 KiB
    usage:   443 MiB used, 3.9 TiB / 3.9 TiB avail
    pgs:     33 active+clean


问题1: mons are allowing insecure global_id reclaim 警告

解决:
    health: HEALTH_WARN
            mons are allowing insecure global_id reclaim
            1 pool(s) do not have an application enabled
原因:
问题背景
警告含义:Ceph 的 Monitor 允许不安全的 global_id 回收。global_id 是客户端的唯一标识符,用于身份验证。如果回收机制不安全,可能导致重复的 global_id 被分配,从而引发潜在的安全问题,例如身份冒充。
可能原因:这个警告通常在集群升级或配置不当的情况下出现,尤其是当旧版本的客户端与新版本的 Monitor 交互时。

解决:
修改配置,禁止不安全的 global_id 回收
执行命令:
ceph config set mon auth_allow_insecure_global_id_reclaim false

验证:
cephadmin@ceph-deploy:~/ceph-cluster$ ceph -s
  cluster:
    id:     76f62a5b-2c67-488d-bb11-46687aec5868
    health: HEALTH_WARN
          1 pool(s) do not have an application enabled

  services:
    mon: 2 daemons, quorum ceph-mon01,ceph-mon02 (age 80s)
    mgr: ceph-mgr01(active, since 46m), standbys: ceph-mgr02
    osd: 16 osds: 16 up (since 10m), 16 in (since 11m)

  data:
    pools:   2 pools, 33 pgs
    objects: 3 objects, 591 KiB
    usage:   443 MiB used, 3.9 TiB / 3.9 TiB avail
    pgs:     33 active+clean


问题2: 1 pool(s) do not have an application enabled 警告
原因:
Ceph 集群中的一个存储池在创建时未指定应用程序,或者创建后未手动启用。
未启用应用程序的存储池不会影响功能,但会导致健康状态警告。

解决:
创建一个存储池就不会有这个警告了
启用应用程序:
    health: HEALTH_WARN
            1 pool(s) do not have an application enabled
执行命令:
ceph osd pool application enable mypool cephfs

验证:
cephadmin@ceph-deploy:~/ceph-cluster$ ceph -s
  cluster:
    id:     76f62a5b-2c67-488d-bb11-46687aec5868
    health: HEALTH_OK

  services:
    mon: 2 daemons, quorum ceph-mon01,ceph-mon02 (age 14m)
    mgr: ceph-mgr01(active, since 61m), standbys: ceph-mgr02
    osd: 16 osds: 16 up (since 25m), 16 in (since 26m)

  data:
    pools:   2 pools, 33 pgs
    objects: 3 objects, 591 KiB
    usage:   443 MiB used, 3.9 TiB / 3.9 TiB avail
    pgs:     33 active+clean
本章完,感谢各位读者的耐心阅读,有问题可以随时写在评论区,看到第一时间回复.
下一章我们聊聊 ceph集群应用基础(块存储,对象存储,挂载配置)等


 被折叠的 条评论
为什么被折叠?
被折叠的 条评论
为什么被折叠?
 到【灌水乐园】发言


