


RQL Overview IRQL 概述
Present since the early stages of Windows NT, an Interrupt Request Level (IRQL) defines the current hardware priority at which a CPU runs at any given time. On a multi-processor architecture, each CPU can hold a different and independent IRQL value, which is stored inside the CR8 register. We should keep this in mind as we are going to build our lab examples on a quad-core system.
中断请求级别 (IRQL) 自 Windows NT 的早期阶段以来就存在,它定义了 CPU 在任何给定时间运行的当前硬件优先级。在多处理器体系结构上,每个 CPU 可以保存一个不同的独立 IRQL 值,该值存储在 CR8 寄存器中。我们应该牢记这一点,因为我们将在四核系统上构建我们的实验室示例。
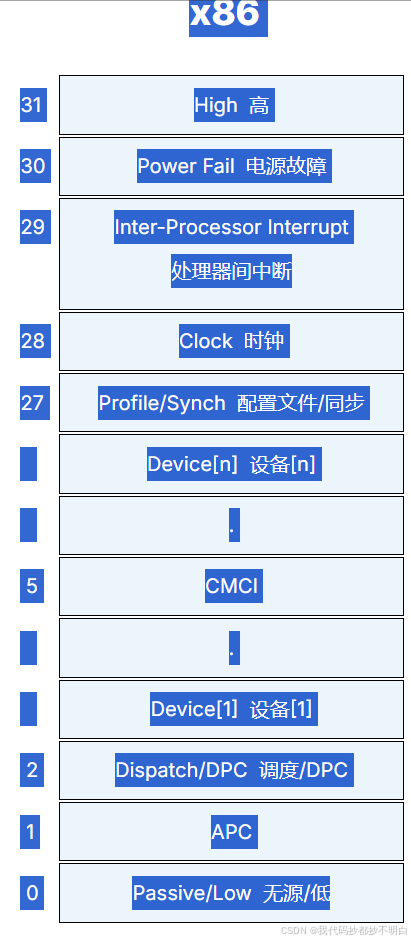
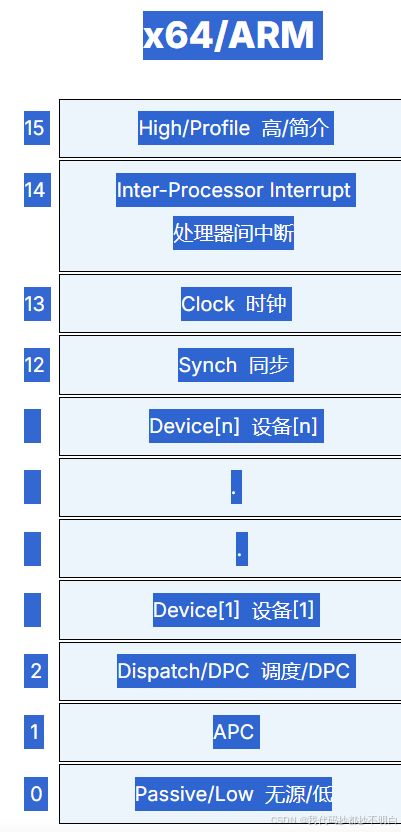
Every hardware interrupt is mapped to a specific request level as depicted below.
每个硬件中断都映射到特定的请求级别,如下所示。
A CPU is interrupted from completing its current task only when it receives an interrupt that is above the current IRQL value. The current running thread is responsible for handling these interrupts, which saves the current CPU state and then processes the Interrupt Service Routine (ISR) mapped to the incoming IRQL. Each interrupt routine is mapped inside the Interrupt Description Table (IDT), whose pointer is stored inside the idtr register. From the debugger, the IDT can be inspected through the !idt command, which automatically resolves pointers symbols and other details.
仅当 CPU 收到高于当前 IRQL 值的中断时,CPU 才会中断完成其当前任务。当前正在运行的线程负责处理这些中断,从而保存当前 CPU 状态,然后处理映射到传入 IRQL 的中断服务例程 (ISR)。每个中断例程都映射在中断描述表 (IDT) 内,其指针存储在 idtr 寄存器内。在调试器中,可以通过 !idt 命令检查 IDT,该命令会自动解析指针符号和其他细节。
kd> !idt

Dumping IDT: fffff8015e262000

00:	fffff8015b81fb00 nt!KiDivideErrorFault
01:	fffff8015b81fe40 nt!KiDebugTrapOrFault	Stack = 0xFFFFF8015E2A0000
02:	fffff8015b820340 nt!KiNmiInterrupt	Stack = 0xFFFFF8015E292000
03:	fffff8015b820800 nt!KiBreakpointTrap
04:	fffff8015b820b40 nt!KiOverflowTrap
05:	fffff8015b820e80 nt!KiBoundFault
06:	fffff8015b8213c0 nt!KiInvalidOpcodeFault
07:	fffff8015b8218c0 nt!KiNpxNotAvailableFault
08:	fffff8015b821bc0 nt!KiDoubleFaultAbort	Stack = 0xFFFFF8015E28B000
09:	fffff8015b821ec0 nt!KiNpxSegmentOverrunAbort
0a:	fffff8015b8221c0 nt!KiInvalidTssFault
...
d1:	fffff8015b817f18 nt!HalpTimerClockInterrupt (KINTERRUPT fffff8015c1119a0)
Retrieving IRQL entries 检索 IRQL 条目
Notice that the interrupt at index d1 is mapped to the CPU clock. We can verify if its IRQL indeed corresponds to the 13th value from the table above. To do so, we dump the CPU clock’s KINTERRUPT structure that we found earlier in the IDT.
请注意,索引 d1 处的中断映射到 CPU 时钟。我们可以验证其 IRQL 是否确实对应于上表中的第 13 个值。为此,我们转储我们之前在 IDT 中找到的 CPU clock的 KINTERRUPT 结构。
kd> dt _KINTERRUPT fffff8015c1119a0 Irql
nt!_KINTERRUPT
   +0x05c Irql : 0xd ''
The KINTERRUPT is a crucial structure that stores information related to interrupt dispatching.
KINTERRUPT 是存储与中断调度相关的信息的关键结构。
Now that we’ve briefly discussed IRQLs, let’s explore their role and
现在我们已经简要讨论了 IRQL,让我们来了解一下它们的作用和
duties as kernel synchronization mechanisms.
职责作为内核同步机制。
Synchronization at IRQL ≥ 2
IRQL ≥ 2 的同步
When two or more threads need to access a shared kernel resource, they must agree on how to access the shared object in a synchronous way to eliminate the chances of corrupting it.
当两个或多个线程需要访问共享内核资源时,它们必须就如何以同步方式访问共享对象达成一致,以消除损坏共享对象的可能性。
A mutex (from Mutual Exclusion) is one way to accomplish such synchronization between threads. When the first thread wants to access a Critical Section (the shared portion of code), it acquires a lock on the mutex. Once the thread has completed its tasks, it releases the mutex’s lock and only at that moment can another thread acquire it and access the shared resource. In layman’s terms, a mutex is protecting the critical section from being accessed or modified by multiple threads at the same time.
互斥锁(来自 Mutual Exclusion)是在线程之间完成此类同步的一种方法。当第一个线程想要访问 Critical Section(代码的共享部分)时,它会获取互斥锁。一旦线程完成其任务,它就会释放互斥锁的锁,只有在那时,另一个线程才能获取它并访问共享资源。通俗地说,互斥锁可以保护关键部分不被多个线程同时访问或修改。
Since the Windows system scheduler runs at DISPATCH_LEVEL (IRQL 2), mutexes cannot be adopted at a level above or equal to 2. This is due to the fact that any thread-synchronization mechanism requires the scheduler to take scheduling action on those threads and thus, having a thread running at the same IRQL of the scheduler will ultimately prevent the scheduler from even starting.
由于 Windows 系统计划程序以 DISPATCH_LEVEL (IRQL 2) 运行,因此不能在大于或等于 2 的级别采用互斥锁。这是因为任何线程同步机制都要求计划程序对这些线程执行计划作,因此,在计划程序的同一 IRQL 上运行线程最终会阻止计划程序启动。
Now, the pressing question from a rootkit developer’s perspective: why do we even need a synchronization primitive at IRQL ≥ 2 if the scheduler is already taking care of everything at lower priorities? Rootkits and alike, often access and modify shared kernel resources in order to subvert system properties or just to simply be less conspicuous. The rootkit synchronization technique we are going to analyze in this blog post has its very effectiveness in running at IRQL DISPATCH_LEVEL, thus enabling the rootkit code to modify kernel structures without risking any system crash.
现在,从 rootkit 开发人员的角度来看,一个紧迫的问题是:如果调度程序已经处理了较低优先级的所有内容,为什么我们还需要在 IRQL ≥ 2 中使用同步原语呢?Rootkit 等经常访问和修改共享的内核资源,以破坏系统属性,或者只是为了不那么显眼。我们将在这篇博文中分析的 Rootkit 同步技术在 IRQL DISPATCH_LEVEL 上运行时非常有效,从而使 Rootkit 代码能够修改内核结构,而不会冒任何系统崩溃的风险。
Albeit this technique has been originally presented in the well-known Hoglund/Butler book from 2005, it’s still equally effective on present systems.
尽管这项技术最初在 2005 年著名的 Hoglund/Butler 书中提出,但它在当前系统上仍然同样有效。
The code reference for this project is available on GitHub. It’s an x64 version of Bill Blunden’s Rootkit Arsenal project driver that implements the Hoglund/Butler synchronization mechanism.
GitHub 上提供了此项目的代码参考。它是 Bill Blunden 的 Rootkit Arsenal 项目驱动程序的 x64 版本,用于实现 Hoglund/Butler 同步机制。
Idling CPUs – DPCs to the Rescue
空闲 CPU – DPC 来救援
The goal of our rootkit project is to access a shared kernel resource while making sure that no other threads running on any CPU are going to step on our toes. As mentioned earlier, we are not allowed to rely on mutexes to perform our synchronization routine, so we need to resort to another kernel mechanism: Deferred Procedure Calls (DPC).
我们的 rootkit 项目的目标是访问共享的内核资源,同时确保在任何 CPU 上运行的其他线程都不会踩到我们的脚趾。如前所述,我们不允许依赖互斥锁来执行我们的同步例程,因此我们需要求助于另一种内核机制:Deferred Procedure Calls (DPC)。
DPCs are normally used whenever a high hardware interrupt wants to hold up some of its routine to the lower DISPATCH (2) level. In this way, DPCs allow drivers to down-prioritize less critical tasks to a lower IRQL level. Once initialized, DPCs are then enqueued on a per-CPU queue and executed when all the remaining higher IRQLs are finished.
每当高硬件中断想要将其某些例程保持到较低的 DISPATCH (2) 级别时,通常使用 DPC。通过这种方式,DPC 允许驱动程序将不太关键的任务的优先级降低到较低的 IRQL 级别。初始化后,DPC 将在每个 CPU 队列中排队,并在所有剩余的较高 IRQL 完成后执行。
One complementary feature of DPCs is that, after initializing the DPC structure with the KeInitializeDpc routine, we can specify the exact target CPU where the DPC is going to be executed with the KeSetTargetProcessorDpc function. The reason this is critically important will become clear shortly.
DPC 的一个补充功能是,在使用 KeInitializeDpc 例程初始化 DPC 结构后,我们可以指定要使用 KeSetTargetProcessorDpc 函数执行 DPC 的确切目标 CPU。这至关重要的原因很快就会变得清晰。
Now that we’re armed with a basic understanding of DPCs, let’s determine how they fit in our project. Here’s the overall approach we are going to implement as our custom DISPATCH-LEVEL mutex:
现在我们已经对 DPC 有了基本的了解,让我们确定它们如何适应我们的项目。以下是我们将实现为自定义 DISPATCH-LEVEL 互斥锁的总体方法:
- Increase the current CPU’s IRQL to DISPATCH_LEVEL.
将当前 CPU 的 IRQL 增加到 DISPATCH_LEVEL。 - Initialize and enqueue DPCs so we set other CPUs to DISPATCH_LEVEL and perform an infinite NOP loop.
初始化 DPC 并入队,以便我们将其他 CPU 设置为 DISPATCH_LEVEL 并执行无限 NOP 循环。 - The current CPU accesses the shared resource.
当前 CPU 访问共享资源。 - We tell DPCs running on the other CPUs to exit the loop.
我们告诉在其他 CPU 上运行的 DPC 退出循环。 - We restore the current CPU’s IRQL
我们恢复当前 CPU 的 IRQL
This way, we are able to safely access the shared resource by forcing the remaining CPUs to do nothing and just sit on their metaphorical hands. We’re now going to dissect the relevant code portion for each of these steps, and finally verify our assumptions with the debugger.
这样,我们就可以通过强制剩余的 CPU 什么都不做,只是坐在他们的隐喻手上来安全地访问共享资源。现在,我们将剖析每个步骤的相关代码部分,最后使用调试器验证我们的假设。
Inspecting the Code 检查代码
From a high-level perspective, we already know what to do, so let’s investigate how. We can start by inspecting the DriverEntry routine.
从高层次的角度来看,我们已经知道该怎么做,所以让我们研究一下怎么做。我们可以从检查 DriverEntry 例程开始。
C
NTSTATUS DriverEntry(IN PDRIVER_OBJECT pDriverObject, IN PUNICODE_STRING regPath)
{
	NTSTATUS ntStatus;
	KIRQL irql;
	PKDPC dpcPtr;
	DBG_TRACE("Driver Entry", "Establishing other DriverObject function pointers");
	(*pDriverObject).DriverUnload = Unload;

	DBG_TRACE("Driver Entry", "Raising IRQL");
	irql = RaiseIRQL();

	DBG_TRACE("Driver Entry", "Acquiring Lock");
	dpcPtr = AcquireLock();

	AccessResource();

	DBG_TRACE("Driver Entry", "Releasing Lock");
	ReleaseLock(dpcPtr);

	DBG_TRACE("Driver Entry", "Lowering IRQL");
	LowerIRQL(irql);
	return (STATUS_SUCCESS);

}
Inspecting DriverEntry code
检查 DriverEntry 代码
In the first step of our routine, we increase the current process IRQL through the RaiseIRQL function.
在例程的第一步中,我们通过 RaiseIRQL 函数增加当前进程 IRQL。
C
KIRQL RaiseIRQL()
{
	KIRQL curr;
	KIRQL prev;
	/* Get the current interrupt irql level */
	curr = KeGetCurrentIrql();
	prev = curr;

	if (curr < DISPATCH_LEVEL)
	{
		KeRaiseIrql(DISPATCH_LEVEL, &prev);
	}
	return (prev);
}
We first retrieve the current CPU’s IRQL level through the KeGetCurrentIrql function and, interestingly enough, this ntoskrnl routine comprises only two instructions.
我们首先通过 KeGetCurrentIrql 函数检索当前 CPU 的 IRQL 级别,有趣的是,此 ntoskrnl 例程仅包含两条指令。
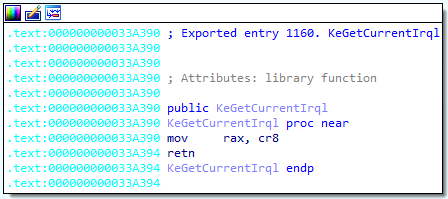
This proves what we just learned earlier–that the current CPU IRQL value is stored in the cr8 register and is then placed in RAX as a return value.
这证明了我们之前学到的内容 — 当前 CPU IRQL 值存储在 cr8 寄存器中,然后作为返回值放入 RAX 中。
As a next step, RaiseIRQL checks if the current IRQL value is lower than DISPATCH_LEVEL and if so, it raises it to that IRQL through the KeRaiseIrql function. Inside ntoskrnl, this function is mapped as KfRaiseIrql and performs the following:
下一步,RaiseIRQL 检查当前 IRQL 值是否低于 DISPATCH_LEVEL 值,如果是,则通过 KeRaiseIrql 函数将其提高到该 IRQL。在 ntoskrnl 中,此函数映射为 KfRaiseIrql 并执行以下作:
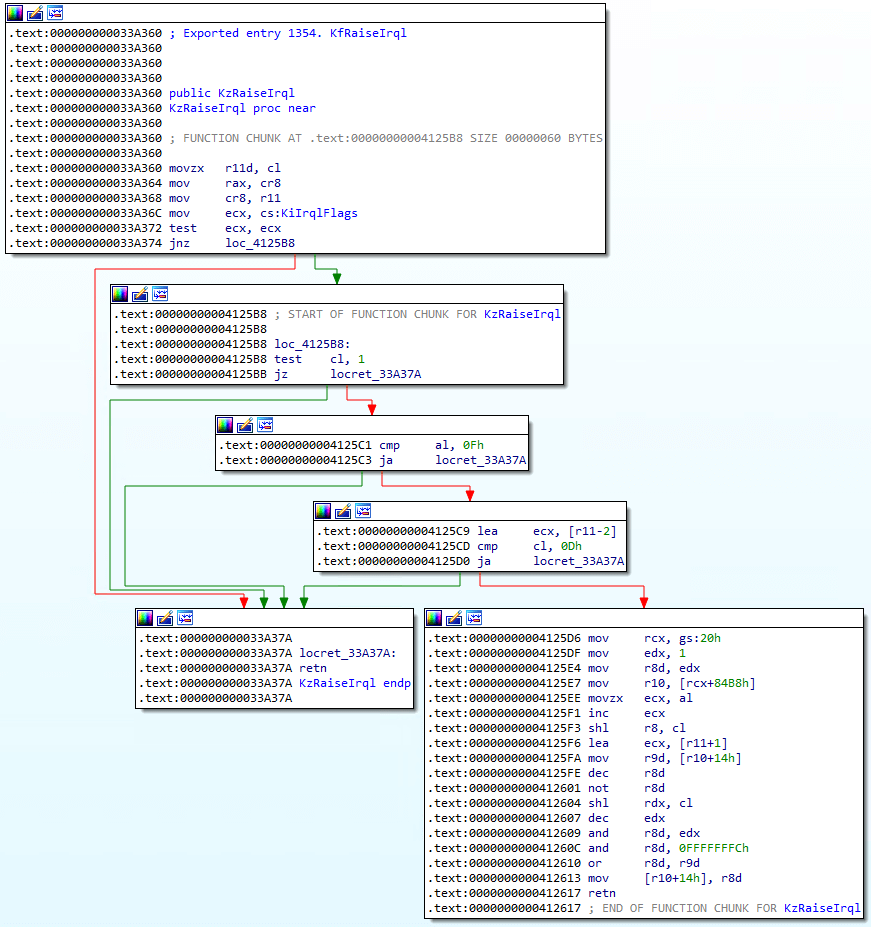
The top-most block provides the main functionality. In the first three instructions, the desired IRQL level is saved in r11. The current IRQL is then placed in rax as a return value and finally, the requested IRQL is placed in cr8. The other three blocks are just checking that the requested IRQL is not 1 (APC), and that the current IRQL and requested ones are not above 0xF (max allowed value).
最顶层的块提供主要功能。在前三个指令中,所需的 IRQL 级别保存在 r11 中。然后,当前 IRQL 作为返回值放置在 rax 中,最后,请求的 IRQL 放置在 cr8 中。其他三个块只是检查请求的 IRQL 是否不是 1 (APC) ,以及当前 IRQL 和请求的 IRQL 是否不高于 0xF (最大允许值) 。
If all these conditions are false, on the bottom right block, the undocumented SchedulerAssist value from the KPRCB is modified accordingly.
如果所有这些条件都为 false,则在右下角的块上,将相应地修改 KPRCB 中未记录的 SchedulerAssist 值。
As there is no explicit check in the function, if we were to pass a value higher than 0xf to KeRaiseIrql, we could incur a SYSTEM_THREAD_EXCEPTION_NOT_HANDLED bug-check due to a privileged instruction exception.
由于函数中没有显式检查,如果我们要将高于 0xf 的值传递给 KeRaiseIrql,则可能会因特权指令异常而导致SYSTEM_THREAD_EXCEPTION_NOT_HANDLED错误检查。
Having raised the current CPU’s IRQL, it is now time to perform the same operation for the other remaining CPUs. This is accomplished with the help of the AcquireLock function and through the use of DPCs. Let’s analyze this routine by decoupling it by functionality.
提高当前 CPU 的 IRQL 后,现在可以对其他剩余 CPU 执行相同的作。这是在 AcquireLock 函数的帮助下通过使用 DPC 来实现的。让我们通过按功能解耦来分析这个例程。
C
PKDPC AcquireLock()
{
...
	InterlockedAnd(&LockAcquired, 0);
	InterlockedAnd(&nCPUsLocked, 0);

	DBG_PRINT2("[AcquiredLock]: nCPUs=%un", KeNumberProcessors);

	dpcArray = (PKDPC)ExAllocatePoolWithTag(NonPagedPool,KeNumberProcessors * sizeof(KDPC), 0x0F11);
	if (dpcArray == NULL) { return(NULL); }

	cpuID = KeGetCurrentProcessorNumber();

	for (i = 0; i < KeNumberProcessors; i++)
	{
		PKDPC dpcPtr = &(dpcArray[i]);

		if (i != cpuID)
		{
			KeInitializeDpc(dpcPtr, lockRoutine, NULL);
			KeSetTargetProcessorDpc(dpcPtr, i);
			KeInsertQueueDpc(dpcPtr, NULL, NULL);
		}
	}

	nOtherCPUs = KeNumberProcessors - 1;
	InterlockedCompareExchange64(&nCPUsLocked, nOtherCPUs, nOtherCPUs);

	while (nCPUsLocked != nOtherCPUs)
	{
		NOP_FUNC();
		InterlockedCompareExchange64(&nCPUsLocked, nOtherCPUs, nOtherCPUs);
	}

	return (dpcArray);
}
The AcquireLock function AcquireLock 函数
Before dealing with anything related to DPCs, we first need some sort of synchronization mechanism that tells us that all the CPU are running at DISPATCH_LEVEL along with a method to signal the other CPUs when to exit the infinite NOP loop.
在处理与 DPC 相关的任何内容之前,我们首先需要某种同步机制,它告诉我们所有 CPU 都以 DISPATCH_LEVEL 的速度运行,以及一种方法来向其他 CPU 发出信号何时退出无限 NOP 循环。
According to MSDN, the Interlocked function family provides exactly what we want:
根据 MSDN 的说法,Interlocked 函数系列恰好提供了我们想要的:
The interlocked functions provide a simple mechanism for synchronizing access to a variable that is shared by multiple threads. This function is atomic with respect to calls to other interlocked functions.
互锁函数提供了一种简单的机制,用于同步对多个线程共享的变量的访问。此函数对于其他联锁函数的调用是原子的。
These functions are generated as intrinsics by the compiler, so that the CPU can force memory barriers to guarantee mutual exclusion and order of operation between threads.
这些函数由编译器作为内部函数生成,因此 CPU 可以强制内存屏障来保证线程之间的互斥和作顺序。
To this end, we are going to use LockAcquired as a boolean-like variable to notify lockRoutine when to exit the loop. We’ll also use nCPUsLocked as a counter variable to atomically increment it on every CPU, via the InterlockedIncrement64(&nCPUsLocked) statement.
为此,我们将使用 LockAcquired 作为类似布尔值的变量来通知 lockRoutine 何时退出循环。我们还将使用 nCPUsLocked 作为计数器变量,通过 InterlockedIncrement64(&nCPUsLocked) 语句在每个 CPU 上以原子方式增加它。
As a next step, we can now take care of DPCs creation. We first need to allocate a kernel pool via ExAllocatePoolWithTag of the size of a KDPC multiplied by the number of the running CPUs.
下一步,我们现在可以处理 DPC 的创建。我们首先需要通过 ExAllocatePoolWithTag 分配一个内核池,该池的大小等于 KDPC 的大小乘以正在运行的 CPU 的数量。
We then run a for-loop where we initialize on every other CPU the DPC via the KeInitializeDpc function, providing the respective KDPC and the lockRoutine as a function to be executed by the scheduled DPC. Next, we tell which CPU has to run the DPC with a call to KeSetTargetProcessorDpc and we finally enqueue it with KeInsertQueueDpc.
然后,我们运行一个 for 循环,通过 KeInitializeDpc 函数在每隔一个 CPU 上初始化 DPC,提供相应的 KDPC 和 lockRoutine 作为由计划的 DPC 执行的函数。接下来,我们告诉哪个 CPU 必须通过调用 KeSetTargetProcessorDpc 来运行 DPC,最后使用 KeInsertQueueDpc 将其排队。
Once the DPC is running on the given CPU, it will execute the lockRoutine function that we have passed as an argument during DPC initialization, which has the following structure.
一旦 DPC 在给定的 CPU 上运行,它将执行我们在 DPC 初始化期间作为参数传递的 lockRoutine 函数,该函数具有以下结构。
C
void lockRoutine
...
{
	// Atomically increase the value of nCPUsLocked, which means that another CPU enters the nop cycle */
	InterlockedIncrement64(&nCPUsLocked);

	// spin NOP until LockAcquired flag is set ( i.e., by ReleaseLockO))
	while (InterlockedCompareExchange64(&LockAcquired, 1, 1) == 0)
	{
		NOP_FUNC();
	}
	// Exit the NOP loop
	InterlockedDecrement64(&nCPUsLocked);
	return;
}
The lockRoutine function lockRoutine 函数
First, InterlockedIncrement64 is called, so that the nCPUsLocked variable that was previously set to zero is now incremented to one. Since this routine will be executed by every other CPU, the variable will be incremented by each one and ultimately reach the “total CPU-1” value, which will force the while-loop in the AcquireLock function to exit.
首先,调用 InterlockedIncrement64,以便之前设置为 0 的 nCPUsLocked 变量现在递增为 1。由于此例程将由每个其他 CPU 执行,因此变量将由每个 CPU 递增,并最终达到“总 CPU-1”值,这将强制退出 AcquireLock 函数中的 while 循环。
As a next step, lockRoutine employs the InterlockedCompareExchange64 function to check if the value of LockAcquired is set to “0” or “1”. If it’s 0, it will enter a while-loop and execute the standby NOP_FUNC routine, defined in the project’s lib.asm resource.
下一步,lockRoutine 使用 InterlockedCompareExchange64 函数来检查 LockAcquired 的值是否设置为“0”或“1”。如果为 0,它将进入 while 循环并执行在项目的 lib.asm 资源中定义的备用 NOP_FUNC 例程。
The purpose of this routine is to run on each other CPU that has been already raised at DISPATCH_LEVEL so that will prevent the execution of any thread that might undermine our operations.
这个例程的目的是在已经在 DISPATCH_LEVEL 时引发的其他 CPU 上运行,这样可以防止执行任何可能破坏我们作的线程。
Having all the other CPUs but ours stuck on an infinite loop allows us to safely access the shared resource with the current IRQL value of DISPATCH_LEVEL.
让除我们的 CPU 以外的所有其他 CPU 都卡在无限循环中,使我们能够安全地访问当前 IRQL 值为 DISPATCH_LEVEL 的共享资源。
Normally, the shared resource that a rootkit wants to modify would be some kind of kernel table or structure like the EPROCESS ActiveProcessLinks. For the sake of this blog post, we are just going to demonstrate it with the following routine.
通常,rootkit 想要修改的共享资源将是某种内核表或结构,如 EPROCESS ActiveProcessLinks。为了这篇博文,我们只用下面的例程来演示它。
C
void AccessResource()
{
	int i = 0;
    int max = 1 * 1000000000;
	DBG_TRACE("Accessing Shared Resource");
	for (i = 0; i < max ; i++)
	{
		SHARED_FUNC();
	}
	return;
}
The AccessResource function
AccessResource 函数
AccessResource will in turn execute the following purposely pointless SHARED_FUNC routine one million times.
AccessResource 将依次执行以下故意无意义的 SHARED_FUNC 例程 100 万次。
SHARED_FUNC PROC
    xchg rax, rbx
    xchg rbx, rax
    ret
SHARED_FUNC ENDP
END
Simulating access to the shared resource
模拟对共享资源的访问
Running the above instructions in this very large for-loop will effectively render the system unusable for a few seconds thus, as a moral of the story, the rootkit should be swift when accessing a shared resource in the kernel.
在这个非常大的 for 循环中运行上述指令将有效地使系统在几秒钟内不可用,因此,作为故事的寓意,rootkit 在访问内核中的共享资源时应该很快。
Debugging the Rootkit 调试 Rootkit
In the debugger, we can now verify what we took for granted in the above code listings. If we place a breakpoint at the AcquireLock routine, we can inspect the KDPC as it gets initialized by KeInitializeDpc.
在调试器中,我们现在可以验证我们在上面的代码清单中认为理所当然的内容。如果我们在 AcquireLock 例程上放置断点,则可以在 KDPC 由 KeInitializeDpc 初始化时检查 KDPC。
Breakpoint 1 hit
IRQL!AcquireLock:
fffff806`1d6a1080 4883ec58        sub     rsp,58h
...
2: kd> pct
IRQL!AcquireLock+0x127:
fffff806`1d6a11a7 ff156b0e0000    call    qword ptr [IRQL!_imp_KeInitializeDpc (fffff806`1d6a2018)]
2: kd> u fffff8061d6a1470
The first parameter passed to the function is the empty KDPC structure.
传递给函数的第一个参数是空的 KDPC 结构。
1: kd> dt _KDPC ffffb289db9035b0
nt!_KDPC
   +0x000 TargetInfoAsUlong : 0
   +0x000 Type             : 0 ''
   +0x001 Importance       : 0 ''
   +0x002 Number           : 0
   +0x008 DpcListEntry     : _SINGLE_LIST_ENTRY
   +0x010 ProcessorHistory : 0
   +0x018 DeferredRoutine  : (null)
   +0x020 DeferredContext  : (null)
   +0x028 SystemArgument1  : (null)
   +0x030 SystemArgument2  : (null)
   +0x038 DpcData          : (null)
The structure gets populated once the function returns,
一旦函数返回,结构就会被填充,
1: kd> t
nt!KeInitializeDpc:
fffff806`160e3ac0 33c0            xor     eax,eax

1: kd> pt
nt!KeInitializeDpc+0x18:
fffff806`160e3ad8 c3              ret

1: kd> dt _KDPC ffffb289db9035b0
nt!_KDPC
   +0x000 TargetInfoAsUlong : 0x113
   +0x000 Type             : 0x13 ''
   +0x001 Importance       : 0x1 ''
   +0x002 Number           : 0
   +0x008 DpcListEntry     : _SINGLE_LIST_ENTRY
   +0x010 ProcessorHistory : 0
   +0x018 DeferredRoutine  : 0xfffff806`1d6b1470     void  IRQL!lockRoutine+0
   +0x020 DeferredContext  : (null)
   +0x028 SystemArgument1  : (null)
   +0x030 SystemArgument2  : (null)
   +0x038 DpcData          : (null)
The DeferredRoutine is our defined DPC routine, while the Number value refers to the target CPU where it is going to be executed, which gets populated once KeSetTargetProcessorDpc returns.
DeferredRoutine 是我们定义的 DPC 例程,而 Number 值是指要执行它的目标 CPU,一旦 KeSetTargetProcessorDpc 返回,该 CPU 就会填充。
1: kd> dt _KDPC ffffb289db9038b0
nt!_KDPC
   +0x000 TargetInfoAsUlong : 0x5030113
   +0x000 Type             : 0x13 ''
   +0x001 Importance       : 0x1 ''
   +0x002 Number           : 0x503
   +0x008 DpcListEntry     : _SINGLE_LIST_ENTRY
   +0x010 ProcessorHistory : 0
   +0x018 DeferredRoutine  : 0xfffff806`1d6d1470     void  IRQL!lockRoutine+0
   +0x020 DeferredContext  : (null)
   +0x028 SystemArgument1  : (null)
   +0x030 SystemArgument2  : (null)
   +0x038 DpcData          : (null)
The resulting value is the result of the constant 0x500 plus the CPU index.
结果值是常量 0x500 加上 CPU 索引的结果。
If the 0x500 value is added to the CPU index, KeInsertQueueDpc can infer that the user called KeSetTargetProcessorDpc to set the target CPU
如果将 0x500 值添加到 CPU 索引中,则 KeInsertQueueDpc 可以推断用户调用 KeSetTargetProcessorDpc 来设置目标 CPU
We can also verify the enqueued DPCs through the !dpcs command.
我们还可以通过 !dpcs 命令验证排队的 DPC。
2: kd> !dpcs
CPU Type      KDPC       Function
 0: Normal  : 0xffffb289db903b50 0xfffff8061d701470 IRQL!lockRoutine

 1: Normal  : 0xffffb289db903b90 0xfffff8061d701470 IRQL!lockRoutine
Note that since DPCs are processed quite fast, it’s not always trivial to catch them enqueued on all the CPUs.
请注意,由于 DPC 的处理速度非常快,因此捕获它们在所有 CPU 上排队并不总是一件容易的事。
Nice, then we can now enable a breakpoint on IRQL!NOP_FUNC and continue execution.
很好,那么我们现在可以在 IRQL 上启用断点了!NOP_FUNC并继续执行。
2: kd> g
Breakpoint 7 hit
IRQL!NOP_FUNC:
fffff806`1d691000 90              nop

1: kd> g
Breakpoint 7 hit
IRQL!NOP_FUNC:
fffff806`1d691000 90              nop

3: kd> t
Breakpoint 7 hit
IRQL!NOP_FUNC:
fffff806`1d691000 90              nop
And we have proven that the NOP function is running on every other CPU, as intended.
我们已经证明,NOP 函数按预期在所有其他 CPU 上运行。
As a final check, we can now verify that all the other CPUs are executing the NOP routine while we are accessing the share resource. Let’s break on IRQL!AccessResource and verify the IRQL level for all the CPUs.
作为最后的检查,我们现在可以验证在我们访问共享资源时所有其他 CPU 是否都在执行 NOP 例程。让我们在 IRQL 上休息一下!AccessResource 并验证所有 CPU 的 IRQL 级别。
Breakpoint 6 hit
IRQL!AccessResource:
fffff806`1d691020 4883ec38        sub     rsp,38h
0: kd> t
IRQL!AccessResource+0x4:
fffff806`1d691024 c744242000000000 mov     dword ptr [rsp+20h],0

0: kd> !irql 0
Debugger saved IRQL for processor 0x0 -- 2 (DISPATCH_LEVEL)

0: kd> !irql 1
Debugger saved IRQL for processor 0x1 -- 2 (DISPATCH_LEVEL)

0: kd> !irql 2
Debugger saved IRQL for processor 0x2 -- 2 (DISPATCH_LEVEL)

0: kd> !irql 3
Debugger saved IRQL for processor 0x3 -- 2 (DISPATCH_LEVEL)


 6833
6833

 被折叠的 条评论
为什么被折叠?
被折叠的 条评论
为什么被折叠?
 到【灌水乐园】发言


