


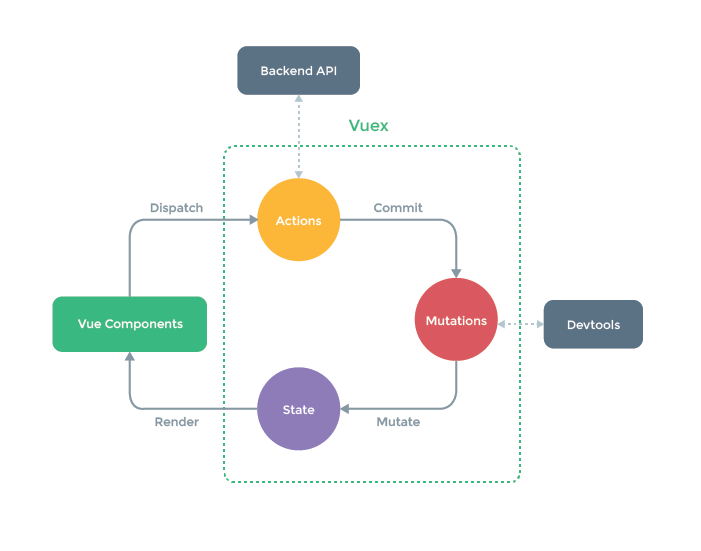
Vuex
Vuex集中式存储管理应用的所有组件的状态,并以相应的规则保证状态以可预测的方式发生变化。
安装Vuex
vue add vuex
核心概念
- state:状态、数据
- mutations:更改状态的函数
- action:异步操作
- store:包含以上概念的容器
状态 - state
state保存应用状态
export default new Vuex.Store({
  state: {
    counter: 0
  }
})
<h1>
  {{$store.state.counter}}
</h1>
状态变更 - mutations
mutations用于修改状态
export default new Vuex.Store({
  mutations:{
    add(state){
      state.counter++
    }
  }
})
<h1 @click="$store.commit('add')">
  {{$store.state.counter}}
</h1>
派生状态 - getters
从state派生出来新状态,类似计算属性
export default new Vuex.Store({
  getters:{
    doubleCounter(state){
      return state.counter * 2;
    }
  }
})
<h1>
  {{$store.getters.doubleCounter}}
</h1>
动作 - actions
添加业务逻辑,类似于controller
export default new Vuex.Store({
  actions:{
    add({commit}){
      setTimeout(() => commit('add'), 1000);
    }
  }
})
<h1 @tap="$store.dispatch('add')">
  {{$store.state.counter}}
</h1>
Vuex原理解析
任务分析
- 实现插件
- 实现Store类
- 维持一个响应式状态state
- 实现commit()
- 实现dispatch()
- 实现getters
- 挂载$store
- 实现Store类
创建新的插件
在Vue2.x项目中的src路径下,复制一份store文件,重命名为ou-store。
然后在ou-store路径下新建一个ou-vuex.js文件,并将index.js文件中的Vuex引入改为ou-vuex.js。
import Vuex from './ou-vuex'
同时将main.js中的router引入也修改一下。
import router from './ou-vuex'
创建vue的插件
回头看一下store/index.js,首先是使用Vue.use()注册了Vuex,然后再实例化了Vuex.Store这个类,因此Vuex这个对象里含有一个install方法以及一个Store的类。
import Vue from 'vue'
import Vuex from 'vuex'

Vue.use(Vuex)

export default new Vuex.Store({
    ...
})
因此我们来创建一个新的Vuex插件。
let Vue;    // 保存Vue的构造函数,插件中需要用到

class Store {}

function install(_Vue) {
    Vue = _Vue;
}

export default {Store, install};
挂载$store
let Vue;    // 保存Vue的构造函数,插件中需要用到

class Store {}

function install(_Vue) {
    Vue = _Vue;

    Vue.mixin({
        beforeCreate() {
            // 挂载$store
            if(this.$options.store){
                Vue.prototype.$store = this.$options.store;     // vm.$store
            }
        }
    })
}

export default {Store, install};
实现响应式保存state数据
因为state是一个对象,我们可以使用new Vue()将state转换为一个响应式数据进行保存起来。
其次,我们不能显式去保存这个state,暴露给外面,因此我们可以使用get和set去保存。
class Store {
    /*
    * options:
    *   state
    *   mutations
    *   actions
    *   modules
    *   getters
    * */
    constructor(options = {}) {
        // data响应式处理
        this._vm = new Vue({
            data: {
                $$state: options.state    // 通过this._vm._data.$$state 或 this._vm.$data.$$state 获取
            }
        });
    }

    // 获取state
    get state() {
        return this._vm._data.$$state;
    }

    // 不可设置state
    set state(v) {
        console.error('please use replaceState to reset state');
    }
}
实现commit方法
当我们使用commit方法时,都是$store.commit(type,payload),第一个参数即mutations的type值,第二个是payload负载,而对应mutation方法的参数为state和payload,因此我们来实现:
class Store {
    constructor(options = {}) {
        this._vm = new Vue({
            data: {
                $$state: options.state
            }
        });

        // 保存用户配置的mutations选项
        this._mutations = options.mutations;
    }

    get state() {
        return this._vm._data.$$state;
    }

    set state(v) {
        console.error('please use replaceState to reset state');
    }


    commit(type, payload) {
        // 获取type对应的mutation
        const entry = this._mutations[type]
        if(!entry) {
            console.error(`unknown mutation type : ${type}`);
            return ;
        }

        // 传递state和payload给mutation
        entry(this.state, payload)
    }
}
实现dispatch方法
dispatch方法跟commit方法大同小异,不同之处在于dispatch调用的是action异步函数,而action的参数为context和payload,payload我们可以通过dispatch的参数获取到,而context执行上下文其实就是实例中的this。
但action是用来处理异步函数的,因此我们需要对dispatch方法进行this绑定;同时,action方法中有可能会调用到commit方法,因此我们也需要对commit方法进行this绑定。
class Store {
    constructor(options = {}) {
        this._vm = new Vue({
            data: {
                $$state: options.state
            }
        });

        // 保存用户配置的mutations选项和actions选项
        this._mutations = options.mutations;
        this._actions = options.actions;

        // 将commit和dispatch绑定this,
        this.commit = this.commit.bind(this);
        this.dispatch = this.dispatch.bind(this);
    }

    get state() {
        return this._vm._data.$$state;
    }

    set state(v) {
        console.error('please use replaceState to reset state');
    }


    commit(type, payload) {
        const entry = this._mutations[type]
        if(!entry) {
            console.error(`unknown mutation type : ${type}`);
            return ;
        }

        entry(this.state, payload)
    }

    dispatch(type, payload) {
        // 获取用户编写的type对应的action
        const entry = this._actions[type];
        if(!entry) {
            console.error(`unknown action type : ${type}`)
        }
        // 异步结果处理常常需要返回Promise
        return entry(this, payload)
    }
}
实现getters派生状态
当我们定义getters状态时,实际上是定义了一个function。
getters: {
   doubleCounter(state) {
     return state.counter * 2;
   }
},
而使用getters中某一个派生状态时,实际上是得到一个值,也就是这个function的返回值。
<h4>double count: {{$store.getters.doubleCounter}}</h4>
这其实就有点像对象中的get属性,因此我们可以使用Object.defineProperty()来实现getters。
class Store {
    constructor(options = {}) {
        this._vm = new Vue({
            data: {
                $$state: options.state
            }
        });

        this._mutations = options.mutations;
        this._actions = options.actions;

        this.commit = this.commit.bind(this);
        this.dispatch = this.dispatch.bind(this);

        // 初始化getters,默认为一个空对象
        this.getters = {};

        // 遍历options.getters
        for (const key in options.getters) {
            const self = this;
            Object.defineProperty(
                this.getters,
                key,   // key名
                {
                    get() {
                      	// 调用对应的函数,第一个参数为state,将结果返回
                        return options.getters[key](self._vm._data.$$state)
                    }
                }
            )
        }

    }
}


 367
367


 被折叠的 条评论
为什么被折叠?
被折叠的 条评论
为什么被折叠?
 到【灌水乐园】发言


