


环境
实验要求
- 按照实验架构图部署

- 关闭防火墙和seliunx(需要服务器都要执行)
systemctl stop firewalld && setenforce 0
部署数据库M-M
mysql-1
- 修改配置文件
vim /etc/my.cnf
添加一下内容
log-bin= my1log
server-id= 1
gtid_mode=ON
enforce_gtid_consistency=1
- 重新启动数据库
systemctl restart mysqld
- 登录数据库,创建共享用户
mysql -uroot -pNEW-password123
grant all on *.* to slave@'%' identified by 'NEW-password123';   #创建用户
flush privileges;     #刷新授权
mysql-2
- 修改配置文件
vim /etc/my.cnf
添加以下内容
log-bin= my2log
server-id= 2
gtid_mode=ON
enforce_gtid_consistency=1
- 重新启动数据库
systemctl restart mysqld
- 登录数据库,创建共享用户
mysql -uroot -pNEW-password123
grant all on *.* to slave@'%' identified by 'NEW-password123';   #创建用户
flush privileges;     #刷新授权
- 配置主主复制
> help change master to
> edit
change master to
master_host='fuye3',
master_user='slave',
master_password='NEW-password123',
master_auto_position=1;
>start slave;
>show slave status\G

mysql-2上也要创建一样的授权用户,在mysql-1上进行change master to 的操作
注意
mysql-1:
>edit
    change master to
                   master_host='主机名',
                   master_user='授权用户',
                   master_password='授权密码',
                   master_auto_position=1;
>start slave;
>show slave status\G

配置keepalived(两台服务器都要安装)
- 安装keepalived
yum -y install keepalived
- 将原有的配置文件备份或删除,创建新的配置文件
vim /etc/keepalived/keepalived.conf
 ! Configuration File for keepalived
global_defs {
   router_id directory1
}
vrrp_script check_run {
   script "/etc/keepalived/keepalived_chech_mysql.sh"
   interval 5
}

vrrp_instance VI_1 {
    state MASTER      #备   BACKUP
    interface ens33
    virtual_router_id 89
    priority 100     #备  小于100
    advert_int 1
    authentication {
        auth_type PASS
        auth_pass 1111
    }
    virtual_ipaddress {
        192.168.92.222/24     #VIP
    }
     track_script {
        check_run
    }

real_server 192.168.92.130 80 {   # IP
                weight 1
                inhibit_on_failure
                TCP_CHECK {
                        connect_timeout 3
                        connect_port 80
                        }
                }
  }
- 添加脚本
vim /etc/keepalived/keepalived_chech_mysql.sh
#!/bin/bash
/usr/bin/mysql -uroot -p'NEW-password123' -e "show status" &>/dev/null
if [ $? -ne 0 ] ;then
#	service keepalived stop
	systemctl stop keepalived
fi
- 重新启动keepalived
systemctl start keepalived
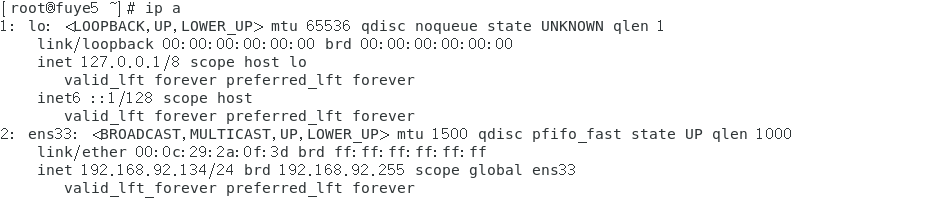
检测
- 查看IP
mysql-1

mysql-2
配置Java(tomcat)
1.安装JDK和tomcat
- 下载相关的安装包
wget https://mirrors.tuna.tsinghua.edu.cn/apache/tomcat/tomcat-7/v7.0.96/bin/apache-tomcat-7.0.96.tar.gz
- 解压到制定的目录下
tar xf apache-tomcat-7.0.34.tar.gz -C /usr/local/
tar xf jdk-8u91-linux-x64.tar.gz -C /usr/local
ln -s /usr/local/jdk1.8.0_91 /usr/local/java
- 重命名,进行相关的配置:
mv /usr/local/jdk1.7.0_67/  /usr/local/java
mv /usr/local/apache-tomcat-7.0.96/  /usr/local/tomcat
2.修改环境变量
vim /etc/profile
JAVA_HOME=/usr/local/java
PATH=$JAVA_HOME/bin:$PATH          //使用JAVA_HOME下的JAVA命令
export JAVA_HOME PATH
CATALINA_HOME=/usr/local/tomcat	  //Tomcat安装目录
export CATALINA_HOME
source /etc/profile
3.检测
java -version

4.启动Tomcat
cd到/tomcat/bin/下。找到相关的选项:
cd /usr/local/tomcat/bin/
 ./startup.sh    //启动项
 ./shutdown     //关闭项
5.测试
在服务器中输入相关的ip:8080 进行测试是否成功

6. 部署jspgou
- 将/tomcat/webapps下的ROOT移除
rm -rf /usr/local/tomcat/webapps/ROOT/
- 解压jsp----------.zip
 yum -y install unzip
 unzip jspgouV6-ROOT.zip
- 拷贝解压包下的ROOT到/tomcat/webapps/下。
cp -r ROOT/ /usr/local/tomcat/webapps/
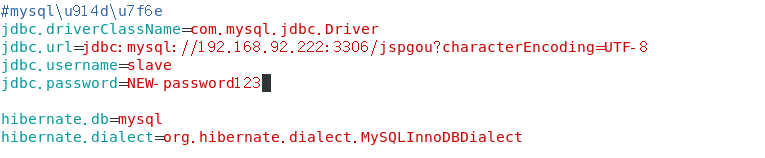
7.更改数据库连接
- 切换目录到/tomcat/webapps/ROOT/WEB-INF/config/下
cd /usr/local/tomcat/webapps/ROOT/WEB-INF/config/
- 编辑
jdbc.properties修改 文件第二十行左右
- 导入数据
cd /root/DB/     //解压包出来的
mysql -u root -pNEW-password -D jspgou < jspgou.sql
可能遇到的问题

解决方案
在/etc/my.cnf文件下添加一下内容
vim /etc/my.cnf
sql_mode=STRICT_TRANS_TABLES,ERROR_FOR_DIVISION_BY_ZERO,NO_AUTO_CREATE_USER,NO_ENGINE_SUB
explicit_defaults_for_timestamp=1
8.测试
在浏览器访问http://192.168.92.133:8080/jeeadmin/jspgou/index.do
用户名:admin
密 码:123456


配置PHP(布置qq农场)
配置haproxy
haproxy-1
haproxy
- 下载安装haproxy并启动
yum -y install haproxy
systemctl start haproxy
- 如果想知道配置文件详情,请点击haproxy配置文件详解
- 修改配置文件
vim /etc/haproxy/haproxy.cfg
global
        log   127.0.0.1 local3 info
        maxconn 4096
        user nobody
#       uid 99
        group nobody
#       gid 99
        daemon
        nbproc 1
defaults
        log     global
        mode       http
        maxconn 2048
        retries         3
        option  redispatch
        stats   uri  /haproxy
        stats auth     fuye:123
        contimeout      5000
        clitimeout          50000
        srvtimeout          50000
#timeout connect 5000
#timeout client 50000
#timeout server 50000

frontend http-in
        bind 0.0.0.0:80
        mode http
        log   global
        option httplog
        option httpclose
     acl html url_reg  -i  \.html$
     use_backend html-server if html
     default_backend html-server
frontend http-in
        bind 0.0.0.0:8080
        mode http
        log   global
        option httplog
        option httpclose
     acl java url_reg  -i  \.jsp$
     use_backend java-server if java
     default_backend java-server
backend html-server
        mode http
        balance roundrobin
        option httpchk GET /index.php
        cookie SERVERID insert indirect nocache
        server html-A 192.168.92.130:80  weight 1 cookie 3 check inter 2000 rise 2 fall 5

backend java-server
        mode http
        balance roundrobin
        cookie SERVERID insert indirect nocache
        server html-B 192.168.92.133:8080 weight 1 cookie 4 check inter 2000 rise 2 fall 5
- 重新启动haproxy
systemctl restart haproxy
keepalived
- 下载安装keepalived
yum -y install keepalived
修改配置文件
! Configuration File for keepalived

global_defs {
   router_id directory2
}

vrrp_instance VI_1 {
    state MASTER
    interface ens33
    nopreempt
    virtual_router_id 80
    priority 100
    advert_int 1
    authentication {
        auth_type PASS
        auth_pass 1111
    }
    virtual_ipaddress {
        192.168.92.111/24
    }
}
- 重新启动keepalived
systemctl restart keepalived
haproxy-2
- 下载安装haproxy并启动
yum -y install haproxy
systemctl start haproxy
- 如果想知道配置文件详情,请点击haproxy配置文件详解
- 修改配置文件
vim /etc/haproxy/haproxy.cfg
global
        log   127.0.0.1 local3 info
        maxconn 4096
        user nobody
#       uid 99
        group nobody
#       gid 99
        daemon
        nbproc 1
defaults
        log     global
        mode       http
        maxconn 2048
        retries         3
        option  redispatch
        stats   uri  /haproxy
        stats auth     fuye:123
        contimeout      5000
        clitimeout          50000
        srvtimeout          50000
#timeout connect 5000
#timeout client 50000
#timeout server 50000

frontend http-in
        bind 0.0.0.0:80
        mode http
        log   global
        option httplog
        option httpclose
     acl html url_reg  -i  \.html$
     use_backend html-server if html
     default_backend html-server
frontend http-in
        bind 0.0.0.0:8080
        mode http
        log   global
        option httplog
        option httpclose
     acl java url_reg  -i  \.jsp$
     use_backend java-server if java
     default_backend java-server
backend html-server
        mode http
        balance roundrobin
        option httpchk GET /index.php
        cookie SERVERID insert indirect nocache
        server html-A 192.168.92.130:80  weight 1 cookie 3 check inter 2000 rise 2 fall 5

backend java-server
        mode http
        balance roundrobin
        cookie SERVERID insert indirect nocache
        server html-B 192.168.92.133:8080 weight 1 cookie 4 check inter 2000 rise 2 fall 5
- 重新启动haproxy
systemctl restart haproxy
keepalived
- 下载安装keepalived
yum -y install keepalived
修改配置文件
! Configuration File for keepalived

global_defs {
   router_id directory2
}

vrrp_instance VI_1 {
    state BACKUP
    interface ens33
    nopreempt
    virtual_router_id 80
    priority 50
    advert_int 1
    authentication {
        auth_type PASS
        auth_pass 1111
    }
    virtual_ipaddress {
        192.168.92.111/24
    }
}
- 重新启动keepalived
systemctl restart keepalived
检测


- 通过vip访问
http://192.168.92.111:80

http://192.168.92.111:8080/


 796
796


 被折叠的 条评论
为什么被折叠?
被折叠的 条评论
为什么被折叠?
 到【灌水乐园】发言


