简介
基于上篇文章
第八课:springboot 通过@Profile注解配合maven打包的应用
我们通过@Profile注解 通过maven 打包的时间指定不同环境加载不同值;
项目中还可能会碰到 根据某一个属性或者别的条件判断决定是否使配置中的某个类是生效的;或者通过我们自定义的条件来判断是否需要将当前类注入到spring对象中;
项目demo下载
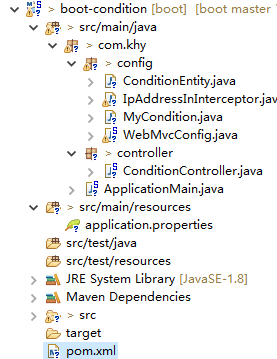
项目的结构

代码内容
1.pom.xml
<project xmlns="http://maven.apache.org/POM/4.0.0" xmlns:xsi="http://www.w3.org/2001/XMLSchema-instance" xsi:schemaLocation="http://maven.apache.org/POM/4.0.0 http://maven.apache.org/xsd/maven-4.0.0.xsd">
  <modelVersion>4.0.0</modelVersion>
  <groupId>com.khy.boot</groupId>
  <artifactId>boot-condition</artifactId>
  <version>0.0.1-SNAPSHOT</version>

   <parent>
		<groupId>org.springframework.boot</groupId>
		<artifactId>spring-boot-starter-parent</artifactId>
		<version>1.5.4.RELEASE</version>
	</parent>

     <properties>
		<project.build.sourceEncoding>UTF-8</project.build.sourceEncoding>
		<project.reporting.outputEncoding>UTF-8</project.reporting.outputEncoding>
		<java.version>1.8</java.version>
		<!--含有多个main 需要指定某一个启动class类 -->
		<start-class>com.khy.MainApplication</start-class>
	</properties>

	 <dependencies>
		<dependency>
			<groupId>org.springframework.boot</groupId>
			<artifactId>spring-boot-starter-web</artifactId>
		</dependency>

		<dependency>
			<groupId>com.alibaba</groupId>
			<artifactId>fastjson</artifactId>
			<version>1.2.6</version>
		</dependency>
		<dependency>
			<groupId>org.apache.commons</groupId>
			<artifactId>commons-lang3</artifactId>
			<version>3.4</version>
		</dependency>
		<dependency>
			<groupId>commons-collections</groupId>
			<artifactId>commons-collections</artifactId>
		</dependency>
  </dependencies>

  	<!-- 通过maven的profiles 来替换application.properties文件中的profiles -->
	<profiles>
		<profile>
			<id>dev</id>
			<properties>
				<profileActive>dev</profileActive>
			</properties>
		</profile>
		<profile>
			<id>prod</id>
			<properties>
				<profileActive>prod</profileActive>
			</properties>
			<!-- 默认线上的配置是生效的怕设置忘记了 -->
			<activation>
				<activeByDefault>true</activeByDefault>
			</activation>
		</profile>
		<profile>
			<id>test</id>
			<properties>
				<profileActive>test</profileActive>
			</properties>
		</profile>
	</profiles>

	<build>
	    <plugins>
	        <plugin>
	            <groupId>org.springframework.boot</groupId>
	            <artifactId>spring-boot-maven-plugin</artifactId>
	        </plugin>
	    </plugins>
	</build>
</project>
2.WebMvcConfig.java
@Configuration
public class WebMvcConfig extends WebMvcConfigurerAdapter {

	@Autowired(required=false)
	private IpAddressInInterceptor ipAddressInInterceptor;

	@Override
	public void addInterceptors(InterceptorRegistry registry) {
		if(null != ipAddressInInterceptor){
			registry.addInterceptor(ipAddressInInterceptor)
			.addPathPatterns("/**")//标识拦截所有
			.excludePathPatterns("/","/test/**");//标识设置的请求不被拦截;
		}
	}

	 /**
	  * 可以通过@Conditional注解来判断当前@Bean注解是否生效
	  * 只有当value 返回的是true表示需要初始化
	  * @author  khy
	  * @createTime 2020年6月15日下午4:19:45
	  * @return
	  */
	@Bean("ipAddressInInterceptor")
	@Conditional(value=MyCondition.class)
	public IpAddressInInterceptor initInterecptor() {
		IpAddressInInterceptor interceptor = new IpAddressInInterceptor();
		return interceptor;
	}

	/**
	 * @ConditionalOnProperty 注解里面的配置项
	 * prefix 属性标识前缀 案例中 添加 khy 或者 khy.condition 都可以
	 * name 标识properties文件中的属性值 如果 prefix=khy 则 name=condition.properties
	 * 如果prefix=khy.condition 则 name=properties 一样的;
	 * havingValue 标识 properties里面的属性值和当前属性值是否一样只有一样的时间返回的是true
	 * matchIfMissing 如果properties文件中没有配置 可以设置未 true 或者false
	 *
	 * @author  khy
	 * @createTime 2020年6月15日下午4:41:44
	 * @return
	 */
	@Bean("conditionEntity")
	@ConditionalOnProperty(prefix="khy.condition",name="properties",havingValue="prod",matchIfMissing=false)
	public ConditionEntity prodConditionEntity() {
		ConditionEntity conditionEntity = new ConditionEntity("candy","online");
		return conditionEntity;
	}

	@Bean("conditionEntity")
	@ConditionalOnProperty(prefix="khy.condition",name="properties",havingValue="dev",matchIfMissing=false)
	public ConditionEntity devConditionEntity() {
		ConditionEntity conditionEntity = new ConditionEntity("test","test");
		return conditionEntity;
	}

}
3.MyCondition.java
public class MyCondition implements Condition {

	@Override
	public boolean matches(ConditionContext context, AnnotatedTypeMetadata metadata) {
		String[] profiles = context.getEnvironment().getActiveProfiles();
		if(null != profiles && profiles.length > 0){
			for (String str : profiles) {
				if(str.equals("prod")){
					return true;
				}
			}

		}
		return false;
	}
}
4.ConditionEntity.java
public class ConditionEntity {

    private String name;

    private String password;

    public ConditionEntity(String name, String password) {
		super();
		this.name = name;
		this.password = password;
	}
	// get/set.....
}
5.ConditionController.java
@RestController
@RequestMapping("/condition")
public class ConditionController {

	@Autowired
	private ConditionEntity conditionEntity;
	@RequestMapping("/test")
	public String test(){
		if(null != conditionEntity){
			return JSON.toJSONString(conditionEntity);
		}
		return "conditionEntity is null" ;
	}
}
实现的原理内容
通过前面的文章我们明白通过maven 打包个Profile 注解我可以根据条件选择将某个类注入到spring的中
而本案例IpAddressInInterceptor 黑白名单拦截器的注入是通过@Conditional(value=MyCondition.class) 注解 完成的
value中使我们自定义的MyCondition.java类;只有当该类的matches方法返回的是true标识生效;当前IpAddressInInterceptor 才会被@Bean注解注入到spring中去;因为我们也是根据spring中的profiles.active属性判定的
所以还是依赖maven打包的 -P prod 指定对于的环境;
然后下面的 ConditionEntity类的对象是通过
@ConditionalOnProperty(prefix=“khy.condition”,name=“properties”,havingValue=“dev”,matchIfMissing=false)
注解来配置的;该注解的几个属性内容
profix 表application.properties文件中的属性的前缀
name和profix 组成属性的key值;
havingValue的值和指定属性值一致的时间生效;
matchIfMissing标识如果没有当前属性配置false标识不生效 true标识生效;
案例中ConditionEntity 两个方法都是通过@Bean注入到是spring中 但是havingValue 的值是不同的;
所以同事也只有一个是生效的;
所以当我们默认使用的是prod配置属性;
我们访问 测试controller方法 可以看出来生效的是注解中havingValue=prod的 ConditionEntity被注入到spring中.


 1500
1500


 被折叠的 条评论
为什么被折叠?


