x6自定义样式

x6自定义节点样式

自定义节点

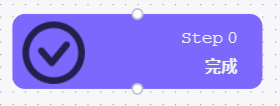
  • 官方的示例如下自定义节点示例(由于自动布局示例的要素过多,暂以倒数第二个示例来看)
  • 要素:
    • markup:markup官方文档
      markup指定了渲染节点/边时使用的 SVG/HTML片段,使用 JSON 格式描述。例如 Shape.Rect节点的markup定义如下。
      • tagname:
        通过tagname指定需要创建的SVG/HTML元素
      • selector:
        SVG/HTML元素的唯一标识,可以在attrs中通过selector:'name'name属性修改样式
      • className:
        SVG/HTML元素的css样式名
      • style:
        SVG/HTML元素的内联样式
    • attrs:
      定制节点样式的选项,是一个复杂的对象key:{value...},key是节点中的selector值,value是该元素的SVG属性值

注册自定义节点样式

//'diy-shape'自定义节点样式名
//{} 自定义节点构成,包含markup,attrs等属性
//true 允许覆盖重写样式,方便在节点中添加修改样式
Graph.registerNode('diy-shape',{
    width:200,    //节点宽度200px
    height:60,    //节点高度60px
    markup:[
        {
            tagName:'rect',    //指定元素为rect形状
            selector:'body',    //元素命名为body
        }{
            tagName:'image',    //指定元素为image
            selector:'avatar'    //元素命名为avatar
        }{
            tagName: 'text',    
            selector: 'rank',
        },
        {
            tagName: 'text',
            selector: 'name',
        },
    ],
    //自定义样式
    attrs:{    
        //对名为body的元素样式修改
        body: {
            refWidth: '100%',
            refHeight: '100%',
            fill: '#ffffff',
            stroke: '#000000',
            rx: 10,
            ry: 10,
            PointerEvent: 'visiblePainted',
        },
        avatar: {
            width: 48,
            height: 48,
            refX: 8,
            refY: 6,
        },
        rank: {
            refX: 0.9,
            refY: 0.2,
            fontFamily: 'Courier New',
            fontSize: 14,
            textAnchor: 'end',
        },
        name: {
            refX: 0.9,
            refY: 0.6,
            fontFamily: 'Courier New',
            fontSize: 14,
            fontWeight: '800',
            textAnchor: 'end',
        },
    }
},true)

添加自定义节点

//注册节点到侧边栏
id:'diy-shape1',
shape:'diy-shape',    //通过shape选项使用前面自定义的节点
attrs: {    //重新定义了许多样式。如果在注册形状时,第三个参数不填或为False,则会报错
    body: {
        fill: '#7c68fd',
        stroke: 'none',
    },
    avatar: {
        opacity: 0.7,
        'xlink:href':'自定义图片链接或base64',    //使用外链或base64放图片,
        width: '50px',
        height: '50px',
    },
    rank: {
        text: 'Step 0',
        fill: '#f1f1f1',
        wordSpacing: '-5px',
        letterSpacing: 0,
    },
    name: {
        text: '完成',
        fill: '#f1f1f1',
        fontSize: 13,
        fontFamily: 'Arial',
        letterSpacing: 0,
    },
    //添加之前定义的连接桩,不添加不能连其他节点
    ports: { ...ports }, //连接桩

},

自定义连线

注册连线样式

Graph.registerEdge(
  'diy-edge',
  {
    zIndex: -1,
    attrs: {
      line: {
        fill: 'none',
        strokeLinejoin: 'round',
        strokeWidth: '2',
        stroke: '#4b4a67',
        sourceMarker: null,
        targetMarker: null,
      },
    },
  },
  true
);

使用自定义连线

在data的edges中声明shape
{
    source: 'Step1-Vasp晶格常数-GeoOpt', // String,必须,起始节点 id
    target: 'Step2-结果收敛判断脚本', // String,必须,目标节点 id
    fileDependencies: [
    {
        targetAppFile: '08d88153-6397-4136-8c09-7052f740dc87',
        dependencyAppFile: '08d85499-af1c-428c-867c-b78a8fde4597',
        dependencyType: 'appFile',
    },
    {
        targetAppFile: '08d88153-76de-435d-8c4d-477393c28d95',
        dependencyAppFile: '08d85499-d4aa-4580-880e-d1dfab86e2cd',
        dependencyType: 'appFile',
    },
    ],
    // attrs: edgeAttrs,
    shape: 'diy-edge',
    zIndex: 1,
},
  • 0
    点赞
  • 1
    收藏
    觉得还不错? 一键收藏
  • 1
    评论
要携带自定义样式导出X6流程图,需要遵循以下步骤: 1. 创建一个新的X6 Graph实例,并在其中添加自定义节点和边的样式。可以使用X6的Shape和Connector API来创建自定义样式。 ```js const graph = new X6.Graph({ container: document.getElementById('graph-container'), // 添加自定义节点样式 nodeStyles: { customNode: { shape: 'rect', width: 100, height: 50, attrs: { body: { fill: '#ff9c6e', stroke: '#333', strokeWidth: 1, rx: 10, ry: 10, }, }, }, }, // 添加自定义样式 edgeStyles: { customEdge: { shape: 'edge', attrs: { line: { stroke: '#333', strokeWidth: 2, targetMarker: { name: 'classic', size: 8, }, }, }, }, }, }); ``` 2. 创建一个新的X6 Graph的模板,并将自定义节点和边加入其中。 ```js const template = new X6.Graph({ // 添加自定义节点样式 nodeStyles: { customNode: { shape: 'rect', width: 100, height: 50, attrs: { body: { fill: '#ff9c6e', stroke: '#333', strokeWidth: 1, rx: 10, ry: 10, }, }, }, }, // 添加自定义样式 edgeStyles: { customEdge: { shape: 'edge', attrs: { line: { stroke: '#333', strokeWidth: 2, targetMarker: { name: 'classic', size: 8, }, }, }, }, }, }); // 添加自定义节点 const customNode = template.createNode({ x: 100, y: 100, width: 100, height: 50, shape: 'customNode', label: 'Custom Node', attrs: { label: { fill: '#fff', }, }, }); // 添加自定义边 const sourceNode = template.createNode({ x: 200, y: 200, width: 100, height: 50, label: 'Source Node', attrs: { body: { fill: '#9b9b9b', }, label: { fill: '#fff', }, }, }); const targetNode = template.createNode({ x: 400, y: 200, width: 100, height: 50, label: 'Target Node', attrs: { body: { fill: '#9b9b9b', }, label: { fill: '#fff', }, }, }); const customEdge = template.createEdge({ source: sourceNode, target: targetNode, shape: 'customEdge', }); // 将模板隐藏,避免在导出时显示 template.hide(); ``` 3. 将要导出的X6 Graph的节点和边添加到模板中,并使用X6的Exporter API导出为PNG或SVG格式的图片。 ```js // 添加要导出的节点和边 graph.addNode(customNode); graph.addNode(sourceNode); graph.addNode(targetNode); graph.addEdge(customEdge); // 导出PNG格式图片 X6.Exporter.exportPng(graph, { width: graph.getContentSize().width, height: graph.getContentSize().height, }).then((dataUri) => { // 在新窗口中打开图片 const newWindow = window.open(); newWindow.document.write(`<img src="${dataUri}" />`); }); // 导出SVG格式图片 X6.Exporter.exportSvg(graph, { width: graph.getContentSize().width, height: graph.getContentSize().height, }).then((svg) => { // 在新窗口中打开SVG const newWindow = window.open(); newWindow.document.write(svg); }); ``` 4. 如果要在导出的图片中包含自定义样式,需要将自定义样式CSS代码添加到导出的图片中。 ```js // 导出SVG格式图片,并添加自定义样式CSS代码 X6.Exporter.exportSvg(graph, { width: graph.getContentSize().width, height: graph.getContentSize().height, }).then((svg) => { // 在新窗口中打开SVG,并添加自定义样式CSS代码 const newWindow = window.open(); newWindow.document.write(` <style> .customNode rect { fill: #ff9c6e; stroke: #333; stroke-width: 1; rx: 10; ry: 10; } .customEdge path { stroke: #333; stroke-width: 2; marker-end: url(#classic); } </style> ${svg} `); }); ```

“相关推荐”对你有帮助么?

  • 非常没帮助
  • 没帮助
  • 一般
  • 有帮助
  • 非常有帮助
提交
评论 1
添加红包

请填写红包祝福语或标题

红包个数最小为10个

红包金额最低5元

当前余额3.43前往充值 >
需支付:10.00
成就一亿技术人!
领取后你会自动成为博主和红包主的粉丝 规则
hope_wisdom
发出的红包
实付
使用余额支付
点击重新获取
扫码支付
钱包余额 0

抵扣说明:

1.余额是钱包充值的虚拟货币,按照1:1的比例进行支付金额的抵扣。
2.余额无法直接购买下载,可以购买VIP、付费专栏及课程。

余额充值