


前言写本篇文章的目的,纯属自用记录。因为第一次接触thymeleaf,踩了好多坑,又因为自己不想用Thymeleaf默认配置模板路径,而是自己建webapp,发现网上更是很少可用的文章,特此记录。
Thymeleaf是什么?
简单说, Thymeleaf 是一个跟 Velocity、FreeMarker 类似的模板引擎,它可以完全替代 JSP 。
从代码层次上讲:Thymeleaf是一个java类库,他是一个xml/xhtml/html5的模板引擎,可以作为mvc的web应用的view层。
为什么要使用Thymeleaf?
使用jsp的弊端:
1项目目录结构繁琐
2页面不简洁
3jsp内置错误页面不能覆盖springboot默认的错误页面
4只能打成war不能打成jar
5内置的jetty服务器不支持jsp
Thymeleaf的优点:
1开箱即用,它提供标准和spring标准两种方言,可以直接套用模板实现JSTL、 OGNL表达式效果,避免每天套模板、改jstl、改标签的困扰。同时开发人员也可以扩展和创建自定义的方言;
2Thymeleaf 提供spring标准方言和一个与 SpringMVC 完美集成的可选模块,可以快速的实现表单绑定、属性编辑器、国际化等功能。
3有网无网的情况下模版页面都可以执行,美工的页面拿来就可以用,相对jsp减少了额外的标签,页面也更加简洁。
注意:Spring-boot支持FreeMarker、Thymeleaf、jsp、veocity 。但是对freemarker和thymeleaf的支持最好,不推荐使用jsp
Thymeleaf的引入
万事第一步引包
		<!--模板引擎-->
        <dependency>
            <groupId>org.springframework.boot</groupId>
            <artifactId>spring-boot-starter-thymeleaf</artifactId>
        </dependency>
        <dependency>
            <groupId>org.springframework.boot</groupId>
            <artifactId>spring-boot-starter-web</artifactId>
        </dependency>
第二步添加配置文件 application.yml
spring:
  thymeleaf:
    mode: LEGACYHTML5
    #编码 可不用配置
    encoding: UTF-8
    #内容类别,可不用配置
    content-type: text/html
    #开发配置为false,避免修改模板还要重启服务器
    cache: false
    #配置模板路径,默认是templates,可以不用配置
    prefix: classpath:/WEB-INF/views/
    #后缀
    suffix: .html
spring.thymeleaf.mode的默认值是HTML5,其实是一个很严格的检查,改为LEGACYHTML5可以得到一个可能更友好亲切的格式要求
Thymeleaf的使用
刚在第二步添加 application.yml 中Thymeleaf的配置时,有一点需要大家注意下,那就是prefix: classpath:/WEB-INF/views/,Thymeleaf默认配置模板路径,是resources下的templates,静态文件默认是resources下的static。但是由于个人原因,我觉的把页面和各种配置文件放在一起不够清晰,于是沿用了老的webapp的目录结构,在resources新建立了webapp/WEB-INF/views/目录。但是新建的目录还只是个普通的目录,需要我们进行变更文件夹性质。


最后点击ok然后去设置yml文件即可。

此时thymeleaf的模板就会在webapp下寻找。
静态文件的路径配置
静态文件的路径在webapp/static下,修改WebMvcConfigurer 的读取路径

@Configuration
public class WebConfig implements WebMvcConfigurer {

	@Bean
	public TokenInterceptor tokenInterceptor() {
		return new TokenInterceptor();
	}

	@Override
	public void addResourceHandlers(ResourceHandlerRegistry registry) {
		registry.addResourceHandler("/**").addResourceLocations("classpath:/");
	}

	/**
	 * 注入自定义拦截类到spring容器
	 * @return
	 */
	@Bean
	public SessionInterceptor getMyInterceptor(){
		return  new SessionInterceptor();
	}


	@Override
	public void addInterceptors(InterceptorRegistry registry) {

		InterceptorRegistration authInterceptor = registry.addInterceptor(getMyInterceptor());
		// 拦截配置
		authInterceptor.addPathPatterns("/**");
		// 排除配置
		List<String> excludePatterns = new ArrayList<>();
		excludePatterns.add("/static/**");
		excludePatterns.add("/passport/login");
		excludePatterns.add("/index/**");
		excludePatterns.add("/sample/getSampleList");
		excludePatterns.add("/sample/getSampleStatuses");
		excludePatterns.add("/webjars/**");
		excludePatterns.add("/error/**");
		authInterceptor.excludePathPatterns(excludePatterns);
	}
}
测试页面访问,和静态文件访问
- 静态文件测试,建立jingTai.html

<html>
<head>
    <meta charset="UTF-8">
    <title>Title</title>
</head>
<body>
我是静态页面!
</body>
</html>
启动项目测试,浏览器输入http://localhost:8106/static/jingTai.html,效果如下

2. 页面的访问
新建controller


编写页面
<!DOCTYPE html>
<!--// 是Thyme leaf 命名空间,通过引入该-->
<!--// 命名空间就可以在HTML 文件中使用Thymeleaf 标签语言,用关键字“ th ” 来标注。-->
<html xmlns:th="http://www.thymeleaf.org">
<head>
    <meta charset="UTF-8">
    <title>Show User</title>
</head>
<body>
<table>
    成功进来了!222333444555
    <tr th:each="user : ${userList}">
        <td th:text="${user.loginName}"></td>
        <td th:text="${user.password}"></td>
    </tr>
</table>
</body>
<script type="text/javascript">
</script>
</html>
thymeLeaf在idea中报红线的解决方法:
settings->inspectioins->ThymeLeaf

测试访问页面

th: 是thymeleaf特有的标签属性,大致等同于 jstl的写法,文章最后会罗列一些写法方式。
引入前端组件bootstrap + jquery
pom依赖
<!-- 前端依赖 -->
		<dependency>
			<groupId>org.webjars</groupId>
			<artifactId>bootstrap</artifactId>
			<version>4.3.1</version>
		</dependency>

		<dependency>
			<groupId>org.webjars</groupId>
			<artifactId>jquery</artifactId>
			<version>3.1.1</version>
		</dependency>

		<dependency>
			<groupId>org.webjars</groupId>
			<artifactId>webjars-locator</artifactId>
			<version>0.36</version>
		</dependency>
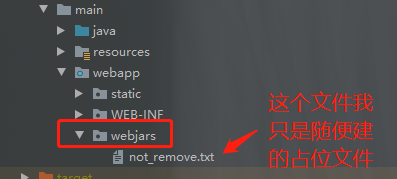
在webapp下建webjars文件夹,下载后的依赖默认会从webjars空文件找
html引入方式

<head>
    <meta charset="UTF-8">
    <title>Show User</title>
    <link rel="stylesheet" th:href="@{/static/css/common.css}" type="text/css"/>
    <script src="webjars/jquery/3.1.1/jquery.min.js" th:src="@{/webjars/jquery/3.1.1/jquery.min.js}"></script>
    <script src="webjars/bootstrap/4.3.1/js/bootstrap.min.js" th:src="@{/webjars/bootstrap/4.3.1/js/bootstrap.min.js}"></script>
    <link href="webjars/bootstrap/4.3.1/css/bootstrap.min.css"
          th:href="@{/webjars/bootstrap/4.3.1/css/bootstrap.min.css}"
          rel="stylesheet" media="screen" />
</head>
至此前端的引入结束
热部署免于修改页面重启项目
	<!--修改页面免重启 依赖 -->
		<dependency>
			<groupId>nekohtml</groupId>
			<artifactId>nekohtml</artifactId>
			<version>1.9.6.2</version>
		</dependency>

		<!-- java 热部署 依赖 -->
		<dependency>
			<groupId>org.springframework.boot</groupId>
			<artifactId>spring-boot-devtools</artifactId>
			<version>2.0.4.RELEASE</version>
		</dependency>
 cache=false 实现热部署。也就是修改了html后不用重启,刷新页面就能看到效果。不过这儿特别强调一下,修改完html后一定要ctrl+f9重新build一下。再回到浏览器刷新,就能看到效果了
mode = LEGACYHTML5 配置是回避HTML进行严格的检查的配置,当然你需要提前引入nekohtml依赖
java热部署
配置application.yml文件开启热部署
spring:
  devtools:
    restart:
      enabled: true # 配置热部署
      additional-paths: src/main/java
      exclude: WEB-INF/**
修改IDEA设置
File-Settings-Compiler-Build Project automatically

ctrl + shift + alt + /然后选择Registry,勾上 Compiler.autoMake.allow.when.app.running

这样SpringBoot的Thymeleaf和Java代码的热部署就可以使用了!
打包jar

使用mvn clean install -PXXX -Dmaven.test.skip=true 打包
打包后结构如下


至此打包完成。
thymeleaf语句
th属性
html有的属性,Thymeleaf基本都有,而常用的属性大概有七八个。其中th属性执行的优先级从1~8,数字越低优先级越高。
- th:text :设置当前元素的文本内容,相同功能的还有th:utext,两者的区别在于前者不会转义html标签,后者会。优先级不高:order=7
- th:value:设置当前元素的value值,类似修改指定属性的还有th:src,th:href。优先级不高:order=6
- th:each:遍历循环元素,和th:text或th:value一起使用。注意该属性修饰的标签位置,详细往后看。优先级很高:order=2
- th:if:条件判断,类似的还有th:unless,th:switch,th:case。优先级较高:order=3
- th:insert:代码块引入,类似的还有th:replace,th:include,三者的区别较大,若使用不恰当会破坏html结构,常用于公共代码块提取的场景。优先级最高:order=1
- th:fragment:定义代码块,方便被th:insert引用。优先级最低:order=8
- th:object:声明变量,一般和*{}一起配合使用,达到偷懒的效果。优先级一般:order=4
- th:attr:修改任意属性,实际开发中用的较少,因为有丰富的其他th属性帮忙,类似的还有th:attrappend,th:attrprepend。优先级一般:order=5
使用Thymeleaf属性需要注意点以下五点:
- 若要使用Thymeleaf语法,首先要声明名称空间: xmlns:th=“http://www.thymeleaf.org”
- 设置文本内容 th:text,设置input的值 th:value,循环输出 th:each,条件判断 th:if,插入代码块 th:insert,定义代码块 th:fragment,声明变量 th:object
- th:each 的用法需要格外注意,打个比方:如果你要循环一个div中的p标签,则th:each属性必须放在p标签上。若你将th:each属性放在div上,则循环的是将整个div。
- 变量表达式中提供了很多的内置方法,该内置方法是用#开头,请不要与#{}消息表达式弄混。
- th:insert,th:replace,th:include 三种插入代码块的效果相似,但区别很大。
其中关系运算:
gt:great than(大于)
ge:great equal(大于等于)
eq:equal(等于)
lt:less than(小于)
le:less equal(小于等于)
ne:not equal(不等于)
Thymeleaf中常用的th标签
关键字      功能介绍        案例
th:id      替换id          <input th:id="'xxx' + ${collect.id}"/>
th:text     文本替换        <p th:text="${collect.description}">description</p>
th:utext    支持html的文本替换   <p th:utext="${htmlcontent}">conten</p>
th:object    替换对象        <div th:object="${session.user}">
th:value    属性赋值        <input th:value="${user.name}" />
th:with    变量赋值运算        <div th:with="isEven=${prodStat.count}%2==0"></div>
th:style    设置样式            th:style="'display:' + @{(${sitrue} ? 'none' : 'inline-block')} + ''"
th:onclick    点击事件          th:onclick="'getCollect()'"
th:each    属性赋值            tr th:each="user,userStat:${users}">
th:if    判断条件            <a th:if="${userId == collect.userId}" >
th:unless    和th:if判断相反        <a th:href="@{/login}" th:unless=${session.user != null}>Login</a>
th:href    链接地址              <a th:href="@{/login}" th:unless=${session.user != null}>Login</a> />
th:switch    多路选择 配合th:case 使用    <div th:switch="${user.role}">
th:case    th:switch的一个分支        <p th:case="'admin'">User is an administrator</p>
th:fragment    布局标签,定义一个代码片段,方便其它地方引用    <div th:fragment="alert">
th:include    布局标签,替换内容到引入的文件    <head th:include="layout :: htmlhead" th:with="title='xx'"></head> />
th:replace    布局标签,替换整个标签到引入的文件    <div th:replace="fragments/header :: title"></div>
th:selected    selected选择框 选中    th:selected="(${xxx.id} == ${configObj.dd})"
th:src    图片类地址引入          <img class="img-responsive" alt="App Logo" th:src="@{/img/logo.png}" />
th:inline    定义js脚本可以使用变量    <script type="text/javascript" th:inline="javascript">
th:action    表单提交的地址        <form action="subscribe.html" th:action="@{/subscribe}">
th:remove    删除某个属性        <tr th:remove="all">
                    1.all:删除包含标签和所有的孩子。
                    2.body:不包含标记删除,但删除其所有的孩子。
                    3.tag:包含标记的删除,但不删除它的孩子。
                    4.all-but-first:删除所有包含标签的孩子,除了第一个。
                    5.none:什么也不做。这个值是有用的动态评估。
th:attr    设置标签属性,多个属性可以用逗号分隔    比如 th:attr="src=@{/image/aa.jpg},title=#{logo}",此标签不太优雅,一般用的比较少。


 587
587


 被折叠的 条评论
为什么被折叠?
被折叠的 条评论
为什么被折叠?
 到【灌水乐园】发言


